Note
Access to this page requires authorization. You can try signing in or changing directories.
Access to this page requires authorization. You can try changing directories.
Use inventory transfers to move product inventory from a source warehouse to a destination warehouse in Dynamics 365 Field Service. For example, transfer inventory from a central warehouse to a technician's truck, or from one truck to another when technicians meet in the field.
When you add a product to a transfer, Field Service creates two inventory journals: one that decreases the Quantity on Hand at the source warehouse, and one that increases the Quantity on Hand at the destination warehouse. Because Quantity Available is derived from Quantity on Hand, the available quantity changes at both warehouses.
To increase or decrease inventory at a single warehouse instead of moving it between warehouses, adjust inventory levels.
Prerequisites
- A source warehouse and a destination warehouse must exist in your system.
- Products where Field Service Product Type = Inventory must exist in your system. You can't transfer non-inventory or service products.
- The source warehouse must have enough Quantity on Hand for the products you transfer. Field Service blocks a transfer when the quantity exceeds the amount on hand at the source warehouse, or when the product has no inventory record at the source warehouse.
- You need either the Field Service - Administrator security role or the Inventory Purchase security role added to your base Field Service security role. Learn more in Security roles and column-level security profiles.
Create an inventory transfer
In Field Service, select the Inventory area.
Under Inventory, select Transfers, and then select New.
In the Source Warehouse field, select the warehouse to move inventory from.
In the Destination Warehouse field, select the warehouse to move inventory to.
Select Save to create the record.
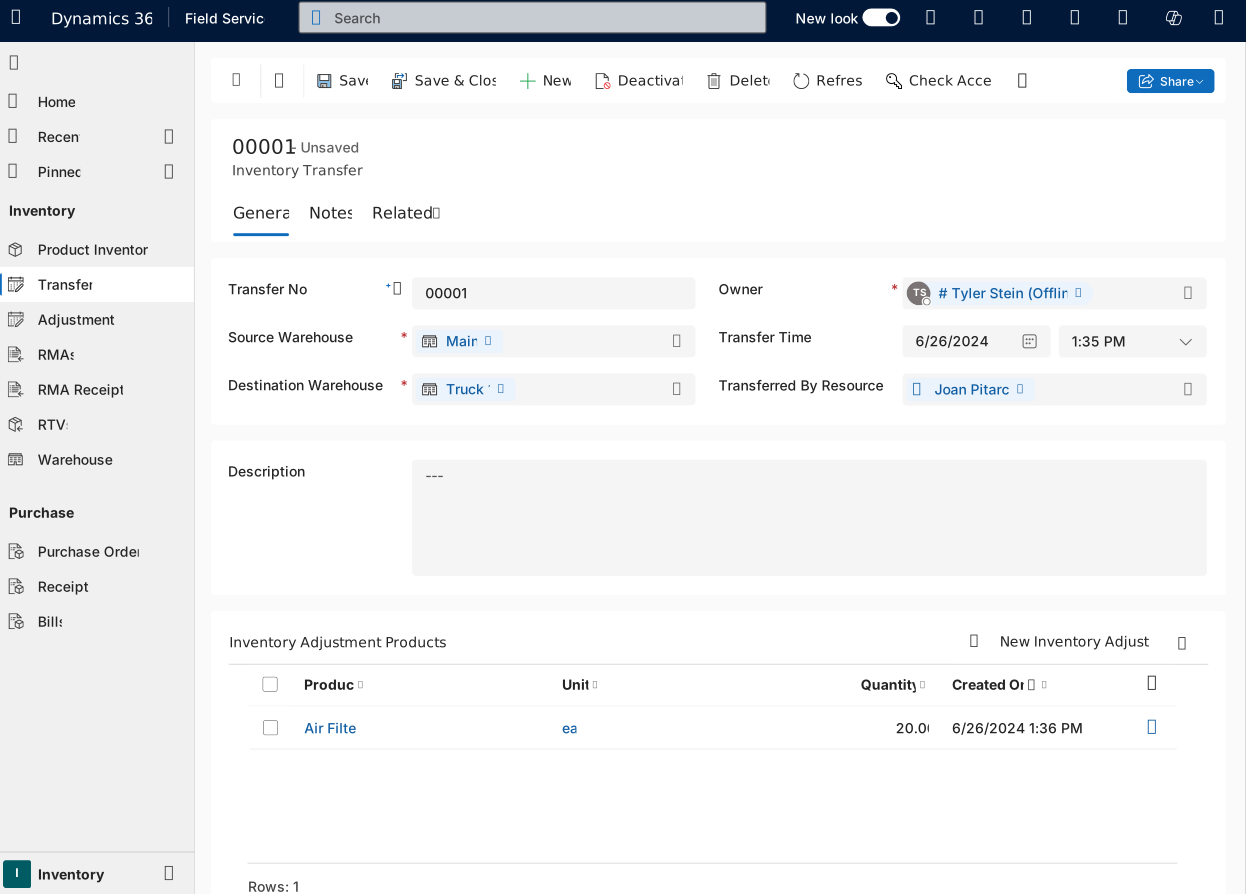
Add products to the inventory transfer
Add a row for each product that you want to move from the source warehouse to the destination warehouse.
In the saved inventory transfer, on the Inventory Transfer Products subgrid, select New Inventory Transfer Product.
In the Product field, select a product where Field Service Product Type = Inventory.
In the Unit field, select the unit of measure.
In the Quantity field, enter the amount to transfer. Enter a positive value that doesn't exceed the Quantity on Hand at the source warehouse.
Select Save and Close. Field Service creates the inventory journals that move the inventory between the warehouses.
Repeat these steps for each product that you want to transfer.
Verify the inventory change
Confirm that the transfer updated the product inventory at both warehouses.
In Field Service, select the Inventory area, and then select Warehouses.
Open the source warehouse. On the Related tab, select Product Inventory, and confirm that the Quantity on Hand decreased for the transferred products.
Return to the list of warehouses and open the destination warehouse. On the Related tab, select Product Inventory, and confirm that the Quantity on Hand increased for the transferred products.
Transfer inventory on the Field Service mobile app
Inventory transfers aren't available in the Field Service mobile app by default. To let technicians transfer inventory in the field—for example, from one truck to another when they meet on-site—an administrator with app customization privileges must add the Inventory Transfer table to the mobile app:
- Add the Inventory Transfer table to the mobile app's navigation. Learn more in Edit the navigation and views on the mobile app.
- To make transfers available when technicians work without a connection, add the Inventory Transfer and Inventory Transfer Product tables to the mobile offline profile.
After the table is enabled, technicians create a transfer by using the same steps described in this article.