Note
Access to this page requires authorization. You can try signing in or changing directories.
Access to this page requires authorization. You can try changing directories.
Note
Community interest groups have now moved from Yammer to Microsoft Viva Engage. To join a Viva Engage community and take part in the latest discussions, fill out the Request access to Finance and Operations Viva Engage Community form and choose the community you want to join.
The primary goal of this tutorial is to illustrate the interoperability between C# and X++. In this tutorial, you write business logic in C# source code and in X++ source code.
You gain experience with the following:
- New tools in Visual Studio.
- The handling of events in C#.
- The use of Language Integrated Query (LINQ) in C# to fetch data.
Prerequisite
This tutorial requires that you access the environment by using Remote Desktop, and be provisioned as an administrator on the instance.
Note
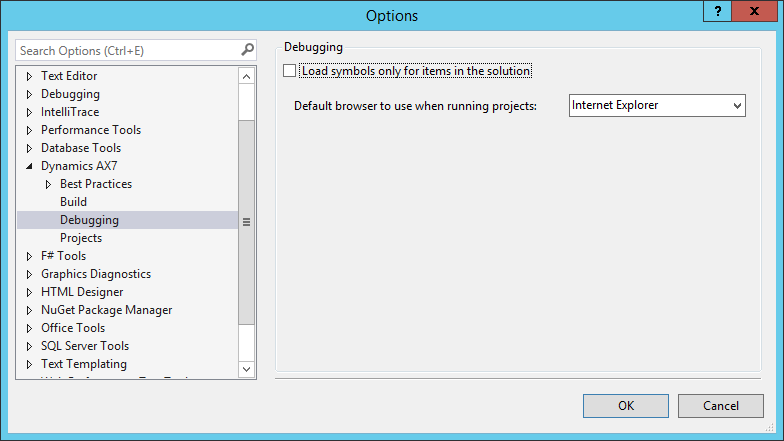
Debugging support for the C# project doesn't work if the Load symbols only for items in the solution checkbox is selected. If this option is selected, change it before running the tutorial. If not, the debugger can't debug the C# code. In Visual Studio, select Extensions > Options > Dynamics 365... > Options > Debugging, and clear the Load symbols only for items in the solution checkbox.
Scenario
Management at the Fleet Management rental company noticed that too many cars are rented to drivers who have a history of unsafe driving habits. Therefore, the company needs to check driving records from external sources before completing a rental. Upper management decided to subscribe to a service that's hosted by the Department of Transportation (DOT). This legal entity manages drivers’ licenses and associated information. This service retrieves the number of citations for the given unique license number. It's not easy to call external services directly from X++ source code. Visual Studio has tools for generating the “code-behind” (in C#) that calls the services, and these tools make the development effort easier. In this tutorial your code doesn't actually call an external service, because the logistics are beyond the scope of the simple lab environment. Instead, you use a mock implementation. The goal of this tutorial is to teach an understanding of the current state of C# and of interoperability with X++, not to provide a real-world solution.
Create a C# class library
You can create a reference from a project to the C# class library, or to any other type of C# project that generates an assembly. Such references affect the build order. The C# project is built before the project that references and depends on it. The infrastructure understands the references, and makes sure that the C# assemblies are deployed correctly to the cloud before execution. Follow these steps to create a C# class library in the Fleet Management solution:
In Visual Studio, select File > Open project/solution.
In the Open Project dialog box, in the File name text box, type the following path, and then press Enter: C:\users\public\desktop\FleetManagement.
Select the file named FleetManagement.sln, and then select Open. If the solution file isn't on your computer, to create the file see End-to-end scenario for the Fleet Management sample application.

Right-click the FleetManagement solution, and select Add > New Project. The Add New Project dialog is displayed.
In the left pane, select Visual C#, and then in the middle pane, select Class Library.
At the bottom, in the Name text box, enter the name DriversLicenseEvaluator.
In the Location text box, enter the following directory path:
C:\users\public\desktop\FleetManagement.Verify that your project is set to “.NET Framework 4.5” in the drop-down list at the top.
Select OK to create the project.

In Solution Explorer, under the DriversLicenseEvaluator project, right-click the file name
Class1.csand rename itDriversLicenseChecker.cs.Select Yes, when prompted to rename all references to the class.

Write a C# method named CheckDriversLicense
In this section, you add C# code for a method named CheckDriversLicense to validate the driver’s license. To do this validation, the method retrieves the driver’s license number from the customer table. The method receives the RecId value for the customer record that contains the information required by the method. Your C# code uses the LINQ provider to look up the customer record from the customer table.
Add the support assemblies that contain the Common type used in the following code. Add these assemblies from the bin folder under the PackagesLocalDirectory folder for your application version:
- Microsoft.Dynamics.AX.Xpp.Support.dll
- Microsoft.Dynamics.AX.Data.Core.dll
Select Add, and then select OK. The assemblies now appear under the references node in the project.
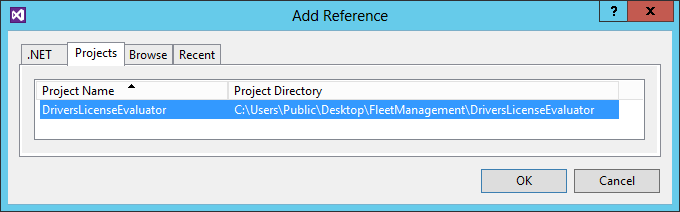
Repeat the Add Reference process, but this time, add the following DLL file from the indicated path:
- Dynamics.Ax.FleetManagement.dll, in
C:\Packages\FleetManagement\bin
- Dynamics.Ax.FleetManagement.dll, in
In Solution Explorer, select the reference
Dynamics.Ax.FleetManagement.dlland set the property Copy Local toFalse.In Solution Explorer, right-click DriversLicenseChecker.cs, and then select View Code.
Add the following three using statements to the DriversLicenseEvaluator namespace, to reduce the verbosity of code that references external classes:
using Dynamics.AX.Application;using Microsoft.Dynamics.AX.Framework.Linq.Data;using Microsoft.Dynamics.AX.Xpp;
Your C# code should now look something like this.
using System;
using System.Collections.Generic;
using System.Linq;
using System.Text;
using System.Threading.Tasks;

namespace DriversLicenseEvaluator
{
    using Dynamics.AX.Application;
    using Microsoft.Dynamics.AX.Framework.Linq.Data;
    using Microsoft.Dynamics.Ax.Xpp;

    public class DriversLicenseChecker
    {
    }
}
Replace the class
CheckDriversLicensewith the following code.Tip
If you prefer, you can paste in the code from the
DriversLicenseChecker.csfile in theC:\FMLabdirectory.public class DriversLicenseChecker { public static bool CheckDriversLicense(long customerId) { // Use LINQ to get back to the information about the license number FMCustomer customer; QueryProvider provider = new AXQueryProvider(null); var customers = new QueryCollection<FMCustomer>(provider); // Build the query (but do not execute it) var query = from c in customers where c.RecId == customerId select c; // Execute the query: customer = query.FirstOrDefault(); if (customer == null) { throw new ArgumentException ("The customerId does not designate a customer"); } if (string.IsNullOrEmpty(customer.DriverLicense)) { // No driver's license was recorded. Veto the rental. return false; } // Call the DOT web service to validate the license number. // This is not practical for this lab, because all the service providers // charge for this service. Instead, just assume that any license number // that contains the sequence "89" is valid. // In the demo data, this is true for Adrian Lannin, // but not for Phil Spencer. return customer.DriverLicense.Contains("89"); } }
Understand the LINQ code
Before proceeding with more C# code, verify that you understand the LINQ code you just added. For more details about LINQ, see Technical Concepts Guide. The basics are described below.
- First, you create a provider. It provides access to all the tables.
- Next, you create a collection of all customers. You retrieve the customer of interest from this collection.
- Then, you create a query with a where clause that designates the requested customer by its RecId.
- The call to the FirstOrDefault method forces execution of the query.
- The method assigns the single matching customer to the customer variable. (Null is assigned if there's no record in the customer database with the provided RecId value.)
- Finally, the customer data is tested to see if the associated driver's license is valid. (The toy example checks if the license contains "89", whereas real-world solutions would call an external service.)
Handle the event when a record is added
The following subsections provide the following information:
- Explain the upcoming code items and their inter-relationships.
- Show the code for an event handler.
- Associate the handler with the event occurrences.
Preparatory overview
When you add a record to a table, the system raises the OnValidateWrite event before it saves the record in the database. You want to call your CheckDriversLicense method each time the OnValidateWrite event is raised for the FMRental table so it can check the customer's license number. To do this, write a C# method that the event calls, and have it call your CheckDriversLicense method. In other words, write an event handler that calls your CheckDriversLicense method. The event handler method receives a parameter of type DataEventArgs. The event handler can set a value in the DataEventArgs structure to accept or reject the record. After you write your event handler method, connect it to the event by assigning or adding it to the OnValidatedWrite delegate that's a member of the FMRental table. Write this assignment in the init method of the data source of the FMRental form.
This assignment to a delegate might seem odd. After all, you're modifying existing code (FMRental) to add handlers, which contradicts the main value proposition of loose coupling that eventing offers. If you did this in X++, you'd use the SubscribesTo attribute to wire up the event handler to the event, as shown in the following example:
    [SubscribesTo(tablestr(CompanyInfo), delegatestr(Customer, validateWriteDelegate))]
    public static void onvalidateWrite(Customer customerInfo, EventHandlerResult eventHandlerResult)
    {
        boolean ok = true; // check for the validity

        eventHandlerResult.result(ok);
    }
However, this approach requires functionality provided by the X++ compiler, and this functionality isn't available in C#. Therefore, you need to use the eventing mechanism that's available in C#.
Note
The system calls the data source init method when you open the form. Technically, the init method is inherited from the FormDataSource class.
Write an event handler method
In C#, write the following event handler method and add it to the DriversLicenseChecker class.
public static void OnValidatedWriteHandler(Common table, DataEventArgs args)
{
    var validateEventArgs = args as ValidateEventArgs;

    // Do not check if already rejected.
    if (validateEventArgs.parmValidateResult())
    {
        var rentalTable = table as FMRental;
        if (rentalTable == null)
        {
            throw new ArgumentNullException("table");
        }

        var result = CheckDriversLicense(rentalTable.Customer);
        validateEventArgs.parmValidateResult(result);
    }
}
Build the DriversLicenseEvaluator project by right-clicking the project node and then selecting Build.
Add a reference pointing to the DriversLicenseEvaluator project
Create a reference from the X++ project named FleetManagement Migrated to the C# project named DriversLicenseEvaluator by completing the following steps.
Right-click the FleetManagement Migrated project, select Add, and then select Reference. Select the row for the DriversLicenseEvaluator project in the Projects references tab, and then select OK.
Under the FleetManagement migrated project, expand the References node. You see a new reference to the DriversLicenseEvaluator project.

Build sequence
Your C# DriversLicenseEvaluator project is built before the FleetManagement migrated project is built. This build order exists because the added reference makes the Fleet project dependent on your project. To view the build sequence, right-click the FleetManagement solution, select Project Build Order, and then select Dependencies.


Add your event handler to a delegate
In Solution Explorer, go to FleetManagement Migrated > User Interface > Forms > FMRental.
Double-click the FMRental form. The Visual Studio designer opens to the form.
Expand the Data Sources node to show the data sources used in the form.
Expand the FMRental data source, and then expand the Methods node to list the methods defined on the data source.
Right-click Methods, and then select Override > init. The list displays all of the methods on the data source that you didn't override yet. When you select init, the process opens the FMRental.xpp file in the X++ code editor with the cursor near the template for the init method.
At the end of the init method body, use the += operator to add one assignment to a delegate.
FMRental.onValidatedWrite += eventhandler
    (DriversLicenseEvaluator.DriversLicenseChecker::OnValidatedWriteHandler);
Select Save, and then build the entire solution.
Final test
In this section, you set breakpoints and run the Fleet application under the Visual Studio debugger. This process enables you to prove the following results:
- Your LINQ query runs when the OnValidateWrite event is raised.
- Your LINQ query successfully retrieves the data for one customer.
Prepare the test
In Solution Explorer, go to FleetManagement Migrated > User Interface > Forms.
Right-click FMRental, and then select Set as Startup Object.
In the code editor for DriversLicenseChecker.cs, find the OnValidateWriteHandler method. Find the following line of code.
var result = CheckDriversLicense(rentalTable.Customer);Set a breakpoint on that line of code. Sekect in the left margin at that line. A red dot displays when the breakpoint is set.
In the CheckDriversLicense method, set another breakpoint at the following line.
if (string.IsNullOrEmpty(customer.DriverLicense))
Run the test
For this test, you're debugging the C# code that you wrote. To do this, you need to tell Visual Studio to load the symbols for the assembly that contains the C# code. Go to Dynamics 365 > Options > Debugging and verify that the Load symbols only for items in the solution checkbox isn't selected.
Tip
If you can't get to the breakpoint in the C# code, you might want to open the Modules window (Debug > Windows > Modules), find the C# module, and load it explicitly.
Select Debug > Start Debugging. This action starts the Fleet application, and a browser window with the FMRental form appears.
Select any Vehicle rental ID to view details.
Select the Edit icon near the top left of the form. The icon looks like a pencil.
In the To field of the Rental section, increase the date by one day.
Select the Save button. This action shifts the focus to Visual Studio at your highlighted breakpoint. This line shows that the OnValidatedWrite event was raised, and that your handler method was called.
Press F5 to continue the run. Instantly, your other breakpoint becomes highlighted.
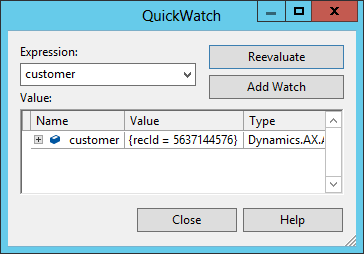
Find the variable customer a few lines above your breakpoint.
Right-click the customer variable, and then select QuickWatch. Any long integer value proves that your LINQ query worked.
Press F5 to complete the Save operation.