Note
Access to this page requires authorization. You can try signing in or changing directories.
Access to this page requires authorization. You can try changing directories.
Note
Community interest groups have now moved from Yammer to Microsoft Viva Engage. To join a Viva Engage community and take part in the latest discussions, fill out the Request access to Finance and Operations Viva Engage Community form and choose the community you want to join.
In this tutorial, you add navigational elements to a workspace and the navigation pane.
Prerequisites
For this tutorial, you need to access the environment by using Remote Desktop, and be provisioned as an administrator on the instance. For more information, see Access Instances.
Key concepts
- A workspace is an overview page that's specific to a particular subject area. All users share workspaces. In this tutorial, you add content into an existing workspace.
- The dashboard is the default home page for each user.
- Tiles are securable objects that you can show on a workspace or the dashboard. You can secure them by using menu items.
Setup
If this tutorial is the first tutorial that you're working on, review Access Instances and make sure that you provision your administrator user if you're working on a local VM.
Import the tutorial project
If you already imported the Fleet management tutorial project, go to the next section.
- Download the Fleet Management sample from https://github.com/Microsoft/FMLab, save it to C:\, and unzip it.
- In Visual Studio, on the Finance and operations menu, select Import Project.
- In Import Project, next to the Filename text box, select the ellipsis button.
- In Select the file to import, browse to C:\FMLab, select FMTutorialDataModel.axpp, and then select Open.
- In the Project file location text box, enter C:\FMLab.
- Select the Overwrite Elements option, and then select OK.
Import transactional data
- In Visual Studio, open the FMTutorial project. On the File menu, point to Open, and then select Project/Solution.
- In Open Project, browse to
C:\FMLab\FMTutorial, and then selectFMTutorial. Select Open. The FMTutorial project appears in Solution Explorer. - Use the
FMTDataHelperclass to load data for the Fleet Management tutorial. In Solution Explorer, in the FMTutorial project, expand Classes, right-click FMTDataHelper, and then select Set as Startup Object. - From the BUILD menu, select Rebuild Solution. You use the rebuild to update the timestamps of the imported artifacts. You can view the build progress in the Output window.
- Press Ctrl+F5 to run the project and load the data.
Add a tile to the tutorial workspace
First, add a new tile to the form FMTClerkWorkspace.
In Solution Explorer, expand Forms and then double-click
FMTClerkWorkspace.In the designer, expand PanoramaBody.
Right-click TileContainer, and then select New > Tile Button.
Specify the following properties for the new tile button.
Property Value Text Test tile Tile FMTAllCustomersTile This tile duplicates the existing All customers tile.
In Solution Explorer, select Forms >
FMTClerkWorkspace. Right-click the form, and then select Set as Start-up Object. You need to set a start-up object so Visual Studio can launch when you press Ctrl+F5 in step 7. When you set this form as the start-up object, the work-in-progress Fleet management clerk workspace appears after you press Ctrl+F5. You preview this form again later in detail.Right-click
FMTutorial, and then select Rebuild.Press Ctrl+F5 to run the project.
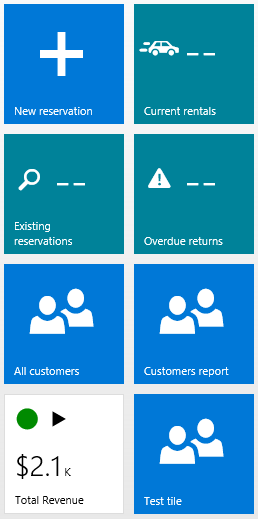
After you build and run the project, the Fleet management clerk workspace launches. The new tile named Test tile that you created appears in the first section of the workspace, at the end of the set of tiles.
Note
The tile doesn't navigate anywhere when clicked. To enable this behavior, define a Menu Item Name on FMTAllCustomersTile under Tiles in Solution Explorer.
Add a new workspace to the navigation pane
Next, add the FMTClerkWorkspace form to the navigation pane. Add it in two locations:
- The All workspaces list.
- A new item in the area list containing a menu structure that shows the workspace.
Create a menu item that points to the FMTClerkWorkspace workspace
Right-click FMTutorial, point to Add, and then click New Item.
Select AX Artifacts > User Interface > Display Menu Item. In the Name property, enter FMTClerkWorkspace.
Select Add.
Specify the following properties for the new menu item.
Property Value Label Reservation management tutorial Object FMTClerkWorkspace
Create a tile that points to the FMTClerkWorkspace workspace menu item
Right-click FMTutorial, point to Add, and then click New Item.
Select AX Artifacts > User Interface > Tile. In the Name property, enter FMTClerkWorkspace.
Select Add.
Specify the following properties for the new tile.
Property Value MenuItemName FMTClerkWorkspace
Add a menu extension for the navigation pane
- In Application Explorer, select User Interface > Menus. Right-click NavPaneMenu, and then select Create extension.
- In Solution Explorer, double-click NavPaneMenu.Extension.
- In the designer, right-click NavPaneMenu.Extension, point to New, and then select Submenu.
- Select the new submenu. In the Name property, enter NavPaneMenuFleetTutorial.
- In Solution Explorer or Application Explorer, locate the FMTClerkWorkspace tile, and drag it onto the newly created submenu. Select Save.
- Right-click
FMTutorial, and then select Rebuild. - Press Ctrl+F5 to run the project. After you build and run the project, the navigation pane contains a link to the new workspace. Open the navigation pane by selecting the navigation pane button (three lines) at the top right of the application window.
- When you open the navigation pane, select All workspaces, and scroll down in the list after it opens. You see the following new Reservation management tutorial workspace in the list.
Add the form to the main menu structure
Now you add a new main menu section that contains a tile that points to the tutorial workspace. You then add a link to the same form in this section. This section demonstrates the appearance of a non-workspace form link.
In Visual Studio, in Solution Explorer, right-click FMTutorial, point to Add, and then click New Item.
Select AX Artifacts > User Interface > Menu. In the Name property, enter FleetManagementTutorial.
Click Add.
In Solution Explorer, double-click the new menu FleetManagementTutorial if it isn't already open.
In the properties list, set the Label property to Fleet management tutorial.
In the designer, right-click FleetManagementTutorial, and click New > Submenu.
Specify the following properties for the new submenu.
Property Value Name Workspaces Label Workspaces In Solution Explorer or Application Explorer, locate the FMTClerkWorkspace display menu item and drag it onto the new Workspaces submenu.
In the designer, right-click FleetManagementTutorial, and then click New > Submenu.
Specify the following properties for the new submenu.
Property Value Name Common Label Common In Solution Explorer or Application Explorer, locate the FMTClerkWorkspace display menu item and drag it onto the new Common submenu.
In Application Explorer, select User Interface > Menus > MainMenu. Right-click MainMenu, and then click Create extension.
In Solution Explorer, locate and open the new extension. Select and double-click MainMenu.Extension to open it.
In the designer, right click MainMenu.Extension, point to New, and then click Menu reference.
Specify the following properties for the new menu reference.
Property Value Name FleetManagementTutorial Menu Name FleetManagementTutorial Select Save.
Right-click FMTutorial, and then click Build.
Press Ctrl+F5 to run the project.
Go to the main menu section you just modified. Open the navigation pane and scroll down until you see the new top-level Fleet management tutorial menu. You might need to clear your browser cache by pressing Ctrl+F5.
Select Fleet management tutorial > Workspaces to expand that submenu. Your navigation pane should look like the following image.
If you select the Common submenu, you see the menu item that you modeled there. You can select either of these links to check that you set up the references correctly. If you set up the references correctly, the tutorial workspace you’re working on opens when selected.