Set up bank runs
Important
Fundraising and Engagement is being retired. Support for Fundraising and Engagement will end at 11:59 PM Pacific Time on December 31, 2026. For more information, go to What’s new in Fundraising and Engagement.
You might have constituents who ask your organization to withdraw funds automatically from their financial institution to pay for a recurring gift. Fundraising and Engagement uses a bank run record to store a donor's bank account details, to use for withdrawing funds in a bank run process. In this case, create a flat file in the correct format to deliver to the bank.
How the bank run process works
Fundraising and Engagement doesn't communicate directly with any banks, but you can send payment requests to the bank. You need to complete fields such as the date range and then generate a flat file when you need payment requests. It's up to you to electronically send the file to the bank. After you send the file to the bank, Fundraising and Engagement updates the system to show the payment has been made. The date shown on Fundraising and Engagement might be different than the date the money is actually withdrawn from the donor account, because the bank may not take action the file on the same day.
Fundraising and Engagement currently supports the following bank formats:
- Scotiabank
- Bank of Montreal (BMO)
- Australian Bankers Association (ABA)
To work with bank run records, do the following steps:
- In the navigation pane, select Gifts from the Change area menu.
- Under Gift Processing select Bank Runs.
Bank run configuration
Before you create a bank run record, you must first configure background services.
Select Configuration from the Change area menu on the navigation pane
Under Settings select Configurations.
In the view that opens, select the Identifier for the configuration you want to use.
Select the Background Services Configurations tab.

Complete the fields Background Services Web Job URL and Bank Run Security Key. For more information about configuring these fields, go to Configuration record prerequisites

Set up a payment processor
Before you create a bank run record, you must set up the payment processor. The payment processor is specific to the bank that performs the bank run process.
Important
The following procedure sets up the bank file format but it does not set up a direct connection to a payment processor. Fundraising and Engagement does not offer direct ACH payments through the payment processor.
In the navigation pane, select Configuration from the Change area menu.
Under Settings select Payment Processors.
On the action pane, select New.
Enter values for Name and Bank Run File Format, and any other required fields.
Complete the bank fields depending on the bank account:
- Scotiabank: Scotiabank Customer Number, Originator Short Name, Originator Long Name
- BMO: BMO Originator ID, Originator Short Name, Originator Long Name
- ABA: ABA Remitter Name, ABA User Name, ABA User Number

Set up bank account
Before you create a bank run record, you must first set up the bank account to use for bank run processing.
- In the navigation pane, select Gifts from the Change area menu.
- Under Relationships, select Contacts or Organizations, and then open the contact record or organization account record for the donor funds deposit.
- On the action pane, select Add Bank Account.
- Complete all the required fields, including Bank Name, A/C Number, Routing Number, Name, and Account Type.
- Select Create, and then select Close.
Create a bank run record
In the navigation pane, select the Gifts are from the Change area menu.
Under Gift Processing select Bank Runs.
On the action pane, select New.
On the General tab of the New Bank Run, complete these fields:

# Field Description 1 Internal Display Name A free text field to enter the name of the bank run. 2 Account to Credit A lookup field for the bank account used to credit the transactions. 3 Start Date Date used for the solution to identify which recurring donations have the next donation on or after this date. 4 End Date Date used for the solution to identify which recurring donations have the next donation on or before this date. 5 Date to be processed The processing date for the bank run. 6 Payment Processor A lookup field for the related payment processor records used to connect the bank run to the correct payment gateway. 7 File Creation Number User-entered number required from BMO and Scotiabank to sequentially mark the bank run. 8 Bank Run Status A dropdown menu to indicate the status of the bank run. 9 Timeline Contains documents related to the bank run. On the action pane, select Save, and then select Retrieve Gift List.
Note
After the the gift list populates, the Bank Run Status changes to Report Available.
Generate a bank run file
After you've created a bank run record and retrieved the gift list, you'll need a bank run file to share and validate with the bank.
- Open the bank run record.
- On the action pane, select Generate Bank Run File.
- When the bank run file is ready, it appears on the Timeline tab in the Note section. Select the attached file to download it.
Here's an example generated bank run file:

Confirm gift list and process the bank run file
After the bank validates the bank run file, you can confirm the gift list and process the bank run.
- Open the bank run record.
- On the action pane, select Confirm Gift List.
- In the Confirm Payment Schedule List dialog, select Create and Update.
- When the transactions are created and the payment schedules are updated, the Bank Run Status changes to List Confirmed.
- After the bank run process completes and the payments have processed, change the Bank Run Status to Processed.
Generate receipts and thank-you letters
To use receipts and thank-you letters within Fundraising and Engagement, you must create the templates for receipts and thank you notes. You must load these templates into Fundraising and Engagement, and you can access them through Available Templates.
After you select Process, Fundraising and Engagement will immediately process the gift and, depending on the type of gift, will allow a user to:
- Generate Receipt: Generate and then download a pre-selected Word document receipt template.
- Print Thank You: Download a pre-selected Word document thank you letter template.
Create a template
For more information about templates, go to Use Word templates to create standardized documents.
The following example shows you how to create a template for a thank-you letter. The same steps apply to creating a receipt.
On the navigation bar, select the cog wheel and then select Advanced Settings.
Select the arrow next to Settings, and then under Business select Templates.
Select Document Templates.
On the action pane, select New.
In the dialog, select Word Template.
Choose the entity for the template from the Filter by entity list, then select Select Entity. Here are some common entities to create Word templates for:
Option Description Transaction For thank-you templates within Transactions. Donor Commitment For thank-you templates within Donor Commitment. Payment Schedule For thank-you templates within Payment Schedules. Event For thank-you templates within the Event Registration process. Receipt For receipt templates within Receipt. In the dialog that opens, select the relationship for the type of document you need.
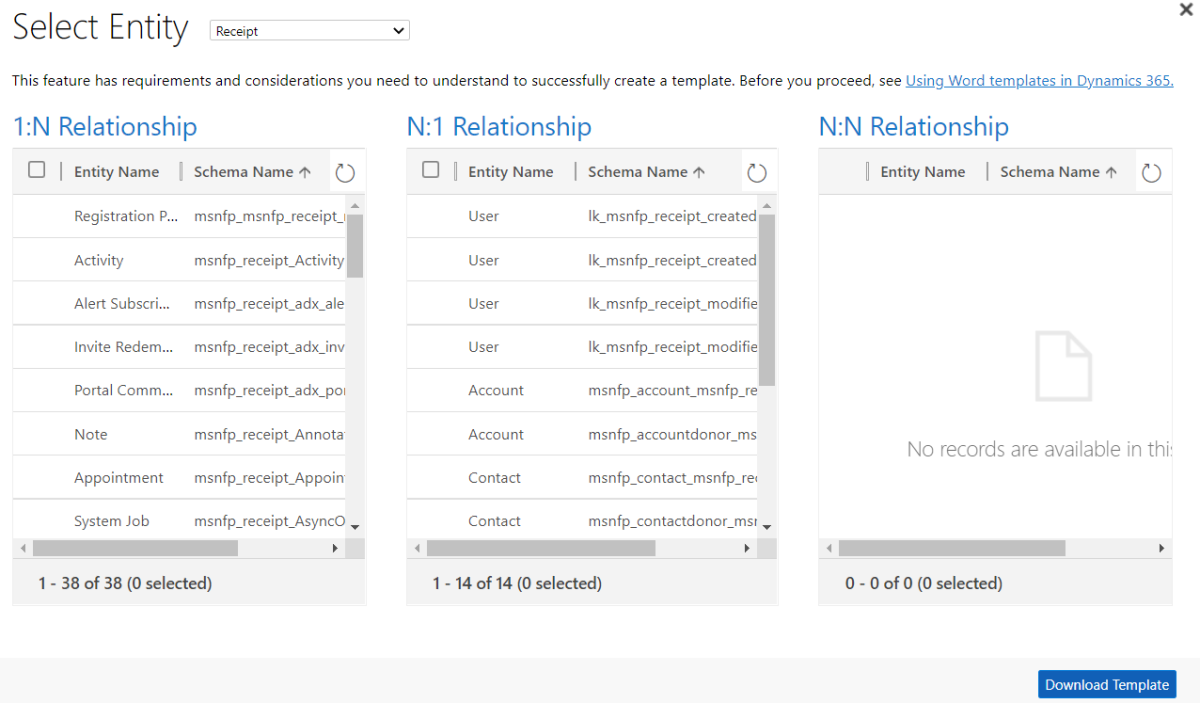
Relationship Description 1:N Relationship One to many. For example, an account can have many contacts. N:1 Relationship Many to one. For example, multiple organizations can have the same contact. N:N Relationship Many to many. For example, a marketing list can have multiple accounts. The relationships you select determine what entities and fields are available in the Word template. Only select relationships for fields that you want to appear in the Word template. The relationships you choose become the XML data (dynamic fields) needed for the Word template.
Select the XML data (dynamic fields) needed for the template, and then select Download Template. The Word template downloads to your computer with the exported entity as XML data.
Open the Word template file. Select Enable Editing at the top of the Word document, if applicable. At this point, the document is empty.
Make sure the Developer tab of the ribbon in Word is enabled. Then select Developer > Mapping > XML Mapping Pane.
The XML Mapping Pane appears on the right side of the Word template. In the Custom XML Part dropdown, select the last option.
The list of pre-selected dynamic fields appears. Write the static thank you messaging (the parts of the letter that are the same for all recipients), and then use the XML Mapping list to insert the dynamic fields you need.

To insert a dynamic field, place the cursor in the template location where you want the field. Then in the XML Mapping list, open the field's context menu, select Insert Content Control, and then select Rich Text.

Word inserts the dynamic field next to the cursor. Repeat this step for each dynamic field you need in the template.
The following image shows what a template might look like when you finish, with the dynamic fields highlighted for emphasis:

When you finish, save the template in Word, and then navigate back to Fundraising and Engagement.
On the action pane, select Upload Template.
Use the Upload Template dialog to select the template, then select Upload to add the completed template to the solution.
To use the template, open a transaction, receipt, donor commitment, or payment Schedule record. Then, select Word Templates from the action pane. Select the dropdown to the right of Word Templates and then choose the template from the list.
The template opens with the dynamic fields populated using current data:

After you upload the template, you must assign it to a workflow to make it available through Print Receipt and Print Thank You commands. For steps, see the next section.
For more information about creating dynamic Word templates, go to Use Word templates to create standardized documents.
Assign a template to a workflow
Fundraising and Engagement includes seven workflows, which must have an assigned template before you can activate them:
| Template | Workflows |
|---|---|
| Transaction | Action – Transaction Receipt Action – Transaction Thank You |
| Donor Commitment | Action – Donor Commitment Thank You |
| Payment Schedule | Action – Payment Schedule Receipt Action – Payment Schedule Thank You |
| Event Package | Action – Event Package Receipt Action – Event Package Thank You |
To assign a template to a workflow in Fundraising and Engagement, open the workflow and select Set Properties.

From the Selected Template option, select the template to use for the workflow you're editing, then select OK, and then publish the workflow.

See also
Gifts overview
Contacts in Fundraising and Engagement
Organizations in Fundraising and Engagement
Transactions in Fundraising and Engagement
Payment schedules in Fundraising and Engagement