Manage volunteers
Volunteer Management is part of Microsoft Cloud for Nonprofit. It's built on Microsoft Power Apps, with the Nonprofit Common Data Model as its foundation.
Volunteer Management helps you manage volunteers for your nonprofit organization. Key capabilities of Volunteer Management include:
Publish engagement opportunities: Design the opportunity and define the qualifications, skills, and shifts needed.
Approve volunteers: Review volunteer profiles and qualifications, and then approve individuals to participate in engagement opportunities.
Track volunteer onboarding: Quickly and easily understand what stage of the onboarding process the volunteer is in.
Manage day-of activities: Track attendance and balance shift volumes when an activity is happening.
Communicate with ease: Define automated messaging to ensure your volunteers receive timely logistics, training, and gratitude for their time.
Gain volunteer insights: Understand who is registering for, failing to show up to, and repeatedly contributing time to your organization.
This article walks you through the main flows of Volunteer Management.
Navigation
Volunteer Management has two main navigation areas: Volunteering and Configuration.
Volunteering
Workplace: Volunteer managers can see helpful dashboards and the activities they need to complete.
Engagement Opportunities: Volunteer managers can set up and manage engagement opportunities and see a calendar of all the engagement opportunity shifts.
Volunteers: Volunteer managers can add and manage volunteers, add and manage groups, and review volunteer applicants.
Onboarding: Volunteer managers can track volunteers through the onboarding process.
Configuration
- Volunteer Settings: Set up qualifications, onboarding qualification stages and steps, and preferences for your organization to use throughout the application.
Dashboards
Volunteer Management has two dashboards to help volunteer managers in their work: Daily Dashboard and Engagement Opportunity Tracking.
Daily Dashboard: View published engagement opportunities, volunteers to review, and draft engagement opportunities that need to be published.
Engagement Opportunity Tracking: Understand how many engagement opportunities are published each month, volunteers per month, and participants needed versus participants confirmed for each engagement opportunity.
Assign security roles
Volunteer Management includes one default security role, Volunteer Manager. To add more security roles, go to Security roles and privileges.
Setup qualifications and preferences for your organization
You can track certain qualifications and preferences for your organization. When setting up the application, navigate to Configuration to set up the qualifications, and preferences your organization wants to track for volunteers. After you set up qualifications and preferences, volunteer managers can access them through lookup fields throughout the application, including on the volunteer record and the engagement opportunity record.
Manage volunteers and groups
Volunteer managers can add volunteers to a database and associate them with groups. A volunteer is a contact type. A group is an entity that has a one-to-many relationship with the contact.
Navigate to Volunteers in the navigation pane. Select New to create a new volunteer contact. Provide the first name, last name, and other contact information.
The volunteer manager can also indicate the volunteer’s preferences, availability, and qualifications. Later, the volunteer manager can view the volunteer’s participation history on this page.
Select Save to save the contact.
Volunteer managers might want to associate several volunteers with a group. Managers can use groups to link volunteers in a logical association. Some examples include what company they're volunteering with, the type of volunteer, or their volunteering role. By adding volunteers to a group, volunteer managers can communicate with the volunteers in the group, understand their engagement, and understand the relationships between volunteers.
Navigate to Groups in the navigation pane. Select New to create a new group.
Add a name for the group, and then select Save.
Select the Summary tab.
In the area on the right, select New Group Members.
Look up one of the contacts that you created, and then select the membership role (lead or member).
Continue to add other contacts to the group as needed.
Optionally, create and add a new contact. In the Quick Create form, create a new contact, and then select Save and Close. The contact autopopulates, and now you can select their membership role (lead or member).

Volunteer managers can send a message to the entire group.
Select New Message to All. Write and send a message to all your group members.
Refresh the Timeline area and see the details appear on the timeline for the group. Easily track all of your communication with the group.
Note
A threat actor can manipulate data without detection because no security monitoring is in place. Furthermore, the absence of logging makes it impossible to effectively handle a security incident. Be sure to perform the following actions:
- Turn on logging in your Dynamics 365 instance.
- If you can't turn on logging by default, communicate the importance of turning it on to your customers when configuring their instances.
For further details, visit the following pages: - Use auditing logs in Dynamics 365 Customer Engagement (on-premises)
- Microsoft Dataverse and model-driven apps activity logging - Power Platform
Create an engagement opportunity
Volunteer managers can create an engagement opportunity to create opportunities for volunteers to engage with your nonprofit.
Navigate to Engagements in the navigation pane. Select New to create a new engagement opportunity. Create a draft by supplying the engagement title, location type, short description, and schedule settings.
Save the draft of the engagement opportunity.
Continue setting up the engagement opportunity by selecting each tab and filling in the relevant information.
Field Description Description Provide the title, short description, and detailed description of the engagement opportunity. Location Select On Location, Virtual or both.
Provide a physical address or a URL for the engagement opportunity. Provide the location contact. You can look up to a contact record.Requirements Provide the needed volunteer qualifications for the engagement opportunity, including any onboarding qualifications required to participate.
Provide the preferences (the volunteer’s interests) for the engagement opportunity.Schedule Indicate if the engagement opportunity is multiple days. If the engagement opportunity is multiple days, indicate the start and, end date.
Indicate if the engagement opportunity has shifts. If it has shifts, add shifts in the area by selecting New Engagement Opportunity Schedule.Message Settings You can set up automated messages to be sent out to volunteers. There are three triggers: Sign Up Completed, Sign Up Approved, or Engagement Completed.
You can indicate who the message should be sent to automatically and what the subject and text should be.
When a message is sent, it appears in the Engagement Opportunity Timeline and on the Timeline on the recipient's contact record.
Message is a custom Activity type and email to be configured. For more information about configuring email, go to Integrate (synchronize) your email system.Post Settings The volunteer manager can hide certain information on the public listing of the engagement opportunity. They can hide the address and the city, or the URL of a virtual event.
The volunteer manager can also automatically approve applicants who apply for an engagement opportunity. If this option is switched to No, then all volunteers who sign up are automatically set to Needs Review.Save the engagement opportunity. If you want to publish it, select the Publish button on the action pane.
- Set to Privately Published to have it only visible internally but shown as ready to start adding volunteers.
- Set to Publish to the Web to make it visible on the Volunteer Engagement portal when it becomes available in the future.
Send emails from Volunteer Management
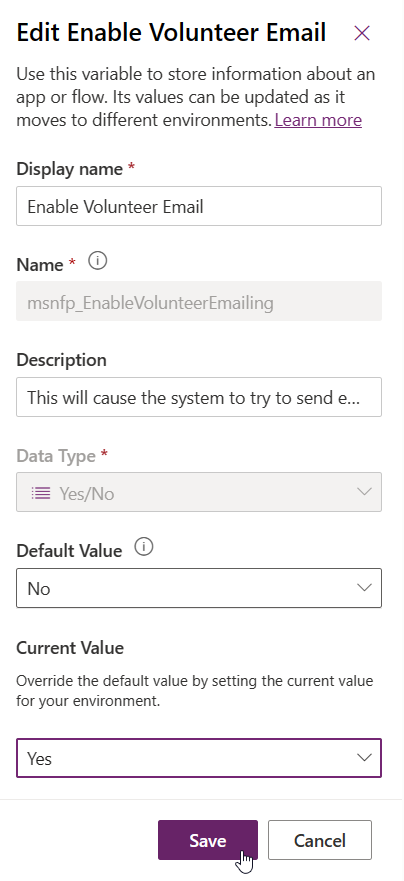
You can set up Volunteer Management to send out emails and automatic messages to volunteers. To enable emailing in Volunteer Management, the system administrator needs to enable the Enable Volunteer Email setting.
Enable emails
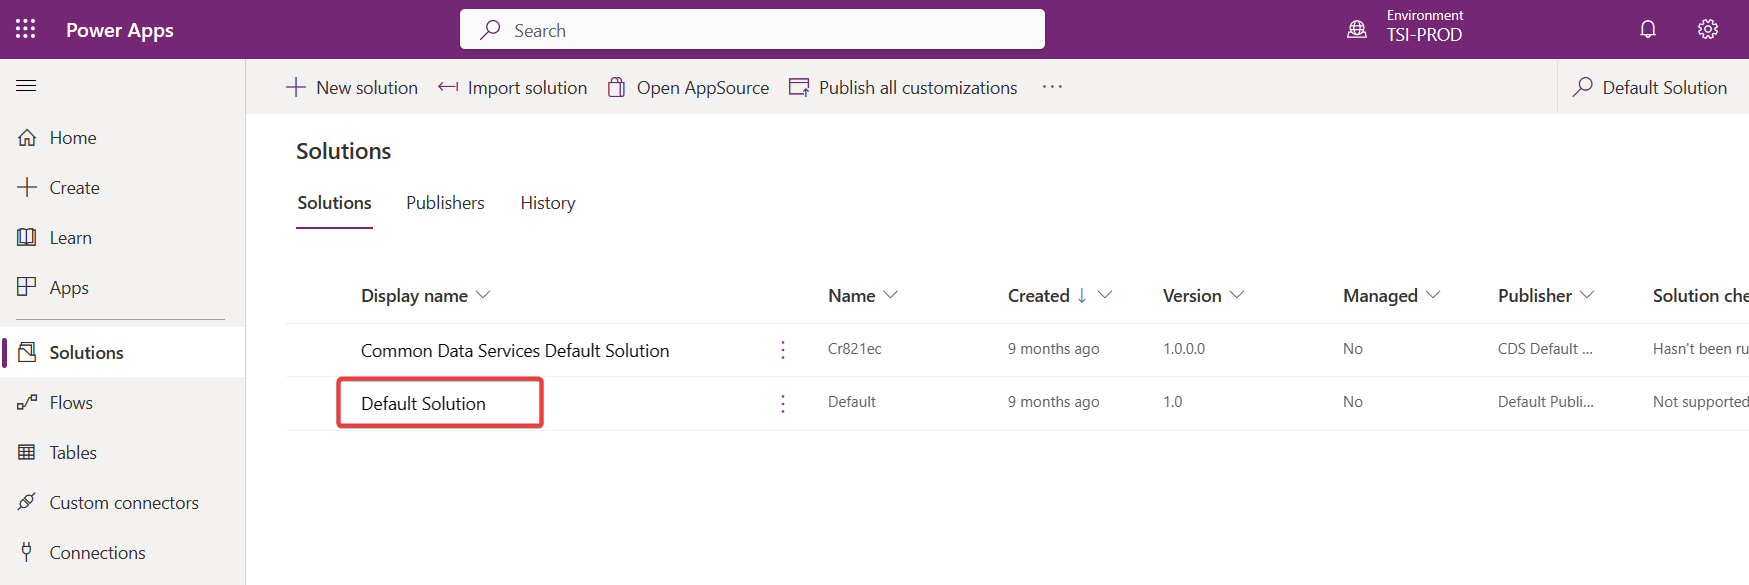
Go to make.powerapps.com and select the environment for Volunteer Management. Select Solutions, and then select Default Solution.
In the left search box, enter environment variables.
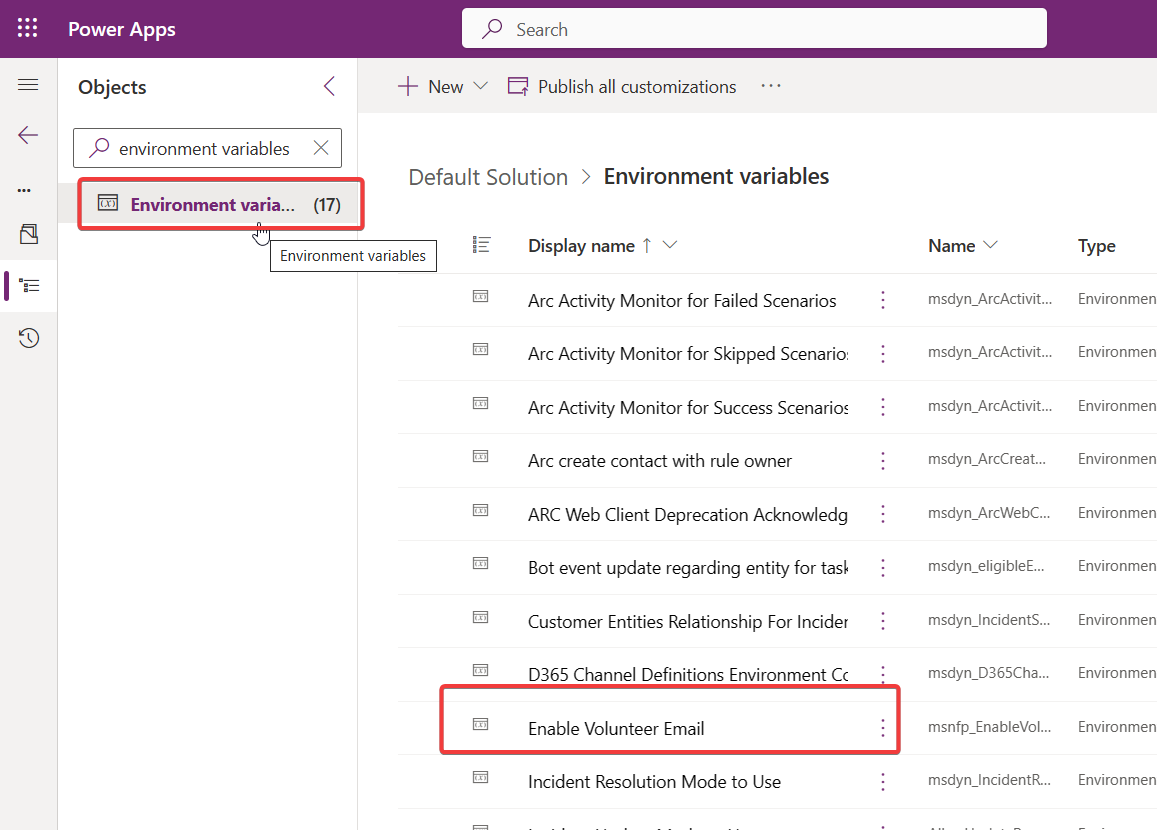
Select Enable Volunteer Email. In the side panel under Current Value, select Yes, and then select Save.
Change the BCC limit
- In the left search box, enter environment variables.
- Select Volunteer Email BCC Limit.
- Change the settings as necessary.
Give permission for emails to be sent on your behalf
To allow the system to send emails on your behalf, you need to first approve the email. For this procedure, you need to use the email account that the emails are from and also use a system administrator account.
- Go to Advanced Settings.
- Navigate to Email Configuration, and then select Mailboxes.
- Search for the email address you would like to send emails from.
- Open the mailbox and select Approve Email.
For more information about approving emails, go to Approve email.
Enable Volunteer Management to send emails on your behalf
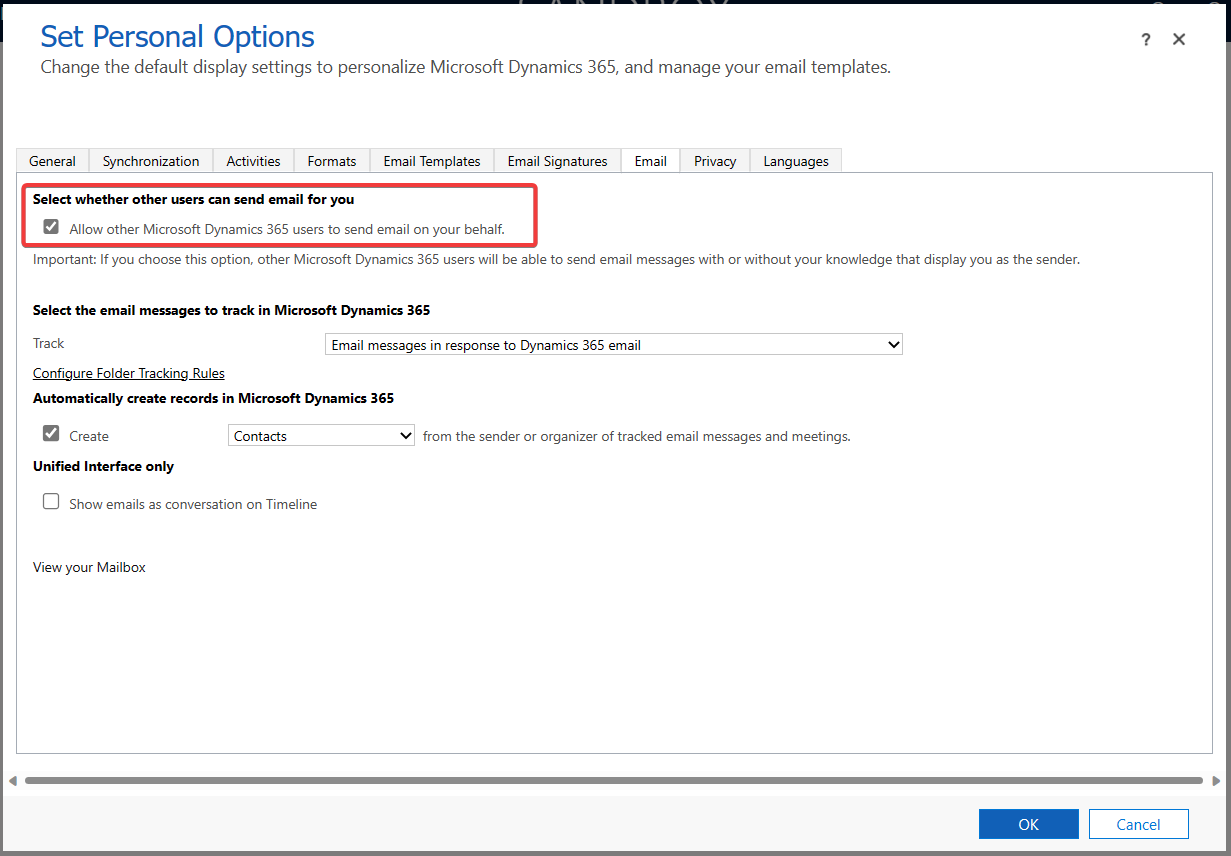
Go to personalization settings.
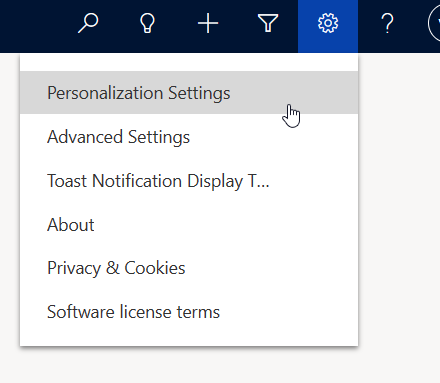
On the Email tab, check the setting Allow the Microsoft Dynamics 365 users to send an email on your behalf.
Enable Volunteer Engagement to send emails
When a volunteer signs up for the engagement opportunity and the auto message setting is on, the application sends an email on behalf of another user. The portal needs permission to send out emails on behalf of another user.
Navigate to admin.powerplatform.microsoft.com and open the environment for Volunteer Management and Volunteer Engagement.
Go to Users and select app users list. Search for the Volunteer Engagement portal user.
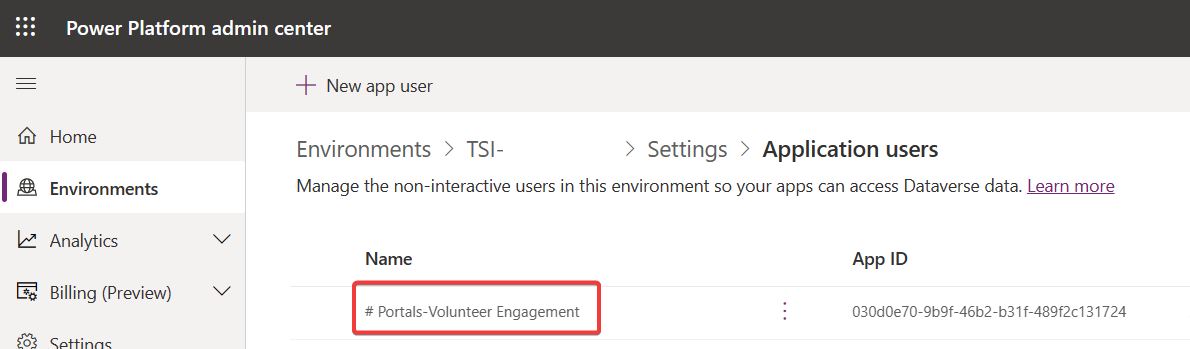
Select the three dots next to the application user name and select Edit security roles.
Add the Send Email as Another User security role and select Save.
Add a volunteer to an engagement opportunity
Volunteer managers can add a volunteer to an engagement opportunity from the contact record or the engagement opportunity.
- Navigate to the contact to add to the engagement opportunity to.
- On the Summary tab under Recent Engagements, select the ellipsis if needed, and then select New Participation.
- Select the Participation Status and the engagement opportunity you want to add the volunteer to.
- Navigate to the engagement opportunity you want to add the volunteer to.
- In the Participants area, select New Participation.
- Select the contact that you want to add to the engagement opportunity and set the participation status. If you set Participation Status to Approved, you can assign the volunteer to an engagement opportunity schedule.
Create an onboarding qualifications template
Onboarding qualifications templates let you apply consistent onboarding processes to individual volunteers. Volunteer managers can set up a process once as a template and apply it to each volunteer.
- Navigate to Configuration > Qualifications.
- Select New.
- Name your onboarding template, and then under Type, select Onboarding. Provide a description and select Save.
After you save your template, you can start adding onboarding stages.
- In the subgrid, select New Onboarding Process Stage.
- In the side panel, enter the Stage name and the Sequence number (the order of the stage in the onboarding process). You can also indicate the number of calendar days the stage should take for tracking.
- Create a new stage for each stage of the onboarding process, repeating the first two steps.
After the stages are set, you can add the steps that make up each stage of the process. You can assign steps to an individual user or a group of users in the system. Each user sees these steps in Workspace > Activities.
- Select the row of the stage, and then select Add Step.
- Name the step. You can also choose who to assign it to. Each time a volunteer is assigned to an onboarding process, these steps are created to the user or group indicated here. This user or group must be a registered user.
- You can also indicate the number of calendar days the step should take for tracking.
- Create steps for each stage of the onboarding process repeating steps 1-3.
After you create the stages and steps, you can save the onboarding template and assign volunteers to the onboarding process.
Assign volunteers to an onboarding process
After you set up an onboarding template, you can assign a volunteer to an onboarding process based on the template created.
- Navigate to Volunteering > Volunteer, and then select the volunteer to assign to an onboarding process.
- On the Summary tab under Onboarding Qualifications, select the ellipsis if needed, and then select New Qualification.
- Under Type, select the onboarding template to add the volunteer to, and then select Save and Close. After you save the qualification, the steps and stages indicated in the template are created specifically for that volunteer.
- Navigate to Onboarding > Qualifications, and then select the onboarding process you created. Select the Onboarding Process tab. On this tab, you can see which stage the volunteer is in the onboarding process and what activities are outstanding.
- Select Next Stage to move the volunteer to the next stage of the onboarding process.
Approve volunteers and add volunteers to a schedule
Volunteer managers can add volunteers to a schedule after they're approved. You can add a volunteer to a schedule through the volunteer record or from the engagement opportunity.
- Navigate to New Applications in the navigation pane. Select the Participation Title record to open details about the participation.
- Assign the volunteer to a shift. In the Shifts table, select New Participation Schedule.
- Select the schedule you want to assign the volunteer to, and then select Save and Close.
You can also add a volunteer to a schedule from the engagement opportunity.
Navigate to the engagement opportunity the volunteer is participating in.
In the Participants area, select the row with the contact you want to add to a schedule, and then select Add Shift. You must set the Participation Status to Approved before adding the volunteer to a schedule.


Manage engagement opportunity schedule
Volunteer managers can see all the shifts across all their engagement opportunities.
- Navigate to Shift Schedule in the navigation pane. The section displays a calendar view of all the shifts across all the engagement opportunities. This calendar provides a comprehensive view of how volunteers can engage with your organization.
- For more information on each schedule, you can select the record from the calendar view.
Close an engagement opportunity and record attendance
Volunteer managers can indicate that an engagement opportunity is completed. They can also record the attendance of participants.
- Navigate to the completed engagement opportunity.
- On the action pane, select Close Opportunity. The engagement opportunity status switches to Closed and new measures show on the screen.
- To take attendance, in the Participants area, select the arrow next to the volunteer. You can see the shifts that they signed up for. If the engagement opportunity doesn't have any shifts, you see Default Shift set for that volunteer.
- Select the row for the shift, and under Schedule Status, select the correct status (Completed, No Show, Canceled) based on their participation for that shift. Select Save and Close.
- The measures on the Summary screen populate based on how many volunteers completed their shift, canceled, or were no-shows. This insight gives you a sense of the success of the engagement opportunity.
- If an engagement opportunity is canceled for any reason, you can select Cancel Opportunity on the action pane. The engagement opportunity status changes to Canceled, and you aren't to add more volunteers to the engagement opportunity.
Integration options
Volunteer Management is built on Microsoft Power Platform, which provides important integrations:
- SharePoint: Volunteer managers deal with several documents associated with volunteers or coordinating engagement opportunities. Power Platform has an out-of-the-box integration with SharePoint that can be configured to allow volunteer managers to store files and easily access files from the Volunteer Management application. More information: Set up SharePoint integration
See also
Volunteer Management known issues
Get started with Microsoft Cloud for Nonprofit solutions powered by Dynamics 365