Note
Access to this page requires authorization. You can try signing in or changing directories.
Access to this page requires authorization. You can try changing directories.
With both Microsoft Exchange Online and customer engagement apps (such as Dynamics 365 Sales, Dynamics 365 Customer Service, Dynamics 365 Marketing, Dynamics 365 Field Service, and Dynamics 365 Project Service Automation) hosted as online services, connecting the two is a simpler, more straightforward configuration.
Important
This feature requires that you have a Microsoft 365 subscription or a subscription to an online service such as SharePoint Online or Exchange Online. For more information, see What is Microsoft 365 and how does it relate to Dynamics 365 (online)?
Get Exchange ready
To use Exchange Online with customer engagement apps, you must have an Exchange Online subscription that either comes as part of a Microsoft 365 subscription or can be subscribed to separately. For information about Exchange Online, go to:
- Exchange Online
- Exchange Online service description
- Microsoft 365 and Office 365 service descriptions
Tip
To make sure you've got a good connection to Exchange Online, run the Microsoft Remote Connectivity Analyzer. For information about which tests to run, see Test mail flow with the Remote Connectivity Analyzer.
For ports required, see Network ports for clients and mail flow in Exchange.
Create an email server profile for Exchange Online
Make sure you have the System Administrator security role or equivalent permissions in Microsoft Dynamics 365. To check your security role, see View your user profile. If you don't have the correct permissions, contact your system administrator.
Sign in to the Power Platform admin center.
In the navigation pane, select Manage, then in the Manage pane, select Environments.
On the Environments page, select an environment.
In the command bar, select Settings.
Expand Email, then select Server profiles.
On the command bar, select New server profile.
For Email Server Type, select Exchange Online, and then enter a meaningful Name for the profile.
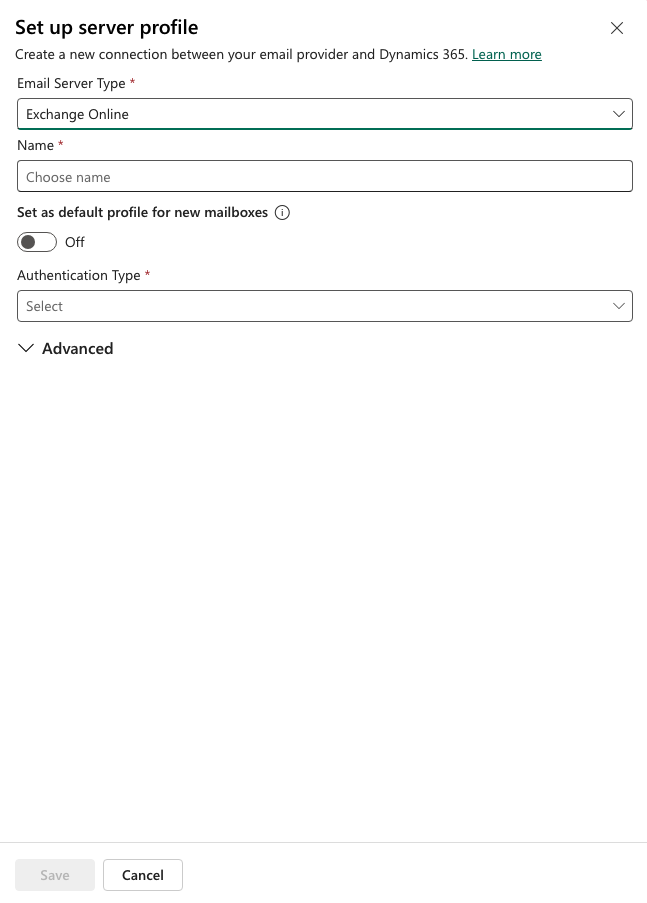
If you want to use this server profile as the default profile for new mailboxes, turn on Set as default profile for new mailboxes.
For Authentication Type, choose one of the following:
Server-to-Server Authentication (Same Tenant): Use this option when Exchange resides in the same tenant as Dynamics 365. More information: Build web applications using server-to-server (S2S) authentication
Oauth (Cross Tenant): Use this option when Exchange resides in a different tenant than Dynamics 365. To get the information for this option, follow the steps in Exchange Online cross-tenant authentication. The Locations and ports fields are automatically populated.
Expand the Advanced section, and then use the tooltips to choose your email processing options.
When you're done, select Save to apply the changes.
Verify that you have the profile Microsoft Exchange Online
If you have an Exchange Online subscription in the same tenant as your subscription, customer engagement apps create a default profile named Microsoft Exchange Online for the email connection.
To verify you have this profile:
- Sign in to the Power Platform admin center.
- In the navigation pane, select Manage, then in the Manage pane, select Environments.
- On the Environments page, select an environment.
- In the command bar, select Settings.
- Expand Email, then select Server profiles.
- Verify that the Microsoft Exchange Online profile is in the list. If the Microsoft Exchange Online profile is missing, verify that you have an Exchange Online subscription and that it exists in the same tenant as your subscription.
- If there are multiple profiles, select the Microsoft Exchange Online profile and set it as default.
Configure default email processing and synchronization
Set server-side synchronization to be the default configuration method for newly created users.
Sign in to the Power Platform admin center.
In the navigation pane, select Manage, then in the Manage pane, select Environments.
On the Environments page, select an environment.
In the command bar, select Settings.
Expand Email, then select Email settings.
Set the Synchronization methods columns as follows:
- Server Profile: Microsoft Exchange Online
- Incoming Email: Server-Side Synchronization or Email Router
- Outgoing Email: Server-Side Synchronization or Email Router
- Appointments, Contacts, and Tasks: Server-Side Synchronization
Select Save to apply the changes.
All new users have these settings applied to their mailbox.
Configure mailboxes
New users have their mailboxes configured automatically with the settings you made in the prior section. For existing users who were added before you made these above settings, you must set the server profile and the delivery method for email, appointments, contacts, and tasks.
In addition to administrator permissions, you must have Read and Write privileges on the Mailbox table to set the delivery method for the mailbox.
- Sign in to the Power Platform admin center.
- In the navigation pane, select Manage, then in the Manage pane, select Environments.
- On the Environments page, select an environment.
- In the command bar, select Settings.
- Expand Email, then select Mailboxes.
- Select Active Mailboxes from the grid view selection list.
- Select all the mailboxes that you want to associate with the Microsoft Exchange Online profile.
- Select Apply Default Email Settings in the top command bar, verify the settings, then select OK.
By default, the mailbox configuration is tested and the mailboxes enabled when you select OK.
To edit mailboxes to set the profile and delivery methods:
- Sign in to the Power Platform admin center.
- In the navigation pane, select Manage, then in the Manage pane, select Environments.
- On the Environments page, select an environment.
- In the command bar, select Settings.
- Expand Email, then select Mailboxes.
- Select Active Mailboxes from the grid view selection list.
- Select the mailboxes that you want to configure, then select Edit in the top command bar.
- Under the General tab, set the Synchronization methods columns as follows:
- Server Profile: Microsoft Exchange Online
- Incoming Email: Server-Side Synchronization or Email Router
- Outgoing Email: Server-Side Synchronization or Email Router
- Appointments, Contacts, and Tasks: Server-Side Synchronization
- Select Save in the command bar to apply your changes.
Approve email
To approve emails for customer engagement apps, a user requires:
- The Approve Email Addresses for Users or Queues privilege.
- The permissions as described in the Permissions model table later in this topic.
Approve your own user mailbox
You can approve your own user mailbox if all of these conditions are met:
Your User Principal Name (UPN) matches the email address in your mailbox record.
The OrgDBOrgSetting RequirePrivilegeToSelfApproveEmailAddress setting is disabled (default) or you have the Approve Email Addresses for Users or Queues privilege.
You have a minimum of User-level Write privileges on the Mailbox table.
The mailbox isn't a queue mailbox.
If RequirePrivilegeToSelfApproveEmailAddress is disabled (default) and you don't have the Approve Email Addresses for Users or Queues privilege, the Approve Email button doesn't appear. However, if you select Test & Enable Mailbox and the conditions mentioned are met, the email address in your mailbox is approved as part of the test and enable process.
Delegate mailbox approval
A user with the Global or Exchange admin role can delegate the mailbox approval process to another user by assigning the Delegated Mailbox Approver security role in Dynamics 365. A user with the Delegated Mailbox Approver role can approve mailboxes in the environment without being a Global or Exchange admin. As mentioned in the permission model section, the user also needs to have the System Administrator security role. This new role is available in Dynamics 365 online version 9.2.22104.00170 or later.
Important
You can't assign the Delegated Mailbox Approver role unless you have the Global or Exchange admin role. If you try to assign this role but aren't a Global or Exchange admin, you receive an error: "You must be an Office 365 Global Administrator or an Exchange Administrator to assign the Delegated Mailbox Approver role." You may also see the error code 0x80090904.
The Delegated Mailbox Approver role isn't currently supported for assigning to a team. If you try to assign this role to a team, you receive an error: "The Delegated Mailbox Approver role can'tbe assigned to a team." You may also see error code 0x80090905 or the message "Failed to add role Delegated Mailbox Approver: CannotAssignDelegatedMailboxApproverRoleToTeam".
Because this is a Dynamics 365 security role, the role is assigned per environment. The role can be assigned to one or more users per environment.
Note
For more information about assigning security roles in Dynamics 365 or Power Apps, see Assign a security role to a user.
For more information about the Global and Exchange admin roles, see Commonly used Microsoft 365 admin center roles.
Require admin approval?
Decide which approach you want your organization to follow for mailbox approval.
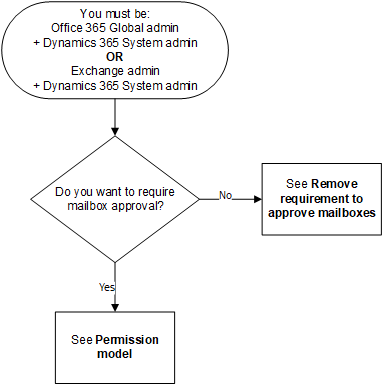
Flowchart with the starting condition "You must be an Office 365 Global admin + Dynamics 365 System admin OR an Exchange admin + Dynamics 365 System admin OR a Dynamics 365 Delegated Mailbox Approver + Dynamics 365 System admin." The first decision point is "Do you want to require mailbox approval?" The "No" path leads to "See 'Remove requirement to approve mailboxes'." The "Yes" path leads to "See Permissions model."
Permissions model
The table describes the permissions required to approve emails.
Terminology
Yes: Can approve email
No: Can't approve email
n/a: Not applicable
Global admin: Tenant level administrator role
Exchange admin: Exchange administrator role
Note
For more information about the Global and Exchange admin roles, see Commonly used Microsoft 365 admin center roles
- Delegated Mailbox Approver: Dynamics 365 security role that is assigned by a Global admin or Exchange admin. A user with this role can approve mailboxes without being a Global or Exchange admin. For more information, see to the section titled Delegate mailbox approval.
Note
This permissions model is rolling out gradually and becomes available once deployed in your region. Check the version number provided in the table for when the changes are available.
| Security roles / Applications in use |
Both roles required: Global admin and System admin |
Both roles required: Exchange admin and System admin |
Both roles required: Delegated Mailbox Approver and System admin |
System admin | Service admin | Exchange admin | Global admin | ||||
|---|---|---|---|---|---|---|---|---|---|---|---|
| Customer engagement apps | Exchange Online | Yes | Yes | Yes1 | No | No | No | No | |||
| Exchange (on-premises) | n/a | n/a | n/a | Yes2 | No | n/a | n/a | ||||
| Customer Engagement (on-premises) | Exchange Online | n/a | n/a | n/a | Yes2 | n/a | n/a | n/a | |||
| Exchange (on-premises) | n/a | n/a | n/a | Yes2 | n/a | n/a | n/a | ||||
1 We're updating for customer engagement apps and Exchange Online, for version 9.2.22104.00170 or later.
2 We recommend that you include your Exchange admin in the custom business processes your organization follows for this configuration.
To determine your version, sign in, and in the upper-right corner of the screen, then select Settings  > About.
Require and configure mailbox approval
Follow these steps to approve email addresses for users and queues. By default, admins as described in the preceding permissions model table are required to approve emails.
Add the Approve Email Addresses for Users or Queues privilege
To approve emails, a Dynamics 365 user requires the Approve Email Addresses for Users or Queues privilege. A system admin can assign the Approve Email Addresses for Users or Queues privilege to any security role and assign the security role to any user.
To manually assign the Approve Email Addresses for Users or Queues privilege to a security role:
- Sign in to the Power Platform admin center.
- In the navigation pane, select Manage, then in the Manage pane, select Environments.
- On the Environments page, select an environment.
- In the command bar, select Settings.
- Expand Users + permissions, then select Security roles.
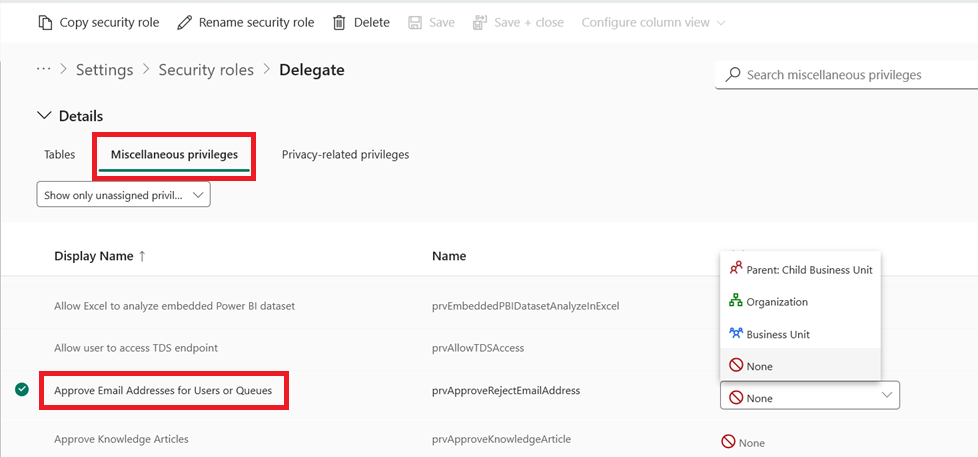
- Select a security role, then go to the Miscellaneous Privileges tab.
- Select the Show only unassigned privileges view.
- Select Approve Email Addresses for Users or Queues and set the privilege level.
Approve mailboxes
You can use a manual or programmatic processes to approve a mailbox.
Approve a mailbox manually
- Sign in to the Power Platform admin center.
- In the navigation pane, select Manage, then in the Manage pane, select Environments.
- On the Environments page, select an environment.
- In the command bar, select Settings.
- Expand Email, then select Mailboxes.
- Select the Active Mailboxes grid view to show the list of mailboxes.
- Select the mailboxes that you want to approve, then select Approve Email from the command bar.
- Select OK to apply the changes.
Approve a mailbox programmatically
Email addresses can't be approved using plug-ins or workflows. External applications can programmatically invoke email address approval by including the emailrouteraccessapproval attribute in the SDK request, provided the record isn't already approved and the caller meets the required authorization criteria.
Remove the requirement to approve mailboxes
Admins, as described in the preceding permissions model table, can change the settings so that mailbox approval isn't required.
- Sign in to the Power Platform admin center.
- In the navigation pane, select Manage, then in the Manage pane, select Environments.
- On the Environments page, select an environment.
- In the command bar, select Settings.
- Expand Email, then select Email settings.
- Under Security and permissions, turn off Process emails only for approved users and Process emails only for approved queues. (These settings are enabled by default.)
- Select Save to apply the changes
Test the configuration of mailboxes
- Sign in to the Power Platform admin center.
- In the navigation pane, select Manage, then in the Manage pane, select Environments.
- On the Environments page, select an environment.
- In the command bar, select Settings.
- Expand Email, then select Mailboxes.
- Select the Active Mailboxes grid view to show the list of mailboxes.
- Select the mailboxes you want to test, then select Test & Enable Mailbox from the command bar. You also have the option to select a mailbox link, then select Test & Enable Mailbox from the command bar.

This process tests the incoming and outgoing email configuration of the selected mailboxes and enables them for email processing. If an error occurs in a mailbox, an alert is shown on the Alerts wall of the mailbox and the profile owner. Depending on the nature of the error, customer engagement apps try to process the email again after some time or disable the mailbox for email processing.
To see alerts for an individual mailbox, open the mailbox, and then under Common, select Alerts.
The result of the email configuration test is displayed in the Incoming Email Status, Outgoing Email Status, and Appointments, Contacts, and Tasks Status columns of a mailbox record. An alert is also generated when the configuration is successfully completed for a mailbox. This alert is shown to the mailbox owner.
You can find information about recurring issues and other troubleshooting information in Blog: Test and Enable Mailboxes in Microsoft Dynamics CRM 2015 and Troubleshooting and monitoring server-side synchronization.
Make sure you've got a good connection to Exchange Online by running the Microsoft Remote Connectivity Analyzer. For information about what tests to run, see Test mail flow with the Remote Connectivity Analyzer.
Tip
If you're unable to synchronize contacts, appointments, and tasks for a mailbox, you might want to select the Sync items with Exchange from this org only, even if Exchange was set to sync with a different org checkbox. More information: When would I want to use this check box?
Enable server-side synchronization functionality for Exchange Online in China
To connect Dynamics 365 with your Exchange Online tenant in China and use server-side synchronization functionality, follow these steps:
- If your org was provisioned before October 17, 2020, contact 21Vianet support to allow your org to connect to Exchange Online. If your org was provisioned after October 17, 2020, this step isn't required.
- Run the following PowerShell script to point your Exchange Online email server profile to the required Exchange Web Services (EWS) endpoint.
- Configure the mailbox, and then test and enable the mailbox.
Use the following PowerShell script to change the EWS endpoint:
#Specify email server profile Id and orgUrl
param (
    [string]$emailServerProfileId = "<profile id>",
    [string]$orgUrl = "<org url>",
    [string]$defaultserverlocation = "https://partner.outlook.cn/EWS/Exchange.asmx"
)
Install-Module Microsoft.Xrm.Data.PowerShell -Force
$conn = Connect-CrmOnline -Credential $cred -ServerUrl $orgUrl
$emailserverprofile = Get-CrmRecord -conn $conn -EntityLogicalName emailserverprofile -Id $emailServerProfileId -Fields defaultserverlocation
$emailserverprofile.defaultserverlocation = $defaultserverlocation;
Set-CrmRecord -conn $conn -CrmRecord $emailserverprofile
See also
Troubleshooting and monitoring server-side synchronization
Test mail flow by validating your connectors