Personalize content using predefined dynamic text
Personalized messages help marketers drive engagement. A common way to personalize content is to use dynamic text (also known as placeholder text) that is automatically replaced with recipients' personal details when the message is sent. For example, rather than using a generic greeting like “Dear customer,” you can use dynamic text (“Dear {{FirstName}}”) that is replaced with the customer name (“Dear John”) upon sending the message.
An instance of placeholder text such as {{Firstname}} is called predefined dynamic text. Before you can use dynamic text, you need to define three pieces of information:
- Data binding: Where the replacement data for the dynamic text comes from (for example, the “firstname” attribute of a “Contact” table).
- Label: How the dynamic text is referred to within the message text (for example,
{{Firstname}}). - Default value: What text to use if the source data is empty.
Defining data binding requires some understanding of the Dataverse data model to correctly connect the dynamic text to the right data source.
Predefined dynamic text is text that has already been defined by someone else and is ready to be used. Customer Insights - Journeys ships with a set of commonly used pieces of predefined dynamic text. More can be added by you or your teammates (see Creating and sharing predefined dynamic text).
Using predefined dynamic text
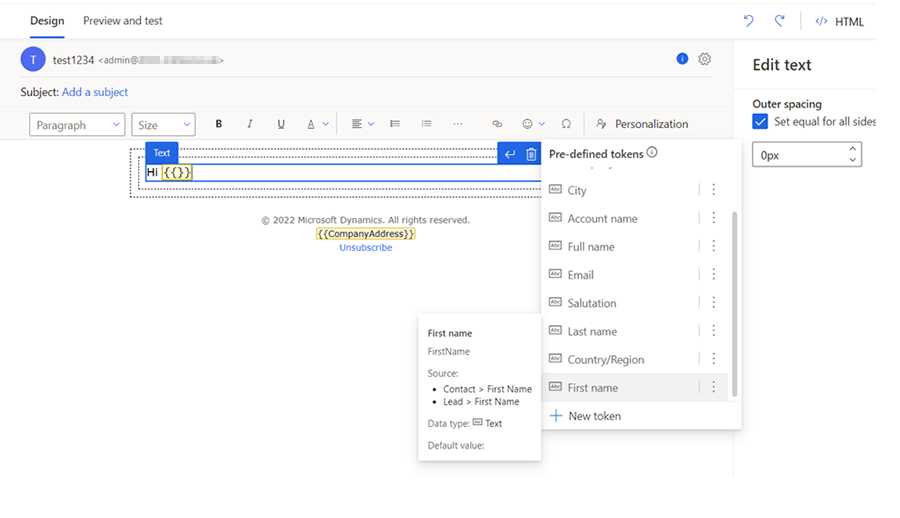
Select Personalize in the email or text message editor to see a list of predefined dynamic text fragments. Next, select some predefined dynamic text from the list to insert it into the message:
Email editor:
Text message editor:

The predefined dynamic text list may be different than shown here because it's dynamic. As your admin and other users create and share more predefined dynamic text, the fragments are added to the list. The top 10 items on the list are sorted by org-wide usage. If there are more than 10 items in the list, you'll see the remaining items sorted by alphabetical order after the top 10 items.
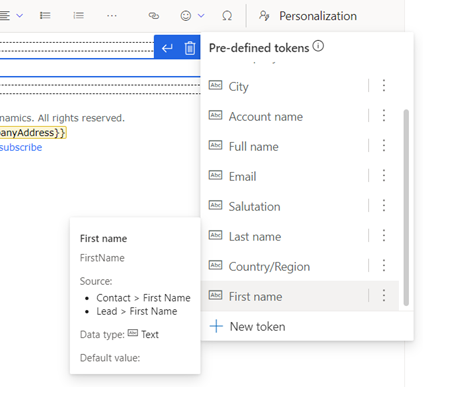
You can hover on dynamic text in the predefined list to see its details. Alternatively, you can select the vertical ellipses next to the dynamic text's name and then select More info.
Changing the default value for the current message
Most of the time you should be able to use predefined dynamic text as-is, but sometimes you may need to change a default value. For example, the default value “Customer” may not work if your email is to non-customers. In this case, you can change the default value by selecting the predefined dynamic text in the editor canvas and then selecting the Personalization menu. After changing the default value, make sure to save it. An updated version of the predefined dynamic text will be saved, but only for the current message.
Changing the default value globally
Note
You can update the default value of a predefined text. Only the default value can be changed if you want to change its definition, you must remove the current predefined text and add a new one.
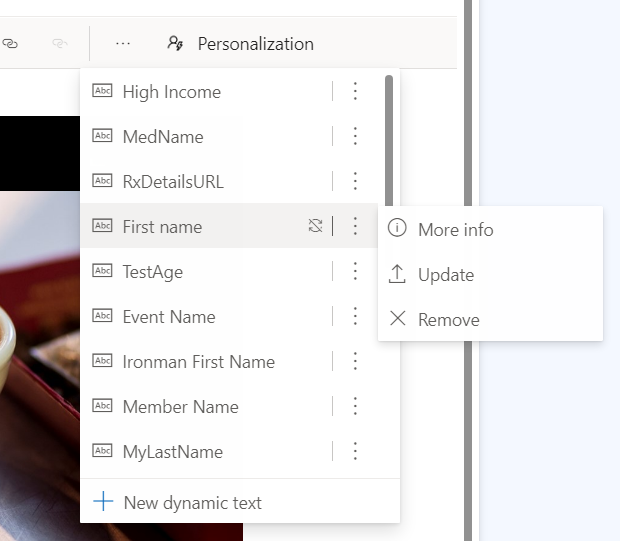
“Update” is shown only when default value is changed (otherwise it isn't shown) and that default value is the only thing that can be changed for a predefined dynamic text. To change the global default value, select the vertical ellipses next to the predefined dynamic text's name and then select Update predefined dynamic text. The predefined dynamic text will be updated for the current message and globally for future usage of the dynamic text in new messages (existing messages aren't affected).
Important
The Update predefined dynamic text command only applies to the current message and future messages. It does not retroactively change previous uses of the dynamic text.
Creating and sharing predefined dynamic text
You aren't limited to the predefined dynamic text that is included with the Customer Insights - Journeys app. Any user can create new predefined dynamic text fragments and share them with their team by adding them to the predefined dynamic text list.
To define and share new predefined dynamic text, follow these steps:
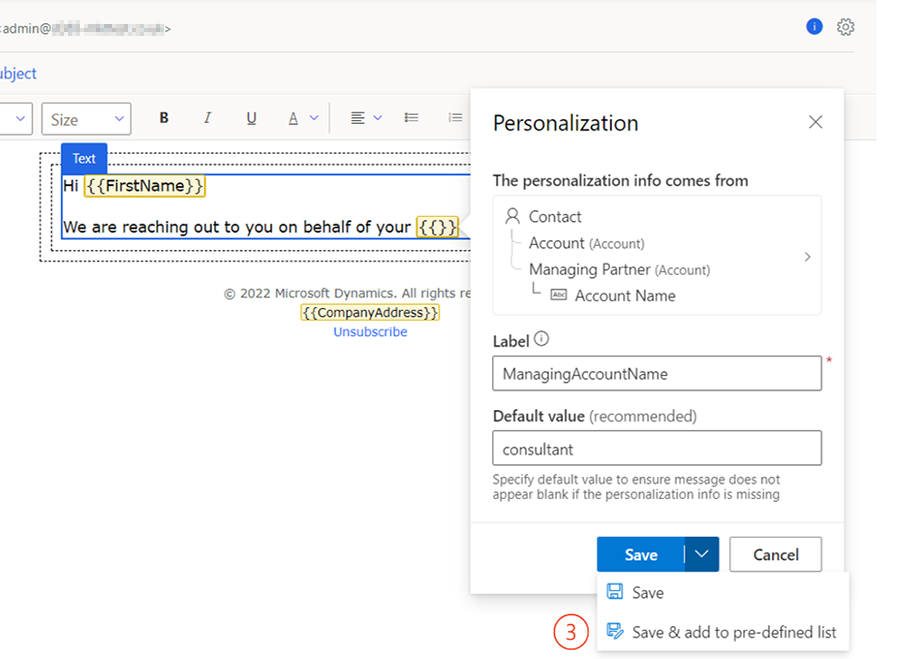
Place your cursor in an empty space in the text box and then select Personalization from the menu bar that pops up. This opens the predefined personalization list.
Select New dynamic text at the bottom of the predefined dynamic text menu and complete steps to define the new dynamic text.
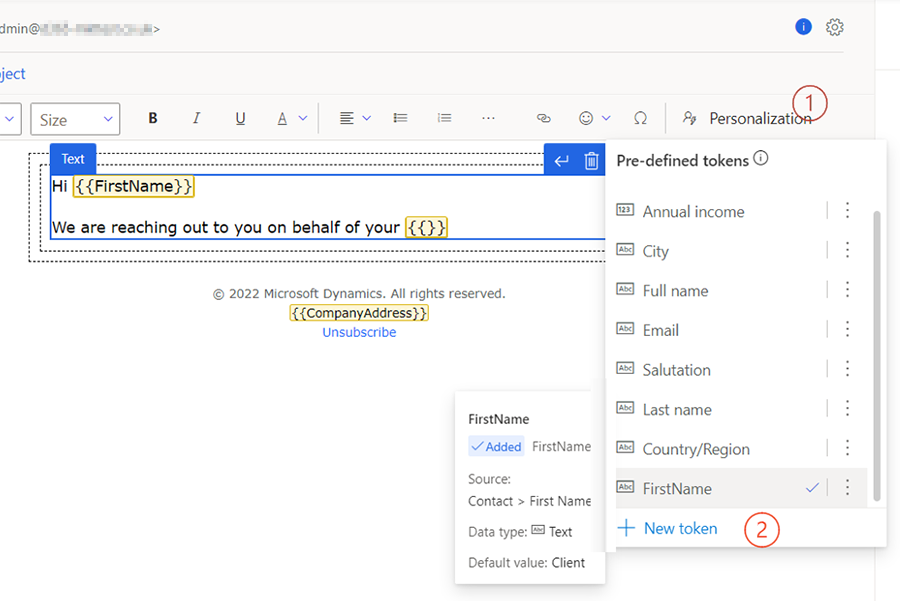
Select the down-facing carat next to the Save button and choose the Save & add to predefined list option.
Note
The Update option is only available for predefined text if the default value changed.
Removing predefined dynamic text
To remove predefined dynamic text:
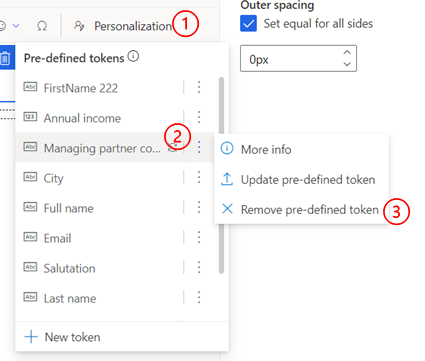
Place your cursor in an empty space in the text box and then select Personalization from the menu bar that pops up.
Select the vertical ellipses next to the dynamic text name.
Select Remove predefined dynamic text from the menu.
Communicate dates and times in various formats
When you work with multiple geographies and languages, communicating dates and times clearly requires using the right format to match the recipient's expectations. To ensure your communications are clear for all recipients, Customer Insights - Journeys supports many date and time formats.
Whenever dynamic text is defined using a datetime type attribute, another set of options becomes available to select a date/time format that is readable and consistent with the locale (language and region) of the audience. If desired, you can also change the locale and time zone to match the audience. The Customer Insights - Journeys app also automatically converts the stored date/time into the selected time zone.
Available formatting options offer three ways to present information: date and time, date only, and time only. Within each format, there are multiple options to cover various use cases.
Note
If the attribute is of type Date only, you won't see date-and-time-only options.
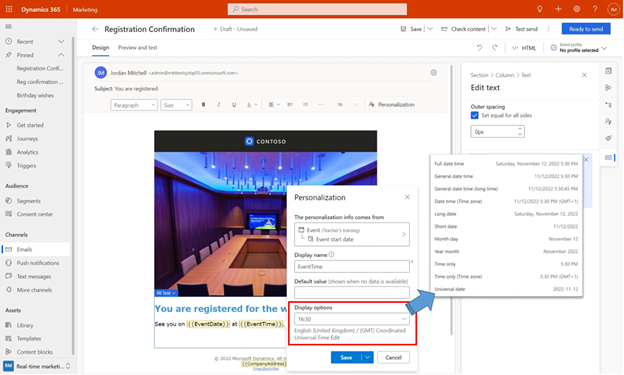
When you select a specific display option, it's applied to that specific dynamic text only. Customer Insights - Journeys remembers the last format used (and selects it automatically for the next dynamic text to help drive consistency). You can also change the format, allowing you the flexibility to present the date and time in different formats within the same email.
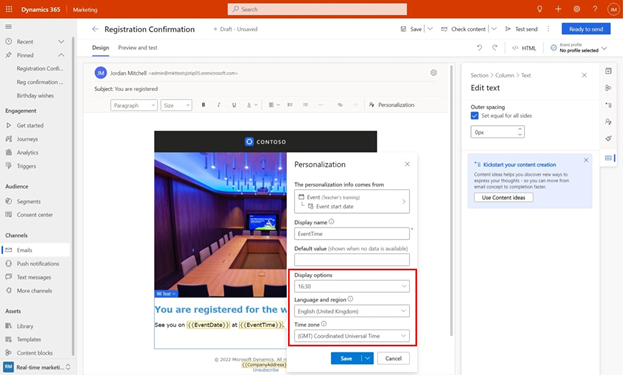
If needed, you can change the language and region setting along with time zone by selecting the Edit option. When the language and region are changed, Customer Insights - Journeys automatically converts the stored date and time into the selected time zone.
Note
The automatic time zone conversion may result in a date change.
Using data that is reached by traversing a 1-to-many relation
Tip
How to enable the preview for more data for personalization
If you don’t see this feature in your app, contact your admin who can activate it by going to Settings > Overview > Feature switches, scrolling to Personalization area, enabling the One-to-many-relation for Dynamic text feature switch, and saving the setting by selecting on Save on the top right corner.
Personalized messages drive engagement that helps deliver desired business outcomes. Dynamic text in Customer Insights - Journeys makes it easy to include personalized information for each recipient. Previously, dynamic text was limited to data that could be reached by 1-to-1 or many-to-1 relations. Now, you can use data that requires traversing 1-to-many or many-to-many relations, unlocking even more data for personalization.
Watch this video to learn more:
Consider a university alumni donation campaign where you would want to include name of the college attended by each alum to drive maximum engagement. An alum might have attended multiple colleges in that university, resulting in a "1-to-many" relationship between student and college records. Dynamic text can now be defined for such data.
Define dynamic text that uses 1-to-many or many-to-many relations
When defining 1-to-many dynamic text, the system needs to know which one out of many related records should be used for data retrieval. You can use the default condition (the first record after sorting by "Created on") or define your own condition, as appropriate. In the example below, dynamic text is being defined to include the owning team's name for service cases for the recipient. As there can be multiple cases for a recipient, you can define a condition to pick the high priority case. However, sometimes that may not be sufficient (there can be multiple high priority cases), and for such cases the system always has a default condition (most recently created record) that will be used as tiebreaker if and when needed.

Access even more data for personalization
You can access any Dataverse table to include information in your communications, not just tables that are directly related to an Audience or Triggers.
Note
This feature is available only in Customer Insights - Journeys.
Using data from additional tables in dynamic text
Most of the time, Dynamic text is used to personalize messages using data from an Audience (for example, Contact or Lead) or Triggers. Dynamic text can also use data from Dataverse tables that can be reached through relationships with an Audience or Triggers. However, there are times when you need to use data from tables that don't have an established or usable relationship with the Audience or Triggers. For example, you may want to include information about a company building available in the Dataverse table “Building" that has no direct or usable relationship with a Contact or Lead. In such case, your starting point for defining dynamic text will be in the “Other tables” dropdown in the Create dynamic text menu.
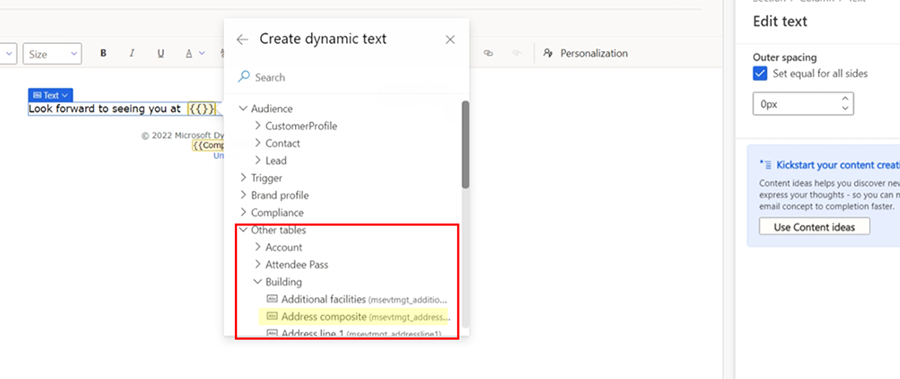
The “Other tables” area includes some of the most commonly used Dataverse tables (for example, event-planning-related tables). When you search for attributes, the search includes these tables. You can define dynamic text using the other tables just like you do with Audience or Triggers. Use an attribute directly or follow relationships from these tables to other related tables until you find the needed attribute.
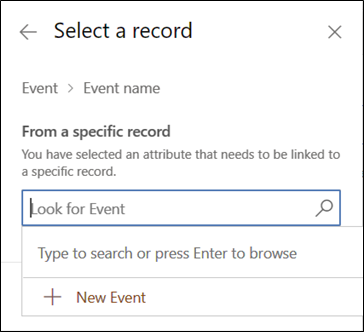
There's one notable difference when you define dynamic text starting with “Other tables”: before the message can be made “ready to send”, you must select a specific record from the selected table. If there's an Audience or Trigger, the specific record is provided by the journey context (that is, the Contact that is actually going through the journey). With the "other tables", you need to provide the specific record information when you're designing the personalized text because the text doesn't have a direct relationship with an Audience or Triggers. For example, if you select an attribute from the Events table, you're asked to select a specific event.
Using data from additional tables in advanced personalization
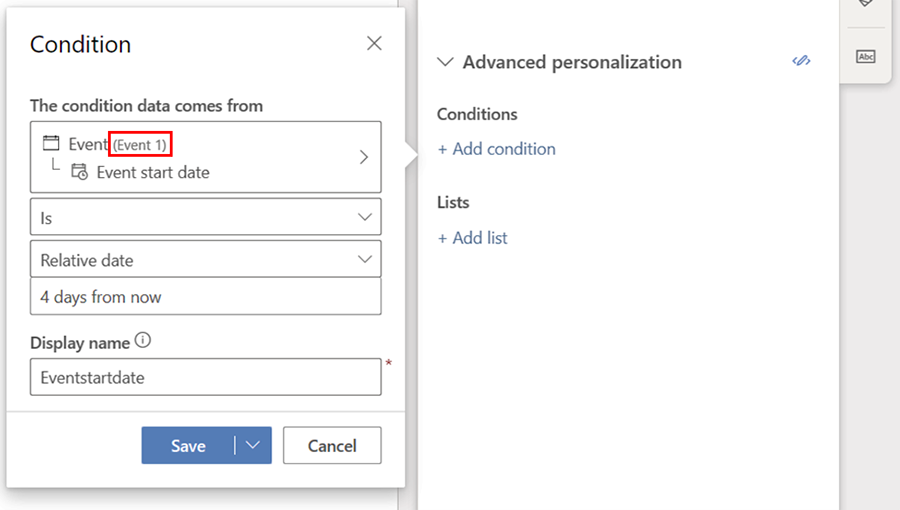
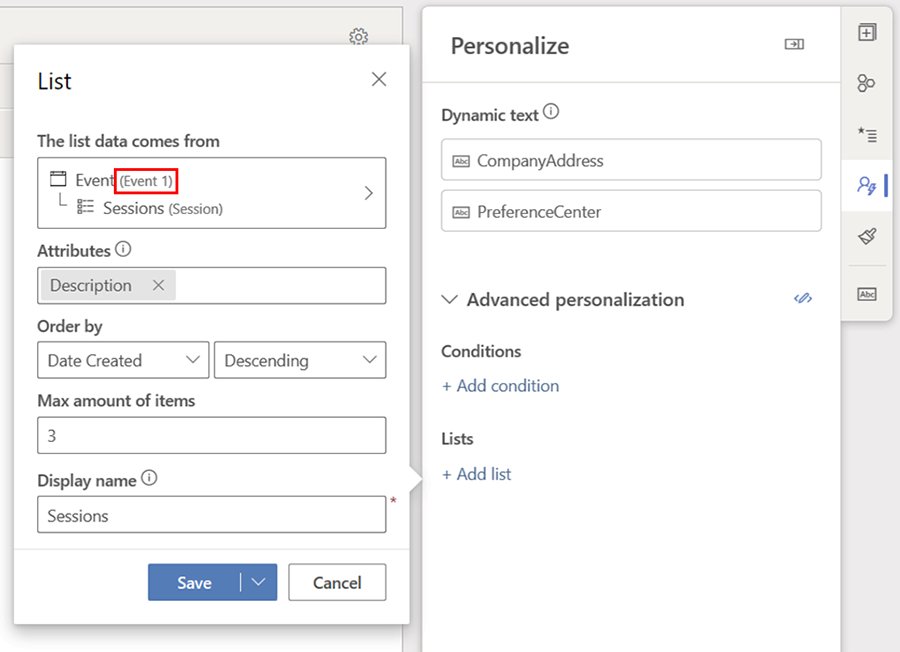
Similar to dynamic text, data from additional tables can also be used to define conditions and lists in advanced personalization.
Validating and finalizing
Though you can decide not to select a specific record right away, the specific record selection must be done before the message can be made “ready to send”. Leaving the record selection for later can be a useful approach to separate the content design phase from the content use (and reuse) phase. This is also how templates can be created. For example, a generic event invitation message like below can be created where all of the event-related dynamic text doesn't have an event selected.
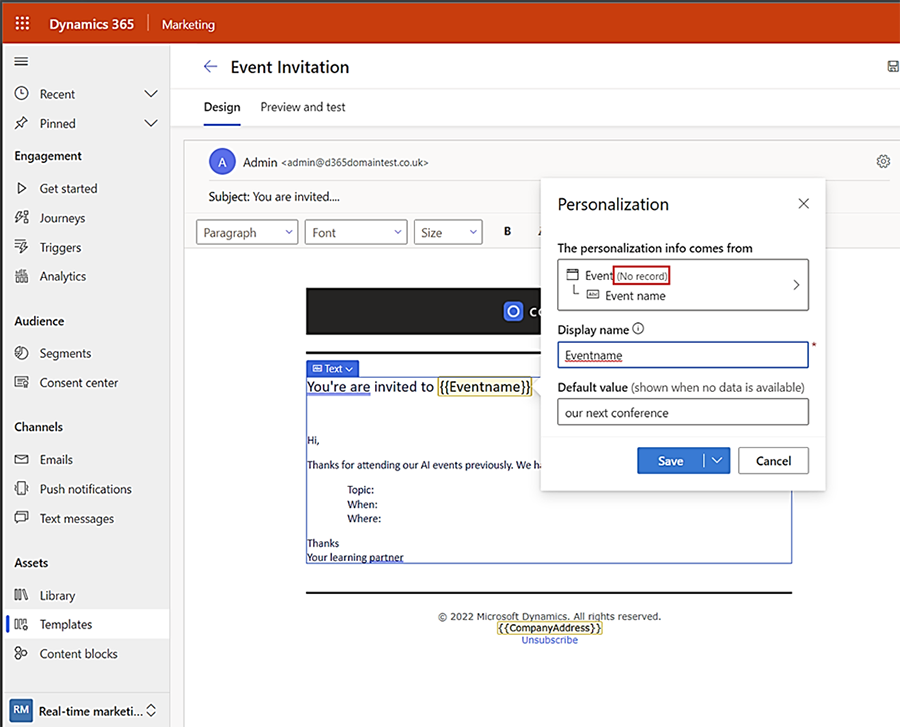
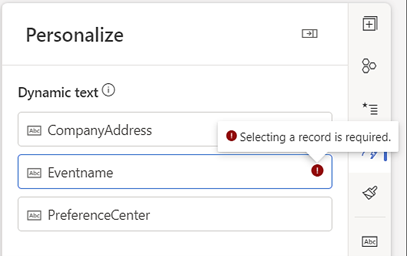
The event selection step can then be completed when the message created from this template is ready to be used in a journey. If you try to make the message “Ready to send” without completing this step, the validation gives an error message. Even without running the validation step, you can see what needs to be done in the personalization tab.
Managing additional tables for personalization
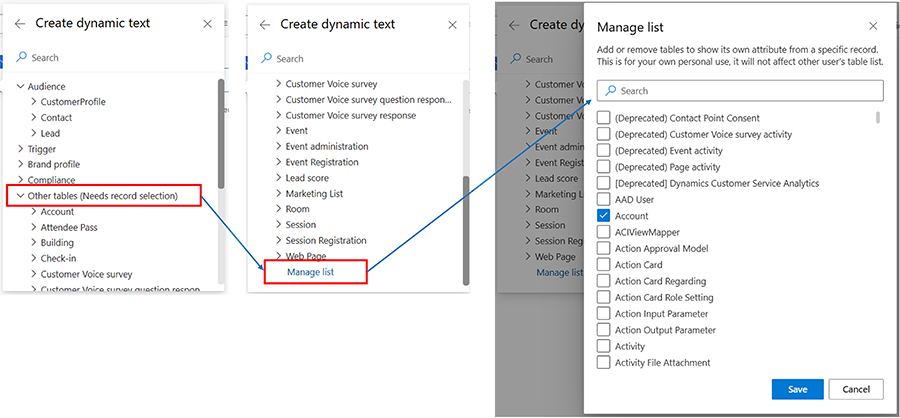
The pick list contains up to 50 tables at any given time. To change the pick list tables, select a piece of dynamic text, expand the "Other tables (Needs record selection)" category, then select Manage list.
Use the predefined filters next to the search bar in the Manage list window to quickly filter the tables list to all tables, tables selected by default, tables that you've selected, or tables that are actually in use in the current message.
Select the tables you want to add or remove, then select Save.
Note
Removing dynamic text only removes it from the predefined list, it does not remove it from the messages that are already using it.
Customer measures (calculated metrics) as data source
When Customer Insights – Data is present and connected, you can use customer measures (calculated metrics) to define dynamic text when using customer profiles. This opens up another source of data that can be used to further personalize messages and journeys. For example, you can define a calculated metric such as LifeTimeSpend or CurrentYearSpend for each customer. These metrics can then be used to define dynamic text to include the values in messages, delivering more personalized and useful content.
Watch this video to learn more:
Creating measures
See Use calculated measures in Customer Insights - Journeys and other Dataverse-based applications to learn how to create measures in Customer Insights – Journeys and what types of measures are available for use in the app.
Note
While the user interface presents itself as a one-to-many relationship, the current implementation in Customer Insights – Data only allows single-dimension metrics and therefore only one value is returned.
Using measures to define dynamic text
To define dynamic text with measures, go to Customer Profile. You should see defined measures as a related table that you can traverse to and use a specific calculation within that table.
