Note
Access to this page requires authorization. You can try signing in or changing directories.
Access to this page requires authorization. You can try changing directories.
When a guide is created with the Microsoft Dynamics 365 Guides PC app, all of the guide's content (instructions, 3D objects, 3D parts, and media) is stored in Microsoft Dataverse. Using the out-of-the-box PC app that comes with Dynamics 365 Guides makes it easy to get started with authoring, but you can also create a guide programmatically with the Microsoft Dataverse Web API or a Microsoft Power Automate flow by adding your own content in the right places in Microsoft Dataverse. This method is useful if you have existing text instructions in other systems or documents. You can just map the information to the appropriate Dataverse tables and fields to automatically generate a guide.
At a minimum, the tables and fields listed in this article are required to create a guide that opens successfully in the PC app.
Three tables required for any guide
Any basic guide requires the following three Microsoft Dataverse tables:
- Guides
- Guide Tasks
- Guide Steps
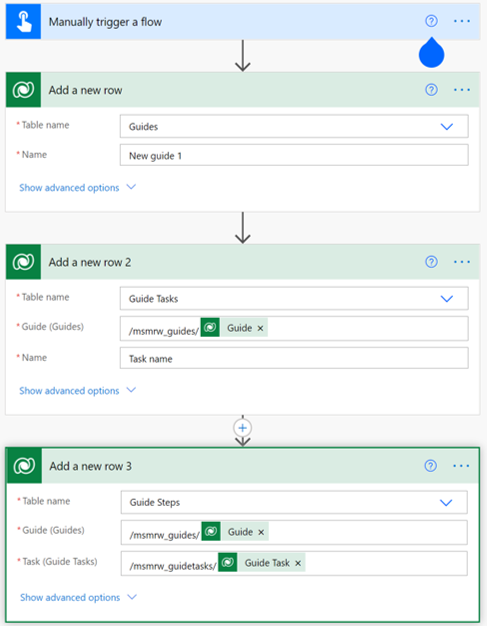
These tables must be created in order since each subsequent table refers to the other tables. In Power Automate, you add a new row to create each table. You can trigger the flow manually or automatically, depending on your scenario.
The following screenshot shows a manually triggered flow that creates the three required tables.

Important
The creation of some tables requires references to other tables for a guide to open properly in the PC app. For example, the Guide Tasks table requires that you reference the Guides table.
To add a table reference, you must enter the table name before adding the unique identifier. You must add an "s" at the end of the table name. To determine the correct table name, see Table (entity) reference for Dynamics 365 Guides.
Fields required to create the Guides table
The following fields are required to create the Guides table:
| Field name | What to enter or select |
|---|---|
| Table name | Select Guides from the list. |
| Name | Enter any guide name. |
| Anchor Type | Select a specific anchor type from the list or select Undecided if you intend to choose the anchor type in the PC app. |
| Schema Version | Enter the data schema version (currently 5). Update this field whenever Microsoft releases a new schema version. |
| Status Reason | Must be set to Active. |
Fields required to create the Guide Tasks table
The following fields are required to create the Guide Tasks table:
| Field name | What to enter or select |
|---|---|
| Table name | Select Guide Tasks from the list. |
| Guide (Guides) | Enter the table name (/msmrw_guides/), and then select Guide from the dynamic lookup. |
| Name | Enter any task name. |
| Status Reason | Must be set to Active. |
Add multiple tasks
If you add multiple tasks, populate the Previous Task field in the form: /msmrw_guidetasks/<ID for Guide Task>. You can find the ID for a specific guide task through the model-driven app, or you can fetch the ID from a Power Automate flow by storing it in a variable.
Fields required to create the Guide Steps table
The following fields are required to create the Guide Steps table:
| Field name | What to enter or select |
|---|---|
| Table name | Select Guide Steps from the list. |
| Guide (Guides) | Enter the table name (/msmrw_guides/), and then select Guide from the dynamic lookup. |
| Task (Guide Tasks) | Enter the table name (/msmrw_guidetasks/), and then select Guide Task from the dynamic lookup. |
Add multiple steps
If you add more than one step to a guide, populate the Response 1 Action Type (for next step) and Previous Step fields so users can navigate between steps.
Populate the Previous Step field for the second and subsequent steps by adding the Guide Step Unique Identifier. You can find the ID for a specific guide step through the model-driven app, or you can fetch the ID from a Power Automate flow by storing it in a variable. For example, the following screenshot shows the identifier passed as a stored variable.
![Screen shot of Previous step field] Screen shot of Previous step field.](media/previous-step-field.png) .
.
Default steps
Set the Step Template Type field to Default and set the Response 1 Action Type field to Go To Next Step.
Question steps
Set the Step Template Type field to Question, and then fill out the Response Action Type, Response Step, and Response Text to populate the Question step responses.
These fields map to the response buttons in the PC app.
![Screen shot of Question step fields in PC app] Screen shot of Question step fields in PC app.](media/question-step-fields-pc-app.png)
Completion steps
Set the Step Template Type field to Completion.
Test your flow
When you run the flow/manually test it, a new guide is created and visible in the Guides PC app.