Configure forecasts by using a custom rollup entity
Forecasting supports custom and other out-of-the-box rollup entities (now known as tables) so you can configure a forecast that's specific to your organizational requirements.
License and role requirements
| Requirement type | You must have |
|---|---|
| License | Dynamics 365 Sales Premium or Dynamics 365 Sales Enterprise More information: Dynamics 365 Sales pricing |
| Security roles | System Administrator or Forecast Manager More information: Predefined security roles for Sales |
How it works
To configure a forecast that's specific to your organization, you can select an entity as a rollup entity, select a related entity as a hierarchical entity, and establish a relationship between them.
Note
- Only the entities that have Change Tracking enabled can be used as a rollup entity. To learn more, see Enable change tracking to control data synchronization.
- Only the hierarchy-enabled entities can be used as a hierarchy entity.
Forecasting supports up to two levels of relationships between the rollup and hierarchical entities. For example, Opportunity > Owner (User) > Territory (Territory) > Territory. Here, Owner is the attribute in the Opportunity entity of type User and Territory is the attribute in User entity of type Territory. This helps the forecast to be more specific to your complex organizational requirements.
While configuring the forecast columns, some attributes that are necessary for a forecast are forecast category, estimated revenue, and estimated close date. Typically, these attributes are available in the selected rollup entity. For complex data models, such as opportunity splits and opportunity products, these attributes are distributed between rollup and related entities. To address this complexity, the enhanced forecasting supports the selection of related attributes for forecast category and estimated close date.
For example, let's consider two data models: opportunity product and opportunity split.
Opportunity product
Use this model to create a product-based revenue forecast.
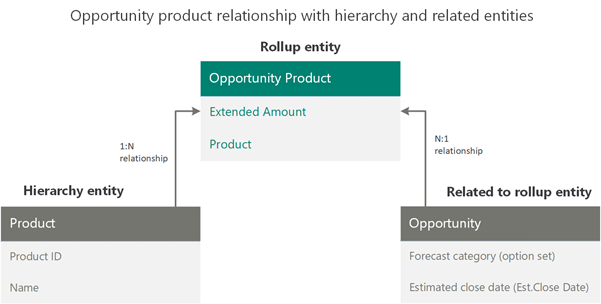
For product-based forecasting, the product level revenue comes from the Opportunity Product entity. Therefore, Opportunity Product must be selected as the rollup entity and Product as the hierarchy entity that has a direct relationship with the Opportunity Product rollup entity.
The other key attributes for the forecast are Forecast category and Est.Close Date. These attributes are available in the Opportunity entity that's related to the Opportunity Product rollup entity.
So, we're using the following entities to create the forecast:
- Opportunity Product as the rollup entity
- Product as the hierarchy entity
- Opportunity for the forecast category and estimated close date
The following image illustrates the above mentioned data model.
Let's configure this forecast.
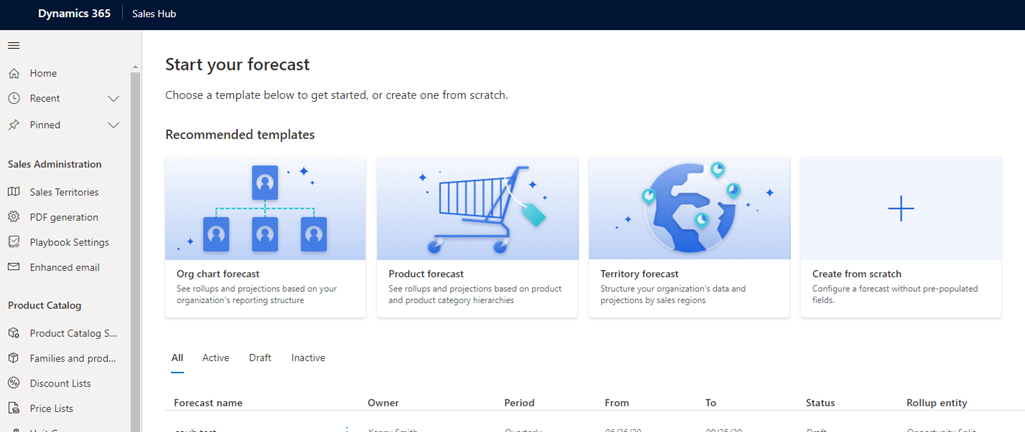
Select the Product forecast template. This template is available to you to configure a forecast based on opportunity product and product hierarchies.
Note
You can choose Create from scratch to create a forecast based on your custom entities and custom relationships.
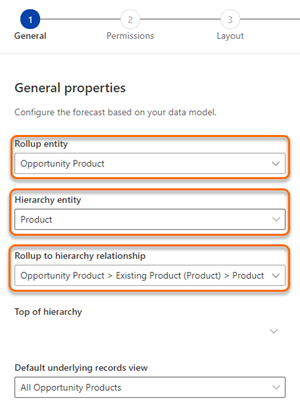
In the General section, select the rollup entity as Opportunity Product and the hierarchy entity as Product.
A direct relationship exists between the rollup and hierarchy entities, so you select the relationship as Opportunity Product > Existing Product (Product) > Product. Here, Existing Product is an attribute in the Opportunity Product rollup entity that has a relationship to the Product hierarchy entity.
If there's no direct entity relationship between the rollup entity and the hierarchy entity, you can choose a related attribute to define the relationship. Select the Related tab, and then choose a related attribute from the list. The list displays attributes of the hierarchy-defined entities only. If no relationships exist, the entity and related tab will be empty, and you can't configure the forecast.
Enter other necessary information in the form, and then select Next. More information: Define general properties and scheduling
Perform the steps in Provide viewing permissions.
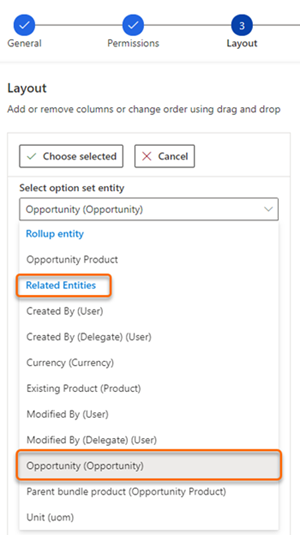
In the Layout section, choose the option set entity from the rollup entity or from its related entities. For this data model, the forecast categories exist in the Opportunity entity. Select the Opportunity (Opportunity) option set entity from Related Entities.
a. In the Opportunity (Opportunity) entity, the Forecast category option set is selected and automatically configured.
b. To configure each column, select the corresponding gear icon
 and the column configuration section opens.
c. In the Amount field, the Extended Amount attribute is selected from Opportunity Product (rollup entity). However, Date field entity isn't available in the Opportunity Product entity. You can select the related Opportunity entity, and then select the Est.Close Date attribute.
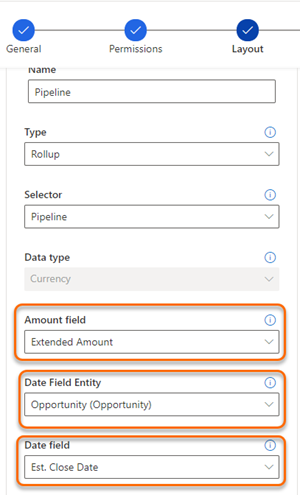
d. Enter other necessary information in the form, and then save it.
Repeat the step to configure other columns in accordance with your needs, and then select Next. More information: Choose layout and columns
If you have enabled premium forecasting and want to take snapshots automatically, see Take snapshots automatically.
Perform the steps in Activate and upload simple columns data.
Opportunity split
Important
The opportunity split is a custom entity and isn't available by default. You must first create the opportunity split custom entity to be able to use as a rollup entity. More information: Create a custom table.
Use this model to create an opportunity split forecast.
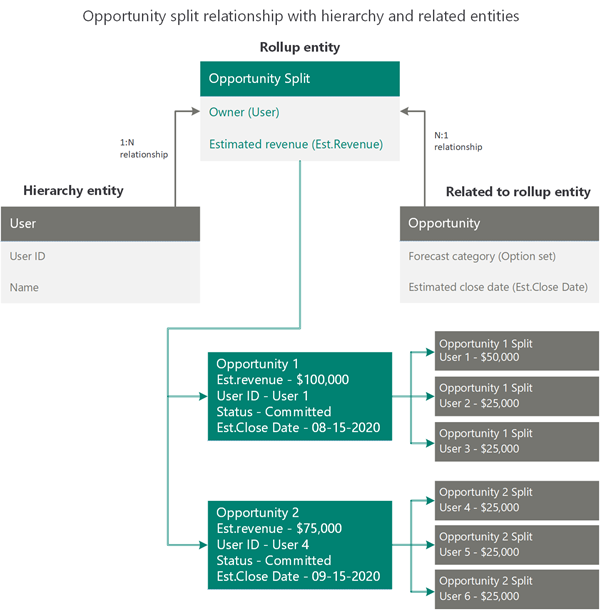
For opportunity split–based forecasting, the user-level revenue comes from the opportunity split entity. Therefore, Opportunity Split must be selected as the rollup entity and User as the hierarchy entity that has a direct relationship with the rollup entity through the Owner attribute.
The other key attributes for the forecast are Forecast category and Est.Close Date. These attributes are available in the Opportunity entity that's related to the opportunity split rollup entity.
So, we're using the following entities to create the forecast:
- Opportunity Split as the rollup entity
- User as the hierarchy entity
- Opportunity for forecast category and estimated close date
The following diagram illustrates the above mentioned data model.
Let's configure this forecast.
On the template selection page, select Create from scratch to create a forecast based on your custom rollup entities.

In the General section, select Opportunity Split as the rollup entity and User as the hierarchy entity.
Because there's a direct relationship between the rollup and hierarchy entities through the Owner attribute, select the relationship as Opportunity Split > Owner (User) > User.
If there's no direct entity relationship between the rollup entity and the hierarchy entity, you can choose a related attribute to define the relationship. Select the Related tab, and then choose a related attribute from the list. The list displays attributes of the hierarchy-defined entities only. If no relationships exist, the entity and related tab will be empty, and you can't configure the forecast.
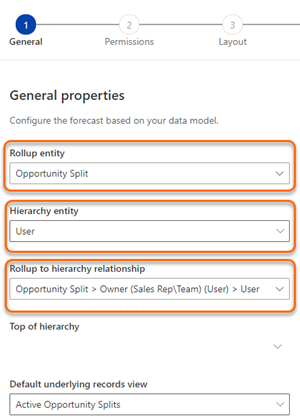
Enter other necessary information in the form, and then select Next. More information: Define general properties and scheduling
Perform the steps in Provide viewing permissions.
In the Layout section, choose the option set entity from the rollup entity or from its related entities. In this example, we select Parent Opportunity (Opportunity) from Related Entities.
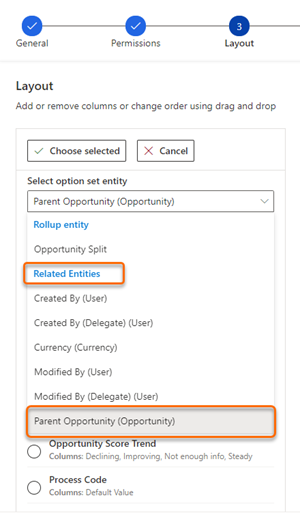
a. In Parent Opportunity (Opportunity), the Forecast category option set is selected. The columns for the Forecast category option set won't be automatically configured, because you might want to use some of the custom attributes. You must manually configure each column.
b. To configure each column, select the corresponding gear icon
 , and the column configuration section opens.
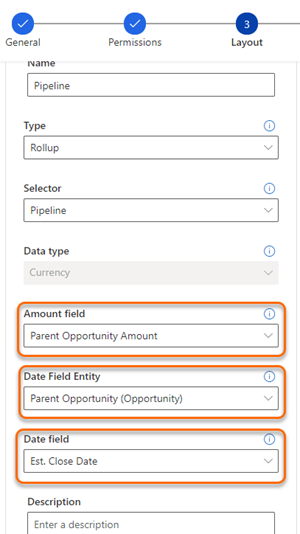
c. Select Amount field. From this list of out-of-the-box and custom revenue attributes that are related to Opportunity Split (such as Parent Opportunity Amount and Revenue Total), select Parent Opportunity Amount.
d. For Date Field Entity, the Opportunity Split entity consists of date attributes. Select Parent Opportunity (Opportunity) from the Related Entities section that consists of the required estimated close date attribute.
e. In Date field, select the Est.Close Date attribute.
Enter other necessary information in the form, and then save it.
Repeat the steps to configure other columns as required, and then select Next. More information: Choose layout and columns
Note
You can't proceed to the next step until you complete the configuration of all the columns.
If you have enabled premium forecasting and want to take snapshots automatically, see Take snapshots automatically.
Perform the steps in Activate and upload simple columns data.
Can't find the options in your app?
There are three possibilities:
- You don't have the necessary license or role.
- Your administrator hasn't turned on the feature.
- Your organization is using a custom app. Check with your administrator for exact steps. The steps described in this article are specific to the out-of-the-box Sales Hub and Sales Professional apps.
See also
Configure forecasts in your organization
Project accurate revenue with sales forecasting
Feedback
Coming soon: Throughout 2024 we will be phasing out GitHub Issues as the feedback mechanism for content and replacing it with a new feedback system. For more information see: https://aka.ms/ContentUserFeedback.
Submit and view feedback for