Events
Microsoft Cloud for Sustainability Technical Summit November 4-7
Nov 4, 11 PM - Nov 7, 11 PM
Gain insights from expert-led sessions, interactive demos, and live Q&A!
Register nowThis browser is no longer supported.
Upgrade to Microsoft Edge to take advantage of the latest features, security updates, and technical support.
Display the Up next widget on your customized forms through sales accelerator configuration in Dynamics 365 Sales.
| Requirement type | You must have |
|---|---|
| License | Dynamics 365 Sales Premium or Dynamics 365 Sales Enterprise More information: Dynamics 365 Sales pricing |
| Security roles | System Administrator More information: Predefined security roles for Sales |
The Up next widget helps sellers to view and perform actions on activities on a record by not losing context or need to switch among multiple applications. The activities include phone call, email, or Teams meeting. The widget displays the current activity, upcoming activity, and completed activities. The activities are added to a record manually or by using a sequence:
By default, the Up next widget is available only in the out-of-the-box Sales Insights, lead, and opportunity forms. If you're using customized forms, you can display the Up next widget on your custom forms by following these steps.
Note
Sign in to the Sales Hub app.
Go to Change area in the lower-left corner of the page, and select Sales Insights settings.
Under Sales accelerator, select Set up.
In the Choose content and layout section, select the custom form for which you want to add the Up next widget.
Note
Here we're using the custom lead form as an example to add the Up next widget for leads. For other record types, you can perform the steps described in the procedure with the custom form selector.
Select the open in new tab icon ( ) and the form designer tab opens.
In the form designer, select Component, and then from Layout, add a column to the form as a placeholder to add the widget.
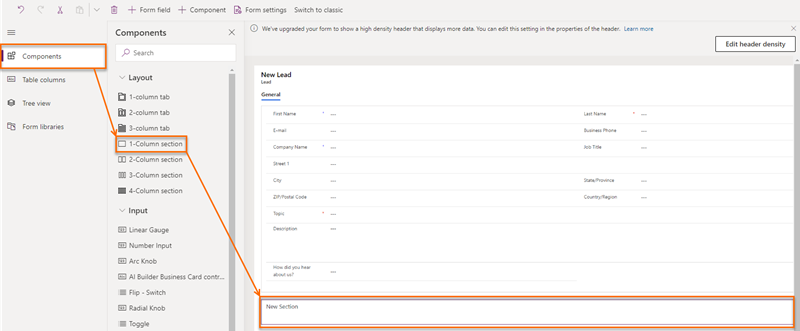
From the site map, select Display > Sequence (Up next).
Note
Ensure that the added placeholder column is selected. If it isn't, the widget will be added at a random place in the form.
In the Edit sequence (Up next) pop-up window, select Done.
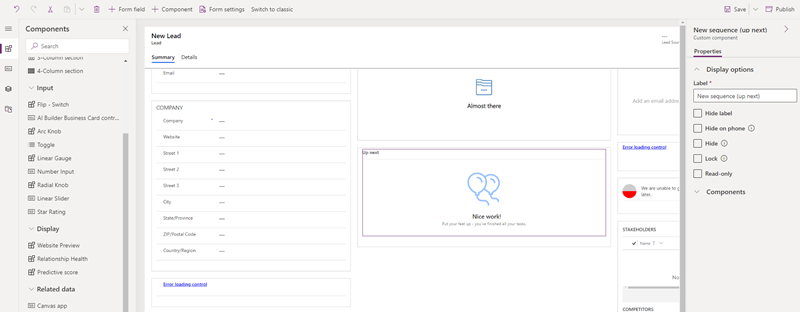
The Up next widget is added to the form, as shown in the following image.
Note
To hide the New section label, go to the Properties tab of the New Section settings pane, and then select Hide label.
Save and publish the form.
There are three possibilities:
Enable and configure sales accelerator
Connect with customers through a record or the Up next widget
Understand the Up next widget
Events
Microsoft Cloud for Sustainability Technical Summit November 4-7
Nov 4, 11 PM - Nov 7, 11 PM
Gain insights from expert-led sessions, interactive demos, and live Q&A!
Register nowTraining
Module
Set up Sales accelerator in Dynamics 365 Sales - Training
Discover the benefits of using the Sales accelerator in Dynamics 365 Sales. Streamline your sales process and approach customers more effectively.
Certification
Microsoft Certified: Dynamics 365 Sales Functional Consultant Associate - Certifications
Demonstrate customization of Dynamics 365 Sales to provide clients with tools to manage customer information, gather insights, and automate best practices.