As a system administrator or sales manager, you can create your own suggested actions that are more relevant to your organization through the assistant management feature. By using events and conditions, you can customize the circumstances on when to create suggestions and push information into the seller’s workflow. This helps the sellers to close deals faster.
Effective August 1, 2024, templates to create new assistant cards won't be available. You can continue to use the Microsoft Power Automate flow to create your custom cards.
To create custom insight cards with the assistant studio, ensure that Microsoft Power Automate is installed.
The custom insight card is displayed in the list of insight cards in Assistant studio only after a card is generated based on the defined flow. For example, you defined a flow to display a card when an opportunity is created with an estimated value above $5,000. When an opportunity is created for the first time in the organization with the estimated value of $6,000, the card is generated and will be available in the list of insight cards in Assistant studio.
In the Sales Hub app, go to Change area in the lower-left corner of the page and select Sales Insights settings.
On the site map, under Assistant, select Home to go to the Assistant Studio page.
Tip
Alternatively, on the Sales Insights settings page, select Manage from the Assistant (full capabilities) section to go to the Assistant Studio page.
On the Assistant Studio page, select + New insight card.
Select + Create from blank and create a flow in Power Automate to define the conditions and actions for the card.
Use Flow Checker to verify errors and warnings in the flow.
Errors and warnings in the flow cause performance or reliability issues. Ensure that the flow is free of errors and warnings. The checker is always active, appearing in the command bar in the designer. The checker shows a red dot when it finds one or more errors in your flow.
When you select Flow Checker, the corresponding error is displayed with more details. In this example, the error specifies that the Card Name isn't entered. Resolve the error to continue.
Note
You must resolve all errors and warnings to save the flow.
(Optional) Select the Test button to test your flow.
Ensure that all the configured steps are working as required. The test feature runs and validates each step in the flow and highlights any error that occurs on a step. You must resolve the error to proceed.
Save the flow.
The card is created. You can further edit the card to set priority and assign to different security roles.
View your saved flows
After you create a flow, a card must be generated based on the created flow to access the flow in the designer. Sometimes, cards might not be generated immediately and you might not find the created flow to update or view.
By default, your organization is selected based on your latest association. If you have multiple organizations associated with you, select the proper organization from your profile settings.
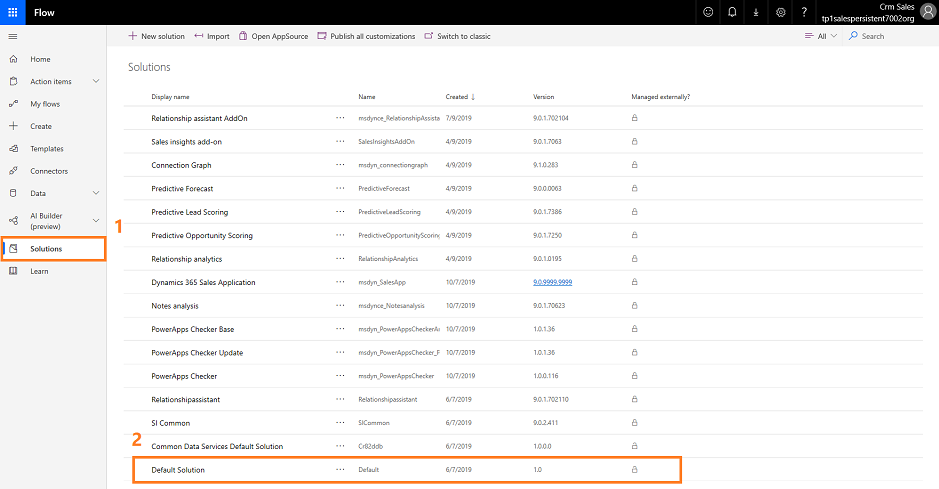
Select Solutions and then select Default Solution.
All default solutions are listed.
On the tool bar, go to Search and look for the flow that you want update or view.
Edit and add actions to cards
You can add actions that a user can do on a card. To select an action, follow these steps:
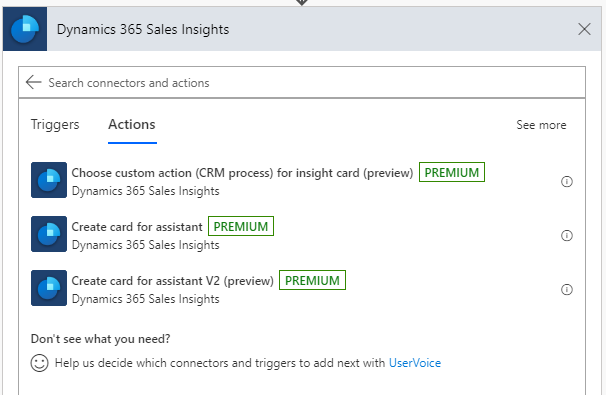
In the Search connectors and actions box, enter Dynamics 365 Sales Insights and open the connector.
In the Actions tab, select the Create card for assistant connector.
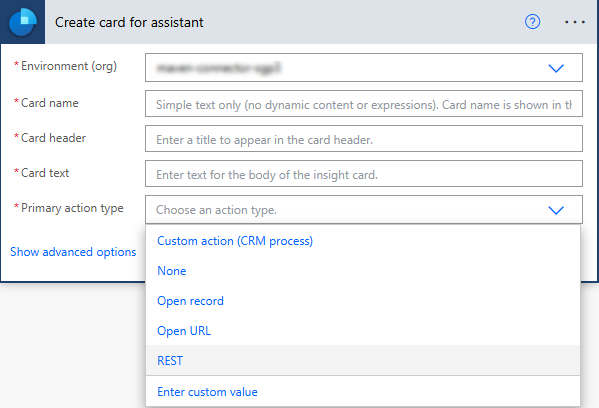
To create a card, enter the following information:
Parameter
Description
Environment (org)
Select your organization name.
Card name
Enter a name for the card.
Card header
Enter a name to appear on the header of the card.
Card text
Enter a message to appear in the body of the card.
Primary action type
Select an action type for the card. The following actions are supported: - Custom action (CRM process): Perform the steps in Custom action (CRM process) to invoke a custom action that is defined in Dynamics 365 Sales for an entity. - Open record - Open URL - REST: Perform the steps in REST to invoke a REST API with the custom action.
Custom action (CRM process)
Use the Custom action (CRM process) option to invoke a custom action that is defined in Dynamics 365 Sales for an entity. To learn more, see Use Web API actions.
To add a custom action, follow these steps:
Open the Dynamics 365 Sales Insights connector.
In the Actions tab, select the Choose custom action (CRM process) for insight card (preview) action.
A step to choose a custom action appears.
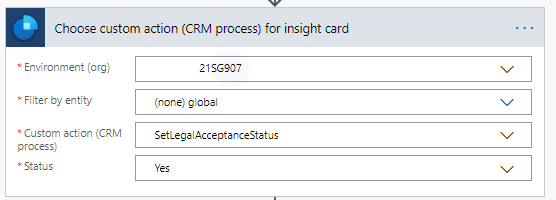
In the Choose custom action (CRM process) for insight card step, enter the required information.
Parameter
Description
Environment (org)
Select your organization name.
Filter by entity
Choose the entity that is associated with the action.
Custom action (CRM process)
Select the custom action that you want to perform on the card. Depending on the selected action, the next set of fields are displayed. In this example, the Status field is displayed.
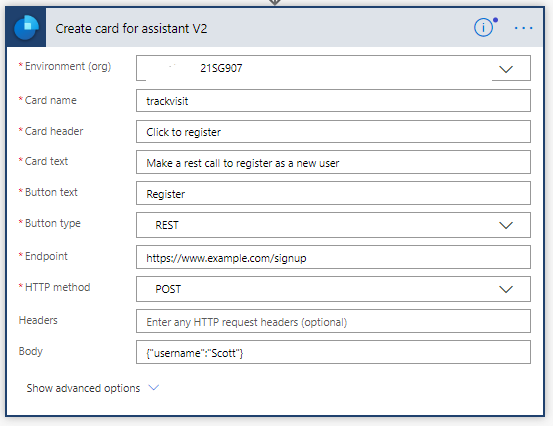
REST
Use the REST option to invoke REST API.
On the Create card for assistant step, enter the necessary information as described in edit and add actions to cards and then select Primary action type as REST.
Enter the following information in parameters to create a card for the REST API:
Parameter
Description
Primary action text
Enter a name for the button that should appear on the card.
Primary action endpoint
Enter the endpoint that the API should call.
Primary action HTTP method
Choose an HTTP method for the API to call.
Can't find the options in your app?
There are three possibilities:
You don't have the necessary license or role. Check the License and role requirements section at the top of this page.
Your administrator hasn't turned on the feature.
Your organization is using a custom app. Check with your administrator for exact steps. The steps described in this article are specific to the out-of-the-box Sales Hub and Sales Professional apps.
Demonstrate customization of Dynamics 365 Sales to provide clients with tools to manage customer information, gather insights, and automate best practices.