Configure the opportunity pipeline view
The opportunity pipeline view (formerly known as deal manager) helps your sellers visualize, prioritize, and manage the opportunities in their pipeline. More information: Use the opportunity pipeline view
If you previously configured the deal manager workspace, learn about the differences between the opportunity pipeline view and the deal manager workspace.
License and role requirements
| Requirement type | You must have |
|---|---|
| License | Dynamics 365 Sales Premium, Dynamics 365 Sales Enterprise, or Dynamics 365 Sales Professional More information: Dynamics 365 Sales pricing |
| Security roles | System Administrator More information: Predefined security roles for Sales |
Video: Opportunity pipeline view
Watch this short video to know how the opportunity pipeline view helps sellers be more productive and efficient.
Set the pipeline view as the default opportunities view
The Read-only Grid view is the default view for opportunities. You can set the Opportunities pipeline view as the default instead, so sellers don't have to switch to it each time they access their opportunities list.
In your sales app, select Settings > Advanced Settings.
Note
The Advanced Settings page is moving from the web client to an Unified Interface app. If your organization has enabled the public preview of the Advanced settings redirection feature, you’ll see the settings open in the Power Platform Environment Settings app. Find more information about the app and navigation path in Advanced settings in the new experience.
In the Settings menu, select Customizations > Customize the system.
From the Power Apps Default Solution page, select Entities > Opportunity.
Select the Controls tab, and then select Pipeline view for web, phone, and tablet. If you don't see Pipeline view in the Control list, select Add Control, then select Pipeline view, and then select Add.
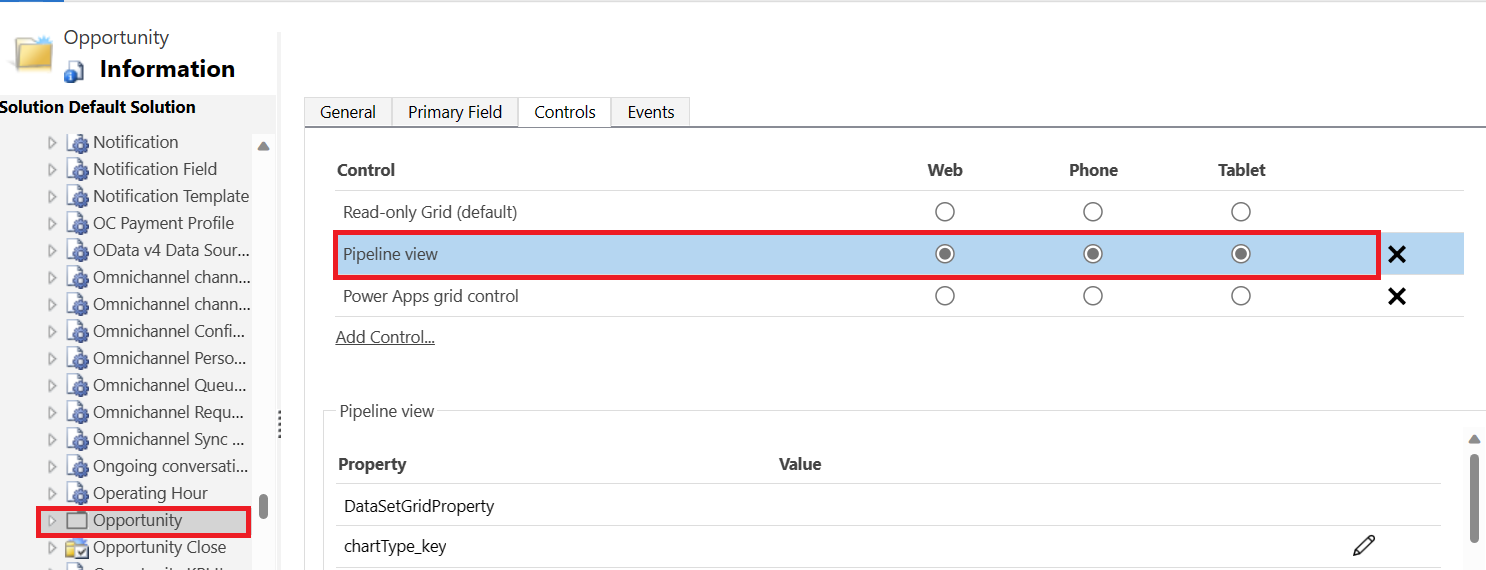
(Optional) In the Properties section, scroll down and set the Enable grouping and Enable aggregation properties to Yes. These settings allow sellers to group and aggregate opportunities in the pipeline view. To know about the seller experience, see Group and aggregate opportunities.
Note
If you've enabled monthly channel or opted in for early access updates, you need not change these properties as they're enabled by default.
Save the changes and select Publish.
From the Sales Hub sitemap, select Opportunities to verify that the pipeline view is set as the default view.


Open the opportunity pipeline view settings page
Open the settings page to configure and customize the opportunity pipeline view experience for your sellers. You'll be accessing the settings page in all the procedures explained in this article.
Do one of the following depending on your license:
If you have the Sales Enterprise or Sales Premium license, select App Settings from the Sales Hub Change area and then select Opportunity pipeline view under General Settings.
If you have the Sales Professional license, append the following URL after the base URL of your Sales Professional app:
&pagetype=control&controlName=MscrmControls.Sales.DealManagerSettings.DealManagerSettings. Example:https://contoso.crm.dynamics.com/main.aspx?appid=9f1002bf-ce2d-ed11-9db1-0022480a772e&pagetype=control&controlName=MscrmControls.Sales.DealManagerSettings.DealManagerSettings.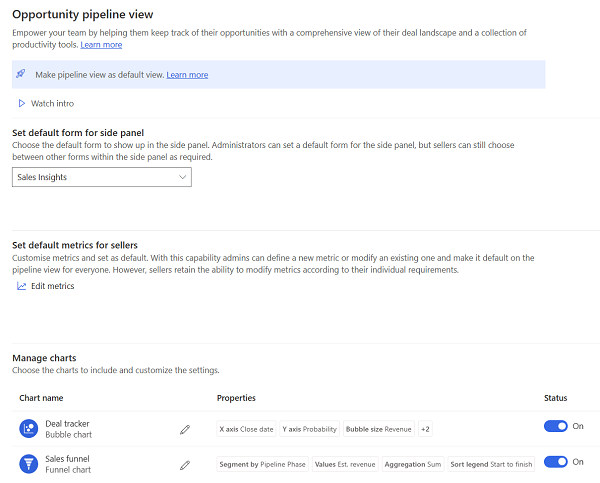

Permissions required for opportunity pipeline view
Permissions to access the pipeline view and the settings page are controlled by the dealmanagersettings and dealmanageraccess entities. The permissions are granted to the following security roles by default:
The read privileges to dealmanagersettings and dealmanageraccess entity is granted to all security roles which are customizable on publish or on first load from the opportunity pipeline view settings page.
The sales-related security roles such as salesperson, sales manager, and vice president of sales get the read privileges to dealmanagersettings and dealmanageraccess entities by default.
Set the default form for side panel
When sellers open an opportunity from the pipeline view, the side panel displays the opportunity details in the Sales Insights form. You can change the default form to the main opportunity form or a custom form for your organization. For example, you can create a custom form specifically for the side panel and set that as default. Sellers can switch to a different form if they prefer and their selection will be remembered and set as a default for them.
- Open the opportunity pipeline view settings page.
- In the Set the default form for side panel section, select the form that you want to set as the default for your organization.
Set the default metrics for sellers
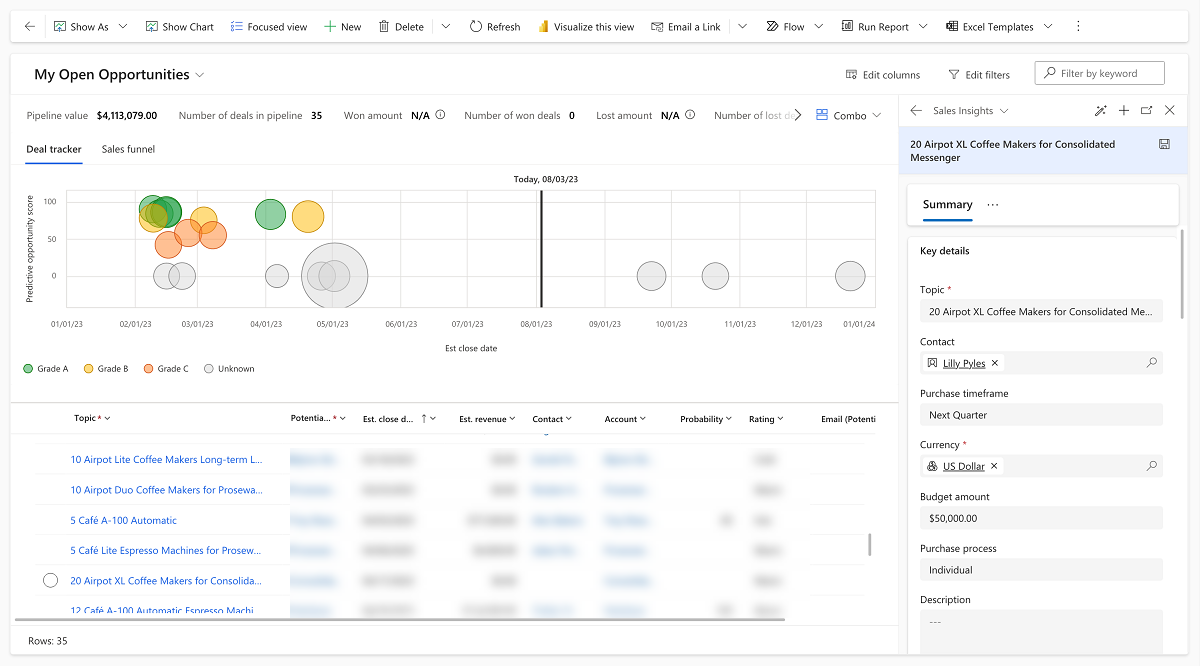
The opportunity pipeline view lists important metrics related to the sales pipeline at the top of the view. You can customize this space to view metrics that you want sellers to track. Sellers will see these metrics by default; they can personalize them if required.
In the Set default metrics for sellers section, select Edit metrics.
Create, update, remove, or delete a metric in the Edit metrics side panel.
To create a metric:
Select Create a Metric.
Select the field and the aggregate function that you want to use for calculating the metric. The Field list displays all the numerical fields in the opportunity entity.
(Optional) Add filters to calculate metrics from specific records. For example, if you want to view the estimated revenue of all opportunities created this year and are in the Develop stage, create a metric with the following values:
- Field: Est. Revenue
- Aggregate function: Sum
- Filters
- Created On: This year
- Sales Stage: Develop
To edit a metric, hover over the metric in the Edit metrics side panel, and select the Edit icon.
To remove a metric temporarily, clear the checkbox against the metric in Edit metrics side panel.
Customize charts
The charts in the pipeline view help sellers visualize their pipeline better. You can customize various elements in the bubble chart, such as the data on the x-axis and y-axis, the size and color of the bubble, the sort order for the legend, and tooltips. Similarly, you can customize elements in the funnel chart, such as the field used for segmentation, the aggregate function used, and so on.
Customize the bubble chart
In the Manage charts section, edit Deal tracker.
Note
You can turn off the corresponding Status toggle to hide the bubble chart.
Customize the following elements:
- Horizontal (x) axis
Select any field of typeDateTime. For example, you can plot the chart based on the delivered date instead of the closed date. - Vertical (y) axis
Select any numerical field. - Segment by
Select what the color codes signify. For example, select Pipeline Phase to color-code the bubbles based on which phase an opportunity is in. - Size
Select a numerical field to indicate the size of the bubble. - Sort legend
Select how to sort the chart legend. Legends indicate the color used for each segment. For example, if you select Opportunity grade as the segment, the legends will be sorted based on the chronological order of the grades. - Tooltips
Select the details that you want users to see displayed as tooltips when they hover over a bubble.
- Horizontal (x) axis
Save the changes and select Publish.
Open the opportunity pipeline view to verify the changes.
Customize the funnel chart
In the Manage charts section, edit Sales funnel.
Note
You can turn off the corresponding Status toggle to hide the funnel chart.
The following screenshot illustrates the parts of the funnel chart that you can customize:

Customize the following elements:
- Segment by
Select the field for segmenting the funnel chart. Default: Pipeline phase - Values
Select the field for sizing the bars in the funnel. Default: Est. revenue - Aggregation
Select the aggregate function to use for the Values field. This field determines the height of the bar. The aggregate value is displayed when you hover over a segment in the funnel chart. - Sort legend
Specify how to sort the segments. For example, selecting Finish to start for a funnel chart segmented by pipeline phase will display the funnel from the last phase to first phase, that is from Close to Qualify.
- Segment by
Save the changes and select Publish.
Open the opportunity pipeline view to verify the changes.

Customize the editable grid
The grid in the opportunity pipeline view is an instance of the Power Apps editable grid control. The grid can be both customized and personalized. As an administrator, you can customize the grid for the entire sales organization. Sellers can personalize their view to include the columns and filters they want to see.
Note
If you customized the editable grid in the deal manager using JavaScript, you need to redo those customizations in the pipeline view. To customize the editable grid, see the Power Apps documentation. For information on grid events, see Events in forms and grids in model-driven apps.
Can't find the options in your app?
There are three possibilities:
- You don't have the necessary license or role. Check the License and role requirements section at the top of this page.
- Your administrator hasn't turned on the feature.
- Your organization is using a custom app. Check with your administrator for exact steps. The steps described in this article are specific to the out-of-the-box Sales Hub and Sales Professional apps.
Related information
Where is the deal manager workspace?
Manage opportunities using pipeline view
Column-level security to control access
Events in forms and grids in model-driven apps