Note
Access to this page requires authorization. You can try signing in or changing directories.
Access to this page requires authorization. You can try changing directories.
View assigned records to reassign them to different sellers or teams. Also, you get detailed information of the record such as topic, owner, created on date, and error details depending on the record type. The supported default record types are leads, opportunities, contacts, and accounts.
View assigned records
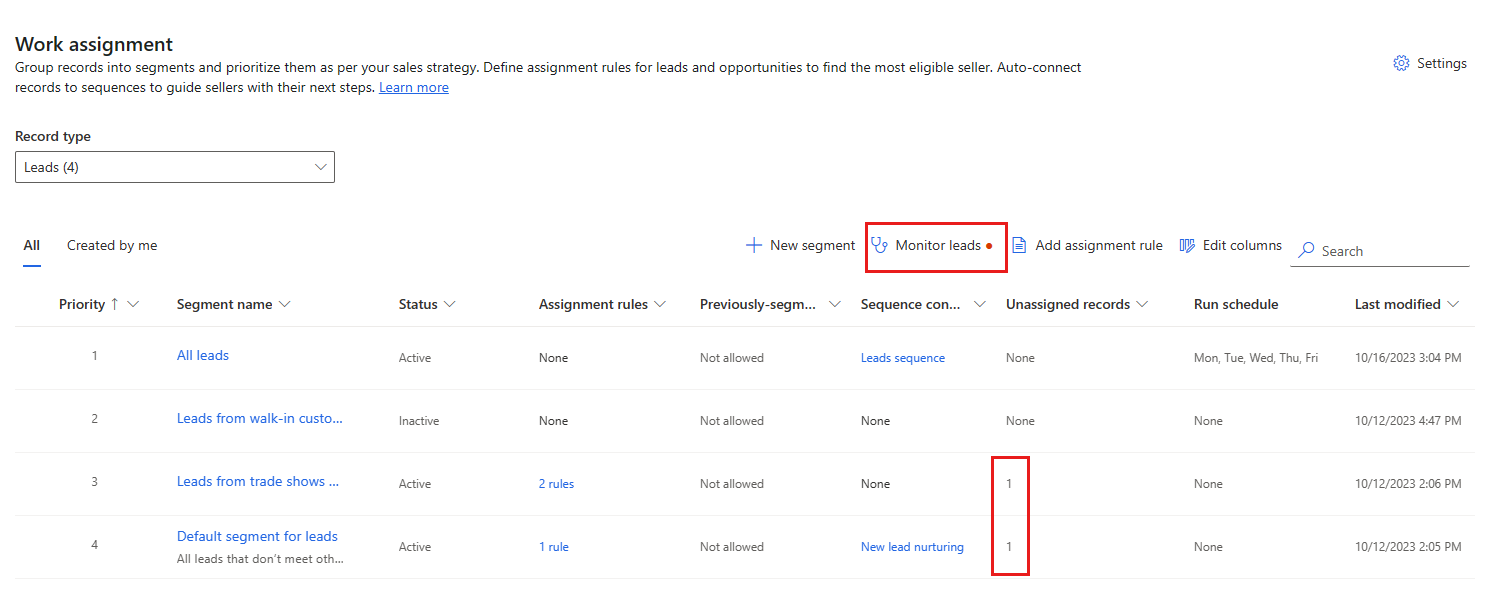
Go to Sales Insights settings, under Sales accelerator, select Work assignment.
Select a Record type to view segments for that type.
Select Monitor record type.

The monitor record page has the following tabs:
- To be processed: Lists the records that are scheduled for process. Any records listed here are automatically assigned to sellers, teams, or queues by the application, and might take up to two minutes.
- Processed: Lists the records that are processed. Information of each record is displayed such as, record's name, status, along with name of the connected segment, assignment rule, and sequence (as applicable).
When a record isn't connected to a segment, assignment rule, or sequence, the Status column displays Needs attention. An information icon is displayed corresponding to the column. Hover over the icon to view the error details. To know more about the error details and resolve the issue, see View record status details.
Note
Though there are no issues with a record, you still view the status as Needs attention. This is because the record is created using the previous version of the work assignment feature. Also, you can see that the Sequence column is empty for such records.

View record status details
When a record's status displays Needs attention, it indicates that the record encountered an error and failed at least one operation, such as segmentation, assignment, or sequence connection. To view the details of the error, open the record's status details pane. The pane provides information about the record such as topic, owner, created on date, and error details depending on the record type. Depending on the error details and status reason, you can take necessary actions to resolve the issue.
In the Processed tab, select a record that needs attention.
Note
You can only select one record at a time to view the status details.
Select View status details.
The details pane displays the record's information such as topic, owner, created on date, and error details depending on the record type. For example, a lead record displays the topic, owner, created on date, assigned to, previous owner, assignment due in, error details, and status reason.
- The Error details section provides information about the error that might prevent the record from being segmented, assigned, or connected to a sequence.
- The Status reason section shows the reason why record didn't get segmented, left unassigned, or failed connecting to a sequence.
Depending on the error details and status reason, you can take necessary actions to resolve the issue. For more information about the status reasons and resolution, see Analyze error details and resolve issues.
Analyze error details and resolve issues
When a record's status displays Needs attention, it indicates that the record encountered an error and failed at least one operation, such as segmentation, assignment, or sequence connection. Analyze the status reason and error details to understand and resolve the issue. Let's look at the status reasons and the possible actions to resolve the issue.
Assignment errors
| Status reason | Description | Resolution |
|---|---|---|
| There was an issue with the server | A problem with the server that your tenant is hosted on caused the assignment rules not to run. | The Error details section provides detailed information on why the issue occurred, take appropriate action to resolve the issue. For example, the error code: Read Privilege Check For Owner failed with exception: Principal user (Id=*********-****-ef11-****-6045bd05f95c, type=8, roleCount=1, privilegeCount=40, accessMode='0 Read-Write', AADObjectId='********-****-4681-****-3248305c05df', MetadataCachePrivilegesCount=10681, businessUnitId=xxxxxxxxx-069b-xxxx-xxxx-000d3a3bd6b9), is missing prvReadmsdyn_sequencetarget privilege (Id=xxxxxxxxxxx-bde8-xxxx-xxxx-316bb7899302) on OTC=10848 for entity 'msdyn_sequencetarget' (LocalizedName='Sequence Target'). context.Caller=***********-****-ef11-****-000d3a3bd6b9. Consider adding missed privilege to one of the principal (user/team) roles. specifies that user is missing the required privilege to run the assignment rules. Add the required privilege to the user or team to resolve the issue. |
| Record doesn't meet any conditions | The record doesn't meet the assignment criteria. | Assign the record manually, create a rule that will assign it, or update the existing assignment rule for future records like it to be assigned automatically. Verify that the conditions are properly defined in the assignment rule. If the conditions aren't met, update the conditions in the assignment rule and run the assignment rules again. |
| No sellers meet the conditions | No sellers met the assignment criteria when the assignment rules ran. | Make sure your assignment rules include all eligible sellers, or create one that does. Turn on the Assign record toggle under the Enable for assignment tab in the Work assignment settings. More information: Stop assigning work to sellers. After resolving the issue, run the assignment rules again. |
| Eligible sellers don't have availability | No eligible sellers were automatically available when the assignment rules ran. | Configure the seller availability in the work assignment settings and run the assignment rules again if more sellers are available now. |
| Eligible sellers don't have capacity | No eligible sellers could automatically take on more work when the assignment rules ran. | Verify and update the seller's capacity in the work assignment settings and run the assignment rules again if more sellers can accept work now. |
| Record unassigned as seller doesn't have the necessary permissions | No sellers eligible for assignment have necessary permissions. | Verify that the sellers have at least read access to the record type. Update the permissions of the sellers and run the assignment rules again. |
| Seller not assigned as record is older than the set timeframe | The seller was created before the time frame specified in the rule. | Update the record creation time frame under the Eligible record type for this rule section in the assignment rule and run the run the assignment rules again. |
| Multiple eligible teams found | Multiple eligible teams were identified to assign the record for the configured assignment rule. | Update the conditions for identifying eligible teams to ensure only one team qualifies or update the distribution algorithm to assign to any one team at random. |
| Couldn't find eligible team | No eligible team was found to assign the record for the configured assignment rule. | Verify that the conditions are properly defined in the assignment rule for teams. Update the conditions in the assignment rule accordingly and run the assignment rules again. |
| Multiple eligible queues found | Multiple eligible queues were identified to assign the record for the configured assignment rule. | Update the conditions for identifying eligible queues to ensure only one queue qualifies or update the distribution algorithm to assign to any one queue at random. |
| Couldn't find eligible queue | No eligible queue was found to assign the record for the configured assignment rule. | Verify that the conditions are properly defined in the assignment rule for queues. Update the conditions in the assignment rule accordingly and run the assignment rules again. |
| Rules don't run for this segment | The record was moved to a different segment where assignment rules don't run when records are moved. | Enable the option to run assignment rules when a record is moved under the Previously segmented leads section in the Segment properties pane. Run the assignment rules again. |
| D365WorkAssignment app user doesn't have necessary permissions | An internal user doesn't have the necessary permissions to execute the operation. | The Error details section provides detailed information on why the issue occurred. Provide at least read access to the Sales Work Assignment API Extended Access security role to the sellers and run the assignment rules again. |
Segment errors
| Status reason | Description | Resolution |
|---|---|---|
| Something went wrong | An error occurred while processing the record. | Go to the Error details section to view detailed information on why the error occurred. Take necessary actions to resolve the issue and run the assignment rules again. |
| No matching segments | The record doesn't match any active segments. | Verify that the record meets the conditions defined in the segment and the segment is active. If the record doesn't meet the conditions, update the conditions in the segment and run the assignment rules again. |
| Matched with previous segment | The record matched with the previous segment. | When a record moves to a different segment, the application tries to process it back into its previously assigned segment. This happens when the Previously-segmented record type option is enabled for the segment trying to process the reassigned record. To avoid processing conflicts, ensure that the conditions defined in the new segment don't match with those of the previous segment. |
| D365WorkAssignment app user doesn't have necessary permissions | An internal user doesn't have the necessary permissions to execute the operation. | The Error details section provides detailed information on why the issue occurred. Provide at least read access to the Sales Work Assignment API Extended Access security role to the sellers and run the assignment rules again. |
Sequence errors
| Status reason | Description | Resolution |
|---|---|---|
| Something went wrong | An error occurred while processing the record. | Go to the Error details section to view detailed information on why the error occurred. Take necessary actions to resolve the issue and run the assignment rules again. |
| Seller doesn't have necessary permissions | A seller met the sequence criteria but isn't able to be assigned automatically. | Go to the Error details section to view detailed information on why the error occurred. Provide at least read access to the record type to the seller and run the assignment rules again. |
| Sequence is either deleted or inactive | The record that is trying to connect to sequence is either deleted or inactive for this segment. | Ensure that there's a connected active sequence for this segment. If the sequence is deleted or inactive, create a new sequence and connect it to the segment. Run the assignment rules again. |
| D365WorkAssignment app user doesn't have necessary permissions | An internal user doesn't have the necessary permissions to execute the operation. | The Error details section provides detailed information on why the issue occurred. Provide at least read access to the Sales Work Assignment API Extended Access security role to the sellers and run the assignment rules again. |
Run assignment rules
After you address the errors for unassigned records, run the assignment rules again. Up to 500 records are considered for assignment on each run, with older records taking priority over newer ones. You can run the rules immediately or schedule them to run later.
Under Sales accelerator, select Work assignment.
Select a Record type to view segments of that type.
Select or open a segment that has unassigned records, and then select Segment properties.
Under Run assignment rules for unassigned record type, select Run now.
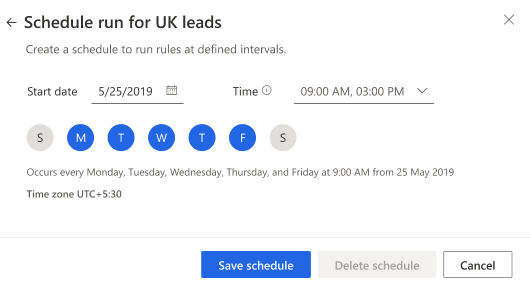
To run the rules later, select + Schedule run, and then select a Start date, the days of the week, and the time when the schedule should run. When you're finished, select Save schedule.
Assignment rule schedules run automatically. A segment can have one scheduled run that fires up to twice a day. For example, you might schedule high-priority segments to run assignment rules every weekday at 6:00 AM and 2:00 PM. Rules for lower-priority segments might run every Friday at 5:00 PM.
View reassignment run history
The assignment run history is a record of each time a segment's assignment rules were run and what the results were. The run history provides the date and time a run started, how long it took, the number of records that are assigned, the run's status, and whether the run was triggered manually or ran on schedule.
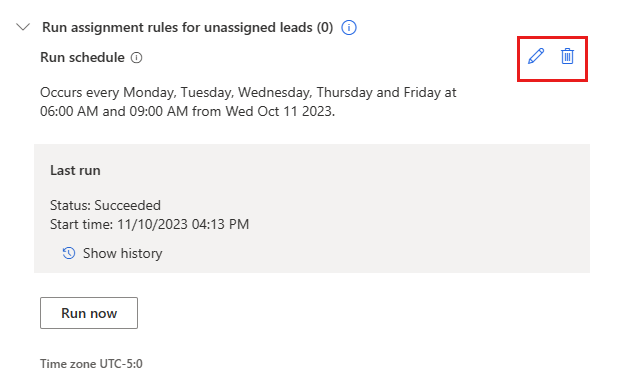
In the Run assignment rules for segment name pane, select Show history.
Override, edit, or delete an assignment rule schedule
To override the scheduled run of a segment's assignment rules and run the rules immediately, select Run now.
To edit the schedule, select the pencil icon.
To delete the schedule, select the trashcan icon.

Assign records manually
If you don't have an assignment rule for a lead or opportunity, you can manually assign it to a salesperson or sales team.
Select one or more records to assign to the same salesperson or team, and then select Assign.

Select a seller. To assign the record to a team instead, select the Teams tab, and then select a sales team. Learn more about sales teams and assignment rules.
To limit your selection to sellers who can be assigned by a rule, turn on Show eligible sellers.Select Assign.
The record is assigned to the seller or team and the list refreshes to remove the record.
Can't find the feature in your app?
There are a few possibilities:
- You don't have the necessary license to use this feature. Check out the comparison table and the licensing guide to see which features are available with your license.
- You don't have the necessary security role to use this feature.
- To configure or setup a feature, you need to have the Administration and customization roles
- To use sales-related features, you need to have the Primary sales roles
- Some tasks require specific Functional roles.
- Your administrator hasn't turned on the feature.
- Your organization is using a custom app. Check with your administrator for exact steps. The steps described in this article are specific to the out-of-the-box Sales Hub and Sales Professional apps.