Note
Access to this page requires authorization. You can try signing in or changing directories.
Access to this page requires authorization. You can try changing directories.
Work order lifecycle states define the states that a work order can go through. Examples include Created, Scheduled, In progress, and Ended. Work order lifecycle states can be manually updated on a work order, or they can be automatically updated (for example, during work order scheduling).
The work order lifecycle states that are required for your work orders must be attached to matching project stages on the Project management and accounting parameters page (Project management and accounting > Project management and accounting parameters). You first set up project stages in Project management and accounting. You then set up work order lifecycle states and work order lifecycle models in Asset Management.
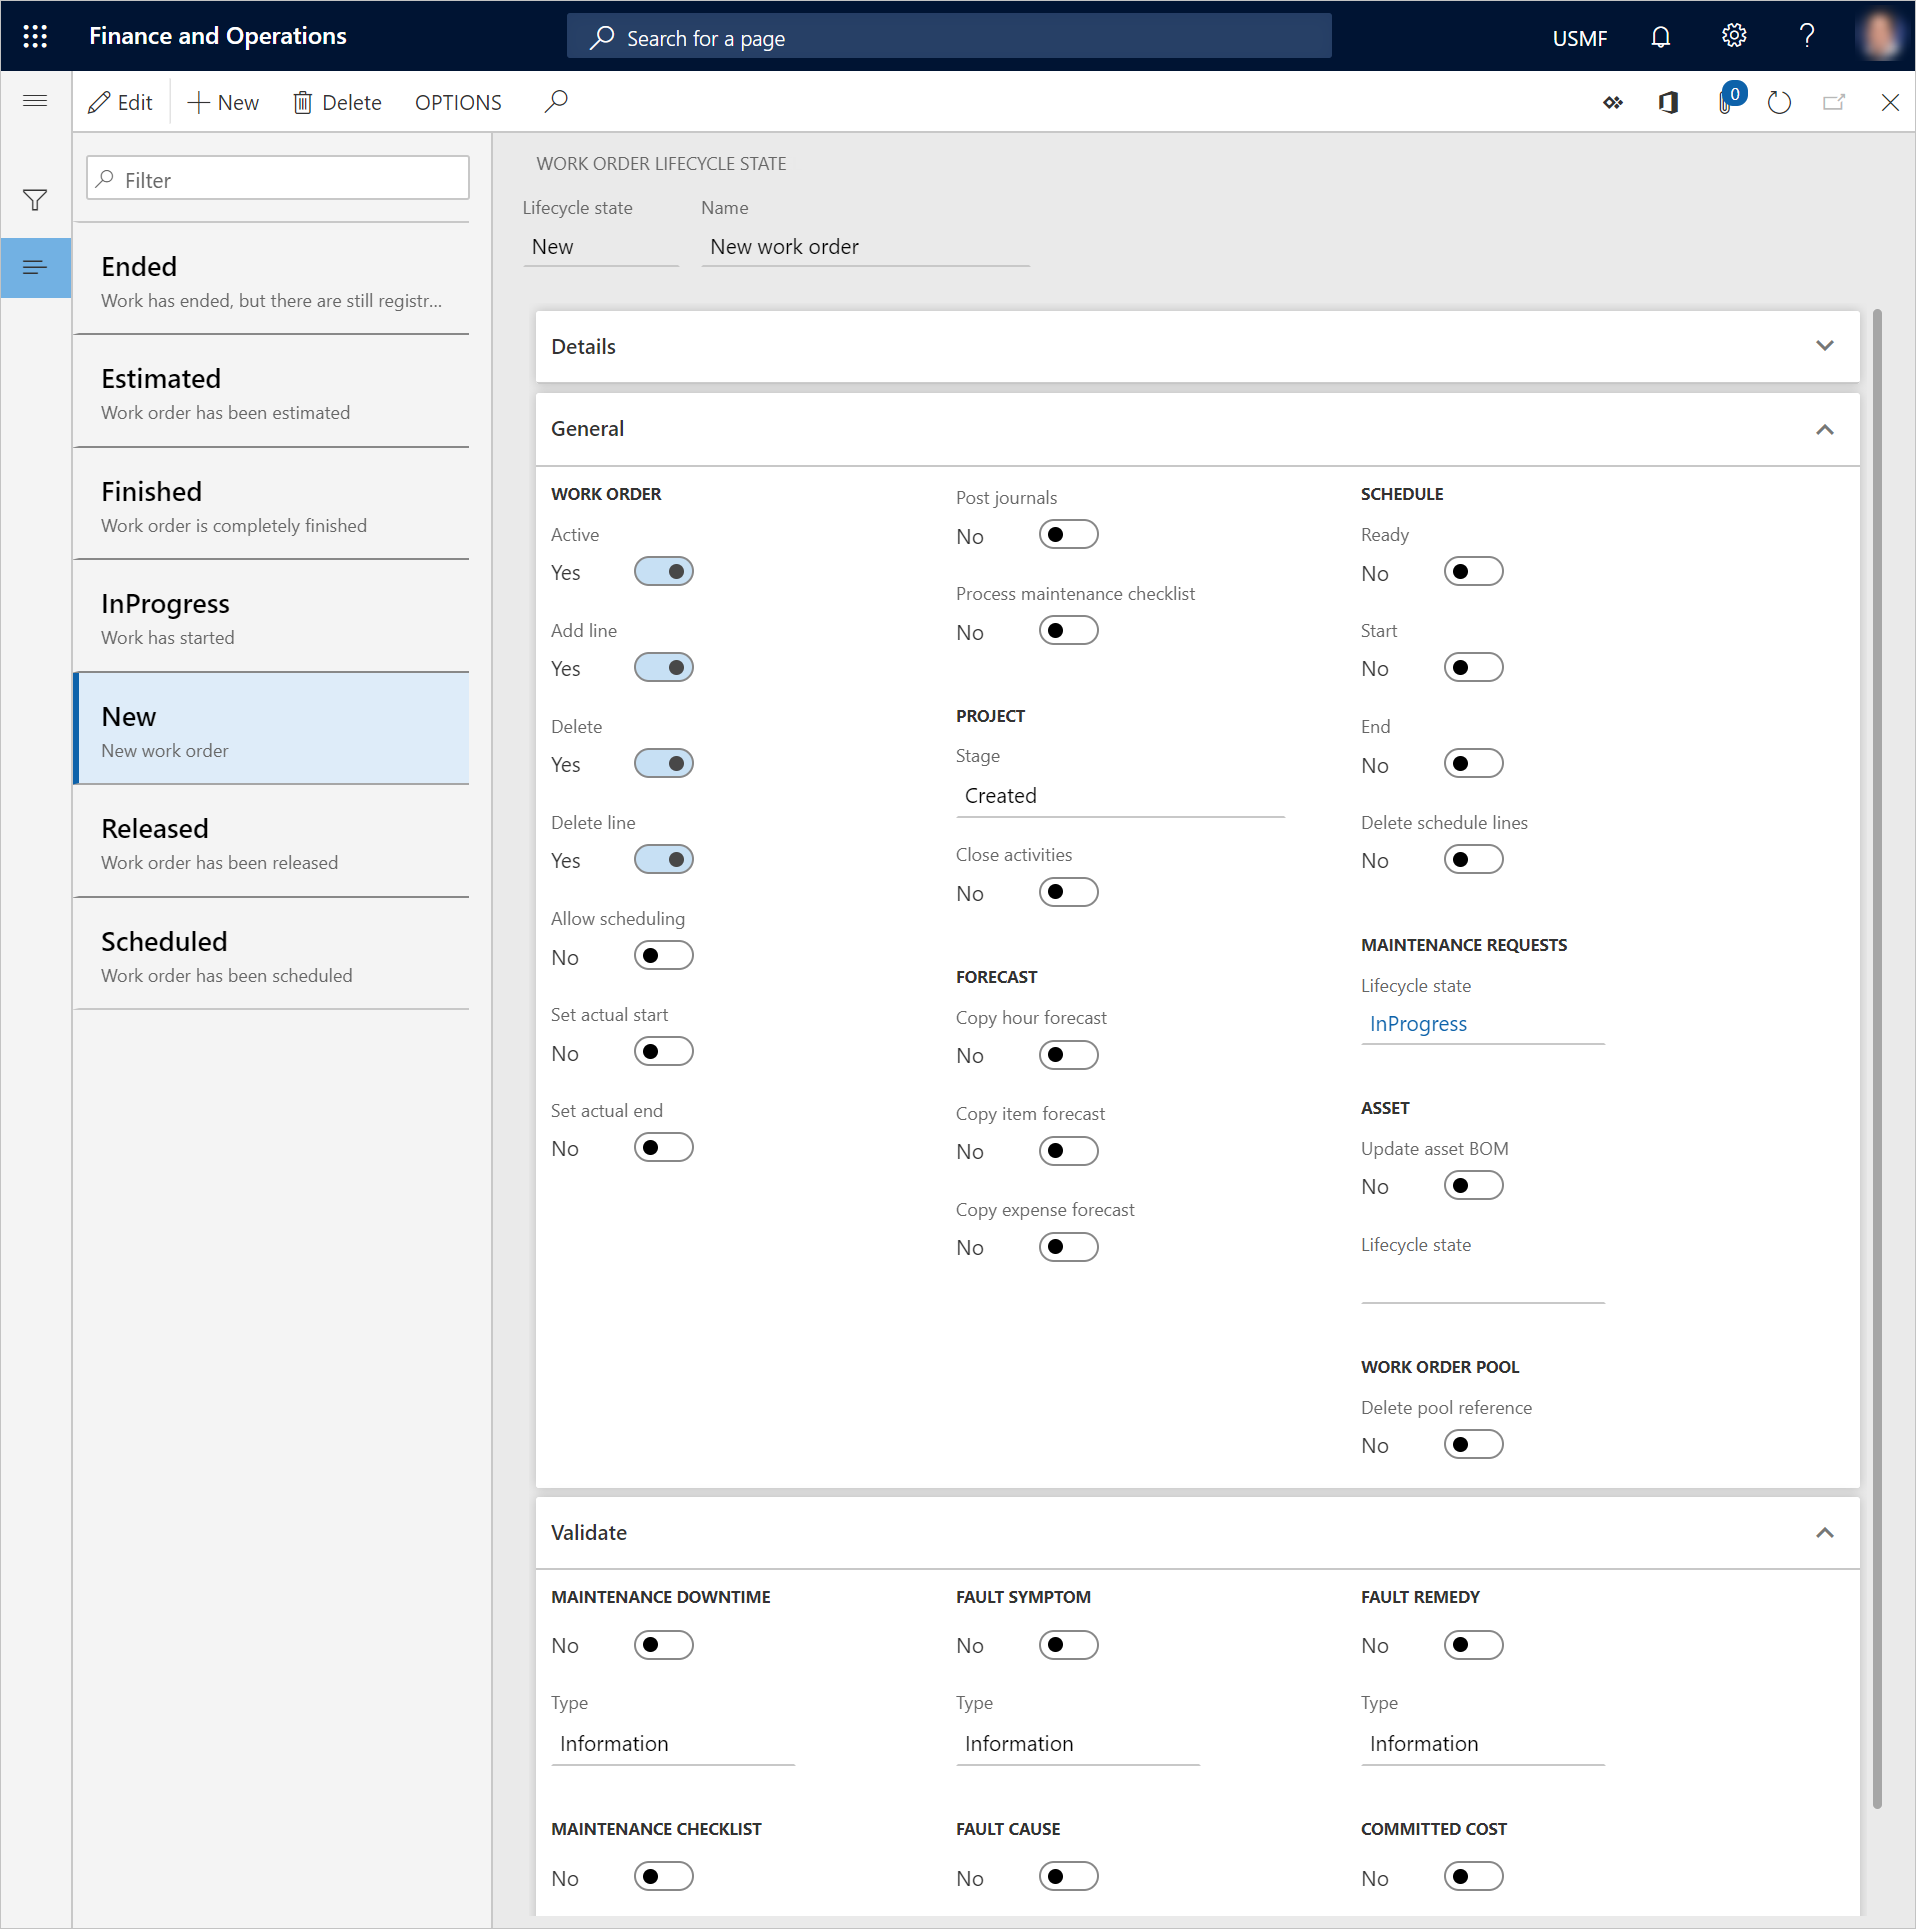
The following table describes the options in the Work order and Schedule sections on the General FastTab of the Work order lifecycle state page (Asset management > Setup > Work orders > Lifecycle states).
| Option name | Description |
|---|---|
| Active | Set this option to Yes if the work order should be active while it's in this lifecycle state. |
| Add line | Set this option to Yes if work order jobs can be added to a work order that is in this lifecycle state. |
| Delete | Set this option to Yes if a work order can be deleted while it's in this lifecycle state. |
| Delete line | Set this option to Yes if work order jobs can be deleted from a work order that is in this lifecycle state. |
| Allow scheduling | Set this option to Yes if a work order can be scheduled while it's in this lifecycle state. |
| Set actual start | Set this option to Yes if the user should be prompted to select an actual start date and time for a work order when it's updated to this lifecycle state. |
| Set actual end | Set this option to Yes if the user should be prompted to select an actual end date and time for a work order when it's updated to this lifecycle state. |
| Post journals | Set this option to Yes if work order journals should be automatically posted when a work order is updated to this lifecycle state. If an error occurs during journal posting, a message is shown, and the update of the work order lifecycle state is canceled. To view the journal lines for a work order, select Asset management > Work orders > All work orders, Active work orders, or My active work orders, select the work order in the list, and then select Journals. This setup of automatic work order journal posting at a specific lifecycle state is the same as when you select Post journals on the Work order journals page. Note: If you set this option to Yes, journals are automatically posted if no approval workflow has been set up. If your company uses the journal approval setup that is configured on the Journal approval page (Project management and accounting > Setup > Journals > Journal approval), a manager or clerk must validate and post consumption registrations. |
| Process maintenance checklist | Set this option to Yes if all attached maintenance checklists should be processed when a work order is updated to this lifecycle state. As part of this processing, any counter registrations that were made on a maintenance checklist are posted, and the result of the whole maintenance checklist is evaluated. Maintenance checklist lines that have Pass and Fail results are evaluated, and if at least one line fails, the whole maintenance checklist is marked as Failed in Asset Management. |
| Ready | Set this option to Yes if the work order job schedule status for all work order jobs that are created on a work order should automatically be updated to Ready when the work order is updated to this lifecycle state. |
| Start | Set this option to Yes if the work order job schedule status for all work order jobs that are created on a work order should automatically be updated to Started when the work order is updated to this lifecycle state. |
| End | Set this option to Yes if the work order job schedule status for all work order jobs that are created on a work order should automatically be updated to Ended when the work order is updated to this lifecycle state. |
| Delete schedule lines | Set this option to Yes if scheduling on all work order jobs that are created on a work order that has already been scheduled should be deleted when the work order is updated to this lifecycle state. In other words, capacity reservations on the asset, the related maintenance worker, and related tools will be deleted. For example, you set this option to Yes on a work order lifecycle state that is named Estimated. Then, when a work order is rolled back to this lifecycle state because rescheduling is required, scheduling can be deleted on that work order. |
Prerequisites for the role-based access feature
To use the role-based access feature (on the Security roles FastTab), as described later in this article, your system must meet the following requirements:
- You must be running Microsoft Dynamics 365 Supply Chain Management 10.0.43 or later.
- The feature that's named Role-based access control for work order lifecycle stages must be turned on in Feature management.
Set up project stages and work order lifecycle states
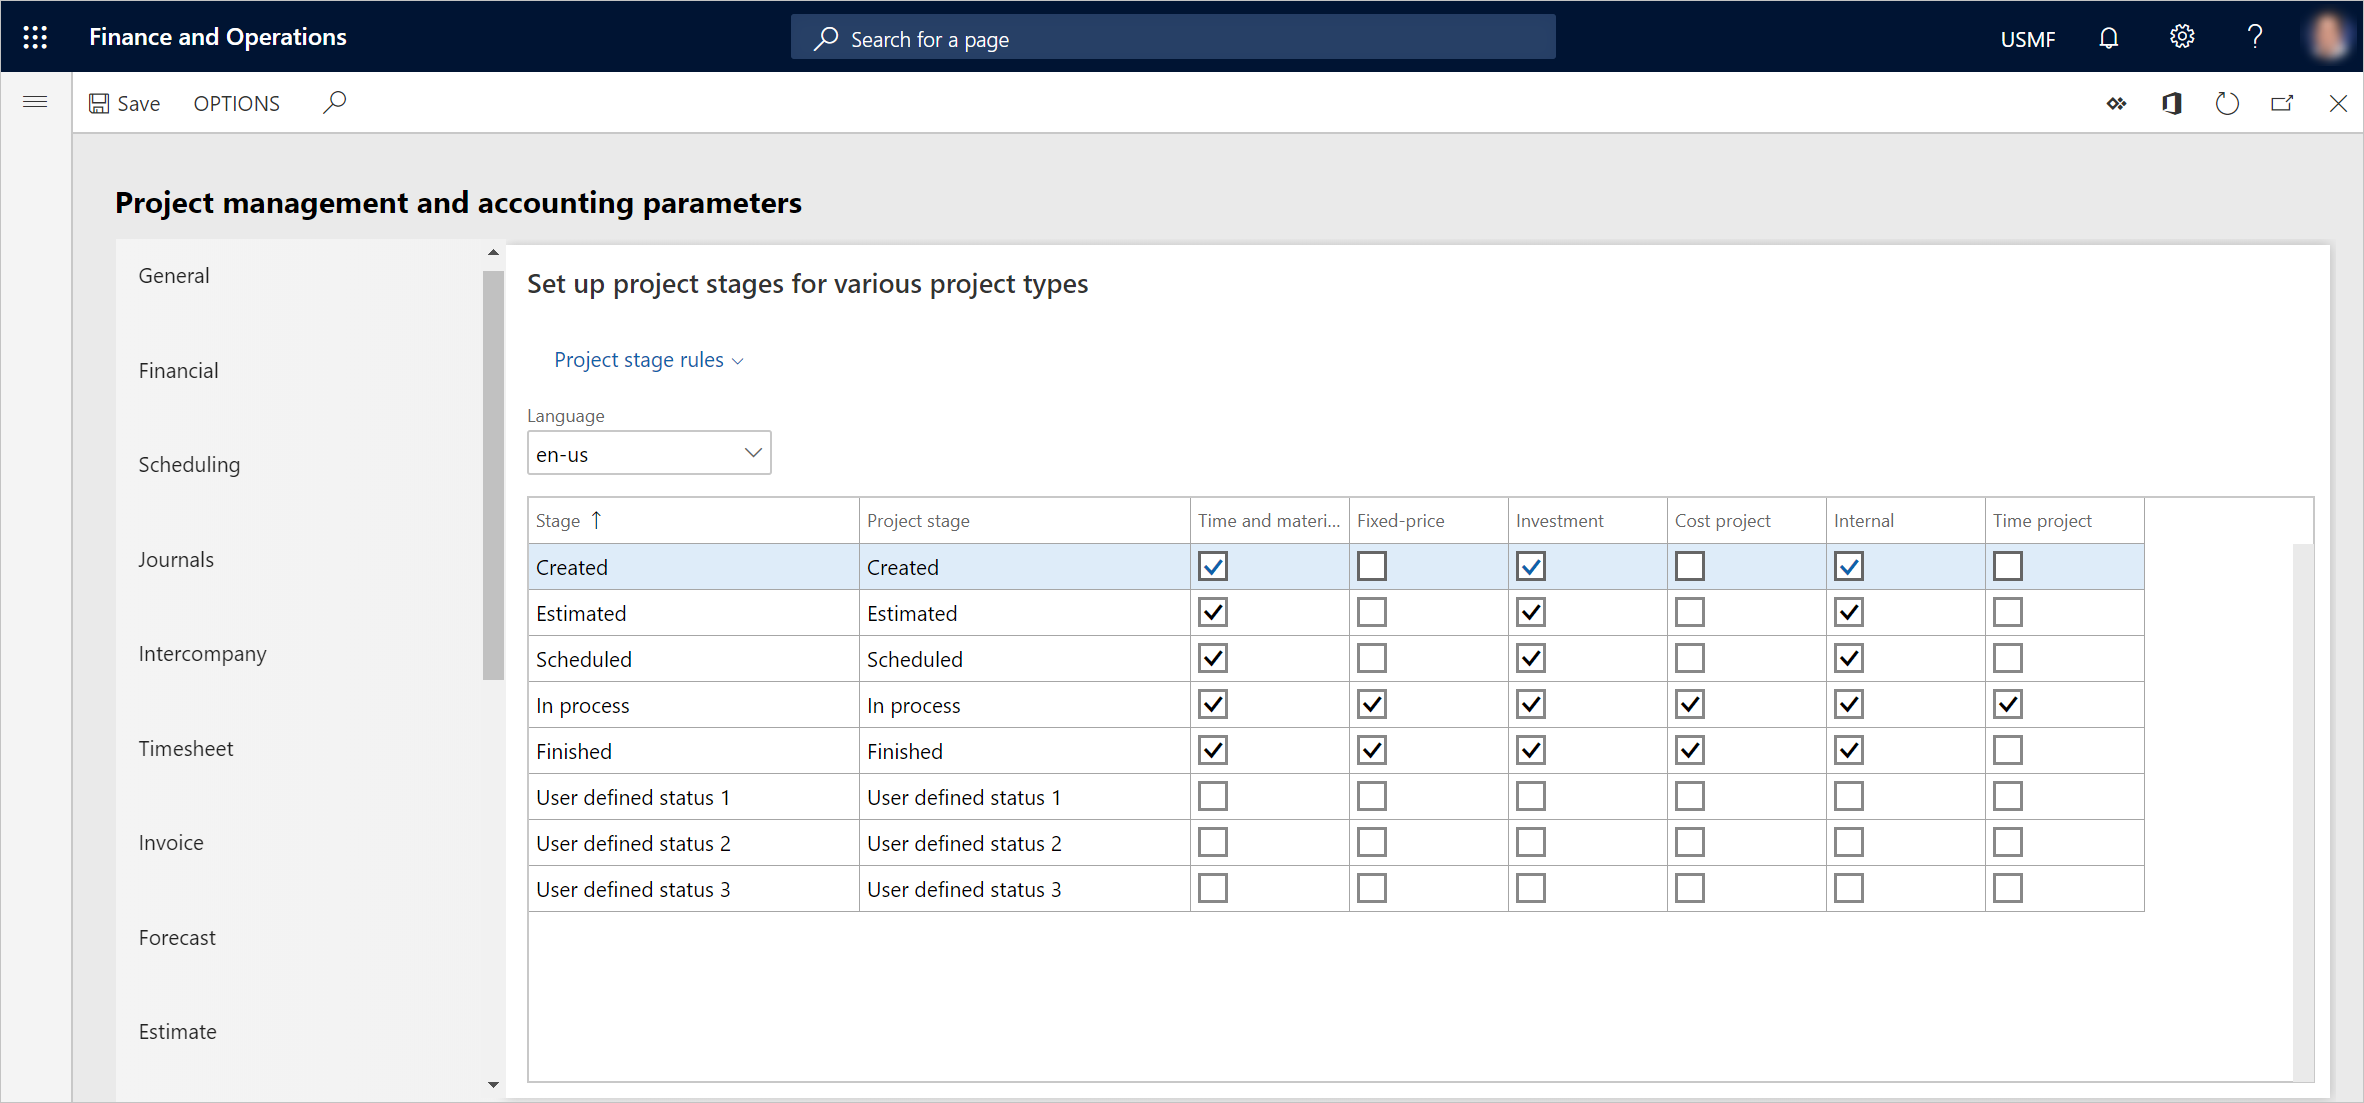
Select Project management and accounting > Setup > Project management and accounting parameters.
On the Project stage tab, for each stage that you want to use, select the check box for every project type that is required for your work orders. The project types define rules about the financial tasks that are allowed. Examples of financial tasks include creating a forecast, creating estimates, and creating beginning balances.
Important
If a project stage isn't selected for a project type, but the project stage is used for a work order lifecycle state, the work order projects won't be updated in the appropriate manner.
Close the Project management and accounting parameters page.
Select Asset management > Setup > Work orders > Lifecycle states.
Select New to create a work order lifecycle state.
In the Lifecycle state field, enter an ID for the lifecycle state.
In the Name field, enter a name.
On the Details FastTab, the Lifecycle models field shows the number of work order lifecycle models that use this lifecycle state.
On the General FastTab, in the Work order section, select the functions that should be available for this lifecycle state by setting the relevant options to Yes. For descriptions of the options, see the table earlier in this article.
In the Project section, in the Stage field, select the project stage that should be related to this lifecycle state.
In the Project section, set the Close activities option to Yes if project activities that are related to each work order job should be automatically closed when the work order is in this lifecycle state.
Note
To find the number of the project activity that is related to a work order job, select Asset management > Work orders > All work orders, Active work orders, or My active work orders. Open the work order, and then select the work order job. The activity number is shown in the Activity number field in the Project section on the General tab of the Line details FastTab.
In the Forecast section, set the Copy hour forecast, Copy item forecast, and/or Copy expense forecast option to Yes if work order project forecasts should automatically be copied to work order journals when the work order is in this lifecycle state.
In the Schedule section, set one of the options to Yes if the schedule status for work order jobs should be updated when the work order is in this lifecycle state. For descriptions of the Ready, Start, End, and Delete schedule lines options, see the table earlier in this article.
Note
To view schedule lines that are related to work order jobs, select Asset management > Work orders > All work orders, Active work orders, or My active work orders. Open the work order, select the work order job on the Work order jobs FastTab, and view related information on the Line details FastTab. The Status field on the Schedule tab shows the status of the work order job. The Status field can be set to the following values: Scheduled, Ready, Started, Stopped, and Ended.
In the Maintenance requests section, in the Lifecycle state field, select the maintenance request lifecycle state that related maintenance requests should be updated to. This update occurs automatically. It can be done only if the maintenance request lifecycle state is selected in the maintenance request lifecycle model that is used for the maintenance request.
In the Asset section, set the Update asset BOM option to Yes if all items that are used on a work order should automatically be updated on the Asset BOM page when the work order is updated to this lifecycle state. This setting might be relevant if, for example, the work order lifecycle state defines the work order as completed or ended.
In the Work order pool section, set the Delete pool reference option to Yes if work orders that are in this lifecycle state should automatically be deleted from work order pools.
On the Validate FastTab, select the validation types that should be activated in this lifecycle state by setting the relevant options to Yes. Then, in the Type field for each validation type that you select, select the type of message that should be shown if mandatory fields that are related to the validation type haven't been validated. If you select Error, the update of the work order lifecycle state is canceled until the related mandatory fields have been updated on the work order.
- The Maintenance downtime, Maintenance checklist, Fault symptom, Fault cause, and Fault remedy options are related to the options in the Mandatory section on the Work order types page (Asset management > Setup > Work orders > Work order types). To activate these validations, the related options must also be set to Yes on the work order type that is used for the work order.
- If the Maintenance checklist option is set to Yes for the lifecycle state that a work order is updated to, validation is done to verify that maintenance checklist lines that are marked as Mandatory have been registered as either Checked or Not applicable. If neither of those registrations has been made on the mandatory lines, an informational, error, or warning message is shown when the work order is updated to this lifecycle state.
- If the Committed cost option is set to Yes for the lifecycle state that a work order is updated to, total amount of committed costs (that is, the total amount of expenses that the legal entity has committed to pay) are calculated for each work order job. A message is shown if the committed cost amount is more than 0 (zero). You select the types of cost commitment that are included on the Cost commitments FastTab on the Cost control tab of the Project management and accounting parameters page (Project management and accounting > Setup > Project management and accounting parameters).
- If the Maintenance downtime option is set to Yes for the lifecycle state that a work order is updated to, maintenance downtime validation is done on the asset that is related to the work order. If a maintenance downtime registration has been made, but there's no Ended registration, a message is shown when the work order is updated to this lifecycle state.
- If the standard project setup doesn't include all the stages that you require for your Asset Management setup, you can set up user-defined project stages on the Project stage tab of the Project management and accounting parameters page. The following illustration shows the Project stage tab on the Project management and accounting parameters page.
On the Security roles FastTab, select the security roles that are allowed to change to this lifecycle state. If no roles are selected, then all users that have access to work order lifecycle states are able to change to this lifecycle state.
Note
If the lifecycle state that you update a work order to is inactive, journals that are related to the work order but that haven't yet been posted are automatically deleted. This behavior helps guarantee automatic cleanup of unused data. (A lifecycle state is inactive if the Active option for it is set to No on the General FastTab of the Work order lifecycle state page.)
However, if you manually set a work order so that it's inactive, journals that are related to the work order but that haven't yet been posted are not automatically deleted. (To manually deactivate a work order, select Asset management > Work orders > All work orders or Active work orders. Open the work order, and switch to the Header view. On the General FastTab, select Edit, and then set the Active option to No.)
Relations among work order lifecycle models, work order types, and work order lifecycle states
Lifecycle models refer to workflows, and lifecycle states are selected in a lifecycle model in sequential order. Lifecycle models are set up on work order types. Work order types determine the size or extent of workflows and work processes. For example, Maintenance, which is a standard work order type, might be related to a work order lifecycle model that has many lifecycle states. By contrast, you might have a Corrective work order type that is used for work orders that haven't been scheduled, or for work orders where the job is completed before the work order is made because of an urgent situation. This work order type might be related to a work order lifecycle model that has only a few lifecycle states.
The reason for using types is that when a type is defined on, for example, a work order or an asset, the related work processes (lifecycle states) are automatically defined. For more information about how to set up work order types, see Work order types.
Note
Lifecycle states, lifecycle models, and types apply to functional locations, assets, and maintenance requests, in addition to work orders.
The following illustration shows the relation between work order types, lifecycle models, and lifecycle states.

Work order lifecycle models
After you've created the work order lifecycle states that are required for your work orders, they can be divided into work order lifecycle models. At a minimum, you should create one standard lifecycle model.
Select Asset management > Setup > Work orders > Lifecycle models.
Select New to create a work order lifecycle model.
In the Lifecycle model field, enter an ID for the lifecycle model.
In the Name field, enter a name.
On the Details FastTab, the Lifecycle states field shows the number of lifecycle states that are selected in this lifecycle model. The Work order types field shows the number of work order types that use this lifecycle model.
On the Lifecycle states FastTab, select the lifecycle states that should be included in the lifecycle model:
- To include a lifecycle state in the lifecycle model, select it in the Lifecycle states remaining section, and then select the right arrow button
 to move it to the Lifecycle states selected section.
 - To include all the available lifecycle states in the lifecycle model, select the Select all available stages button
 . All lifecycle states are moved to the Lifecycle states selected section.
 - To remove a lifecycle state from the lifecycle model, select it in the Lifecycle states selected section, and then select the left arrow button
 to move it to the Lifecycle states remaining section.
- To include a lifecycle state in the lifecycle model, select it in the Lifecycle states remaining section, and then select the right arrow button
Select Lifecycle state updates to define the lifecycle states that can follow a selected lifecycle state.
On the Updates FastTab, in the Scheduled state field, select the lifecycle state that should always be selected for a work order that you've completed work order scheduling for, regardless of the previous lifecycle state of the work order.
In the Unscheduled lifecycle state field, select the lifecycle state that should always be selected for a work order if work order scheduling is deleted.
Save the work order lifecycle model.
