Note
Access to this page requires authorization. You can try signing in or changing directories.
Access to this page requires authorization. You can try changing directories.
This step-by-step walkthrough shows how to build a simple Windows Forms (WinForms) application backed by a SQLite database. The application uses Entity Framework Core (EF Core) to load data from the database, track changes made to that data, and persist those changes back to the database.
The screen shots and code listings in this walkthrough are taken from Visual Studio 2022 17.3.0.
Tip
You can view this article's sample on GitHub.
Prerequisites
You need to have Visual Studio 2022 17.3 or later installed with the .NET desktop workload selected to complete this walkthrough. For more information about installing the latest version of Visual Studio, see Install Visual Studio.
Create the application
Open Visual Studio
On the start window, choose Create new project.
Choose Windows Forms App and then choose Next.
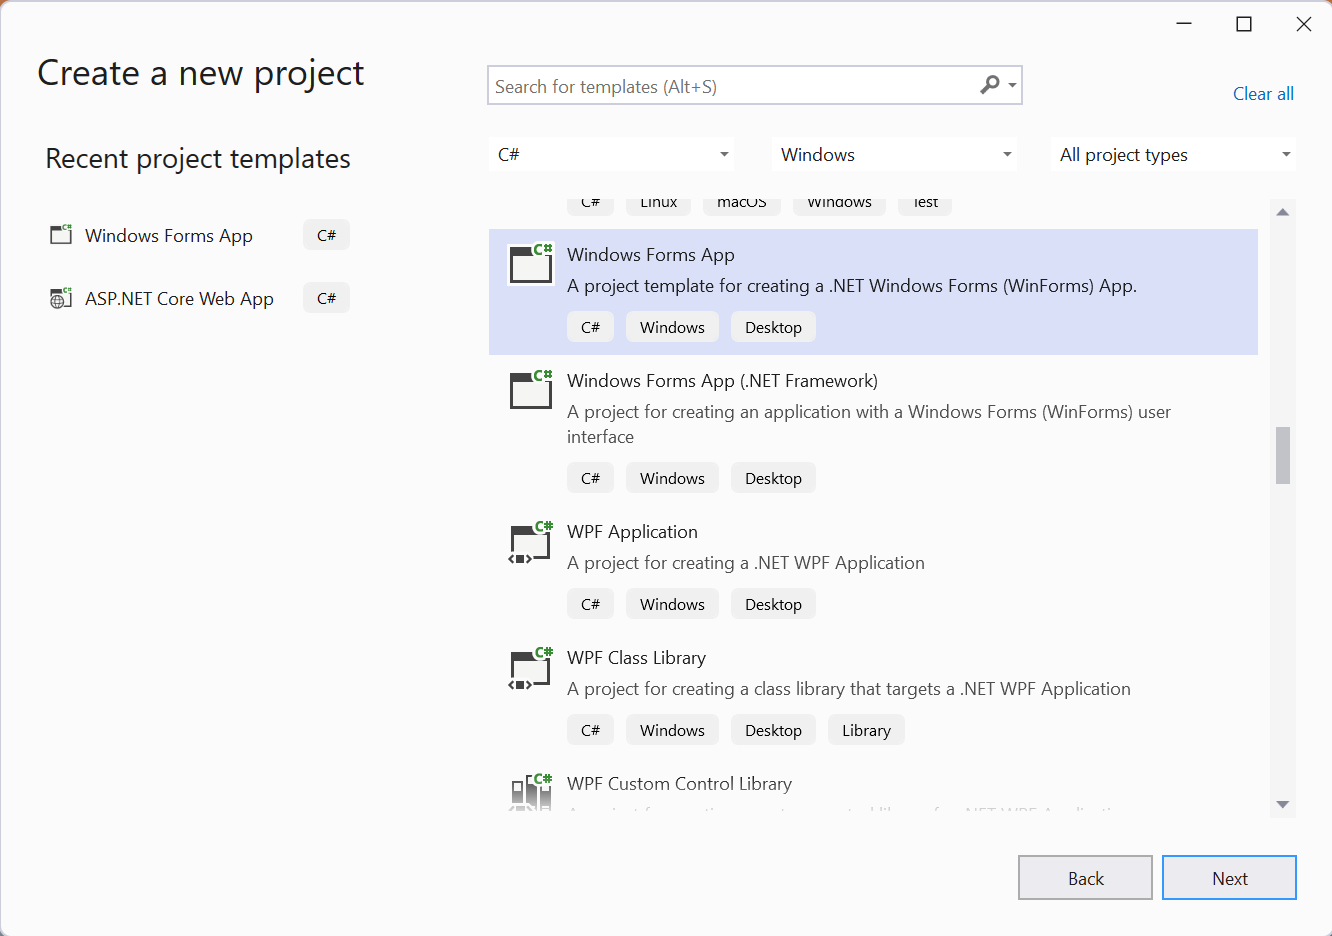
At the next screen, give the project a name, for example, GetStartedWinForms, and choose Next.
At the next screen, choose the .NET version to use. This walkthrough was created with .NET 7, but it should also work with later versions.
Choose Create.
Install the EF Core NuGet packages
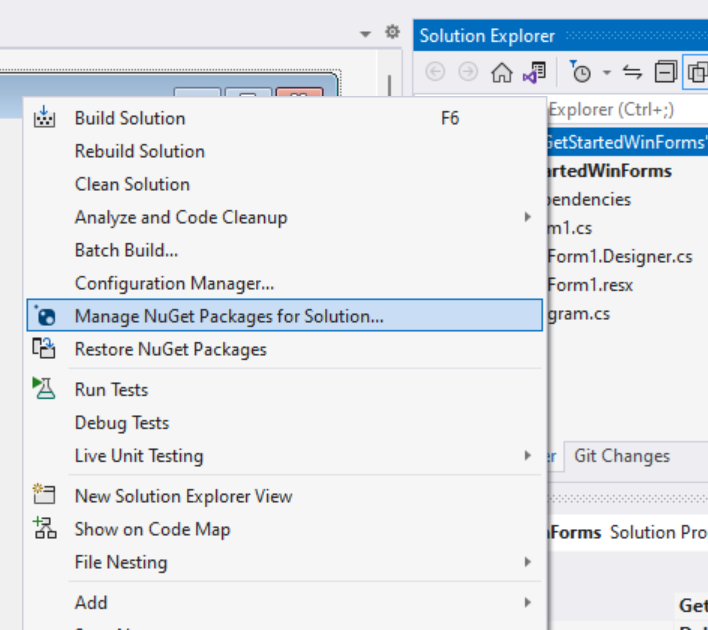
Right-click on the solution and choose Manage NuGet Packages for Solution...
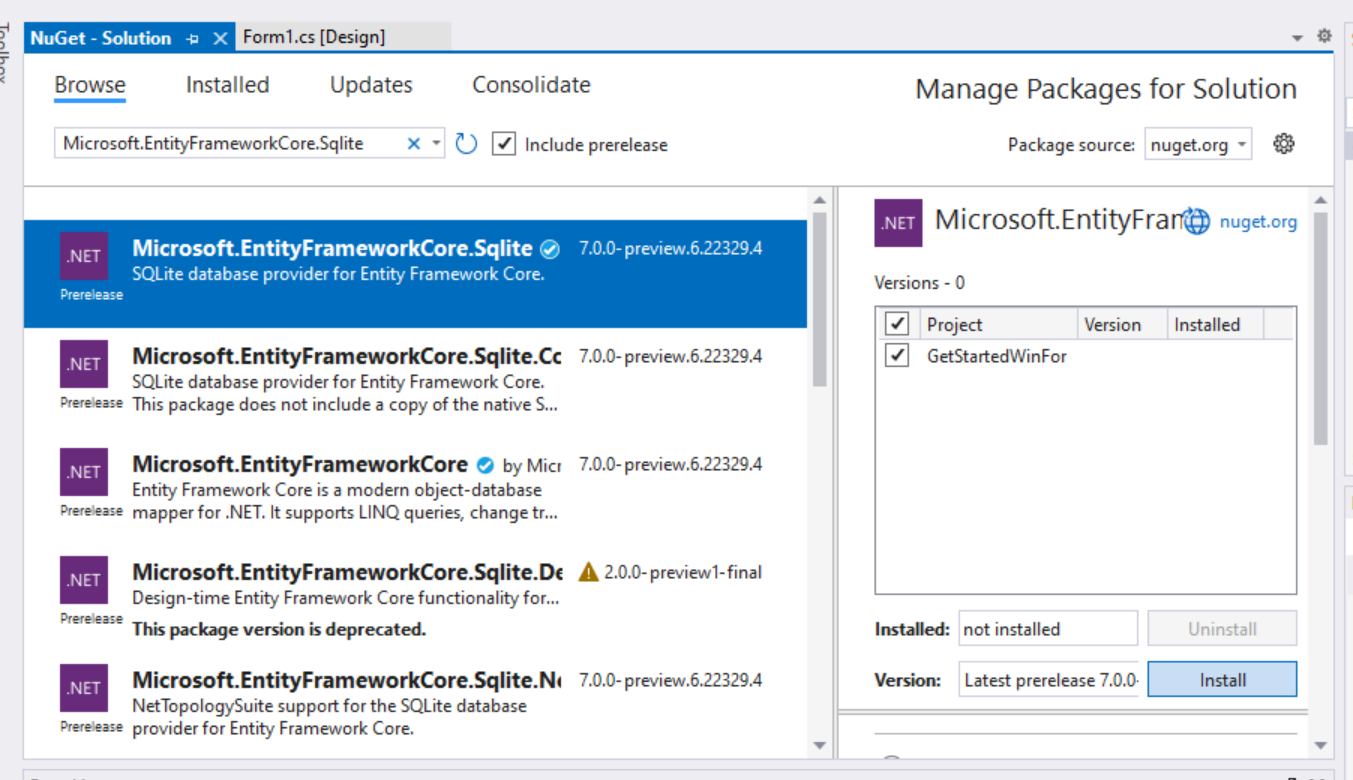
Choose the Browse tab and search for "Microsoft.EntityFrameworkCore.Sqlite".
Select the Microsoft.EntityFrameworkCore.Sqlite package.
Check the project GetStartedWinForms in the right pane.
Choose the latest version. To use a pre-release version, make sure that the Include prerelease box is checked.
Click Install
Note
The Microsoft.EntityFrameworkCore.Sqlite is the "database provider" package for using EF Core with a SQLite database. Similar packages are available for other database systems. Installing a database provider package automatically brings in all the dependencies needed to use EF Core with that database system. This includes the Microsoft.EntityFrameworkCore base package.
Define a model
In this walkthrough we will implement a model using "Code First". This means that EF Core will create the database tables and schema based on the C# classes you define. See Managing Database Schemas to see how to use an existing database instead.
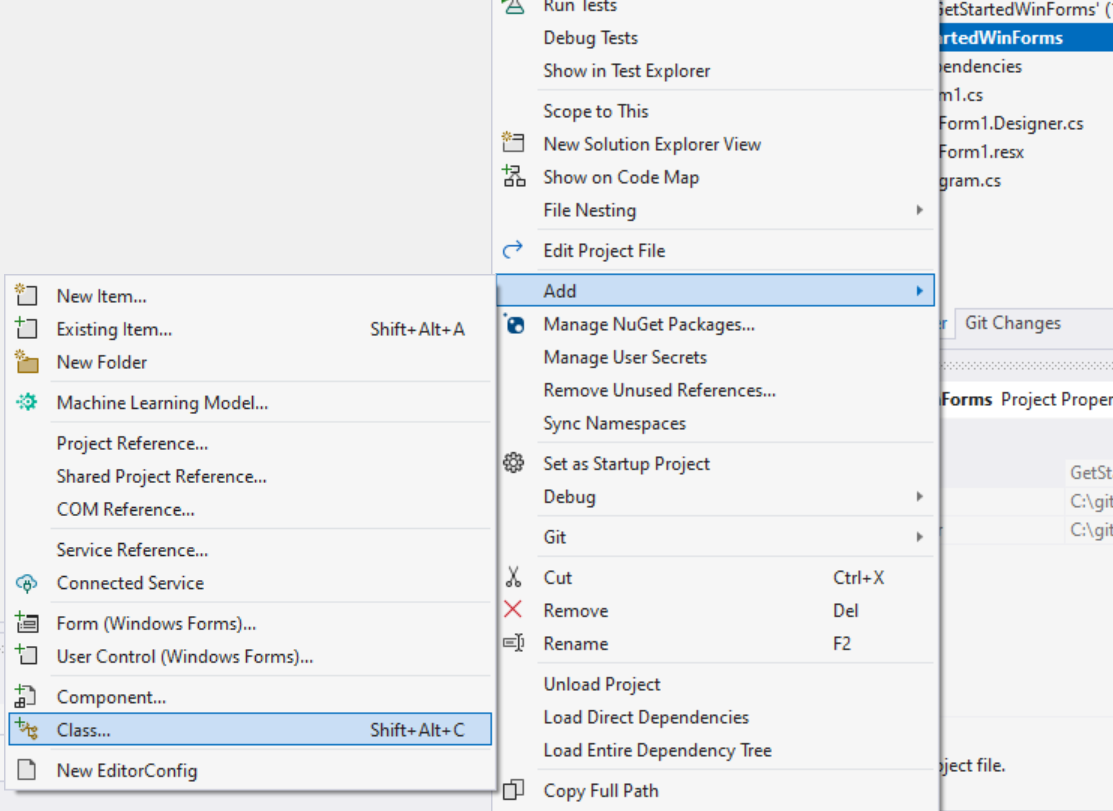
Right-click on project and choose Add, then Class... to add a new class.
Use the filename
Product.csand replace the code for the class with:using System.ComponentModel; namespace GetStartedWinForms; public class Product { public int ProductId { get; set; } public string? Name { get; set; } public int CategoryId { get; set; } public virtual Category Category { get; set; } = null!; }Repeat to create
Category.cswith the following code:using Microsoft.EntityFrameworkCore.ChangeTracking; namespace GetStartedWinForms; public class Category { public int CategoryId { get; set; } public string? Name { get; set; } public virtual ObservableCollectionListSource<Product> Products { get; } = new(); }
The Products property on the Category class and the Category property on the Product class are called "navigations". In EF Core, navigations define a relationship between two entity types. In this case, the Product.Category navigation references the category to which a given product belongs. Likewise, the Category.Products collection navigation contains all the products for a given category.
Tip
When using Windows Forms, the ObservableCollectionListSource, which implements IListSource, can be used for collection navigations. This is not necessary, but does improve the two-way data binding experience.
Define the DbContext
In EF Core, a class derived from DbContext is used to configure entity types in a model and act as a session for interacting with the database. In the simplest case, a DbContext class:
- Contains
DbSetproperties for each entity type in the model. - Overrides the
OnConfiguringmethod to configure the database provider and connection string to use. See Configuring a DbContext for more information.
In this case, the DbContext class also overrides the OnModelCreating method to provide some sample data for the application.
Add a new ProductsContext.cs class to the project with the following code:
using Microsoft.EntityFrameworkCore;

namespace GetStartedWinForms;

public class ProductsContext : DbContext
{
    public DbSet<Product> Products { get; set; }
    public DbSet<Category> Categories { get; set; }

    protected override void OnConfiguring(DbContextOptionsBuilder optionsBuilder)
        => optionsBuilder.UseSqlite("Data Source=products.db");

    protected override void OnModelCreating(ModelBuilder modelBuilder)
    {
        modelBuilder.Entity<Category>().HasData(
            new Category { CategoryId = 1, Name = "Cheese" },
            new Category { CategoryId = 2, Name = "Meat" },
            new Category { CategoryId = 3, Name = "Fish" },
            new Category { CategoryId = 4, Name = "Bread" });

        modelBuilder.Entity<Product>().HasData(
            new Product { ProductId = 1, CategoryId = 1, Name = "Cheddar" },
            new Product { ProductId = 2, CategoryId = 1, Name = "Brie" },
            new Product { ProductId = 3, CategoryId = 1, Name = "Stilton" },
            new Product { ProductId = 4, CategoryId = 1, Name = "Cheshire" },
            new Product { ProductId = 5, CategoryId = 1, Name = "Swiss" },
            new Product { ProductId = 6, CategoryId = 1, Name = "Gruyere" },
            new Product { ProductId = 7, CategoryId = 1, Name = "Colby" },
            new Product { ProductId = 8, CategoryId = 1, Name = "Mozzela" },
            new Product { ProductId = 9, CategoryId = 1, Name = "Ricotta" },
            new Product { ProductId = 10, CategoryId = 1, Name = "Parmesan" },
            new Product { ProductId = 11, CategoryId = 2, Name = "Ham" },
            new Product { ProductId = 12, CategoryId = 2, Name = "Beef" },
            new Product { ProductId = 13, CategoryId = 2, Name = "Chicken" },
            new Product { ProductId = 14, CategoryId = 2, Name = "Turkey" },
            new Product { ProductId = 15, CategoryId = 2, Name = "Prosciutto" },
            new Product { ProductId = 16, CategoryId = 2, Name = "Bacon" },
            new Product { ProductId = 17, CategoryId = 2, Name = "Mutton" },
            new Product { ProductId = 18, CategoryId = 2, Name = "Pastrami" },
            new Product { ProductId = 19, CategoryId = 2, Name = "Hazlet" },
            new Product { ProductId = 20, CategoryId = 2, Name = "Salami" },
            new Product { ProductId = 21, CategoryId = 3, Name = "Salmon" },
            new Product { ProductId = 22, CategoryId = 3, Name = "Tuna" },
            new Product { ProductId = 23, CategoryId = 3, Name = "Mackerel" },
            new Product { ProductId = 24, CategoryId = 4, Name = "Rye" },
            new Product { ProductId = 25, CategoryId = 4, Name = "Wheat" },
            new Product { ProductId = 26, CategoryId = 4, Name = "Brioche" },
            new Product { ProductId = 27, CategoryId = 4, Name = "Naan" },
            new Product { ProductId = 28, CategoryId = 4, Name = "Focaccia" },
            new Product { ProductId = 29, CategoryId = 4, Name = "Malted" },
            new Product { ProductId = 30, CategoryId = 4, Name = "Sourdough" },
            new Product { ProductId = 31, CategoryId = 4, Name = "Corn" },
            new Product { ProductId = 32, CategoryId = 4, Name = "White" },
            new Product { ProductId = 33, CategoryId = 4, Name = "Soda" });
    }
}
Make sure to build the solution at this point.
Adding controls to the form
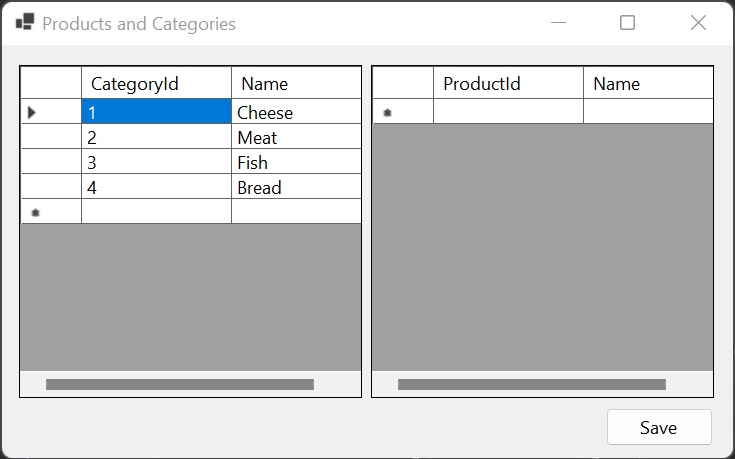
The application will show a list of categories and a list of products. When a category is selected in the first list, then the second list will change to show products for that category. These lists can be modified to add, remove, or edit products and categories, and these changes can be saved to the SQLite database by clicking a Save button.
Change the name of the main form from
Form1toMainForm.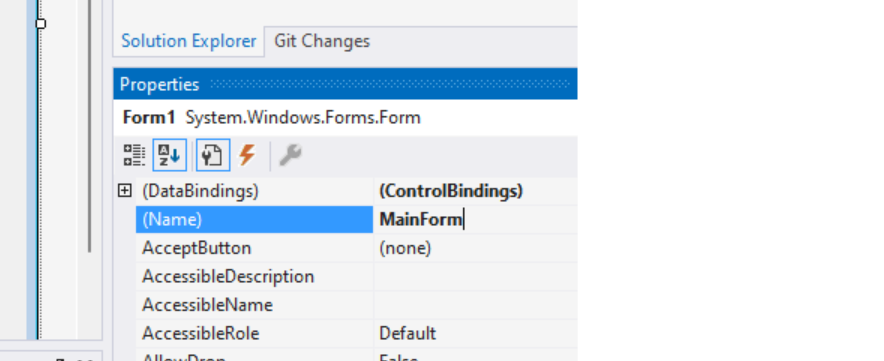
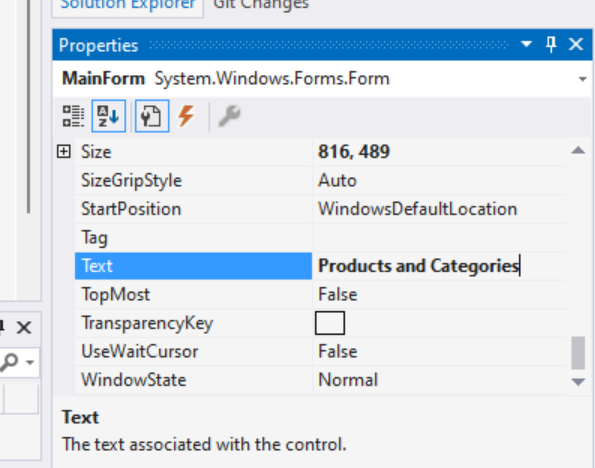
And change the title to "Products and Categories".
Using the Toolbox, add two
DataGridViewcontrols, arranged next to each other.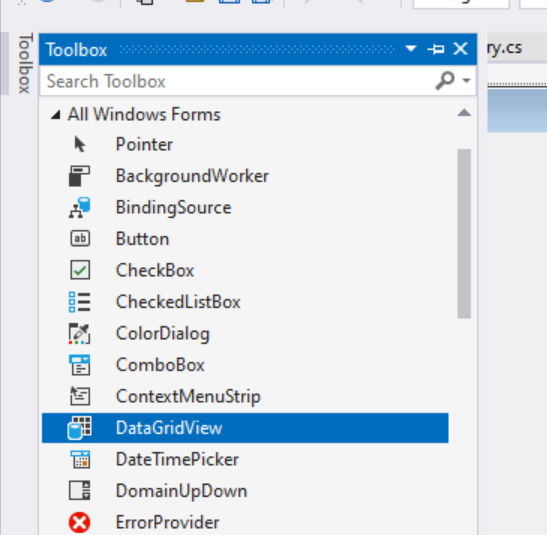
In the Properties for the first
DataGridView, change the Name todataGridViewCategories.In the Properties for the second
DataGridView, change the Name todataGridViewProducts.Also using the Toolbox, add a
Buttoncontrol.Name the button
buttonSaveand give it the text "Save". The form should look something like this: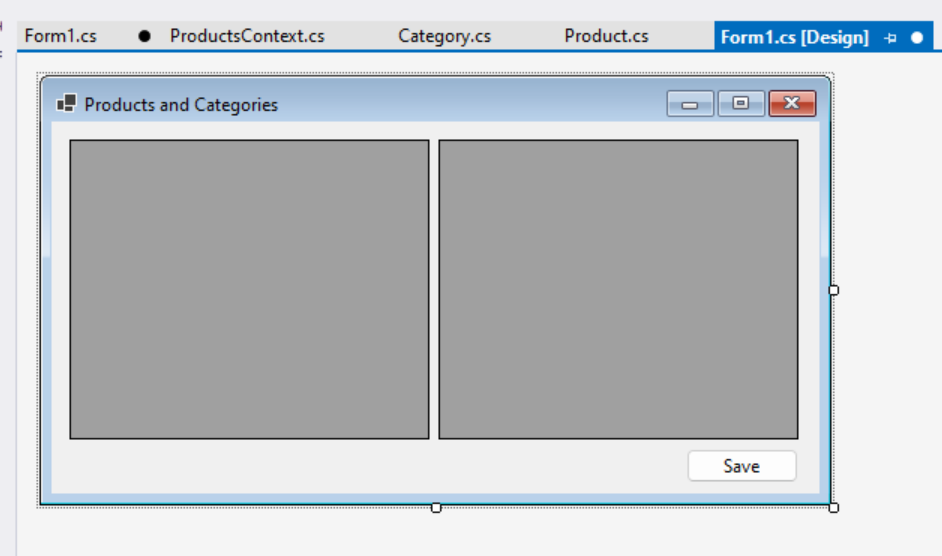
Data binding
The next step is to connect the Product and Category types from the model to the DataGridView controls. This will bind the data loaded by EF Core to the controls, such that the entities tracked by EF Core are kept in sync with those displayed in the controls.
Click the Designer Action Glyph on the first
DataGridView. This is the tiny button at the top-right corner of the control.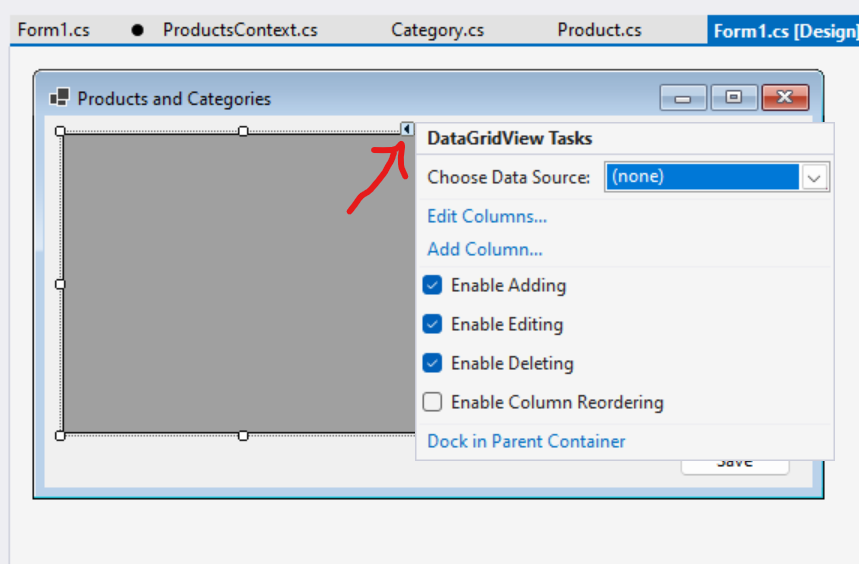
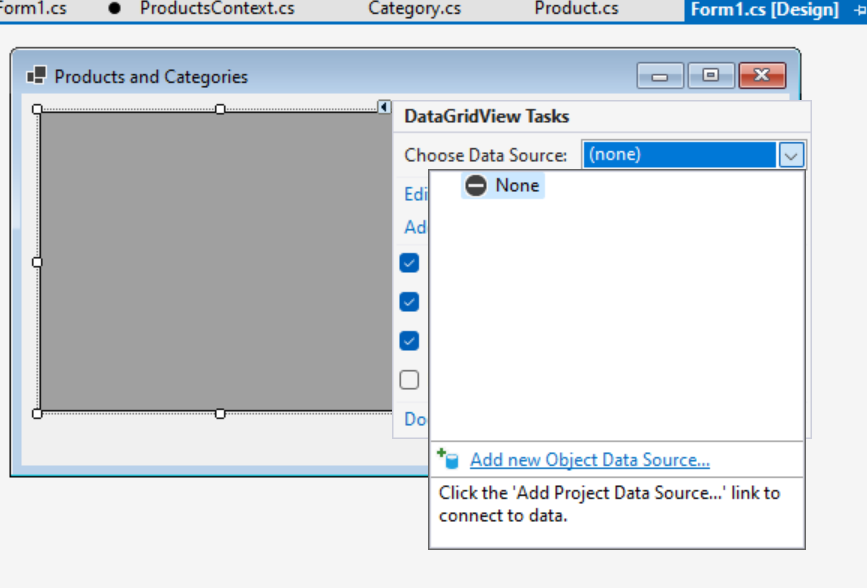
This opens the Action List, from which the drop-down for Chose Data Source can be accessed. We haven't created a data source yet, so go to the bottom and choose Add new Object Data Source....
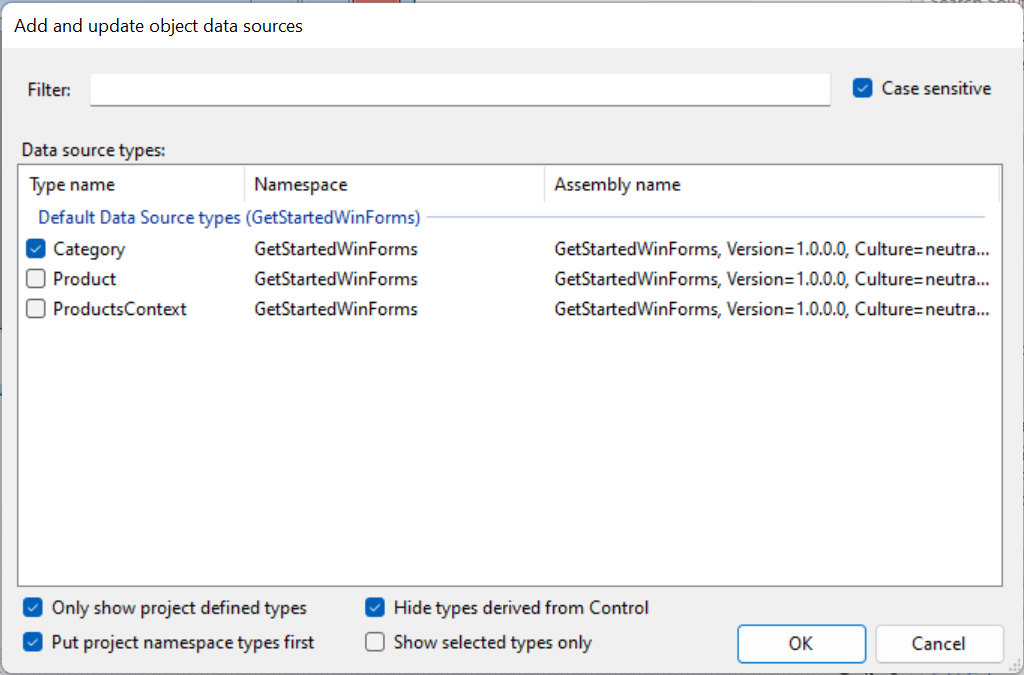
Choose Category to create an object data source for categories, and click OK.
Tip
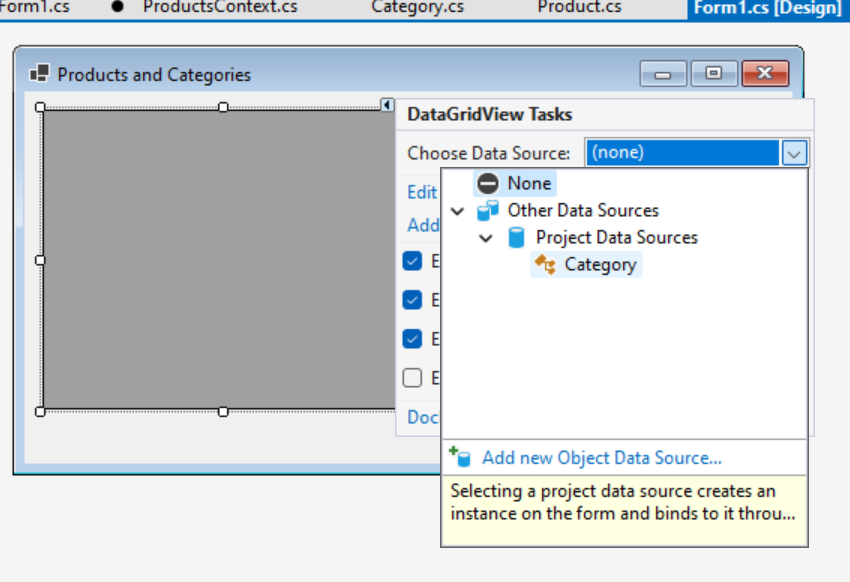
If no data source types appear here, then make sure that
Product.cs,Category.csandProductsContext.cshave been added to the project and the solution has been built.Now the Choose Data Source drop-down contains the object data source we just created. Expand Other Data Sources, then Project Data Sources, and choose Category.
The second
DataGridViewwill be bound to products. However, rather than binding to the top-levelProducttype, it will instead be bound to theProductsnavigation from theCategorybinding of the firstDataGridView. This means that when a category is selected in the first view, the products for that category will automatically be used in the second view.Using the Designer Action Glyph on the second
DataGridView, choose Choose Data Source, then expand thecategoryBindingSourceand chooseProducts.
Configuring what is displayed
By default, a column is created in the DataGridView for every property of the bound types. Also, the values for each of these properties can be edited by the user. However, some values, such as the primary key values, are conceptually read-only, and so should not be edited. Also, some properties, such as the CategoryId foreign key property and the Category navigation are not useful to the user, and so should be hidden.
Tip
It is common to hide primary key properties in a real application. They are left visible here to make it easy to see what EF Core is doing behind the scenes.
Right-click on the first
DataGridViewand choose Edit Columns....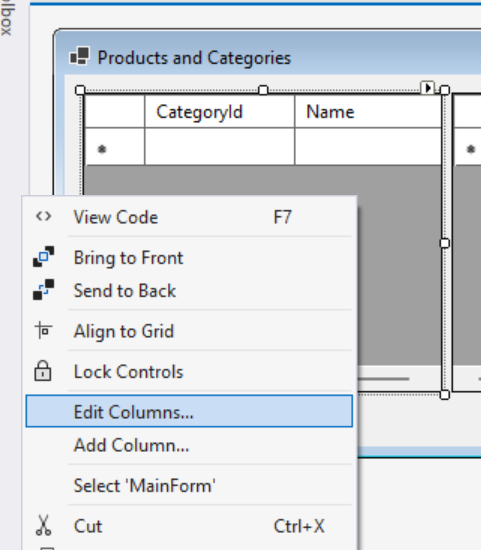
Make the
CategoryIdcolumn, which represents the primary key, read-only, and click OK.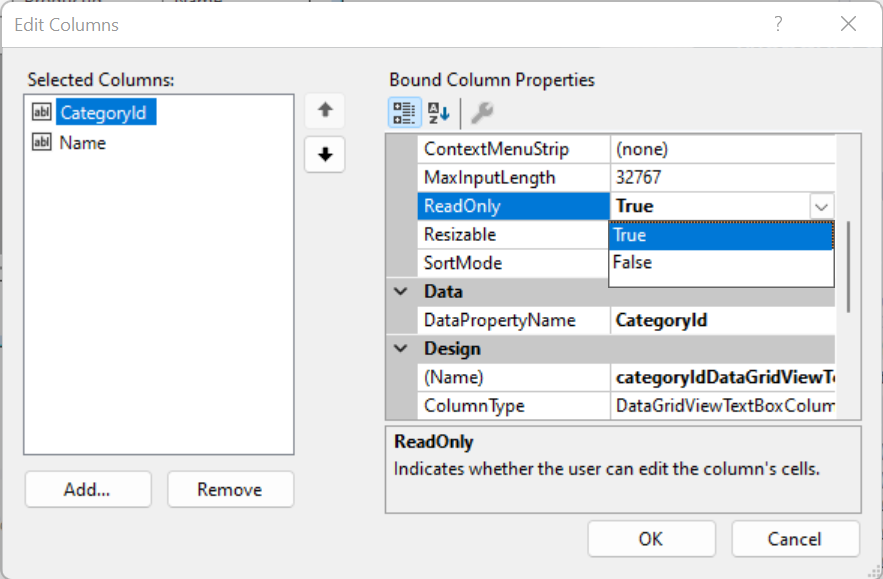
Right-click on the second
DataGridViewand choose Edit Columns.... Make theProductIdcolumn read-only, and remove theCategoryIdandCategorycolumns, then click OK.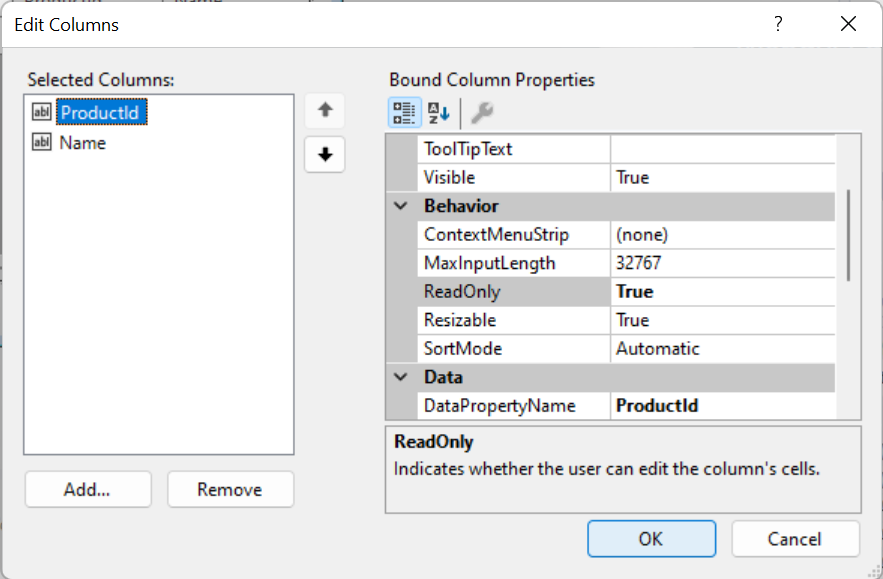
Connecting to EF Core
The application now needs a small amount of code to connect EF Core to the data-bound controls.
Open the
MainFormcode by right-clicking on the file and choosing View Code.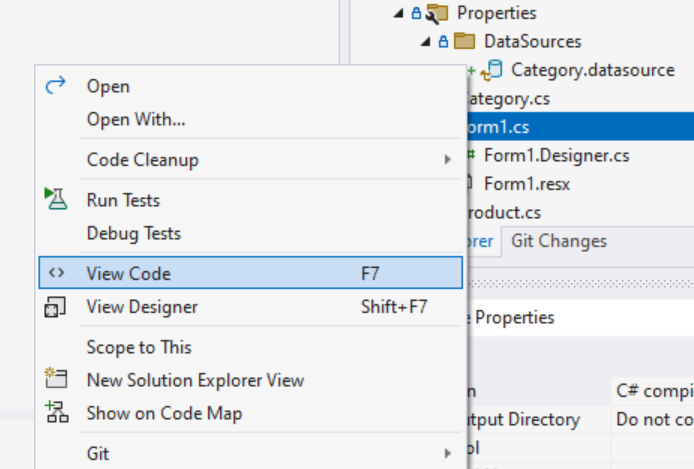
Add a private field to hold the
DbContextfor the session, and add overrides for theOnLoadandOnClosingmethods. The code should look like this:
using Microsoft.EntityFrameworkCore;
using System.ComponentModel;

namespace GetStartedWinForms
{
    public partial class MainForm : Form
    {
        private ProductsContext? dbContext;

        public MainForm()
        {
            InitializeComponent();
        }

        protected override void OnLoad(EventArgs e)
        {
            base.OnLoad(e);

            this.dbContext = new ProductsContext();

            // Uncomment the line below to start fresh with a new database.
            // this.dbContext.Database.EnsureDeleted();
            this.dbContext.Database.EnsureCreated();

            this.dbContext.Categories.Load();

            this.categoryBindingSource.DataSource = dbContext.Categories.Local.ToBindingList();
        }

        protected override void OnClosing(CancelEventArgs e)
        {
            base.OnClosing(e);

            this.dbContext?.Dispose();
            this.dbContext = null;
        }
    }
}
The OnLoad method is called when the form is loaded. At this time
- An instance of the
ProductsContextis created that will be used to load and track changes to products and categories displayed by the application. EnsureCreatedis called on theDbContextto create the SQLite database if it does not already exist. This is a quick way to create a database when prototyping or testing applications. However, if the model changes, then the database will need to be deleted so that it can be created again. (TheEnsureDeletedline can be un-commented to easily delete and re-create the database when the application is run.) You may instead wish to use EF Core Migrations to modify and update the database schema without losing any data.EnsureCreatedwill also populate the new database with the data defined in theProductsContext.OnModelCreatingmethod.- The
Loadextension method is used to load all the categories from database into theDbContext. These entities will now be tracked by theDbContext, which will detect any changes made when the categories are edited by the user. - The
categoryBindingSource.DataSourceproperty is initialized to the categories that are being tracked by theDbContext. This is done by callingLocal.ToBindingList()on theCategoriesDbSetproperty.Localprovides access to a local view of the tracked categories, with events hooked up to ensure the local data stays in sync with the displayed data, and vice versa.ToBindingList()exposes this data as anIBindingList, which is understood by Windows Forms data binding.
The OnClosing method is called when the form is closed. At this time, the DbContext is disposed, which ensures any database resources will be freed, and the dbContext field is set to null so that it cannot be used again.
Populating the Products view
If the application is started at this point, then it should look something like this:
Notice that the categories have been loaded from the database, but the products table remains empty. Also, the Save button does not work.
To populate the products table, EF Core needs to load products from the database for the selected category. To achieve this:
In the designer for the main form, select the
DataGridViewfor categories.In the Properties for the
DataGridView, choose the events (the lightning button), and double click the SelectionChanged event.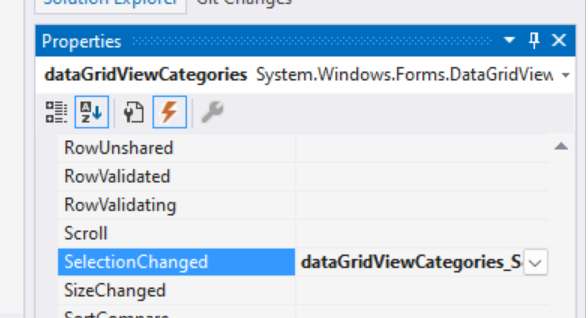
This will create stub in the main form code for an event to be fired whenever the category selection changes.
Fill in the code for the event:
private void dataGridViewCategories_SelectionChanged(object sender, EventArgs e)
{
    if (this.dbContext != null)
    {
        var category = (Category)this.dataGridViewCategories.CurrentRow.DataBoundItem;

        if (category != null)
        {
            this.dbContext.Entry(category).Collection(e => e.Products).Load();
        }
    }
}
In this code, if there is an active (non-null) DbContext session, then we obtain the Category instance bound to the currently selected row of the DataViewGrid. (This may be null if the final row in the view is selected, which is used to create new categories.) If there is a selected category, then the DbContext is instructed to load the products associated with that category. This is done by:
- Getting an
EntityEntryfor theCategoryinstance (dbContext.Entry(category)) - Letting EF Core know that we want to operate on the
Productscollection navigation of thatCategory(.Collection(e => e.Products)) - And finally telling EF Core that we want to load that collection of products from the database (
.Load();)
Tip
When Load is called, EF Core will only access the database to load the products if they have not already been loaded.
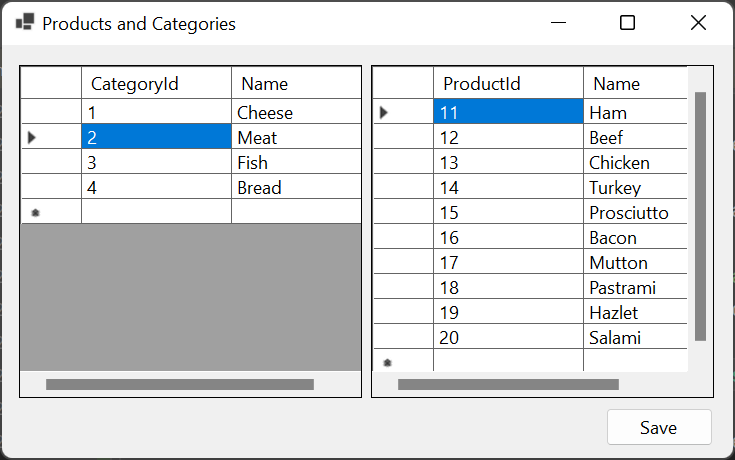
If the application is now run again, then it should load the appropriate products whenever a category is selected:
Saving changes
Finally, the Save button can be connected to EF Core so that any changes made to the products and categories are saved to the database.
In the designer for the main form, select the Save button.
In the Properties for the
Button, choose the events (the lightning button), and double click the Click event.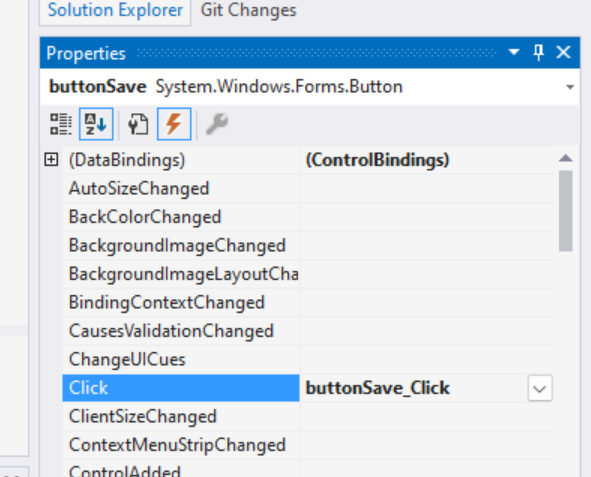
Fill in the code for the event:
private void buttonSave_Click(object sender, EventArgs e)
{
    this.dbContext!.SaveChanges();

    this.dataGridViewCategories.Refresh();
    this.dataGridViewProducts.Refresh();
}
This code calls SaveChanges on the DbContext, which saves any changes made to the SQLite database. If no changes were made, then this is a no-op, and no database call is made. After saving, the DataGridView controls are refreshed. This is because EF Core reads generated primary key values for any new products and categories from the database. Calling Refresh updates the display with these generated values.
The final application
Here is the full code for the main form:
using Microsoft.EntityFrameworkCore;
using System.ComponentModel;

namespace GetStartedWinForms
{
    public partial class MainForm : Form
    {
        private ProductsContext? dbContext;

        public MainForm()
        {
            InitializeComponent();
        }

        protected override void OnLoad(EventArgs e)
        {
            base.OnLoad(e);

            this.dbContext = new ProductsContext();

            // Uncomment the line below to start fresh with a new database.
            // this.dbContext.Database.EnsureDeleted();
            this.dbContext.Database.EnsureCreated();

            this.dbContext.Categories.Load();

            this.categoryBindingSource.DataSource = dbContext.Categories.Local.ToBindingList();
        }

        protected override void OnClosing(CancelEventArgs e)
        {
            base.OnClosing(e);

            this.dbContext?.Dispose();
            this.dbContext = null;
        }

        private void dataGridViewCategories_SelectionChanged(object sender, EventArgs e)
        {
            if (this.dbContext != null)
            {
                var category = (Category)this.dataGridViewCategories.CurrentRow.DataBoundItem;

                if (category != null)
                {
                    this.dbContext.Entry(category).Collection(e => e.Products).Load();
                }
            }
        }

        private void buttonSave_Click(object sender, EventArgs e)
        {
            this.dbContext!.SaveChanges();

            this.dataGridViewCategories.Refresh();
            this.dataGridViewProducts.Refresh();
        }
    }
}
The application can now be run, and products and categories can be added, deleted, and edited. Notice that if the Save button is clicked before closing the application, then any changes made will be stored in the database and re-loaded when the application is re-started. If Save is not clicked, then any changes are lost when the application is re-started.
Tip
A new category or product can be added to a DataViewControl using the empty row at the bottom of the control. A row can be deleted by selecting it and pressing the Del key.
Before saving

After saving
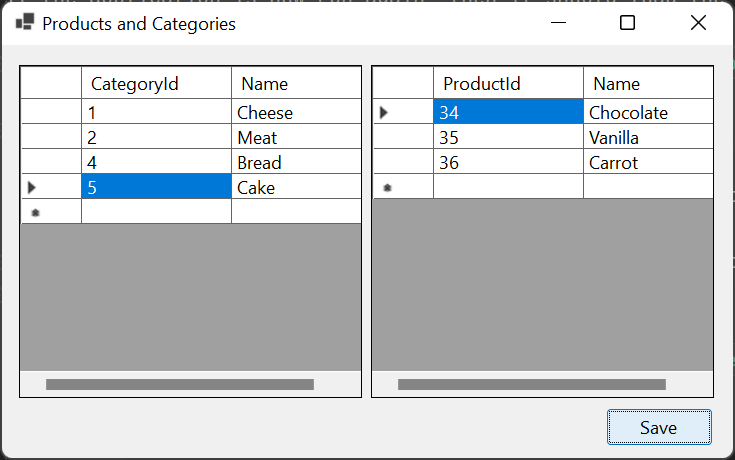
Notice that the primary key values for the added category and products are populated when Save is clicked.
Learn more
Collaborate with us on GitHub
The source for this content can be found on GitHub, where you can also create and review issues and pull requests. For more information, see our contributor guide.