Microsoft's Security Service Edge Solution Deployment Guide for Microsoft Entra Internet Access Proof of Concept
The Microsoft identity-centric Security Service Edge solution converges network and identity access controls so you can secure access to any app or resource from any location, device, or identity. It enables and orchestrates access policy management for employees, business partners, and digital workloads. You can monitor and adjust user access continuously in real time if permissions or risk levels change for private apps, SaaS apps, and Microsoft endpoints.
Protecting enterprise users and managed devices from malicious internet traffic and malware infection concerns all companies. Use Microsoft Entra Internet Access Secure Web Gateway functionality to block traffic based on web categories, and a fully qualified domain name (FQDN), by integrating with Microsoft Entra Conditional Access.
The guidance in this article helps you to deploy Microsoft Entra Internet Access as a proof-of-concept in your production or test environment. It includes setup and configuring web content filtering. You can review prerequisites in the Microsoft's Security Service Edge Solution Deployment Guide Introduction, which includes how to scope your configuration and testing for specific test users and groups.
Deploy and test Microsoft Entra Internet Access
Complete the Configure initial product steps. Learn to enable the Microsoft Entra Internet Access traffic forwarding profile and install the Global Secure Access Client on a test device. For these sample PoC scenarios, you need one test group with one test user as a member.
- Create a baseline policy applying to all internet access traffic routed through the service
- Block a group from accessing websites based on category
- Block a group from accessing websites based on FQDN
- Allow a user to access a blocked website
Sample PoC scenario: Create a baseline policy applying to all internet access traffic routed through the service
Microsoft Internet Access has features to configure a security profile with a priority of 65,000 that applies to all traffic without linking to a Conditional Access policy. Complete the following tasks to create this baseline policy to block an FQDN:
- Configure a block rule for a risky web category by creating a web filtering policy.
- Group and prioritize your web filtering policies by creating a security profile with priority 65,000.
- Use your test user to attempt to access the blocked site to confirm application of your rule.
- Stop the agent and confirm that your test user can access the previously blocked site.
- View activity in the traffic log.
Create a web filtering policy
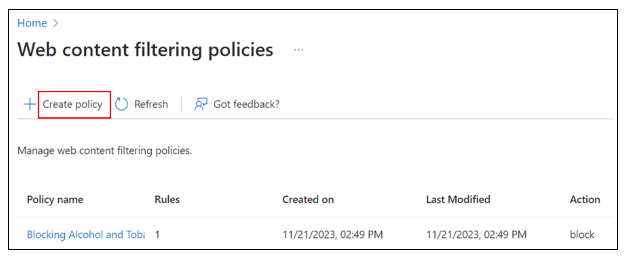
In the Microsoft Entra admin center, go to Global Secure Access > Secure > Web content filtering policies > Create policy > Configure Global Secure Access content filtering.
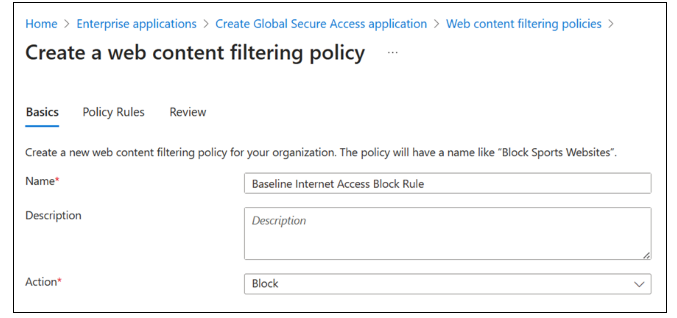
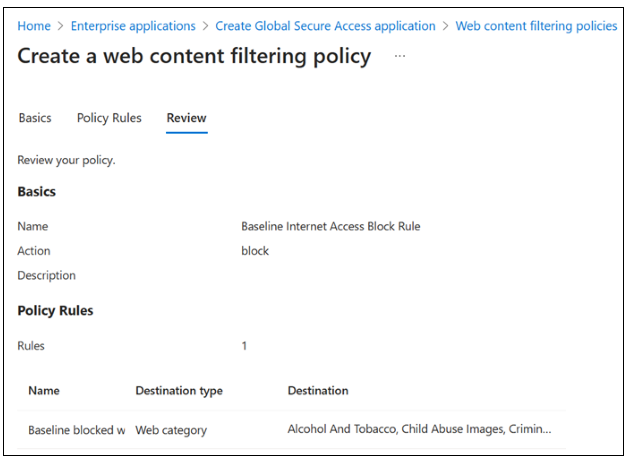
On Create a web content filtering policy > Basics, provide the following details.
- Name: Baseline Internet Access block rule.
- Description: Add a description.
- Action: Block.
Select Next.
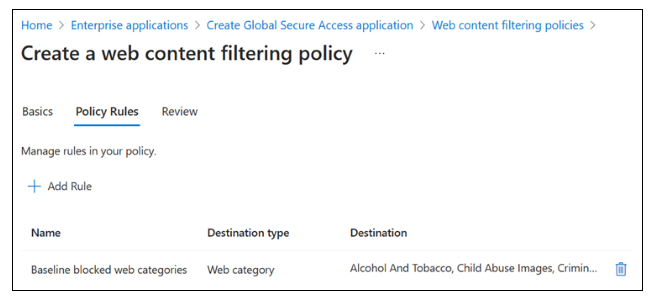
On Create a web content filtering policy > Policy Rules, select Add Rule.

In the Add Rule dialog box, provide the following details.
- Name: Baseline blocked web categories.
- Destination type: webCategory.
- Search: Select a few risky categories, confirm they are in the Selected items list.
Select Add.
On Create a web content filtering policy > Policy Rules, confirm your selections.
Select Next.
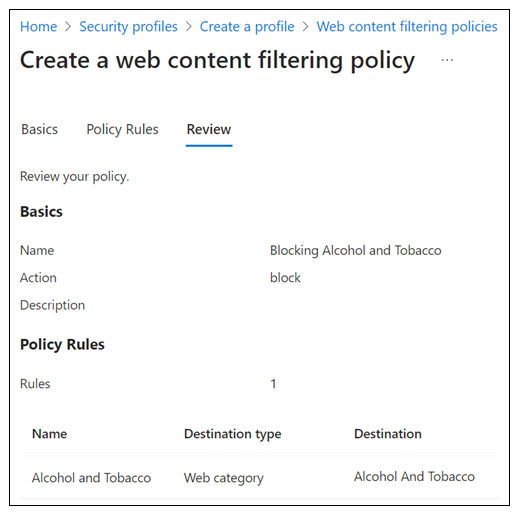
On Create a web content filtering policy > Review, confirm your policy configuration.
Select Create policy.
To confirm policy creation, view it in the Manage web content filtering policies list.


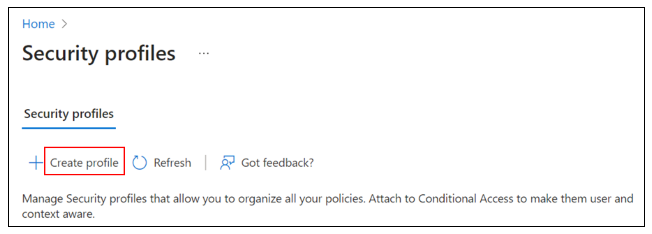
Create a security policy profile
In the Microsoft Entra admin center, go to Global Secure Access > Secure > Security profiles. Select Create profile.
On Create a profile > Basics, provide the following details.
- Profile name: Baseline Internet Access Block Profile.
- Description: Add a description.
- State: enabled.
- Priority: 65000.
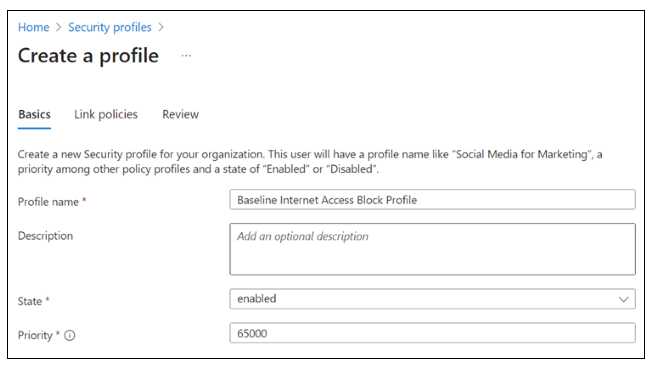
Select Next.
On Create a profile > Link policies, select Link a policy. Select Existing policy.
- In the Link a policy dialog box, select Policy name and select Baseline Internet Access block rule.
- Priority: 100.
- State: Enabled.
Select Add.
On Create a profile > Link policies, confirm Baseline Internet Access Block Rule is in the list.
Select Next.
On Create a profile > Review, confirm your profile configuration.

Select Create a profile.


Attempt to access blocked sites
Sign in to the test device where you installed the global secure access (GSA) agent.
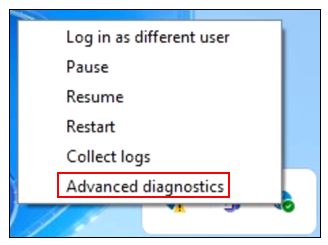
In the system tray, right-click Global Secure Access Client. Select Advanced Diagnostics.
In the Global Secure Access Client - Advanced Diagnostics dialog box, select Traffic.
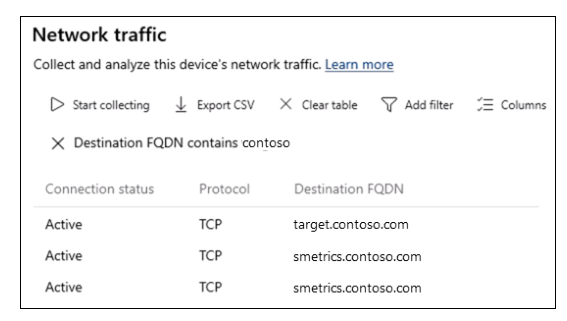
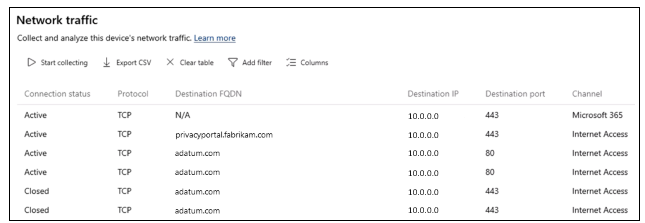
On Network traffic, select Start collecting.

To confirm blocked access, attempt to open the FQDN you blocked. It can take up to 20 minutes for the policy to apply to your client device.

Stop the agent and confirm restored access
On Network traffic, select Stop collecting.
Scroll to observe the traffic related to opening the FQDN, and associated data.
On your test device > System Tray >, expand options > right-click Global Secure Access client. Select Pause.
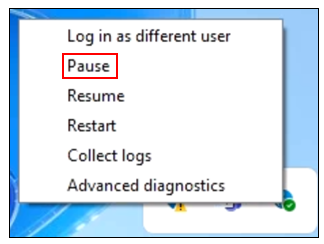
After the confirmation notification appears, open the previously blocked site to confirm restored access.

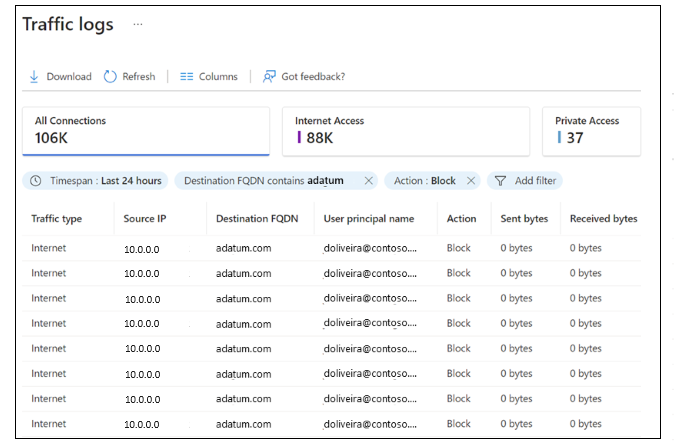
View activity in the traffic log
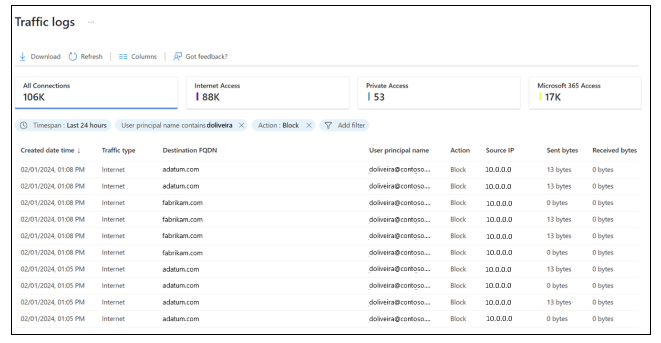
In the Microsoft Entra admin center > Global Secure Access > Monitor, select Traffic logs. If needed, select Add filter. Filter when User principal name contains testuser and Action set to Block.
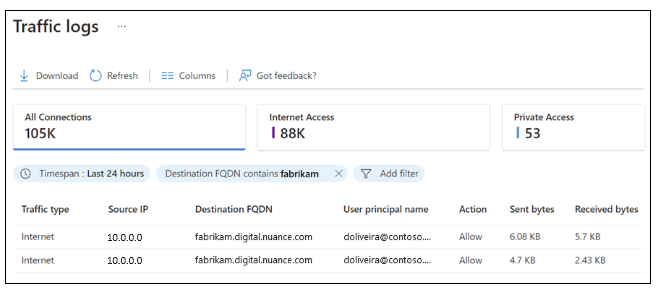
Observe the entries for your target FQDN that show traffic as blocked and then allowed. There may be a delay of up to 20 minutes for entries to appear in the log.

Sample PoC scenario: Block a group from accessing websites based on category
Use Microsoft Entra Internet Access to block or allow access to internet sites based on category. These areas include gambling, alcohol, and tobacco sites. Manually managing blocklists isn't required. Complete the following tasks to configure Microsoft Entra Internet Access to block alcohol and tobacco sites for your test user.
- Configure a block rule for category sites. Create a web filtering policy.
- Group and prioritize your web filtering policies. Create a security profile.
- Configure your test group, with the test user, to use the security profile. Create and assign a Conditional Access policy.
- Confirm rule application by using your test user to attempt to access a blocked site.
- Stop the agent and confirm test user access to the previously blocked site.
- View activity in the traffic log.
Create a web filtering policy
In the Microsoft Entra admin center, go to Global Secure Access > Secure > Web content filtering policies > Create policy > Configure Global Secure Access content filtering.
On Create a web content filtering policy > Basics, provide the following details.
- Name: Blocking Alcohol and Tobacco.
- Description: Add a description.
- Action: Block.
Select Next.
On Create a web content filtering policy > Policy Rules, select Add Rule.
In the Add Rule dialog box, provide the following details.
- Name: Alcohol and Tobacco.
- Destination type: webCategory.
- Search: Alcohol.
- Select Alcohol and Tobacco.
Select Add.
On Create a web content filtering policy > Policy Rules, select Next.
On Create a web content filtering policy > Review, confirm your policy configuration.
Select Create policy.
To confirm policy creation, view it in the Manage web content filtering policies list.


Create a security policy profile
In the Microsoft Entra admin center, go to Global Secure Access > Secure > Security profiles. Select Create profile.
On Create a profile > Basics, provide the following details.
- Profile name: Internet Access Profile.
- Description: Add a description.
- State: enabled.
- Priority: 1000.
Select Next.
On Create a profile > Link policies, select Link a policy.
Select Existing policy.
In the Link a policy dialog box, provide the following details.
- Policy name: Blocking Alcohol and Tobacco.
- Priority: 1000.
- State: Enabled.
Select Add.
On Create a profile > Link policies, confirm Blocking Alcohol and Tobacco in list.
Select Next.
On Create a profile > Review, confirm your profile configuration.
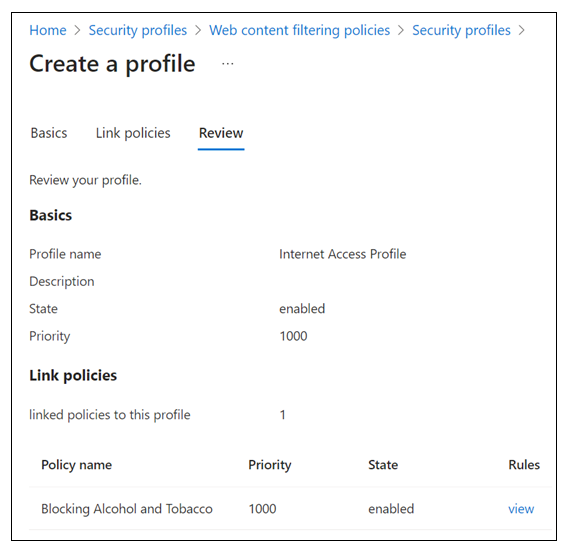
Select Create a profile.
Create a Conditional Access policy
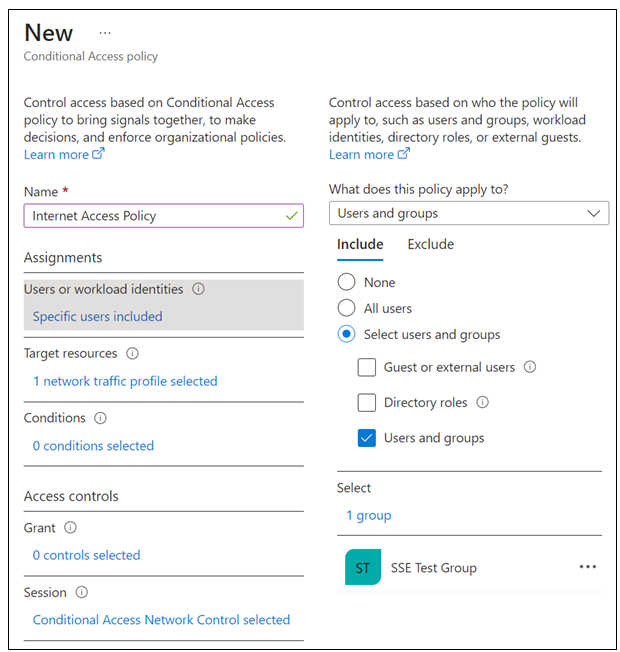
In the Microsoft Entra admin center, go to Protection > Conditional Access. Select Create new policy.
In the New Conditional Access Policy dialog box, configure the following details.
- Name: Internet Access Policy.
- Users or workload identities: Specific users included.
- What does this policy apply to? Users and groups.
- Include > Select users and groups > Select Users and groups.
Select your test group > click Select.
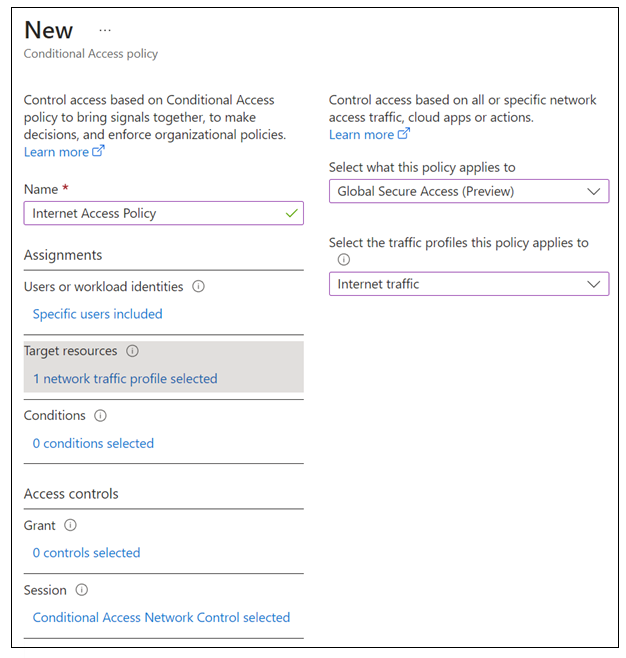
Target resources.
- Select what this policy applies to > Global Secure Access.
- Select the traffic profiles this policy applies to > Internet traffic.
Leave the Grant control at default to grant access so that your defined security profile defines block functionality.
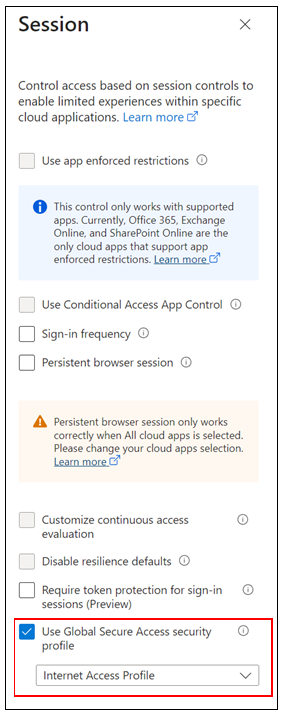
In the Session dialog box, select Use Global Secure Access security profile.
Select Internet Access Profile.
In Conditional Access Overview > Enable policy, select On. Select Create.
Attempt to access blocked sites
Sign in to your test device where you installed the GSA agent.
In the system tray, right-click Global Secure Access Client. Select Advanced Diagnostics.
In the Global Secure Access Client - Advanced Diagnostics dialog box, select Traffic.
On Network traffic, select Start collecting.
Attempt to open an alcohol or tobacco site to confirm blocked access. You should see DeniedTraffic for http websites and a Can't reach this page notification for https websites. It can take up to 20 minutes for the policy to apply to your client device.
Stop the agent and confirm restored access
On Network traffic, select Stop collecting.
Scroll to observe the traffic related to opening the FQDN and associated data. Note the Internet Access in the Channel columns. Conditional Access policies are written as claims to your token that have a one-hour lifetime. It can take up to one hour for new Conditional Access policies to apply to your client device. Because changes propagate across Microsoft Entra, it can take up to 20 minutes for web-filtering policy and security-profile changes to apply to your client device.
On your test device > System Tray >, expand options > right-click Global Secure Access client. Select Pause.
After confirmation notification appears, open the previously blocked site to confirm restored access. Functionality to access the GSA client menu is administratively controllable when the product moves to General Availability.

View activity in the traffic log
In the Microsoft Entra admin center > Global Secure Access > Monitor, select Traffic logs.
If needed, select Add filter. Filter when User principal name contains testuser and Action set to Block.
Observe the entries for your target FQDN that show traffic as blocked and then allowed. There can be a delay of up to 20 minutes for entries to appear in the log.

Sample PoC scenario: Block a group from accessing websites based on FQDN
In some cases, it's necessary to block specific websites rather than using broad web categories. Complete the following tasks to block access to the site based on FQDN. Ensure you include relevant fully qualified domain names (FQDNs) in use by the site that you want to block.
- Configure a block rule for a specific FQDN. Create a web filtering policy.
- Group and prioritize your web filtering policies. Create a security profile.
- Configure your test group (the user is a member) to use the security profile. Create and assign a Conditional Access policy.
- Confirm rule application by using your test user to attempt to access a blocked site.
- Stop the agent and confirm test user access to the previously blocked site.
- View activity in the traffic log.
Create a web filtering policy
In the Microsoft Entra admin center, go to Global Secure Access > Secure > Web content filtering policies > Create policy > Configure Global Secure Access content filtering.
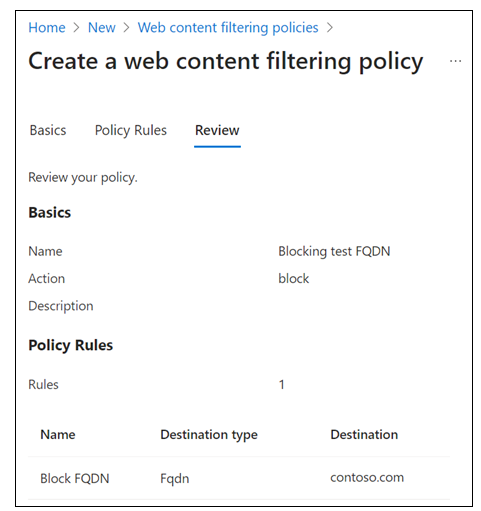
On Create a web content filtering policy > Basics, provide the following details.
- Name: Blocking test FQDN.
- Description: Add a description.
- Action: Block.
Select Next.
On Create a web content filtering policy > Policy Rules, select Add Rule.
In the Add Rule dialog box, provide the following details.
- Name: Enter the name, such as Block test FQDN.
- Destination type: FQDN.
- Destination: enter the test FQDN in the format *.domainname.com or domainname.com.
Select Add.
On Create a web content filtering policy > Policy Rules, confirm your selections.
Select Next.
On Create a web content filtering policy > Review, confirm your policy configuration.
Select Create policy.
To confirm policy creation, view it in the Manage web content filtering policies list.
Create a security policy profile
In the Microsoft Entra admin center, go to Global Secure Access > Secure > Security profiles. Select Create profile.
On Create a profile > Basics, provide the following details.
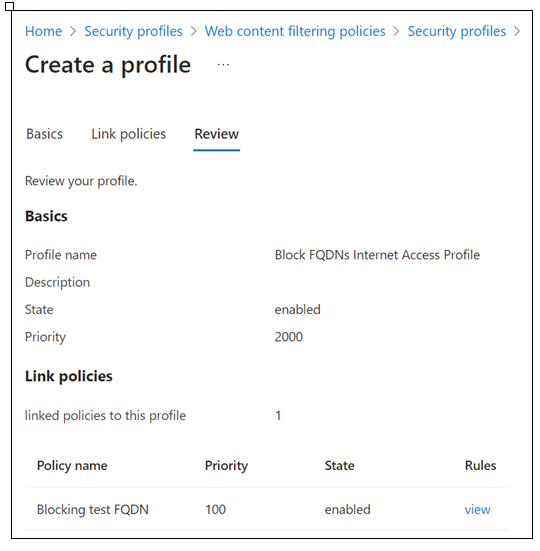
- Profile name: Block FQDNs Internet Access Profile.
- Description: Add a description.
- State: enabled. *Priority: 2000.
Select Next.
On Create a profile > Link policies, select Link a policy.
Select Existing policy.
In the Link a policy dialog box, provide the following details.
- Policy name: Blocking test FQDN.
- Priority: 100.
- State: Enabled.
Select Add.
On the Link policies tab, confirm Blocking test FQDN in list.
Select Next.
On the Review tab, confirm your profile configuration.
Select Create a profile.
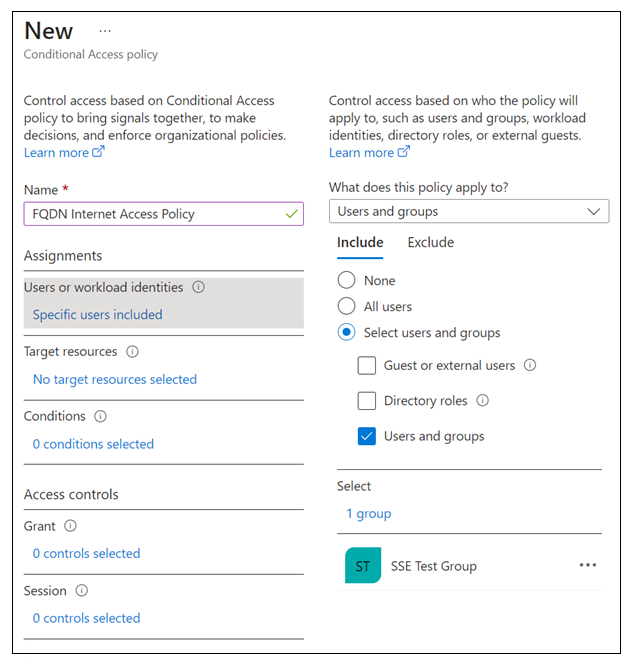
Create a Conditional Access policy
In the Microsoft Entra admin center, go to Protection > Conditional Access. Select Create new policy.
In the New Conditional Access Policy dialog box, configure the following.
- Name: FQDN Internet Access Policy.
- Users or workload identities: Specific users included.
- What does this policy apply to? Users and groups.
- Include > Select users and groups > Select Users and groups.
- Select your test group. Click Select.
Target resources > Select what this policy applies to > Global Secure Access.
Select the traffic profiles this policy applies to > Internet traffic.
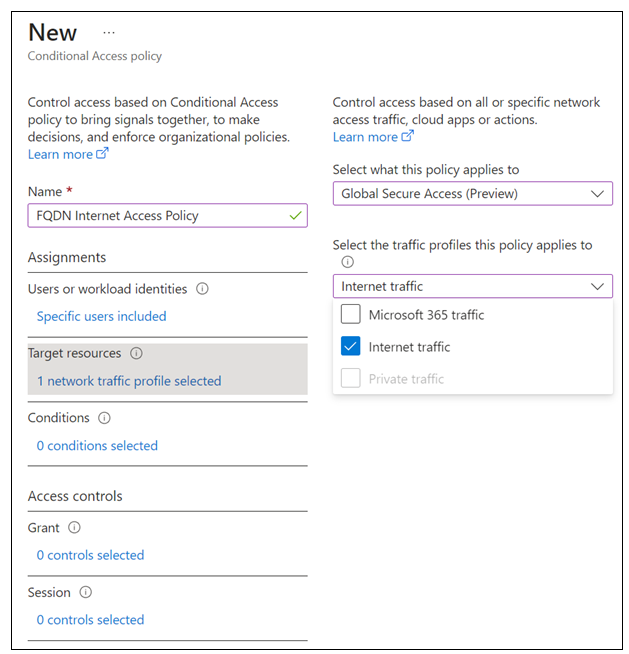
In the Session dialog box, select Block FQDNs Internet Access Profile. Select Internet Access Profile.
In Conditional Access Overview > Enable policy, select On. Select Create.
Attempt to access blocked sites
Sign in to your test device where you installed the GSA agent.
In the System Tray, right-click Global Secure Access Client. Select Advanced Diagnostics.
In the Global Secure Access Client - Advanced Diagnostics dialog box, select Traffic.
On Network traffic, select Start collecting.
Attempt to open the FQDN you configured to confirm blocked access. You should see Access Denied for http websites and Can't reach this page notification for https websites. It can take up to 20 minutes for the policy to apply to your client device.
Stop the agent and confirm restored access
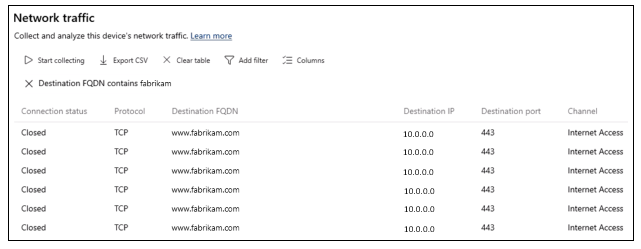
On Network traffic, select Stop collecting.
Scroll to observe the traffic related to opening the FQDN, and associated data.
On your test device > System Tray >, expand options > right-click Global Secure Access client. Select Pause.
After the confirmation notification appears, open the previously blocked site to confirm restored access.

View activity in the traffic log
- In the Microsoft Entra admin center > Global Secure Access > Monitor, select Traffic logs.
- If needed, select Add filter. Filter when User principal name contains testuser and Action set to Block.
- Observe the entries for your target FQDN that show traffic as blocked and then allowed. There can be a delay of up to 20 minutes for entries to appear in the log.
Sample PoC scenario: Allow a user to access a blocked website
In some cases, you might have users that require access to blocked sites for groups in which the user is a member. Complete the following tasks to override a block configured for your test group, so the test user can access the blocked site.
- Configure an allow rule for the same FQDN that you blocked in the previous scenario. Create a web filtering policy.
- Group and prioritize your web filtering policies. Create a security profile with a higher priority than the block policy created previously.
- Configure your test user to use the security profile. Create and assign a Conditional Access policy.
- Confirm rule application by using your test user to attempt to access a blocked site.
- Stop the agent and confirm test user access to the previously blocked site.
- View activity in the traffic log.
Create a web filtering policy
In the Microsoft Entra admin center, go to Global Secure Access > Secure > Web content filtering policies > Create policy > Configure Global Secure Access content filtering.
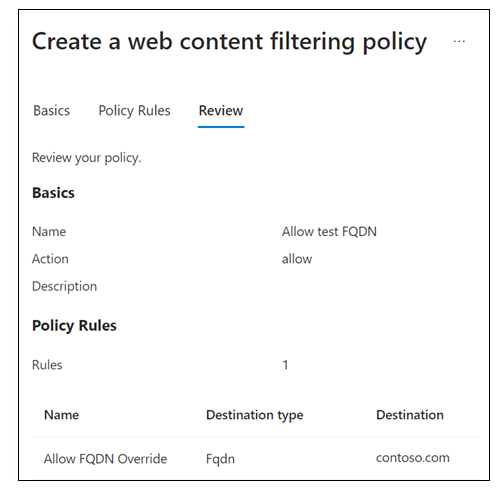
On Create a web content filtering policy > Basics, provide the following details.
- Name: Allow test FQDN.
- Description: Add a description.
- Action: Allow.
Select Next.
On Create a web content filtering policy > Policy Rules, select Add Rule.
In the Add Rule dialog box, provide the following details. Select Add.
- Name: Enter a name, such as Allow FQDN Override.
- Destination type: FQDN.
- Destination: enter the FQDN in the format *.domainname.com or domain.com. Select Add.
On Create a web content filtering policy > Policy Rules, confirm your selections.
Select Next.
On Create a web content filtering policy > Review, confirm your policy configuration.
Select Create policy.
To confirm policy creation, view it in the Manage web content filtering policies list.
Create a security policy profile
In the Microsoft Entra admin center, go to Global Secure Access > Secure > Security profiles. Select Create profile.
](media/sse-deployment-guide-internet-access/security-profiles-expanded.png#lightbox)On Create a profile > Basics, provide the following details.
- Profile name: Allow FQDNs Internet Access Profile.
- Description: Add a description.
- State: enabled.
- Priority: 500.
Select Next.
On Create a profile > Link policies, select Link a policy.
Select Existing policy.
In the Link a policy dialog box, provide the following details.
- Policy name: Allow test FQDN.
- Priority: 100.
- State: Enabled.
Select Add.
On Create a profile > Link policies, confirm Allow test FQDN in list.
Select Next.
On the Review tab, confirm your profile configuration.
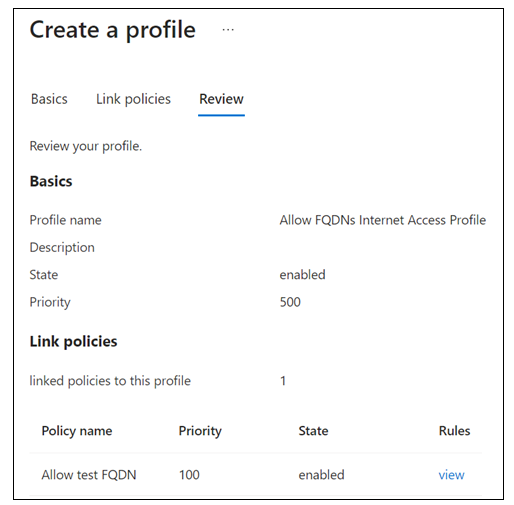
Select Create a profile.
Create a Conditional Access policy
In the Microsoft Entra admin center, go to Protection > Conditional Access. Select Create new policy.
In the New Conditional Access Policy dialog box, configure the following.
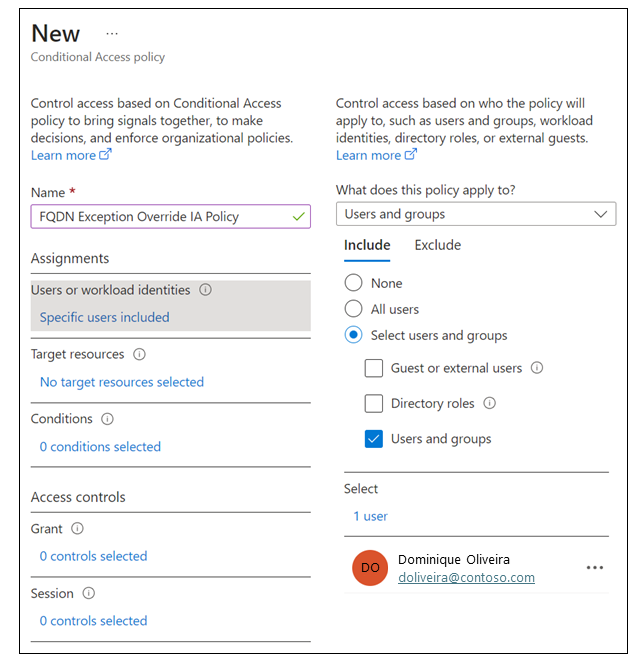
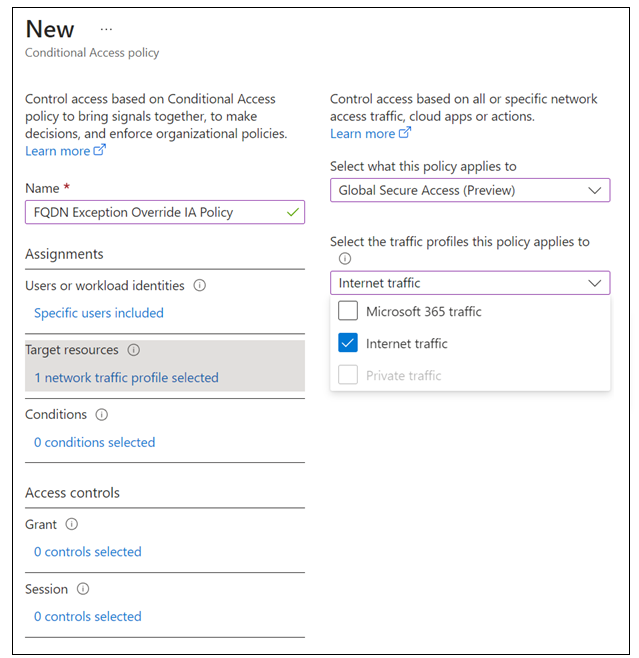
- Name: FQDN Exception Override IA Policy.
- Users or workload identities: Specific users included.
- What does this policy apply to? Users and groups.
- Include > Select users and groups > Select Users and groups.
- Select your test group. Click Select.
Target resources > Select what this policy applies to > Global Secure Access.
Select the traffic profiles this policy applies to > Internet traffic.
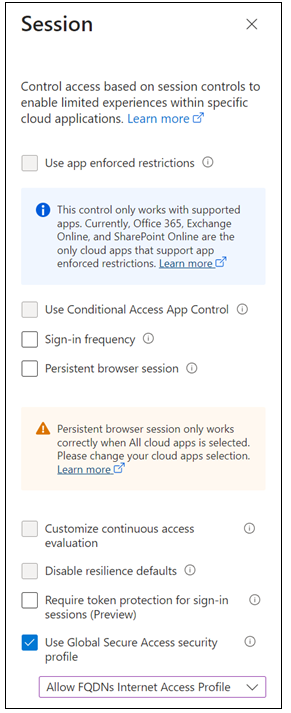
Session > select Use Global Secure Access security profile, select Allow FQDNs Internet Access Profile. Click Select.
In Conditional Access Overview > Enable policy, select On. Select Create.
Attempt to access blocked sites
Sign in to your test device where you installed the GSA agent.
In the System Tray, right-click Global Secure Access Client. Select Advanced Diagnostics.
In the Global Secure Access Client - Advanced Diagnostics dialog box, select Traffic.
On Network traffic, select Start collecting.
To confirm access for this specific user, attempt to open the FQDN that you configured as an exception. It can take up to 20 minutes for the policy to apply to your client device.
Stop the agent and confirm restored access
- On Network traffic, select Stop collecting.
- Scroll to observe the traffic related to opening the FQDN.
View activity in the traffic log
In the Microsoft Entra admin center > Global Secure Access > Monitor, select Traffic logs. If needed, select Add filter. Filter when User principal name contains testuser and Action set to Block.
Observe the entries for your target FQDN that show traffic as blocked and then allowed. There can be a delay of up to 20 minutes for entries to appear in the log.

Next steps
Feedback
Coming soon: Throughout 2024 we will be phasing out GitHub Issues as the feedback mechanism for content and replacing it with a new feedback system. For more information see: https://aka.ms/ContentUserFeedback.
Submit and view feedback for