Note
Access to this page requires authorization. You can try signing in or changing directories.
Access to this page requires authorization. You can try changing directories.
Applies to:  Workforce tenants
  External tenants (learn more)
Tip
This article applies to user flows in external tenants. For information about workforce tenants, see Define custom attributes for user flows.
If your app requires more information than the built-in user attributes provide, you can add your own attributes. We refer to these attributes as custom user attributes.
To define a custom user attribute, you first create the attribute at the tenant level so it can be used in any user flow in the tenant. Then you assign the attribute to your sign-up user flow and configure how you want it to appear on the sign-up page.
Learn more about custom user attributes in User profile attributes article.
Create custom user attributes
Sign in to the Microsoft Entra admin center.
If you have access to multiple tenants, use the Settings icon
 in the top menu to switch to your external tenant from the Directories + subscriptions menu.
Browse to Entra ID > External Identities > Overview.
Select Custom user attributes. The list contains all user attributes available in the tenant, including any custom user attributes that have been created. The Attribute type column indicates whether an attribute is built-in or custom.
Select Add. In the Add an attribute pane, enter a Name for the custom attribute (for example, "Terms of use").
In Data Type, choose String, Boolean, or Int depending on the type of data and user input control you want to create. String attributes have a default user input type value of TextBox, but you're able to change this in a later step (for example if you want to configure radio buttons or multiselect checkboxes).
(Optional) In Description, enter a description of the custom attribute for internal use. This description isn't visible to the user.
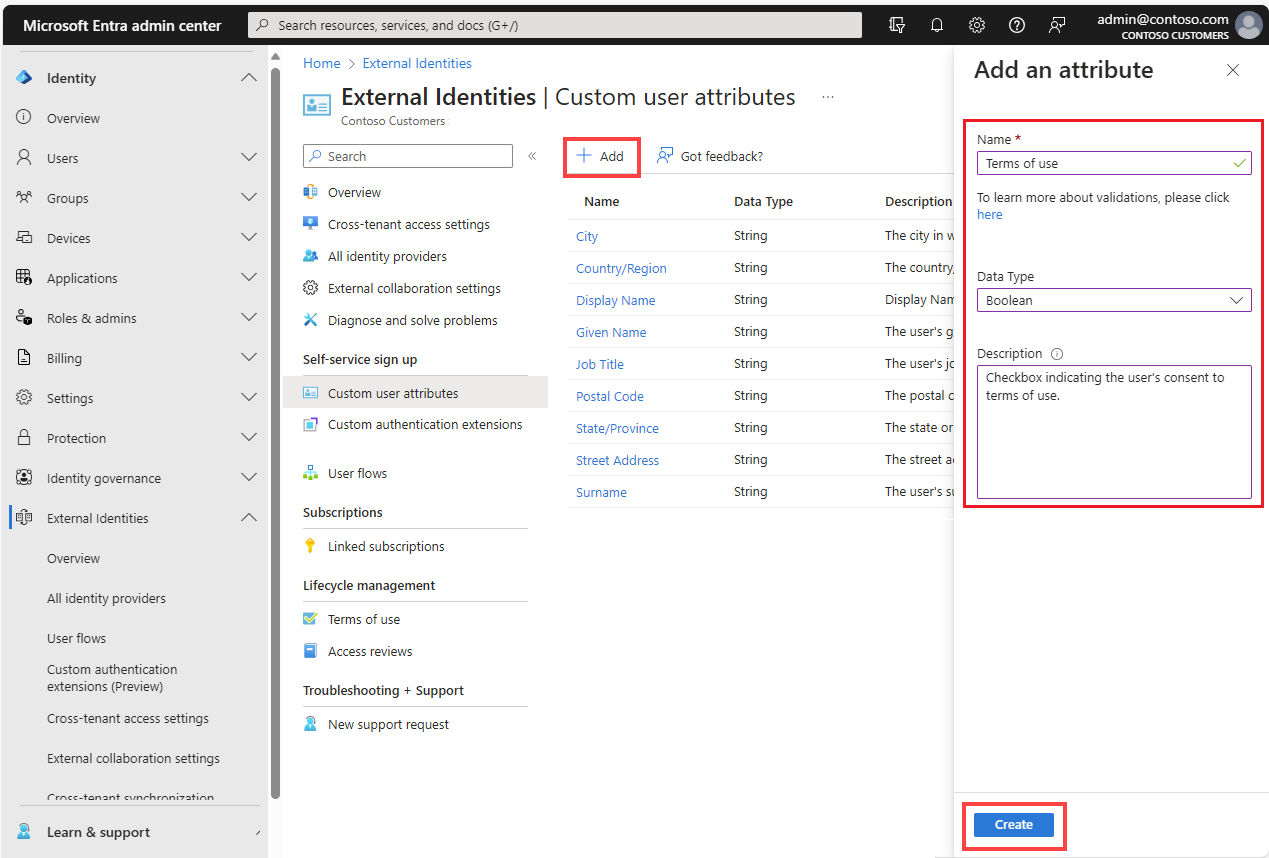
Select Create. The custom attribute is now available in the list of user attributes and can be added to your user flows.

Include the custom user attribute in a sign-up flow
Follow these steps to add custom user attributes to a user flow you've already created. (If you need to create a new user flow, see Create a sign-up and sign-in user flow for customers.)
Sign in to the Microsoft Entra admin center.
If you have access to multiple tenants, use the Settings icon
in the top menu to switch to your external tenant from the Directories + subscriptions menu.Browse to Entra ID > External Identities > User flows.
Select the user flow from the list.
Select User attributes. The list includes any custom user attributes you defined as described in the previous section. For example, the new Terms of use attribute now appears in the list. Choose all the attributes you want to collect from the user during sign-up.
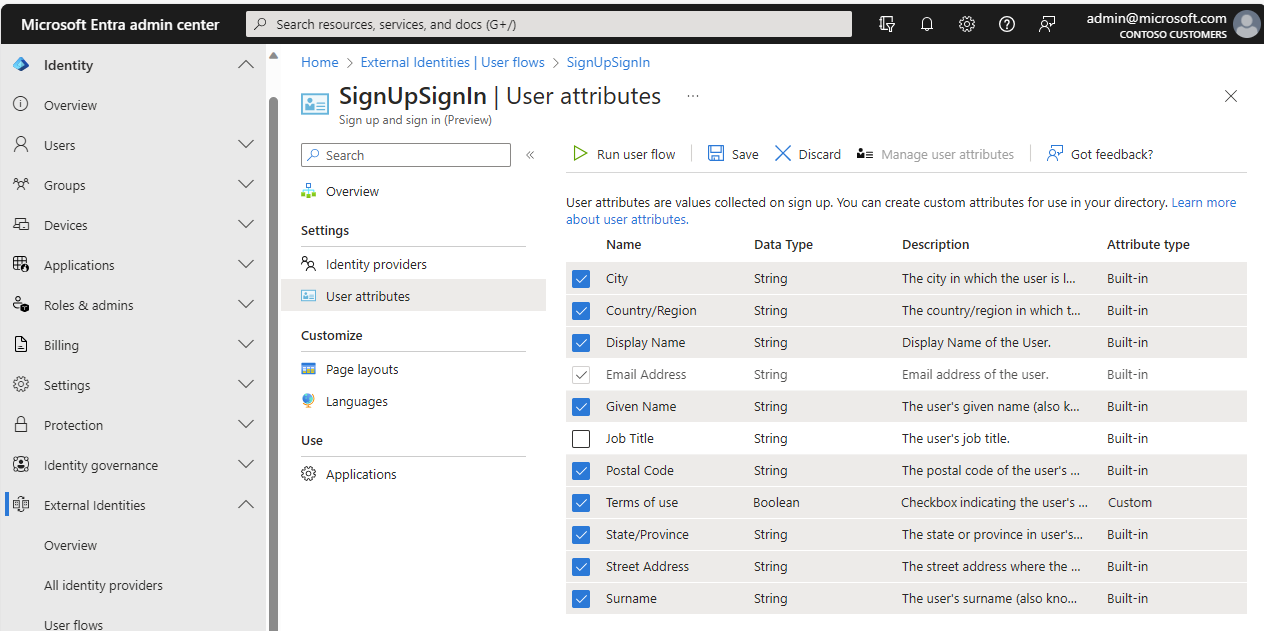
Select Save.

Configure the user input types and page layout
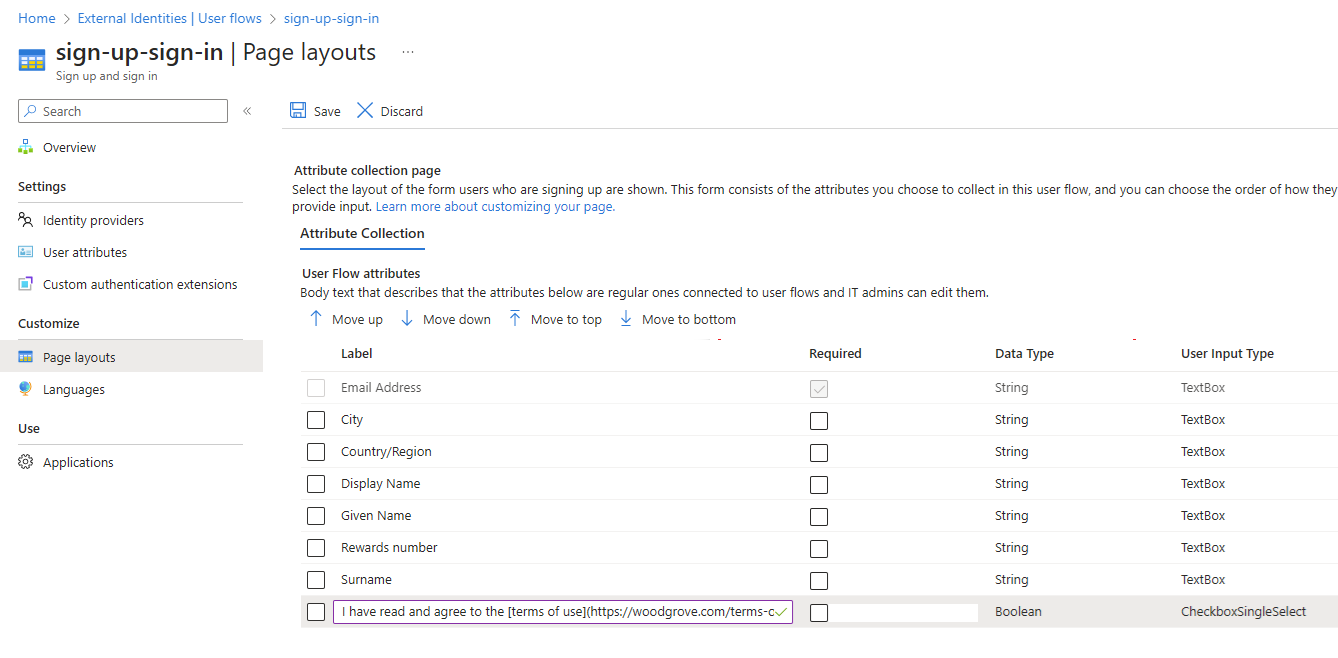
On the Page layout page, you can indicate which attributes are required and arrange the display order. You can also edit attribute labels, create radio buttons or checkboxes, and add hyperlinks to more content (such as terms of use or a privacy policy).
Sign in to the Microsoft Entra admin center.
Browse to Entra ID > External Identities > User flows.
From the list, select your user flow.
Under Customize, select Page layouts. The attributes you chose to collect appear.
Edit the label for any attribute by selecting the value in the Label column and modifying the text.
Configure checkboxes or radio buttons:
- Single-select checkbox: A Boolean attribute type renders as a single-select checkbox on the sign-up page. To configure the text that displays next to the checkbox, select and edit the value in the Label column. Use Markdown language to add hyperlinks. For details, see To configure a single-select checkbox (CheckboxSingleSelect)
- Multiselect checkboxes: Find the String data type attribute you want to configure, and select the value in the User Input Type column to open the editor pane. Choose the CheckboxMultiSelect user input type and enter the values. For details, see To configure multiselect checkboxes (CheckboxMultiSelect).
- Radio buttons: Find the String data type attribute you want to configure, and select the value in the User Input Type column to open the editor pane. Choose the RadioSingleSelect user input type and enter the values. For details, see To configure radio buttons (RadioSingleSelect)
Change the order of display by selecting an attribute and choosing Move up, Move down, Move to top, or Move to bottom.
Make an attribute required by selecting the checkbox in the Required column. All attributes can be marked as required. For multiselect checkboxes, "Required" means that the user must select at least one checkbox.
When all your changes are complete, select Save.
Configure a single-select checkbox (CheckboxSingleSelect)
An attribute with a Boolean data type has a user input type of CheckboxSingleSelect. You can modify the text that displays next to the checkbox and include hyperlinks.
Tip

To try out this feature, go to the Woodgrove Groceries demo and start the “Add links to terms of use and privacy policies” use case.
To configure a single-select checkbox, follow these steps:
On the Page layouts page, find the attribute with data type of Boolean that you want to configure.
Select the value in the Label column and enter the text you want to display next to the checkbox. Use Markdown language to add hyperlinks. For example:
To configure the label for a Terms of use attribute, you could enter:
I have read and agree to the [terms of use](https://woodgrove.com/terms-of-use).Or, you could combine your terms of use and privacy policy into a single required checkbox:
I have read and agree to the [terms of use](https://woodgrove.com/terms-of-use) and the [privacy policy](https://woodgrove.com/privacy).
Select Ok.
On the Page layouts page, select Save.

Configure multiselect checkboxes (CheckboxMultiSelect)
An attribute with a String data type can be configured as a CheckboxMultiSelect user input type, which is a series of one or more checkboxes that appear under the attribute label. The user can select one or more checkboxes. You can define the text for individual checkboxes and include hyperlinks to other content. Making this attribute "Required" means that the user must select at least one of the checkboxes.
On the Page layouts page, find the attribute with data type of String that you want to configure as a series of checkboxes.
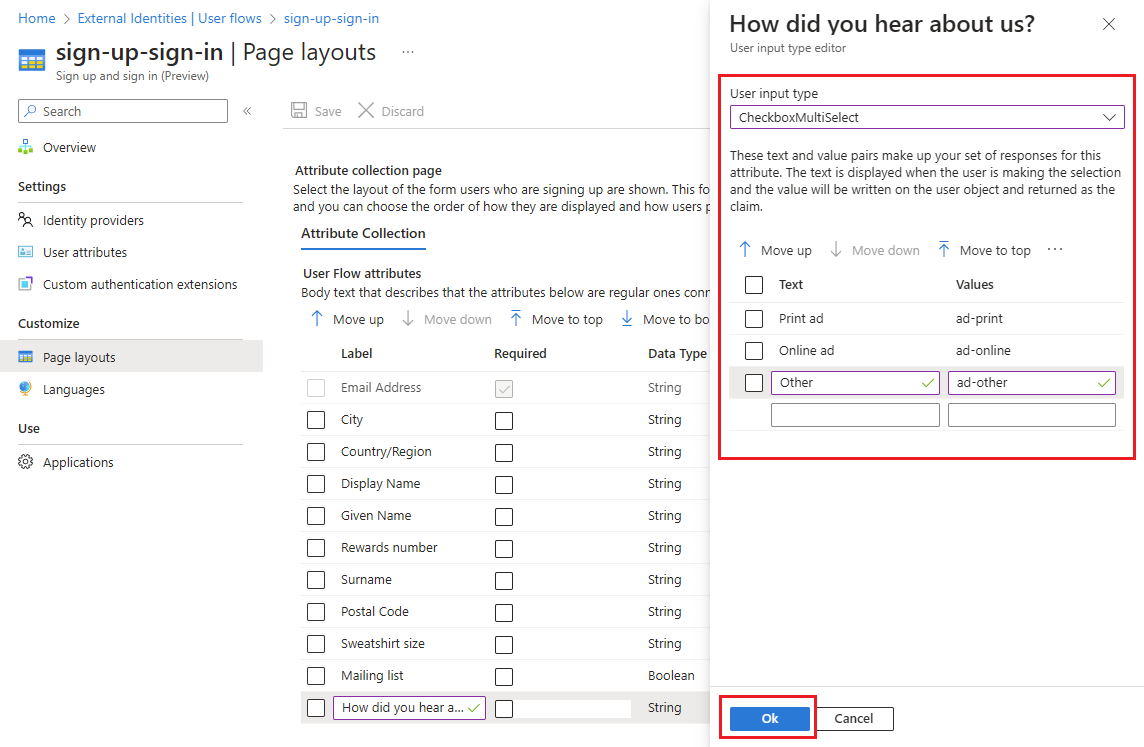
Select the value in the Label column and enter the heading you want to display above the series of checkboxes, for example
How did you hear about us?.Select the value in the User Input Type column to open the editor pane.
In the editor pane, under User input type, select CheckboxMultiSelect.
For each checkbox you want to add, start on a new line and enter the following information:
Under Text, enter the text you want to display next to the checkbox. Use Markdown language to add hyperlinks.
Under Values, enter a value to be written on the user object and returned as the claim if the user selects the checkbox.
Select Ok.
On the Page layouts page, select Save.

Configure radio buttons (RadioSingleSelect)
An attribute with a String data type can be configured as a RadioSingleSelect user input type, which is a series of radio buttons that appear under the attribute label. The user can select only one radio button. You can define the text for individual radio buttons and include hyperlinks to other content.
On the Page layouts page, find the attribute with data type of String that you want to configure as a radio button or series of radio buttons.
Select the value in the Label column and enter the heading you want to display above the series of radio buttons, for example
Sweatshirt size.Select the value in the User Input Type column to open the editor pane.
In the editor pane, under User input type, select RadioSingleSelect.
For each radio button you want to add, start on a new line and enter the following information:
Under Text, enter the text you want to display next to the radio button. Use Markdown language to add hyperlinks.
Under Values, enter a value to be written on the user object and returned as the claim if the user selects the radio button.
Select Ok.
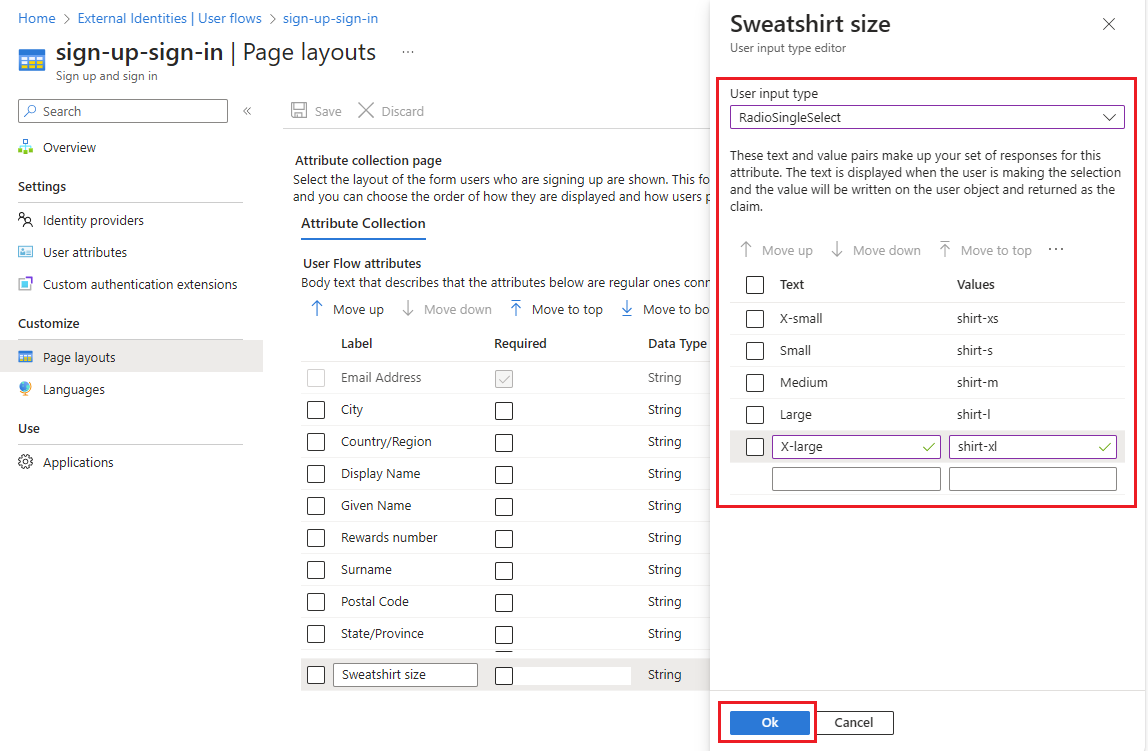
On the Page layouts page, select Save.

Configure attribute visibility and editability with Microsoft Graph
You can control which attributes are shown or collected from users during sign-up by configuring the hidden and editable flags for each attribute. These settings aren't currently available in the admin center UI, but you can configure them using Microsoft Graph.
Each attribute supports the following flags:
hidden: This flag isfalseby default so the attribute displays on the sign-up page, but you can set it totrueto hide the attribute.editable: This flag istrueby default to allow users to edit the attribute, but you can set it tofalseto make the attribute read-only.
Examples:
- To show the attribute on the page but prevent users from editing it, set
hiddentofalseandeditabletofalse. - To hide the attribute from the page while still allowing it to be set programmatically, set
hiddentotrueandeditabletotrue. For example, you can assign a value to the attribute by creating a custom authentication extension for an attribute collection submit event.
To set the hidden and editable flags using Microsoft Graph, use the authenticationAttributeCollectionInputConfiguration resource type. For reference, see the example on updating the page layout of a self-service sign up user flow.
Find the application ID for the extensions app
Custom user attributes are stored in an app named b2c-extensions-app. After a user enters a value for the custom attribute during sign-up, it's added to the user object and can be called via the Microsoft Graph API using the naming convention extension_{appId-without-hyphens}_{custom-attribute-name} where:
{appId-without-hyphens}is the stripped version of the client ID for the b2c-extensions-app.{custom-attribute-name}is the name you assigned to the custom attribute.
Use these steps to find the application ID for the extensions app:
- Sign in to the Microsoft Entra admin center.
- Browse to Entra ID > App registrations > All applications.
- Select the application b2c-extensions-app. Do not modify. Used by AADB2C for storing user data.
- On the Overview page, use the Application (client) ID value, for example:
12345678-abcd-1234-1234-ab123456789, but remove the hyphens.
For example, if you create a custom attribute named loyaltyNumber, refer to it as extension_12345678abcd12341234ab123456789_loyaltyNumber
Add custom user attributes to the ID token
When users sign-in to your app, the app receives an ID token, which includes the user details. These details are called token claims. If needed, you can include a custom user attribute to be available as a claim in the ID token that's returned to your app. To do so, follow the steps in Add attributes to the ID token returned to your application article.
Next steps
Add attributes to the ID token returned to your application.