Note
Access to this page requires authorization. You can try signing in or changing directories.
Access to this page requires authorization. You can try changing directories.
In this article, you learn how to configure Cloudflare Web Application Firewall (Cloudflare WAF) to protect your organization from attacks, such as distributed denial of service (DDoS), malicious bots, Open Worldwide Application Security Project (OWASP) Top-10 security risks, and others.
Prerequisites
To get started, you need:
- Microsoft Entra External ID tenant
- Microsoft Azure Front Door (AFD)
- Cloudflare account with WAF
Learn about tenants and securing apps for consumers and customers with Microsoft Entra External ID.
Scenario description
- Microsoft Entra External ID tenant – The identity provider (IdP) and authorization server that verifies user credentials with custom policies defined for the tenant.
- Azure Front Door – Enables custom URL domains for Microsoft Entra External ID. Traffic to custom URL domains goes through Cloudflare WAF, it then goes to AFD, and then to the Microsoft Entra External ID tenant.
- Cloudflare WAF – Security controls to protect traffic to the authorization server.
Enable custom URL domains
The first step is to enable custom domains with AFD. Use the instructions in, Enable custom URL domains for apps in external tenants.
Create a Cloudflare account
- Go to Cloudflare.com/plans to create an account.
- To enable WAF, on the Application Services tab, select Pro.
Configure the domain name server (DNS)
Enable WAF for a domain.
In the DNS console, for CNAME, enable the proxy setting.

Under DNS, for Proxy status, select Proxied.
The status turns orange.


Note
Azure Front Door-managed certificates aren't automatically renewed if your custom domain’s CNAME record points to a DNS record other than the Azure Front Door endpoint’s domain (for example, when using a third-party DNS service like Cloudflare). To renew the certificate in such cases, follow the instructions in the Renew Azure Front Door-managed certificates article.
Cloudflare security controls
For optimal protection, we recommend you enable Cloudflare security controls.
DDoS protection
Go to the Cloudflare dashboard.
Expand the Security section.
Select DDoS.
A message appears.


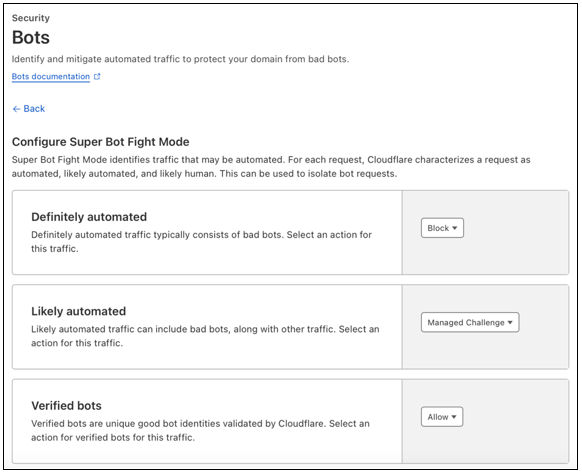
Bot protection
Go to the Cloudflare dashboard.
Expand the Security section.
Under Configure Super Bot Fight Mode, for Definitely automated, select Block.
For Likely automated, select Managed Challenge.
For Verified bots, select Allow.
Firewall rules: Traffic from the Tor network
We recommend you block traffic that originates from the Tor proxy network, unless your organization needs to support the traffic.
Note
If you can't block Tor traffic, select Interactive Challenge, not Block.
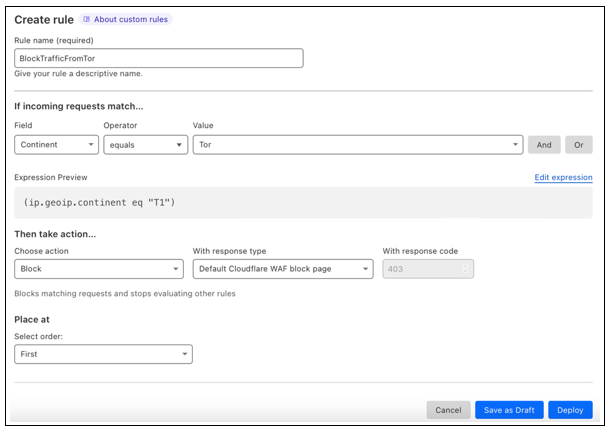
Block traffic from the Tor network
Go to the Cloudflare dashboard.
Expand the Security section.
Select WAF.
Select Create rule.
For Rule name, enter a relevant name.
For If incoming requests match, for Field, select Continent.
For Operator, select equals.
For Value, select Tor.
For Then take action, select Block.
For Place at, select First.
Select Deploy.
Note
You can add custom HTML pages for visitors.
Firewall rules: Traffic from countries or regions
We recommended strict security controls on traffic from countries or regions where business is unlikely to occur, unless your organization has a business reason to support traffic from all countries or regions.
Note
If you can't block traffic from a country or region, select Interactive Challenge, not Block.
Block traffic from countries or regions
For the following instructions, you can add custom HTML pages for visitors.
Go to the Cloudflare dashboard.
Expand the Security section.
Select WAF.
Select Create rule.
For Rule name, enter a relevant name.
For If incoming requests match, for Field, select Country or Continent.
For Operator, select equals.
For Value, select the country or continent to block.
For Then take action, select Block.
For Place at, select Last.
Select Deploy.

OWASP and managed rulesets
Select Managed rules.
For Cloudflare Managed Ruleset, select Enabled.
For Cloudflare OWASP Core Ruleset, select Enabled.

