Tutorial: Prepare a Python Flask web application for authentication
This is the second tutorial in a tutorial series that guides you on securing a Python Flask Web app using Microsoft Entra External ID. In part 1 of this series, you registered an application and configured user flows in your external tenant.
In this tutorial, you'll;
- Create a Python Flask project
- Install the required dependencies
- Configure your Flask web app to use Microsoft Entra External ID for authentication
- Test the sign-in and sign-out experience in your Flask web app
Prerequisites
- Tutorial: Prepare your external tenant to sign in users in a Python Flask web app
- Python 3+.
- Visual Studio Code or another code editor.
Create a Flask project
In a location of choice in your computer, create a folder to host your Flask application, such as flask-web-app.
Open a console window, and change to the directory to your Flask web app folder using the command
cd flask-web-appSet up virtual environment
Depending on your operating system, run the following commands to set up your virtual environment and activate it:
py -m venv .venv
.venv\scripts\activate
Install app dependencies
To install app dependencies, run the following commands:
Note
This sample uses the Python identity third-party library. The library isn't officially maintained by Microsoft but is recommended for your use. This library makes it easier to add authentication to your web app as it abstracts a lot of the MSAL Python details.
pip install flask
pip install identity
pip install python-dotenv
pip install flask-session
The identity library that you install automatically installs Microsoft Authentication Library (MSAL) for Python as its dependency. MSAL Python is the library that enables you to authenticate users and manage their access tokens.
After installing the required libraries, update your requirements file by running the following command:
pip freeze > requirements.txt
Add your configurations
Create an .env* file in your root folder to safely store your app's configuration. Your .env file should contain the following environment variables:
CLIENT_ID=<Enter_your_client_id>
CLIENT_SECRET=<Enter_your_client_secret>
AUTHORITY=https://<Enter_your_subdomain>.ciamlogin.com/<Enter_your_subdomain>.onmicrosoft.com
Replace the placeholders with the values you recorded from the part one of this tutorial series.
Create an app_config.py file to read the environment variables and add other configs that you need. Your app_config.py file should contain the following configs:
Config Description REDIRECT_PATHThe redirect URI path that you registered earlier. This example sets the redirect URI path to /getAToken.ENDPOINTThe Microsoft Graph API endpoint we call later on to get the logged in user details. The user details are available in the user variable in the session. You don't need to call this endpoint to get the user details. This is just for demonstration purposes. SCOPEAn example scope we use to instantiate our client application as an example. SESSION_TYPEThe type of session storage we use. We use the filesystem storage type. In production, you can use the most appropriate method based on your system architecture. Examples would be a centralized database-backed session store or sticky sessions. import os AUTHORITY = os.getenv("AUTHORITY") CLIENT_ID = os.getenv("CLIENT_ID") CLIENT_SECRET = os.getenv("CLIENT_SECRET") REDIRECT_PATH = "/getAToken" ENDPOINT = 'https://graph.microsoft.com/v1.0/me' SCOPE = ["User.Read"] SESSION_TYPE = "filesystem"
Configure app endpoints
At this stage, you create your web app endpoints and add the business logic to your application.
Create a file called app.py in your root folder.
Add the following code at the top of the 8app.py8 file to import required dependencies.
import identity.web
import requests
from flask import Flask, redirect, render_template, request, session, url_for
from flask_session import Session

import app_config
Initialize your Flask app and configure it to use the session storage type you specified in your app_config.py file.
app = Flask(__name__)
app.config.from_object(app_config)
Session(app)
Add the following code to initialize client. A Flask web app is a confidential client. We pass the client secret because confidential clients can safely store it. Under the hood, the identity library calls the
ConfidentialClientApplicationclass of the MSAL library.auth = identity.web.Auth( session=session, authority=app.config["AUTHORITY"], client_id=app.config["CLIENT_ID"], client_credential=app.config["CLIENT_SECRET"], )Add the required endpoints to your Flask app. The web app uses the authorization code flow to sign in the user. Add these endpoints to your app.py file:
/login: This endpoint initiates the sign-in process. It initiates the user sign-in process by redirecting the user to the Microsoft Entra External ID sign-in page. The user is prompted to sign in and consent to the scopes you specify.@app.route("/login") def login(): return render_template("login.html", **auth.log_in( scopes=app_config.SCOPE, # Have user consent to scopes during log-in redirect_uri=url_for("auth_response", _external=True) ))/{REDIRECT_PATH}: This endpoint processes that the response from Microsoft Entra External ID after the user signs in. This is the endpoint that receives the access token and completes the sign-in process. The exact value of theREDIRECT_PATHis defined in the app_config.py file.@app.route(app_config.REDIRECT_PATH) def auth_response(): result = auth.complete_log_in(request.args) if "error" in result: return render_template("auth_error.html", result=result) return redirect(url_for("index"))/logout: This endpoint signs the user out of the web app. The user is redirected to a Microsoft Entra External ID endpoint to sign out. If multiple accounts are present, the user is prompted to choose the account to sign out of. The user will then be redirected back to the web app homepage.@app.route("/logout") def logout(): return redirect(auth.log_out(url_for("index", _external=True)))/: This is the home page of the web app. It calls the get_user method to get a current logged-in user from the session. If no user is logged in, it redirects to the sign-in page.@app.route("/") def index(): user = auth.get_user() if not user: return redirect(url_for("login")) return render_template("index.html", user=user)/call_downstream_api: This endpoint calls Microsoft Graph as a downstream API using the access token that the user gets after signing in.@app.route("/call_downstream_api") def call_downstream_api(): token = auth.get_token_for_user(app_config.SCOPE) if "error" in token: return redirect(url_for("login")) # Use access token to call downstream api api_result = requests.get( app_config.ENDPOINT, headers={'Authorization': 'Bearer ' + token['access_token']}, timeout=30, ).json() return render_template('display.html', result=api_result)
Add the code to run your app at the end of your app.py file.
if __name__ == "__main__":
    app.run()
Create the app templates
Create a folder called templates in your root folder.
In the root folder, create a file called login.html in the templates folder. Add the following code to the login.html file:
<!DOCTYPE html>
<html lang="en">
<head>
    <meta charset="UTF-8">
    <title>Microsoft Identity Python Web App: Login</title>
</head>
<body>
    <h1>Microsoft Identity Python Web App</h1>

    <ul><li><a href='{{ auth_uri }}'>Sign In</a></li></ul>

    <hr>
    <footer style="text-align: right">Microsoft identity platform Web App Sample</footer>
</body>
</html>
In the root folder, create a file called auth_error.html in the templates folder. This page displays any error messages that may come up. Add the following code to the auth_error.html file:
<!DOCTYPE html>
<html lang="en">
<head>
    <meta charset="UTF-8">
    <title>Microsoft Identity Python Web App: Error</title>
</head>
<body>
    <h2>Login Failure</h2>
    <dl>
      <dt>{{ result.get("error") }}</dt>
      <dd>{{ result.get("error_description") }}</dd>
    </dl>
    <hr>
    <a href="{{ url_for('index') }}">Homepage</a>
</body>
</html>
In the root folder, create a file called index.html in the templates folder. This is the app's homepage. Add the following code to the index.html file:
<!DOCTYPE html>
<html lang="en">
<head>
    <meta charset="UTF-8">
    <title>Microsoft Identity Python Web App: Index</title>
</head>
<body>
    <h1>Microsoft Identity Python Web App</h1>
    <h2>Welcome {{ user.get("name") }}!</h2>

    <ul>
    {% if config.get("ENDPOINT") %}
      <li><a href='/call_downstream_api'>Call a downstream API</a></li>
    {% endif %}

    <li><a href="/logout">Logout</a></li>
    </ul>

    <hr>
    <footer style="text-align: right">Microsoft identity platform Web App Sample</footer>
</body>
</html>
In the root folder, create a file called display.html in the templates folder. This page displays the result of the call to the Microsoft Graph endpoint. Add the following code to the display.html file:
<!DOCTYPE html>
<html lang="en">
<head>
    <meta charset="UTF-8">
    <title>Microsoft Identity Python Web App: API</title>
</head>
<body>
    <a href="javascript:window.history.go(-1)">Back</a>
    <h1>Result of the downstream API Call</h1>
    <pre>{{ result |tojson(indent=4) }}</pre> <!-- Just a generic json viewer -->
</body>
</html>
Run and test the sample web app
In your terminal, run the following command:
python3 -m flask run --debug --host=localhost --port=3000You can use the port of your choice. This should be similar to the port of the redirect URI you registered earlier.
Open your browser, then go to
http://localhost:3000. You should see the page similar to the following screenshot: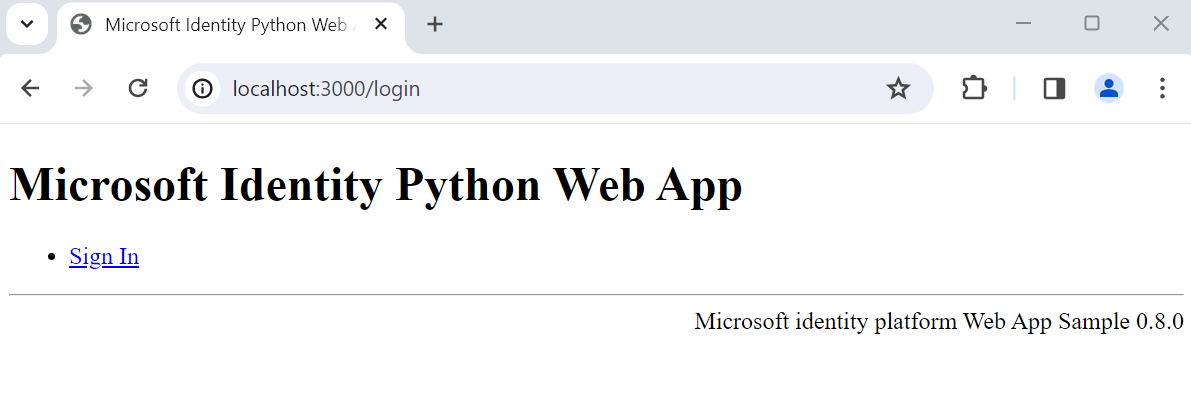
After the page completes loading, select Sign In link. You're prompted to sign in.
On the sign-in page, type your Email address, select Next, type your Password, then select Sign in. If you don't have an account, select No account? Create one link, which starts the sign-up flow.
If you choose the sign-up option, you'll go through the sign-uo flow. Fill in your email, one-time passcode, new password and more account details to complete the whole sign-up flow.
After you sign in or sign up, you're redirected back to the web app. You'll see a page that looks similar to the following screenshot:
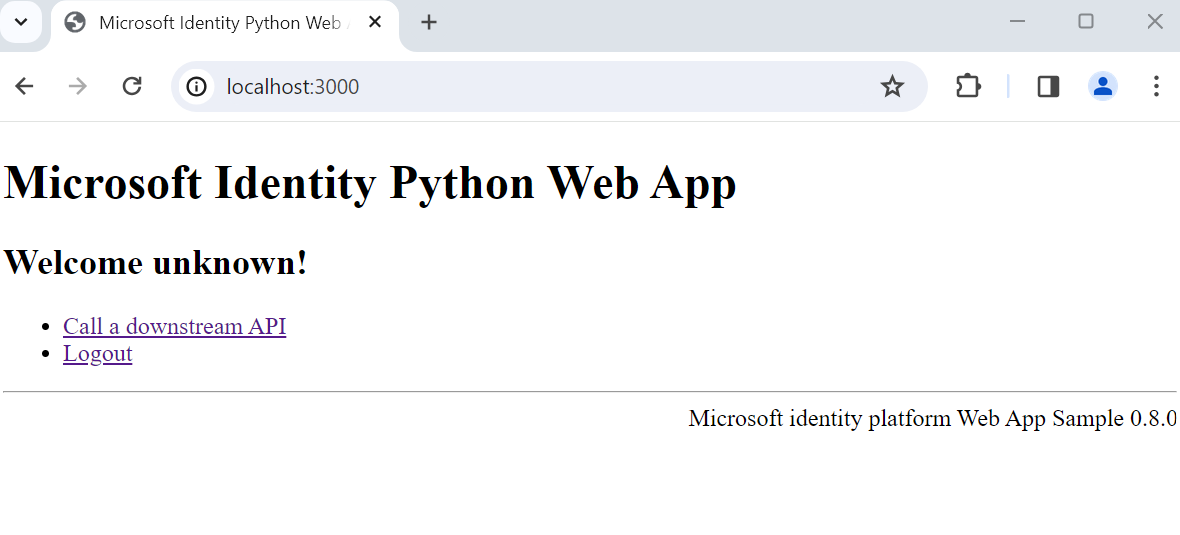
Select Logout to sign the user out of the web app or select Call a downstream API to make a call to a Microsoft Graph endpoint.
Reference material
Whereas the identity library abstracts the details of the MSAL library, you can refer to the MSAL Python documentation for more information on the MSAL library. This reference material helps you understand how you initialize an app and acquire tokens using MSAL Python.
See also
Feedback
Coming soon: Throughout 2024 we will be phasing out GitHub Issues as the feedback mechanism for content and replacing it with a new feedback system. For more information see: https://aka.ms/ContentUserFeedback.
Submit and view feedback for