Note
Access to this page requires authorization. You can try signing in or changing directories.
Access to this page requires authorization. You can try changing directories.
Scenario: In this scenario you learn how to use custom extensibility, and a Logic App, to automatically generate ServiceNow tickets for manual provisioning of users who have received assignments and need access to apps.
In this tutorial, you'll learn:
- Adding a Logic App Workflow to an existing catalog.
- Adding a custom extension to a policy within an existing access package.
- Registering an application in Microsoft Entra ID for resuming Entitlement Management workflow
- Configuring ServiceNow for Automation Authentication.
- Requesting access to an access package as an end-user.
- Receiving access to the requested access package as an end-user.
Prerequisites
- A Microsoft Entra user account with an active Azure subscription. If you don't already have one, you can Create an account for free.
- One of the following least privileged roles: Cloud Application Administrator, Application Administrator, or owner of the service principal.
- A ServiceNow instance of Rome or higher
- SSO integration with ServiceNow. If this isn't already configured, see:Tutorial: Microsoft Entra single sign-on (SSO) integration with ServiceNow before continuing.
Note
It is recommended to use a least privilege role when completing these steps.
Adding Logic App Workflow to an existing Catalog for Entitlement Management
To add a Logic App workflow to an existing catalog use the ARM template for the Logic App creation here:
.

Provide the resource group details, along with the Catalog ID to associate the Logic App with and select purchase. For more information on how to create a new catalog, see: Create and manage a catalog of resources in entitlement management.
After a catalog is created, you'd add a Logic App workflow by doing the following steps:
Sign in to the Microsoft Entra admin center as at least an Identity Governance Administrator.
Tip
Other least privilege roles that can complete this task include the Catalog owner and Resource group owner.
In the left menu, select Catalogs.
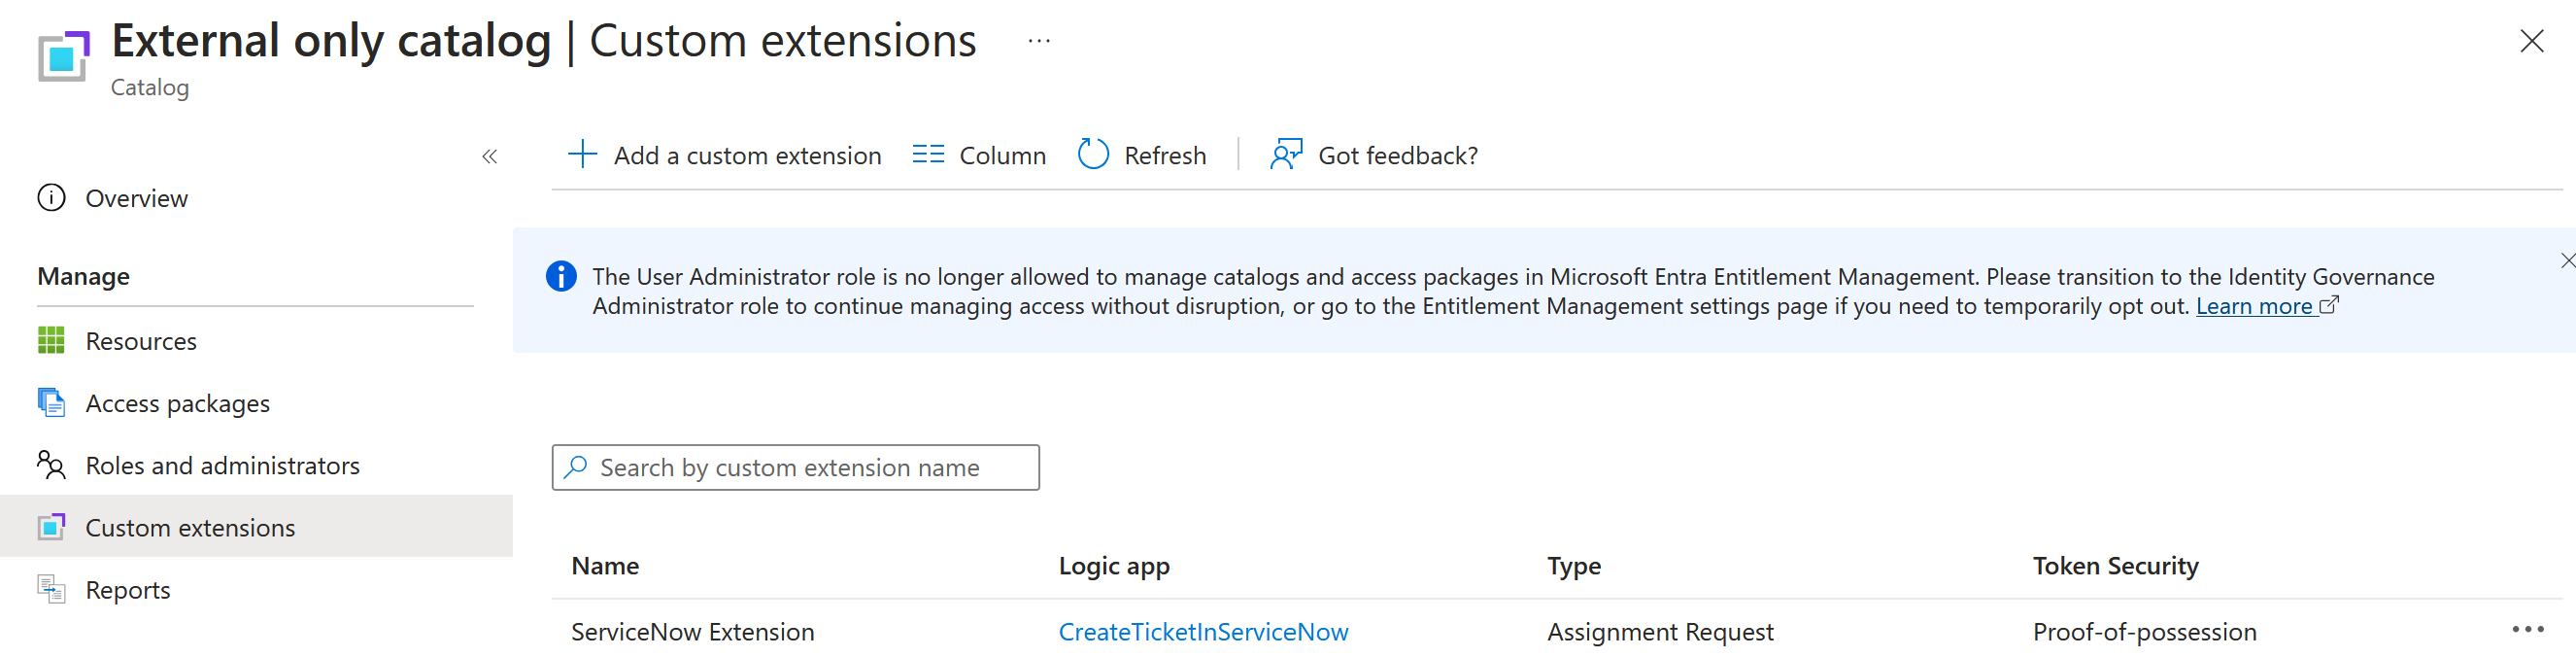
Select the catalog for which you want to add a custom extension and then in the left menu, select Custom Extensions.
In the header navigation bar, select Add a Custom Extension.
In the Basics tab, enter the name of the custom extension and a description of the workflow. These fields show up in the Custom Extensions tab of the Catalog.
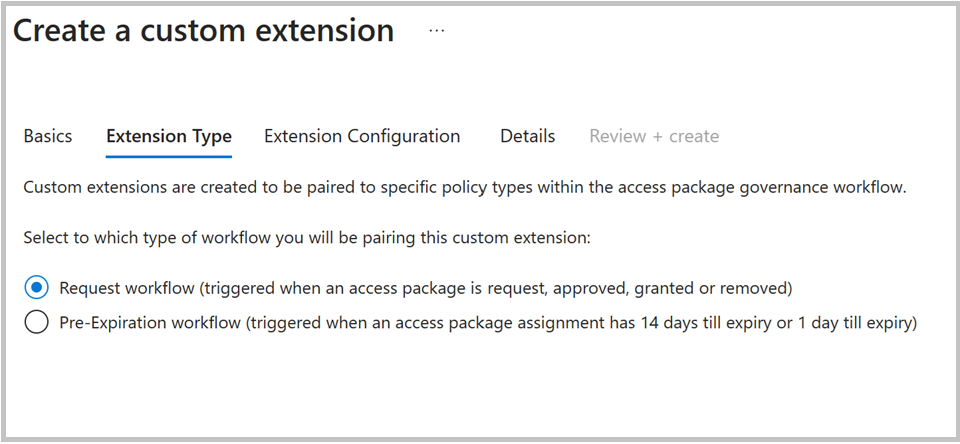
Select the Extension Type as “Request workflow” to correspond with the policy stage of the access package requested being created.
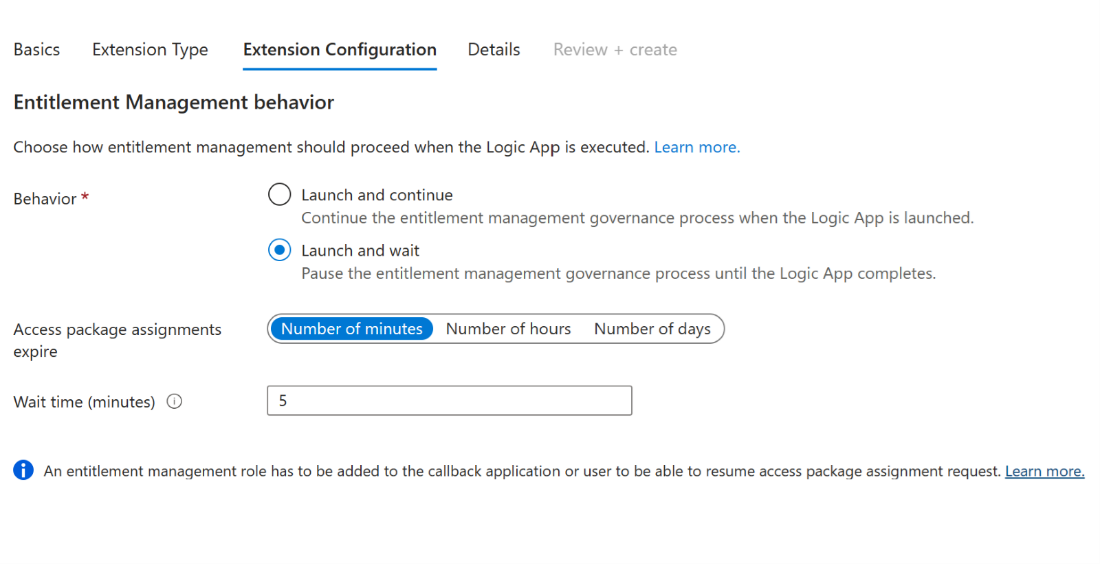
Select Launch and wait in the Extension Configuration which will pause the associated access package action until after the Logic App linked to the extension completes its task, and a resume action is sent by the admin to continue the process. For more information on this process, see: Configuring custom extensions that pause entitlement management processes.
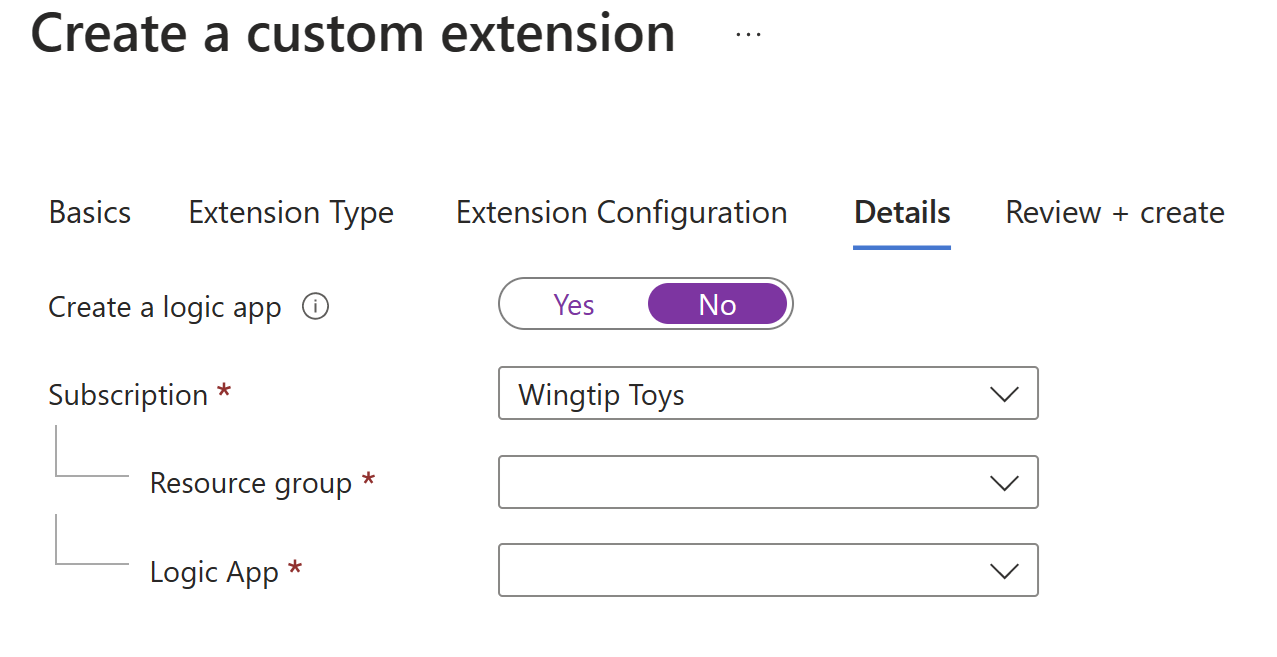
In the Details tab, choose No in the "Create new logic App" field as the Logic App has already been created in the previous steps. However, you need to provide the Azure subscription and resource group details, along with the Logic App name.
In Review and Create, review the summary of your custom extension and make sure the details for your Logic App call-out are correct. Then select Create.
Once created, the Logic App is able to be accessed under Logic App next to the custom extension on the custom extensions page. You're able to call on this in access package policies.


Tip
To learn more about custom extension feature that pause entitlement management processes, see: Configuring custom extensions that pause entitlement management processes.
Adding Custom Extension to a policy in an existing Access Package
After setting up custom extensibility in the catalog, administrators can create an access package with a policy to trigger the custom extension when the request has been approved. This enables them to define specific access requirements and tailor the access review process to meet their organization's needs.
In Identity Governance portal as at least an Identity Governance Administrator, select Access packages.
Tip
Other least privilege roles that can complete this task include the Catalog owner and Access package manager.
Select the access package you want to add a custom extension (Logic App) to from the list of access packages that have already been created.
Change to the policy tab, select the policy, and select Edit.
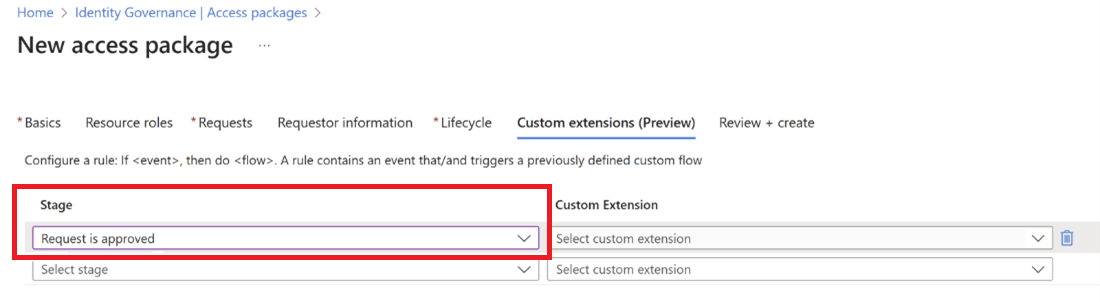
In the policy settings, go to the Custom Extensions tab.
In the menu below Stage, select the access package event you wish to use as trigger for this custom extension (Logic App). For our scenario, to trigger the custom extension Logic App workflow when access package has been approved, select Request is approved.
Note
To create a ServiceNow ticket for an expired assignment that had permission granted previously, add a new stage for "Assignment is removed", and then select the LogicApp.
In the menu below Custom Extension, select the custom extension (Logic App) you created in the above steps to add to this access package. The action you select executes when the event selected in the when field occurs.
Select Update to add it to an existing access package's policy.

Note
Select New access package if you want to create a new access package. For more information about how to create an access package, see: Create a new access package in entitlement management. For more information about how to edit an existing access package, see: Change request settings for an access package in Microsoft Entra entitlement management.
Register an application with secrets in the Microsoft Entra admin center
With Azure, you're able to use Azure Key Vault to store application secrets such as passwords. To register an application with secrets within the Microsoft Entra admin center, follow these steps:
Sign in to the Microsoft Entra admin center as at least an Identity Governance Administrator.
Browse to Entra ID > App registrations.
Under Manage, select App registrations > New registration.
Enter a display Name for your application.
Select "Accounts in this organizational directory only" in supported account type.
Select Register.
After registering your application, you must add a client secret by following these steps:
Browse to Entra ID > App registrations.
select your application.
Select Certificates & secrets > Client secrets > New client secret.
Add a description for your client secret.
Select an expiration for the secret or specify a custom lifetime.
Select Add.
Note
To find more detailed information on registering an application, see: Quickstart: Register an app in the Microsoft identity platform:
To authorize the created application to call the MS Graph resume API you'd do the following steps:
Navigate to the Microsoft Entra admin center Identity Governance - Microsoft Entra admin center
In the left menu, select Catalogs.
Select the catalog for which you have added the custom extension.
Select “Roles and administrators” menu and select “+ Add access package assignment manager”.
In the Select members dialog box, search for the application created by name or application Identifier. Select the application and choose the “Select” button.
Tip
You can find more detailed information on delegation and roles on Microsoft’s official documentation located here: Delegation and roles in entitlement management.
Configuring ServiceNow for Automation Authentication
At this point it's time to configure ServiceNow for resuming the entitlement management workflow after the ServiceNow ticket closure:
- Register a Microsoft Entra application in the ServiceNow Application Registry by following these steps:
- Sign in to ServiceNow and navigate to the Application Registry.
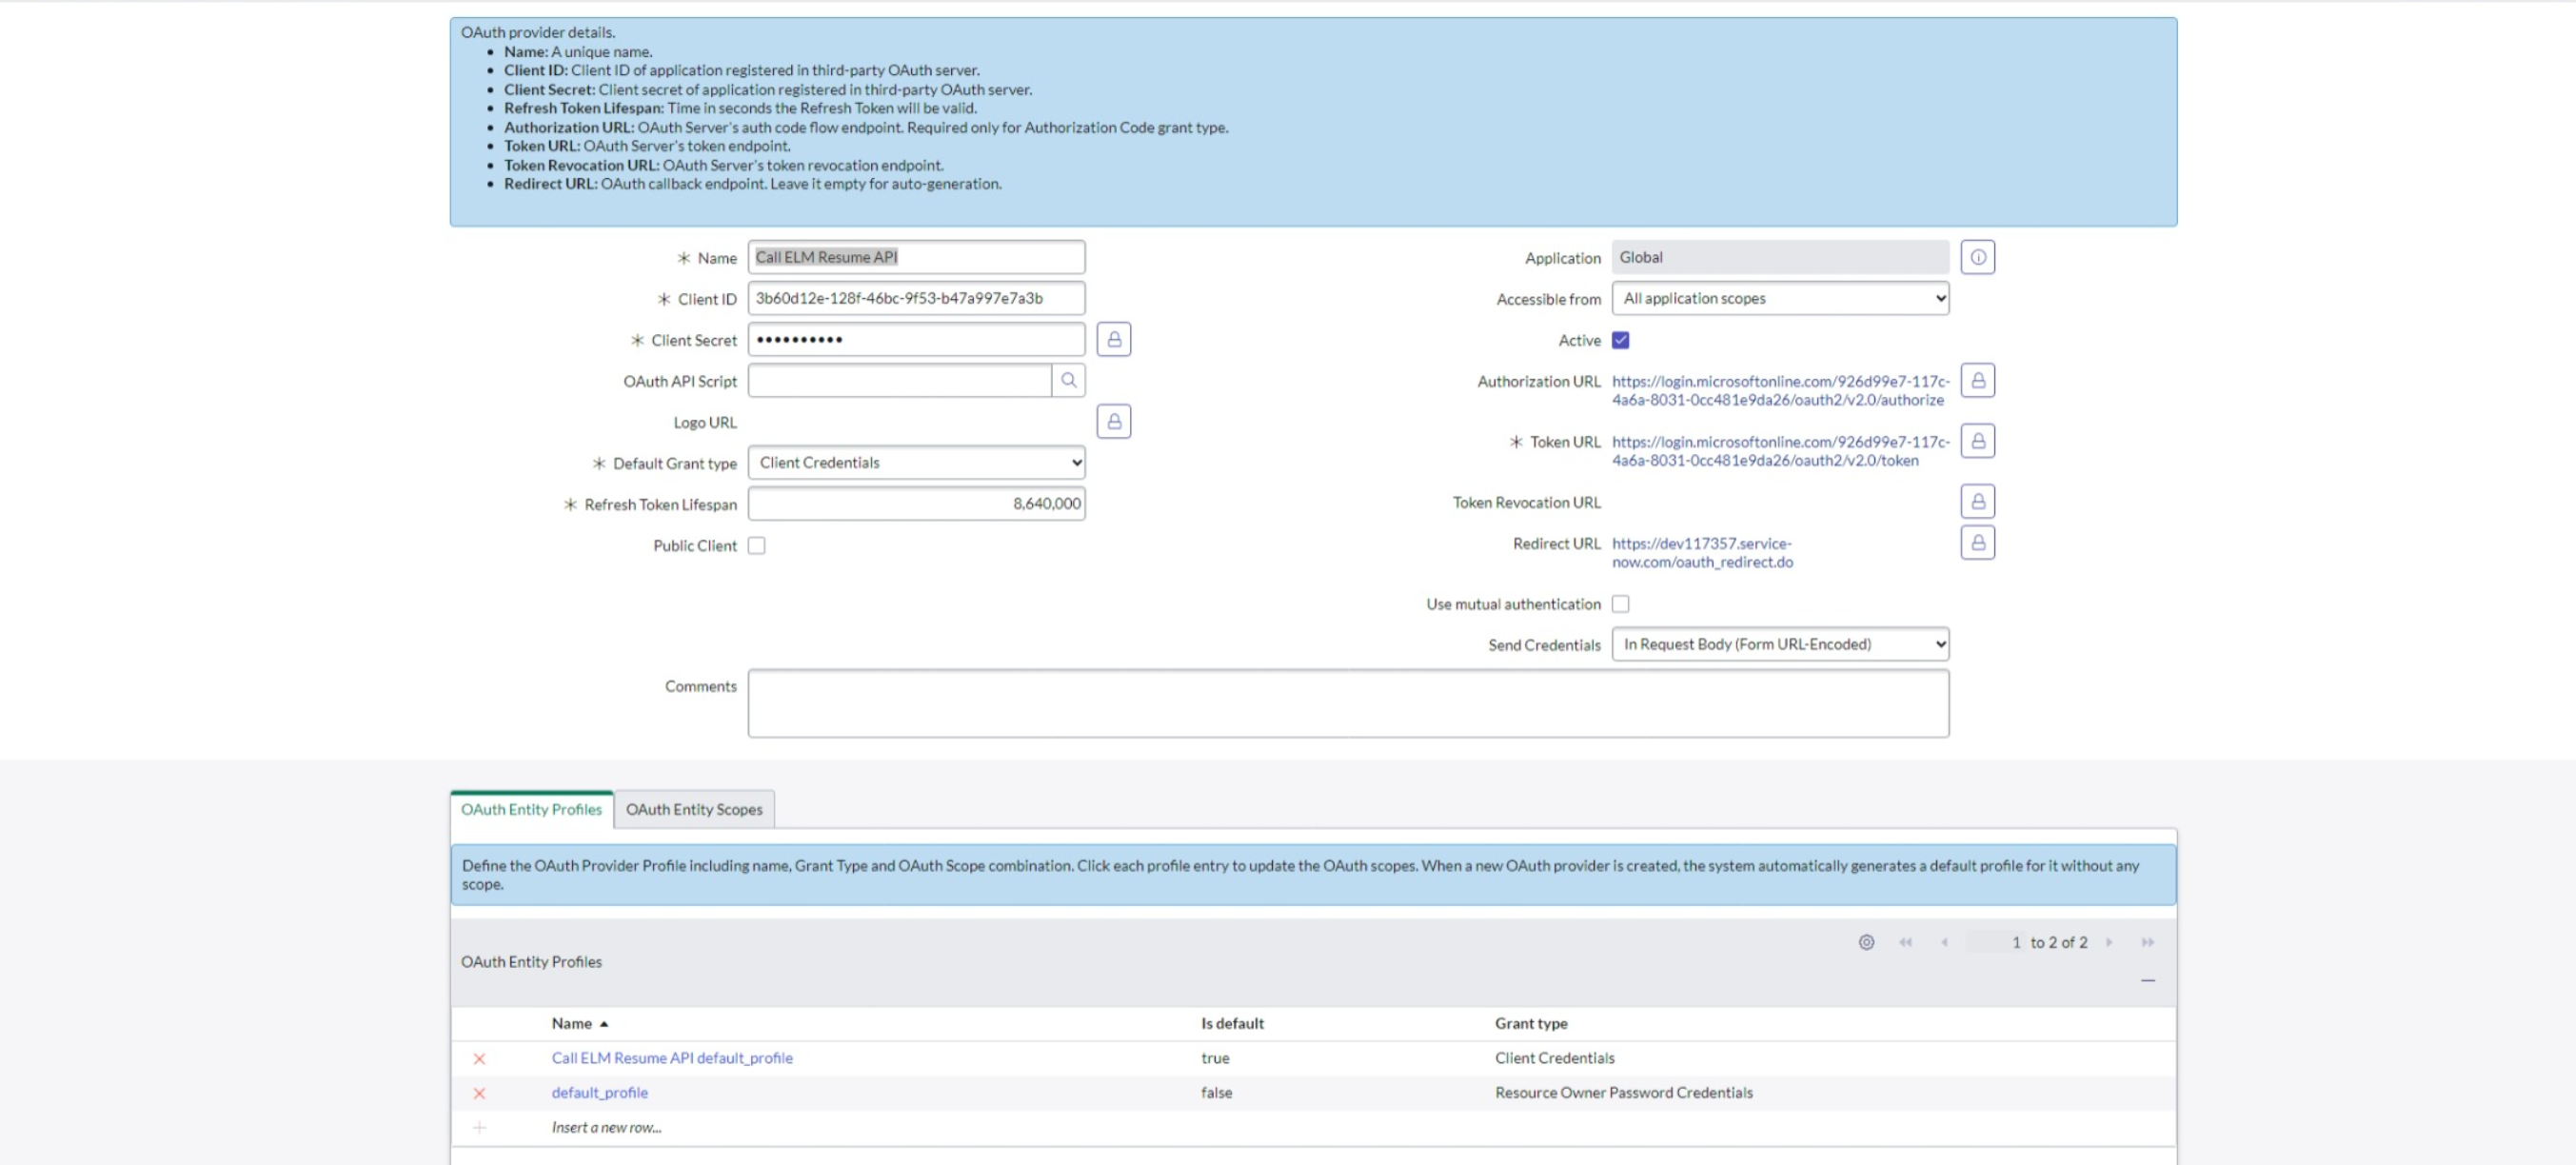
- Select “New” and then select “Connect to a third party OAuth Provider”.
- Provide a name for the application, and select Client Credentials in the Default Grant type.
- Enter the Client Name, ID, Client Secret, Authorization URL, Token URL that were generated when you registered the Microsoft Entra application in the Microsoft Entra admin center.
- Submit the application.
- Create a System Web Service REST API message by following these steps:
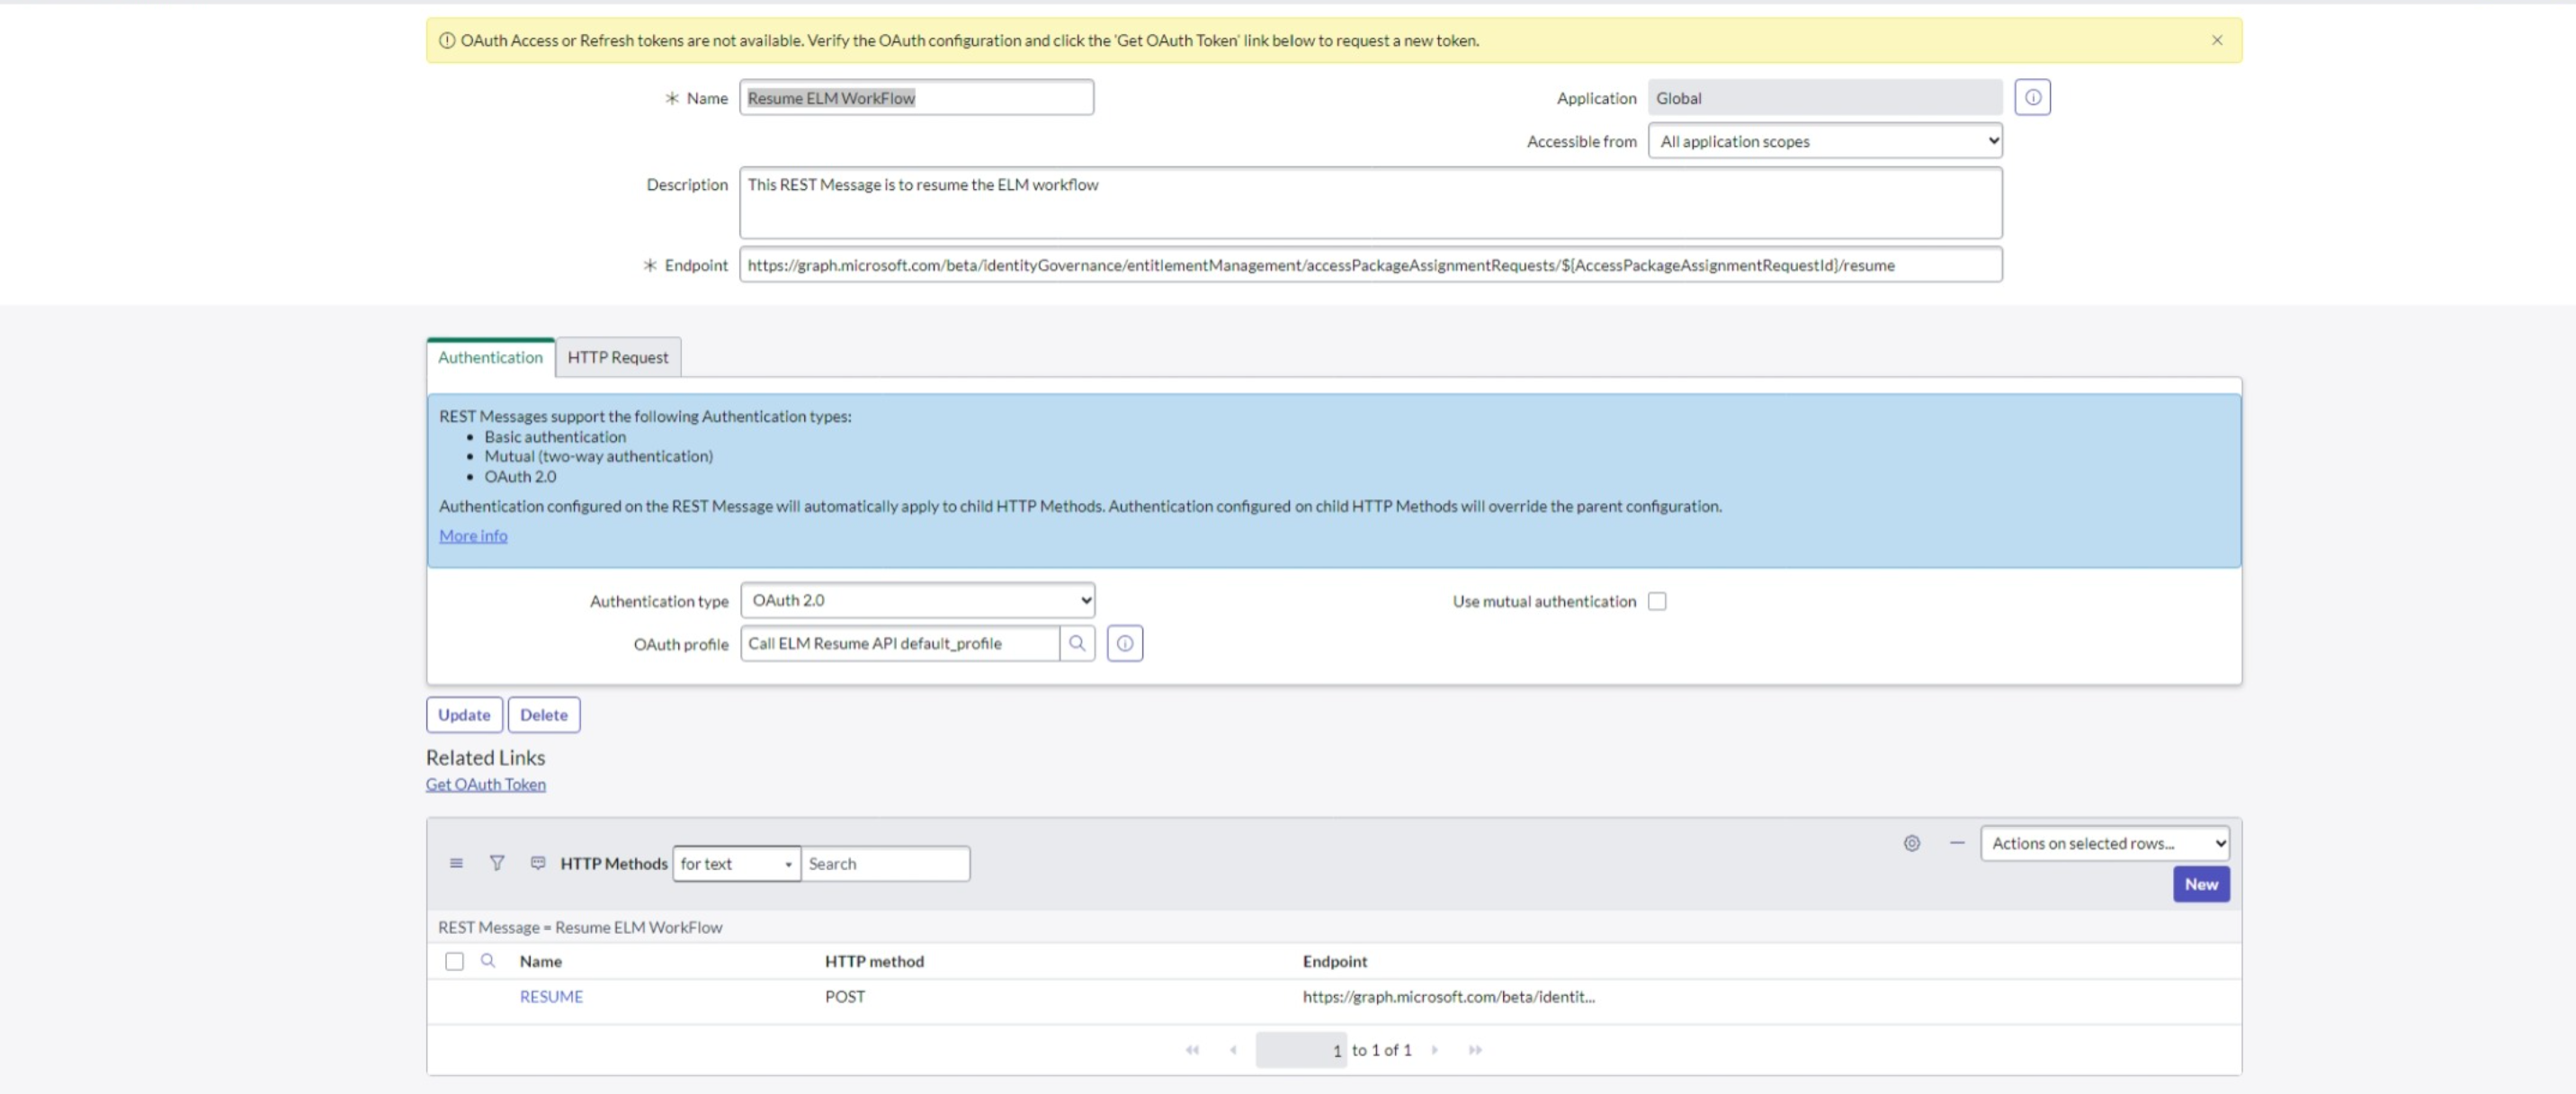
Go to the REST API Messages section under System Web Services.
Select the "New" button to create a new REST API message.
Fill in all the required fields, which include providing the Endpoint URL:
https://learn.microsoft.com/en-us/graph/api/accesspackageassignmentrequest-resume?view=graph-rest-1.0&tabs=httpFor Authentication, select OAuth2.0 and choose the OAuth profile that was created during the app registration process.
Select the "Submit" button to save the changes.
Go back to the REST API Messages section under System Web Services.
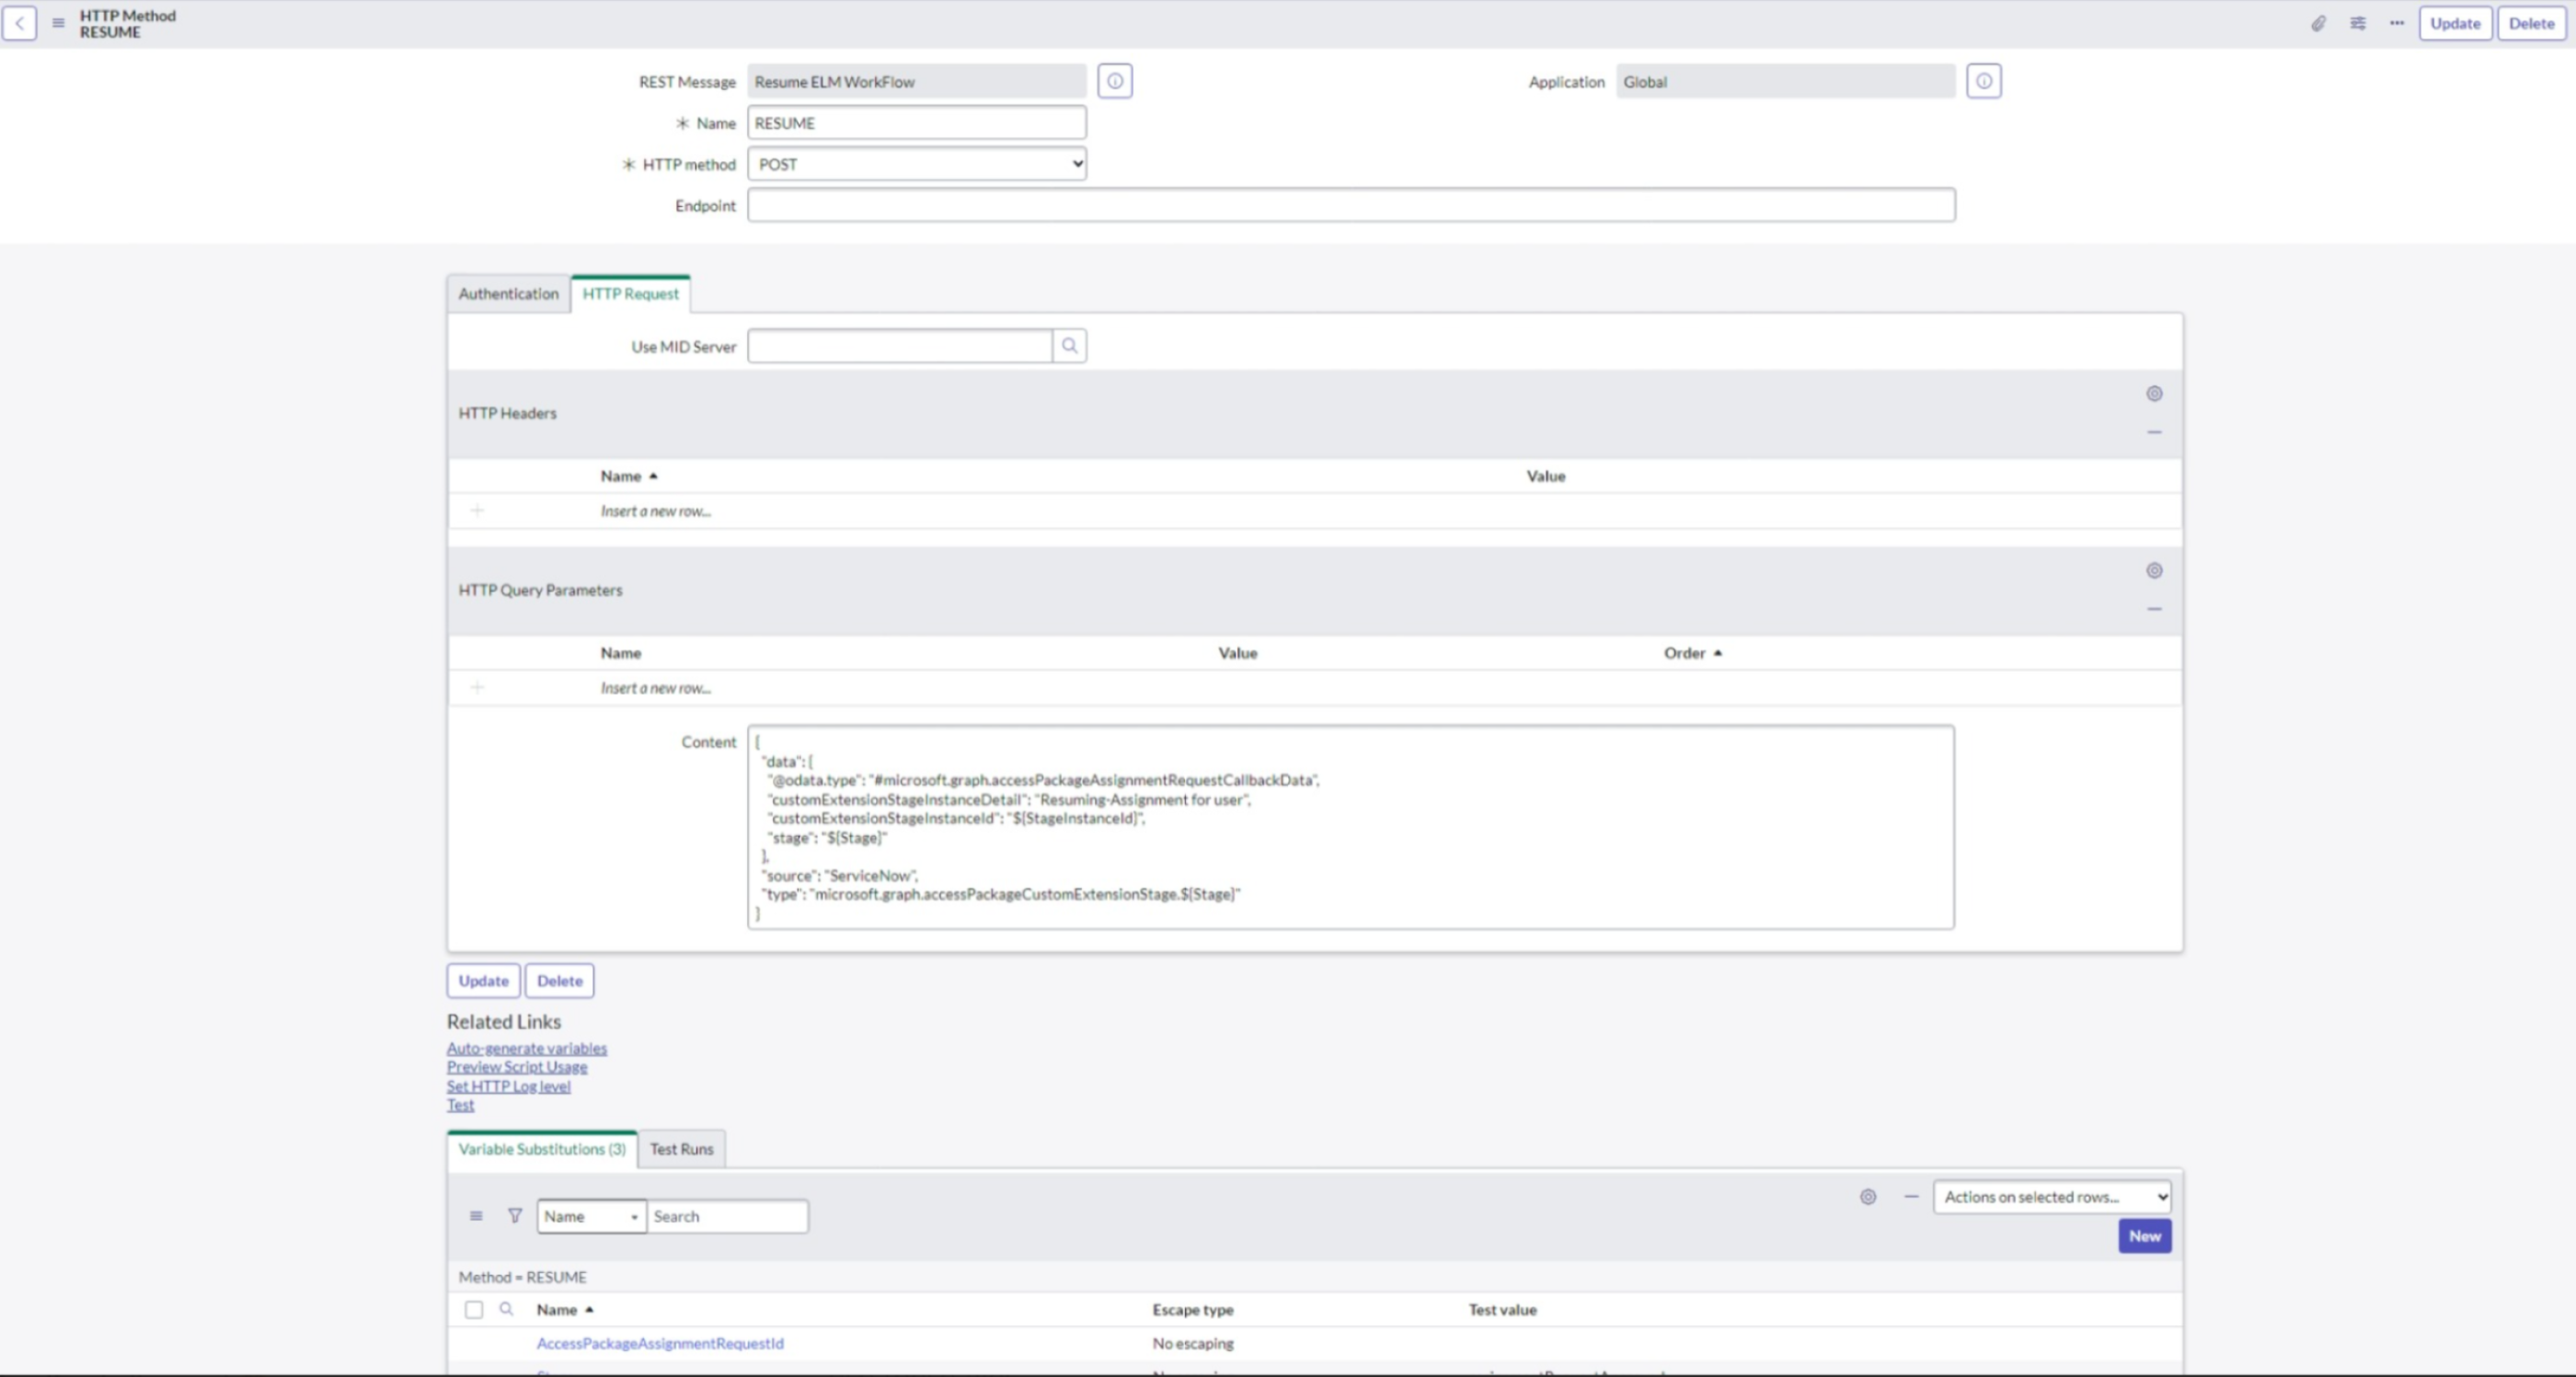
Select Http Request and then select "New". Enter a name, and select "POST" as the Http method.
In the Http request, add the content for the Http query parameters using the following API Schema:
{
"data": {
    "@odata.type": "#microsoft.graph.accessPackageAssignmentRequestCallbackData",
    "customExtensionStageInstanceDetail": "Resuming-Assignment for user",
    "customExtensionStageInstanceId": "${StageInstanceId}",
    "stage": "${Stage}"
          },
          "source": "ServiceNow",
            "type": "microsoft.graph.accessPackageCustomExtensionStage.${Stage}"
            }
Select "Submit" to save the changes.
- Modify the request table schema: To modify the request table schema, make changes to the three tables shown in the following image:
 Add the four column label and type as string:
- AccessPackageAssignmentRequestId
- AccessPackageAssignmentStage
- StageInstanceId
- EntraUserObjectId
- To automate workflow with Flow Designer, you'd do the following:
- Sign in to ServiceNow and go to Flow Designer.
- Select the “New” button and create a new action.
- Add an action to invoke the System Web Service REST API message that was created in the previous step.
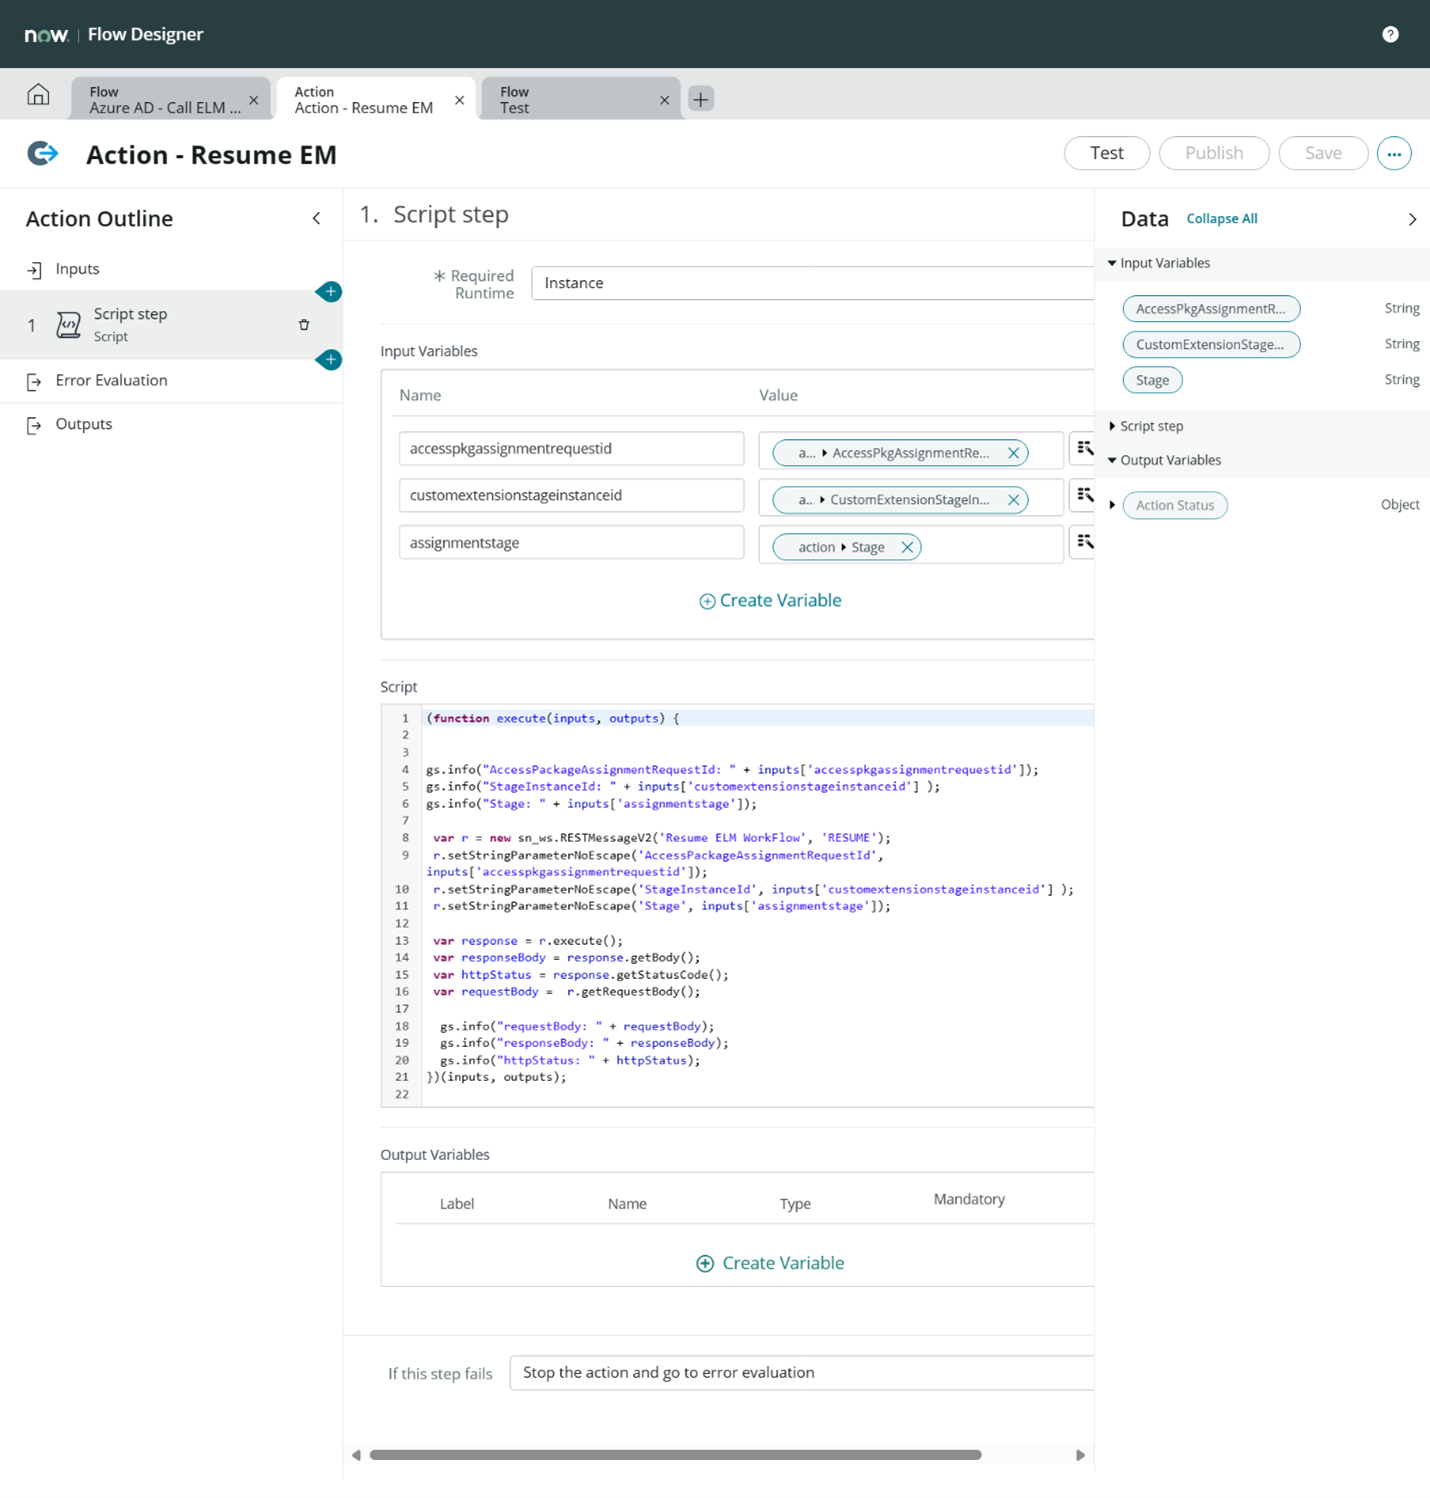 Script for the action: (Update the script with the Column labels created in previous step):
(function execute(inputs, outputs) { gs.info("AccessPackageAssignmentRequestId: " + inputs['accesspkgassignmentrequestid']); gs.info("StageInstanceId: " + inputs['customextensionstageinstanceid'] ); gs.info("Stage: " + inputs['assignmentstage']); var r = new sn_ws.RESTMessageV2('Resume ELM WorkFlow', 'RESUME'); r.setStringParameterNoEscape('AccessPackageAssignmentRequestId', inputs['accesspkgassignmentrequestid']); r.setStringParameterNoEscape('StageInstanceId', inputs['customextensionstageinstanceid'] ); r.setStringParameterNoEscape('Stage', inputs['assignmentstage']); var response = r.execute(); var responseBody = response.getBody(); var httpStatus = response.getStatusCode(); var requestBody = r.getRequestBody(); gs.info("requestBody: " + requestBody); gs.info("responseBody: " + responseBody); gs.info("httpStatus: " + httpStatus); })(inputs, outputs); - Save the Action
- Select the "New" button to create a new flow.
- Enter flow name, select Run as – System User and select submit.
- To create triggers within ServiceNow, you'd follow these steps:
- Select "Add Trigger" and then select "updated" trigger and run the trigger for every update.
- Add a filter condition by updating the condition as shown in the following image:
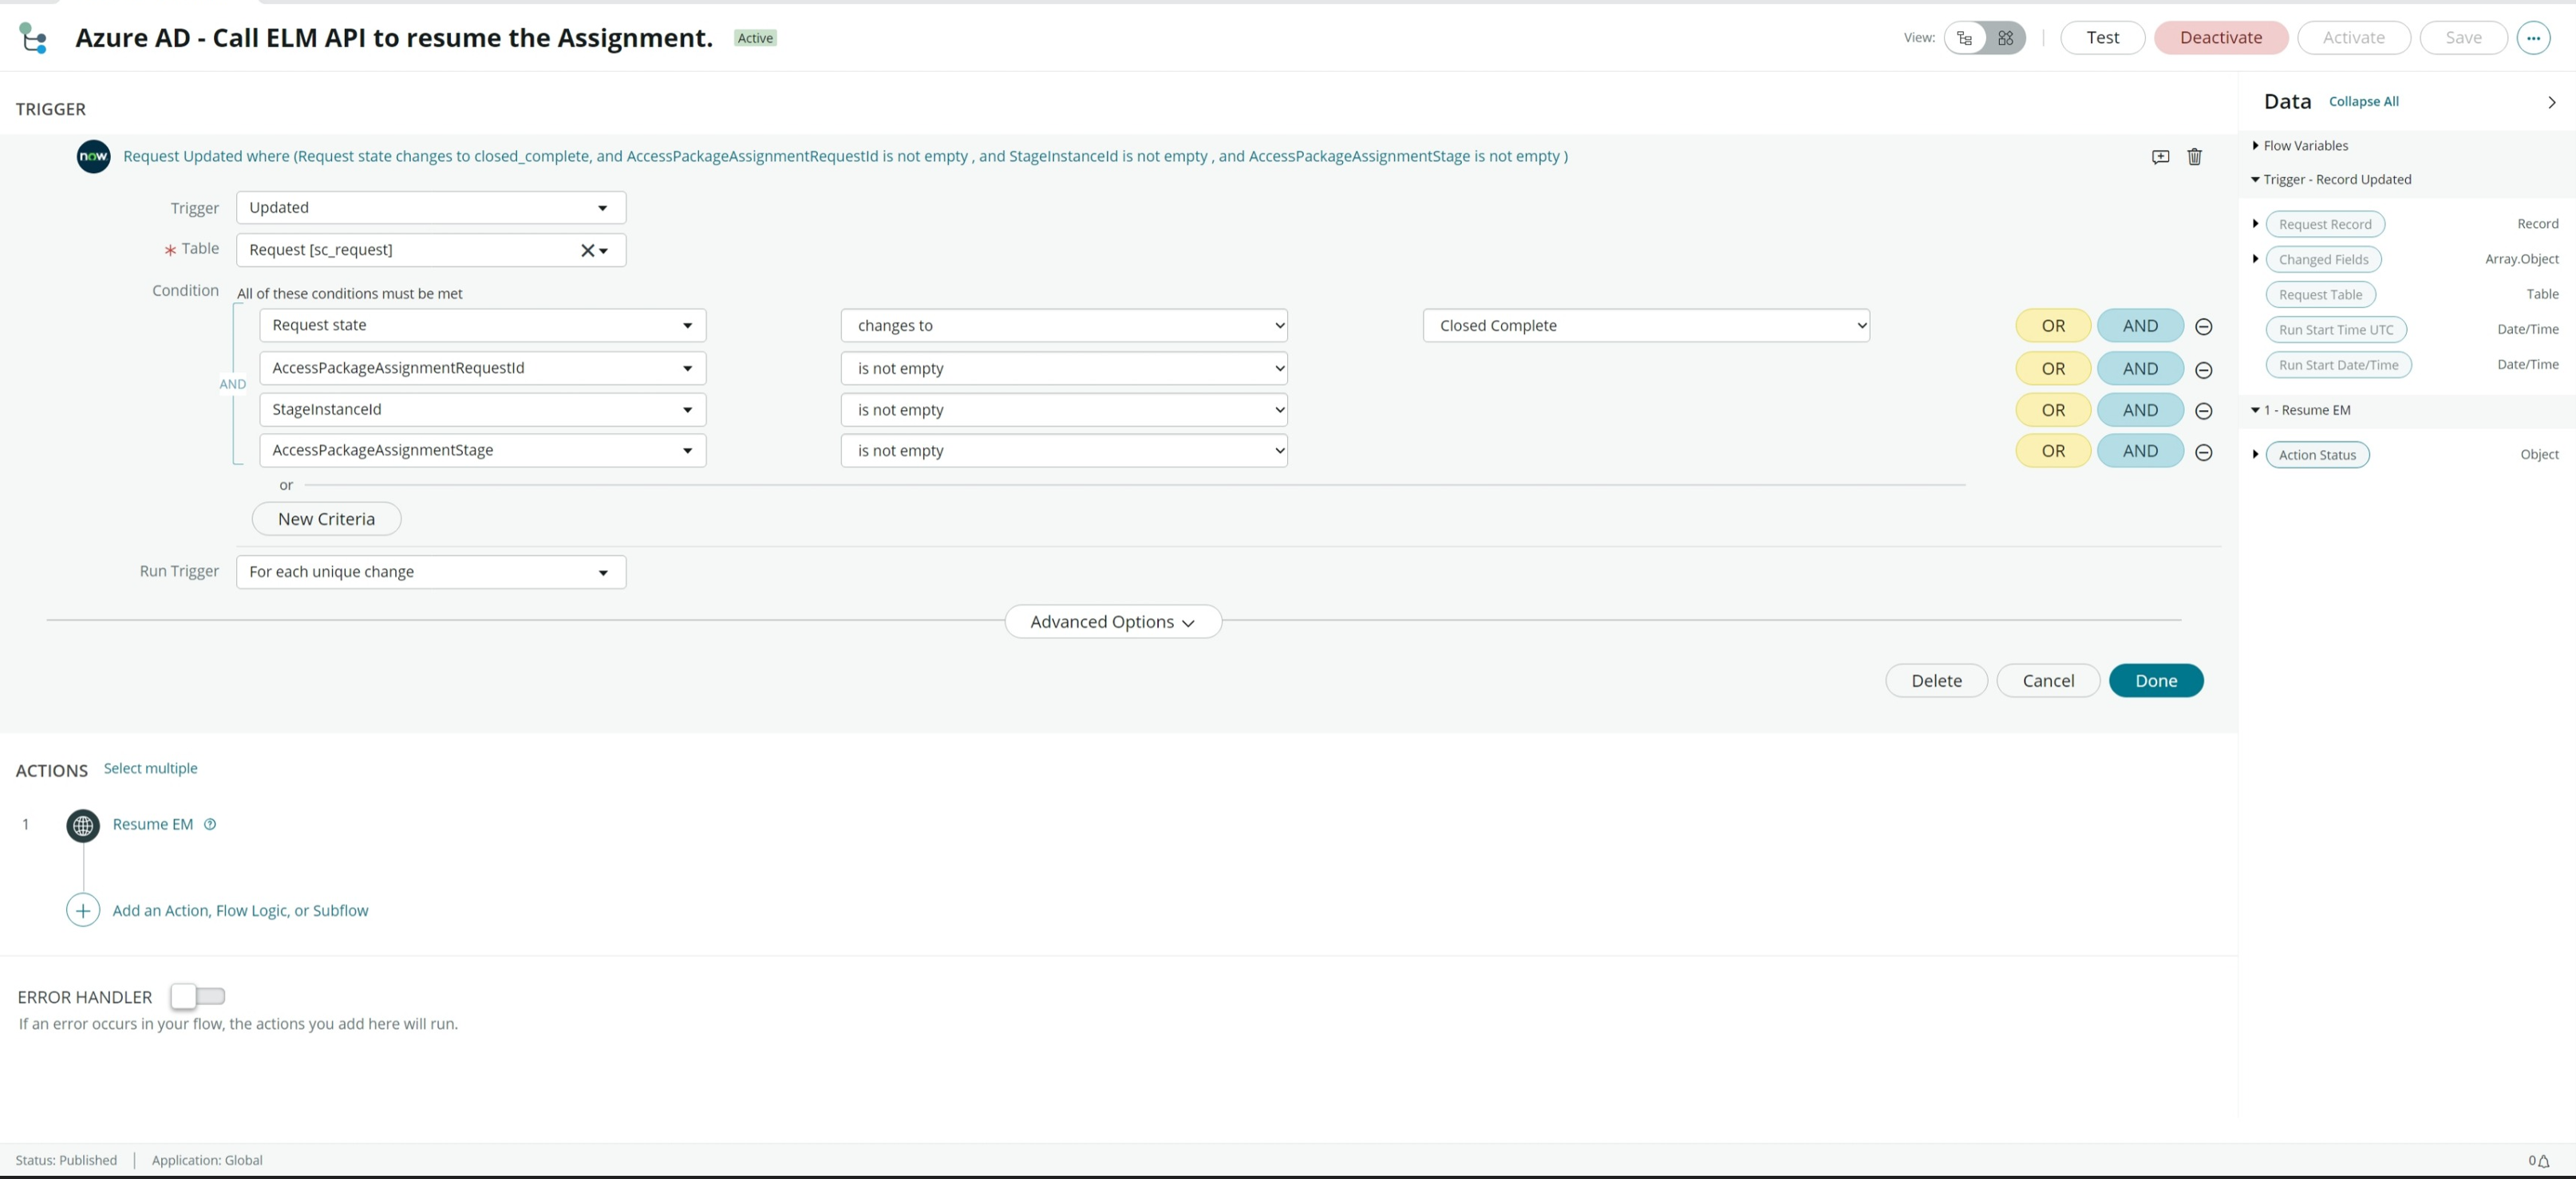
- Select done.
- Select add an action
- Select the Action and then select the action created in the previous step.
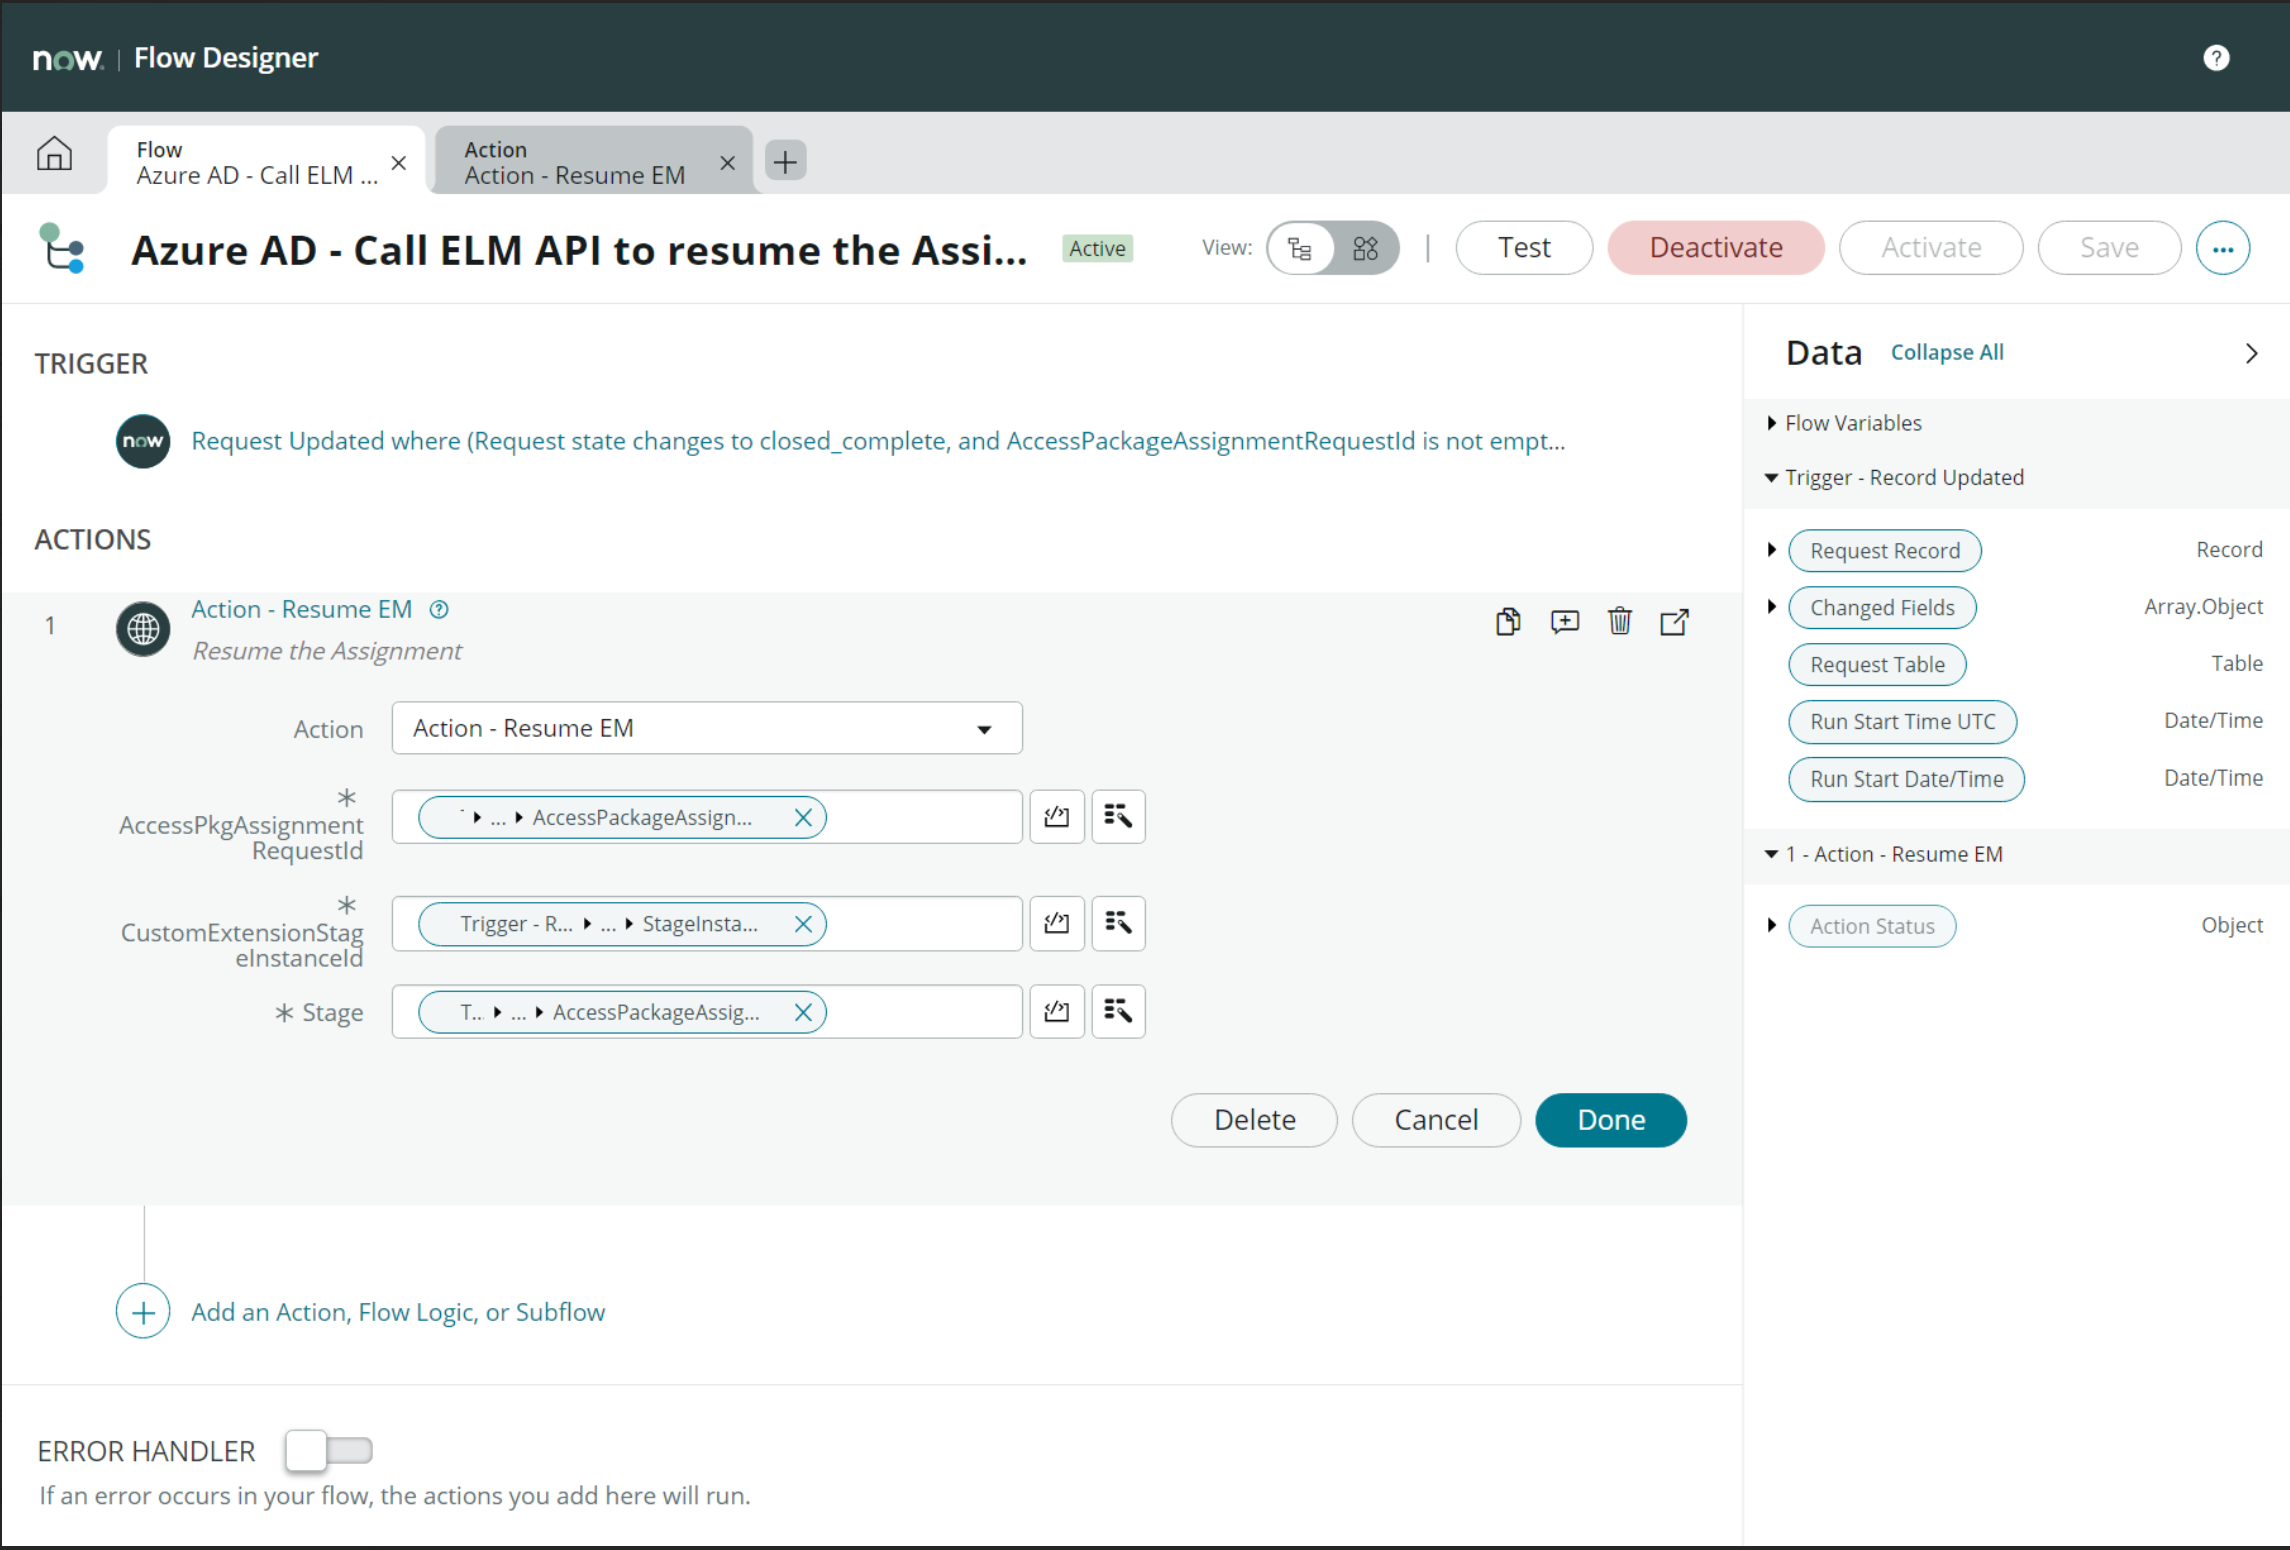
- Drag and drop the newly created columns from the request record to the appropriate action parameters.
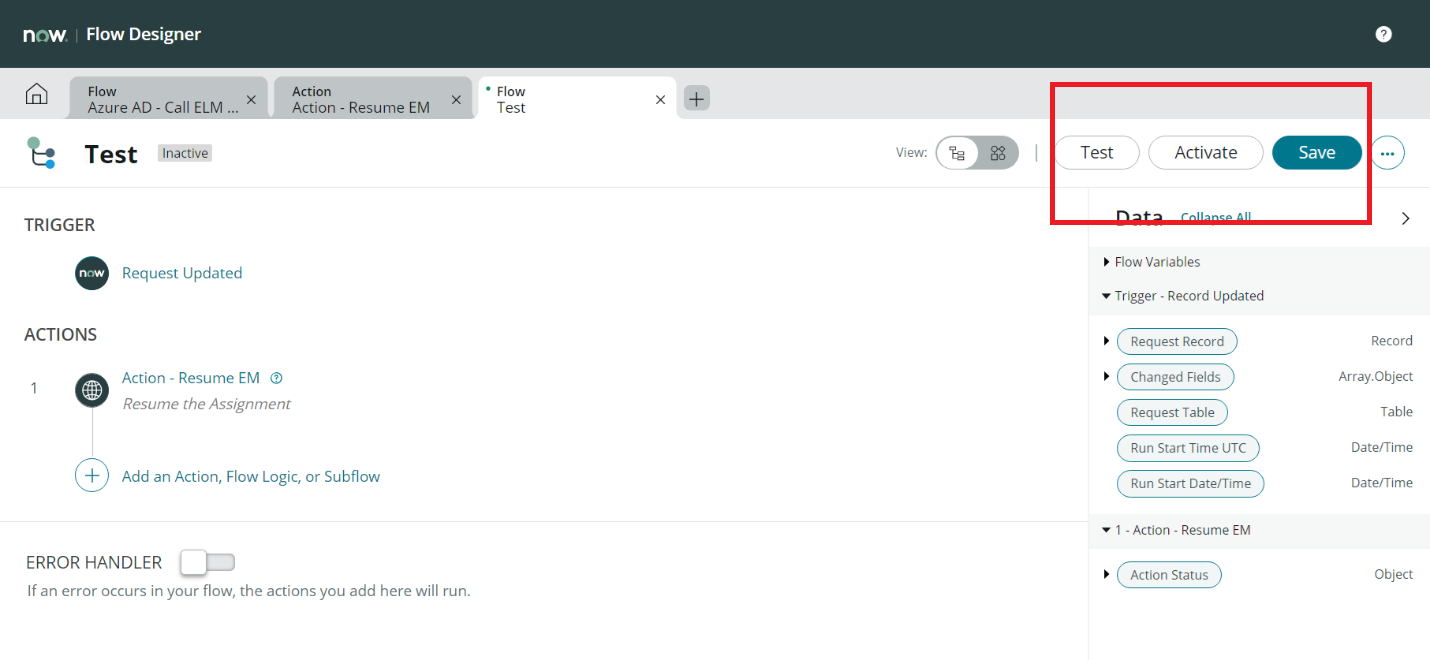
- Select “Done”, “Save” and then “Activate”.


Requesting access to an access package as an end-user
When an end user requests access to an access package, the request is sent to the appropriate approver. Once the approver grants approval, Entitlement Management calls the Logic App. The Logic app then calls ServiceNow to create a new request/ticket and Entitlement Management awaits a callback from ServiceNow.

Receiving access to the requested access package as an end-user
The IT Support team works on the previous ticket created to do necessary provisions, and close the ServiceNow ticket. When the ticket is closed, ServiceNow triggers a call to resume the Entitlement Management workflow. Once the request is completed, the requestor receives a notification from entitlement management that the request has been fulfilled. This streamlined workflow ensures that access requests are fulfilled efficiently, and users are notified promptly.

Note
The end user will see "assignment failed" in the MyAccess portal if the ticket is not closed within 14 days.
Next steps
Advance to the next article to learn how to create...