Note
Access to this page requires authorization. You can try signing in or changing directories.
Access to this page requires authorization. You can try changing directories.
Microsoft Entra ID Governance dynamic permissions helps organizations ensure least privilege for permissions assigned to identities in their applications. During preview, it evaluates privilege levels and separation of duties conflicts to identify agents with powerful permissions and combinations of access that violate your organization's rules.
In this tutorial, you connect Snowflake, enable permission remediation for a catalog, and review detections and planned remediation actions for Snowflake agent identities. For more information, see What is dynamic permissions?.
During preview, dynamic permissions assesses excessive access for Snowflake users with TYPE = SERVICE_AGENT. For more information, see the user TYPE property in Snowflake's CREATE USER reference.
In this tutorial, you:
- Prepare your Snowflake account for discovery.
- Enable dynamic permissions remediation for a catalog.
- Add Snowflake to the catalog and configure permission remediation.
- Start recurring discovery to refresh Snowflake identity and permission data.
- See the resulting detections and remediation details.
Prerequisites
- A Snowflake account. Microsoft recommends piloting dynamic permissions with a non-production Snowflake account during preview.
- Access to a Snowflake user with the
ACCOUNTADMINrole. - A catalog in Microsoft Entra ID Governance. If you don't have one, create a catalog.
- A Snowflake enterprise application added from the Microsoft Entra application gallery. Use the gallery application, not a custom non-gallery application.
- Be an owner of the existing application, or add a new Snowflake gallery application as at least a Cloud Application Administrator.
- Access to the Microsoft Entra admin center as at least an Identity Governance Administrator.
Typically, you'll use a Snowflake application already integrated with Microsoft Entra ID for single sign-on (SSO) and System for Cross-domain Identity Management (SCIM) provisioning. However, neither integration is required for this tutorial. You can add a new Snowflake gallery application without configuring SSO or SCIM. For integration guidance, see Configure single sign-on for Snowflake and Configure automatic user provisioning for Snowflake.
Dynamic permissions is in preview and capabilities are subject to change. Licensing requirements for dynamic permissions have not yet been announced. During preview, dynamic permissions for agent identities requires one of the following license plans:
- Microsoft 365 E7, which includes Agent 365 and Microsoft Entra Suite.
Prepare your Snowflake account for discovery
To analyze permissions for AI agents in Snowflake, Microsoft Entra uses a dedicated service user separate from the Snowflake SCIM security integration. The dedicated service user currently authenticates with a Programmatic Access Token (PAT).
Microsoft recommends piloting dynamic permissions with a non-production Snowflake account during preview.
Note
Microsoft recommends previewing this capability with a non-production or test Snowflake account. The preview script grants the dedicated service user the ACCOUNTADMIN role. Microsoft is partnering with Snowflake to unify advanced identity governance connectivity and the System for Cross-domain Identity Management (SCIM) connection between Snowflake and Microsoft Entra. A future update will move both connections to a single, least-privilege, workload identity-based authentication approach.
The current preview configuration below allows connections from any IPv4 address (0.0.0.0/0) and requires programmatic access token (PAT) authentication.
Sign in to your Snowflake account as a user with the
ACCOUNTADMINrole.Open a SQL worksheet in your Snowflake workspace and paste the following script into it. Don't run the script until you update the warehouse name. The script creates a dedicated service user, assigns the
ACCOUNTADMINrole, configures a network policy, and generates a PAT:USE ROLE ACCOUNTADMIN; -- This warehouse provides compute for recurring discovery queries. SET warehouse_name = 'REPLACE_WITH_YOUR_WAREHOUSE'; CREATE USER IF NOT EXISTS ENTRA_ID_GOV_CONNECTIVITY_USER TYPE = SERVICE DEFAULT_ROLE = ACCOUNTADMIN DEFAULT_WAREHOUSE = $warehouse_name COMMENT = 'Snowflake connectivity service user for advanced Microsoft Entra ID Governance scenarios'; GRANT ROLE ACCOUNTADMIN TO USER ENTRA_ID_GOV_CONNECTIVITY_USER; -- Snowflake's default PAT policy requires a network policy for service users to generate or use a PAT. CREATE NETWORK POLICY IF NOT EXISTS ENTRA_ID_GOV_CONNECTIVITY_NETWORK_POLICY ALLOWED_IP_LIST = ('0.0.0.0/0'); ALTER USER ENTRA_ID_GOV_CONNECTIVITY_USER SET NETWORK_POLICY = ENTRA_ID_GOV_CONNECTIVITY_NETWORK_POLICY; ALTER USER ENTRA_ID_GOV_CONNECTIVITY_USER ADD PROGRAMMATIC ACCESS TOKEN snowflake_connector_token ROLE_RESTRICTION = 'ACCOUNTADMIN' DAYS_TO_EXPIRY = 60 COMMENT = 'Snowflake connectivity PAT for advanced Microsoft Entra ID Governance scenarios';Find the name of the warehouse you'll use for discovery.
Note
The warehouse provides compute for connectivity. Discovery and remediation capabilities aren't limited to the selected warehouse. Query costs charged to the warehouse can vary based on the size of your Snowflake account.
In the worksheet, replace
REPLACE_WITH_YOUR_WAREHOUSEin theSET warehouse_namestatement with the warehouse name. The script uses this variable to set the service user's default warehouse.Run the full script in the same worksheet so that the warehouse variable is available to the statements that use it.
Save the generated access token securely. You'll need it later when configuring discovery and identity governance connectivity in Microsoft Entra.
Add an overpermissioned test agent (optional)
To validate permission remediation, you can add an overpermissioned test agent in your Snowflake test account.
Warning
This example grants the test agent the ACCOUNTADMIN role. Run it only in a non-production Snowflake test account.
Sign in to your Snowflake account as a user with the
ACCOUNTADMINrole.Run the following SQL commands:
USE ROLE ACCOUNTADMIN;

CREATE USER MY_SERVICE_AGENT
  TYPE = SERVICE_AGENT;

GRANT ROLE ACCOUNTADMIN TO USER MY_SERVICE_AGENT;

SHOW GRANTS TO USER MY_SERVICE_AGENT;
Important
After completing this tutorial, remove the MY_SERVICE_AGENT test user from your Snowflake test account.
Enable dynamic permissions remediation for a catalog
Enable permission remediation for the catalog you'll use in this tutorial.
Enabling permission remediation for a catalog automatically enables it for all supported resources in that catalog, provided connectivity to those resources is established. Currently, only Snowflake is supported.
Important
Each application has its own 90-day reporting period, starting when permission remediation is configured for the application in a catalog with permission remediation enabled. During this period, dynamic permissions reports detections and planned remediation actions without automatically applying them.
Microsoft is developing a capability to approve exceptions for individual detections, preventing remediation for those detections. Automatic transitions from reporting to remediation won't begin until this capability is available.
Sign in to the Microsoft Entra admin center as at least an Identity Governance Administrator.
Browse to ID Governance > Dynamic permissions (preview).
Select Resources, and then select Enable dynamic permissions.
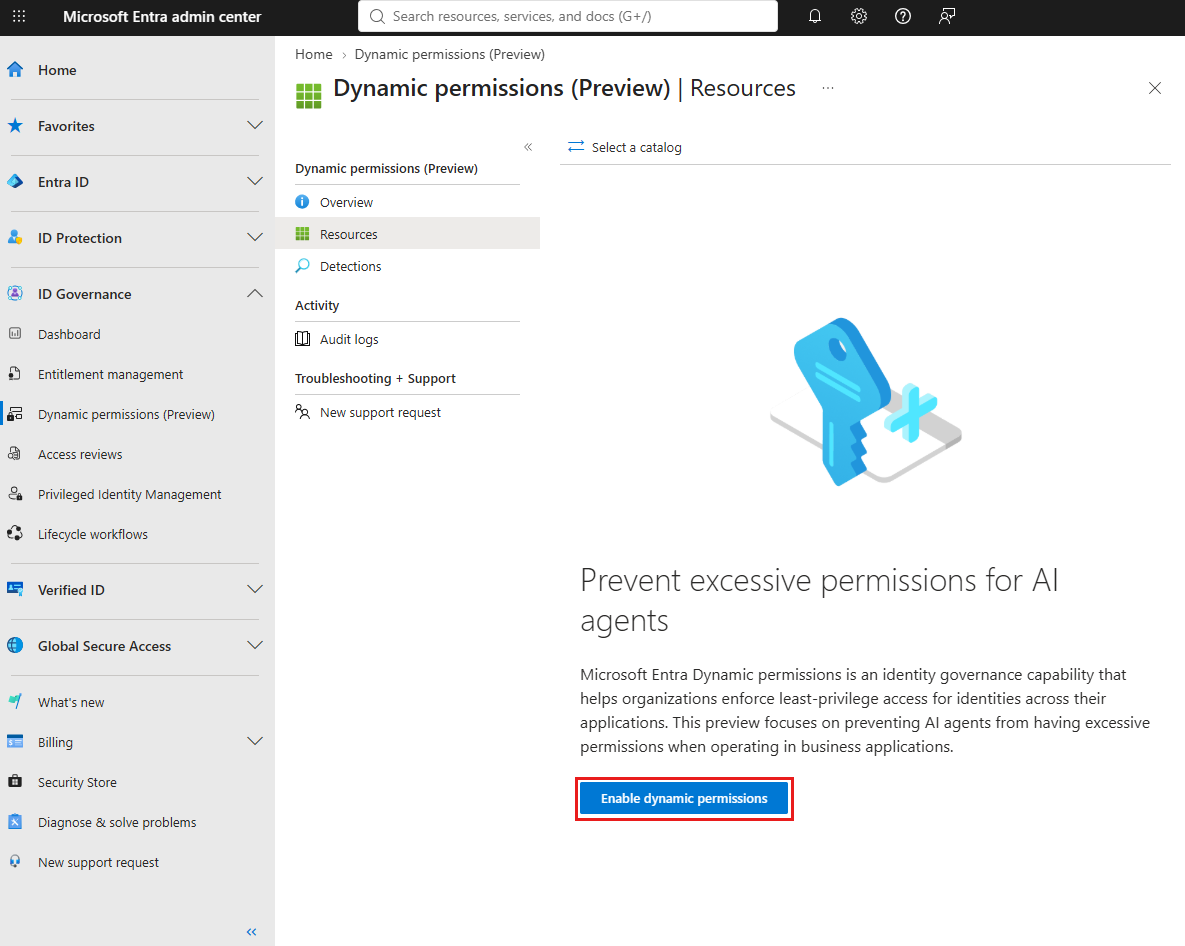
Select the catalog for which you want to enable permission remediation.
Confirm the information, and set Permission remediation to Enabled.
Select Enable dynamic permissions.
Add Snowflake to the catalog
Continue with the catalog you selected in the previous section. If the Snowflake application isn't already part of that catalog, follow these steps to add it.
- On the Resources page in Dynamic permissions (preview), select Add resources.
- Select +Applications.
- In the picker, search for your Snowflake application and select it.
- Select Select to complete the picker.
- Select Add.
Configure permission remediation for Snowflake
Configure the discovery connection and enable permission remediation for the Snowflake application in your catalog. The following steps apply when Discovery connection shows Not configured.
For details about the data collected from Snowflake, see Data collection for dynamic permissions.
Note
If you already provided the discovery and identity governance connectivity information through the enterprise application and provisioning pages, enabling permission remediation for the catalog is sufficient. You don't need to explicitly enable permission remediation for Snowflake.
On the Resources page in Dynamic permissions (preview), select the checkbox next to your Snowflake application. Don't select the application name.
Select Configure permission remediation at the top of the page.
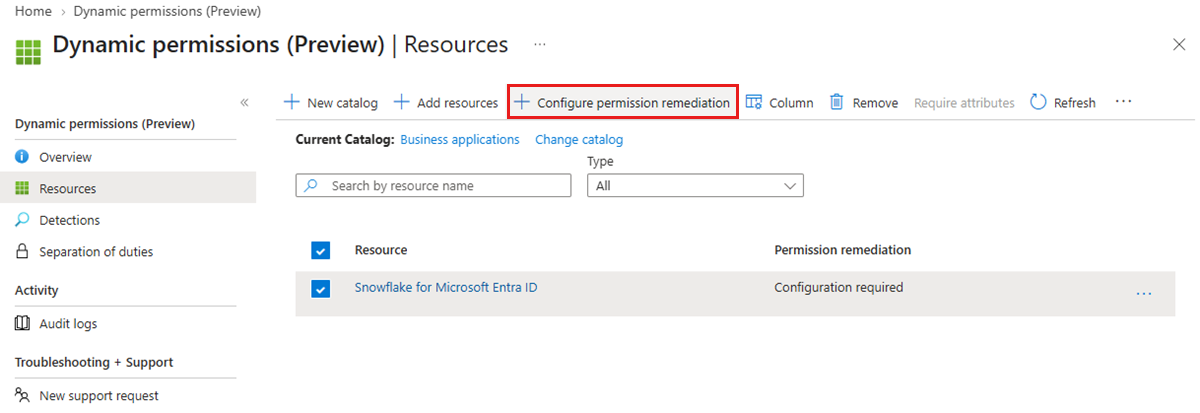
Under Discovery connection, select Configure.
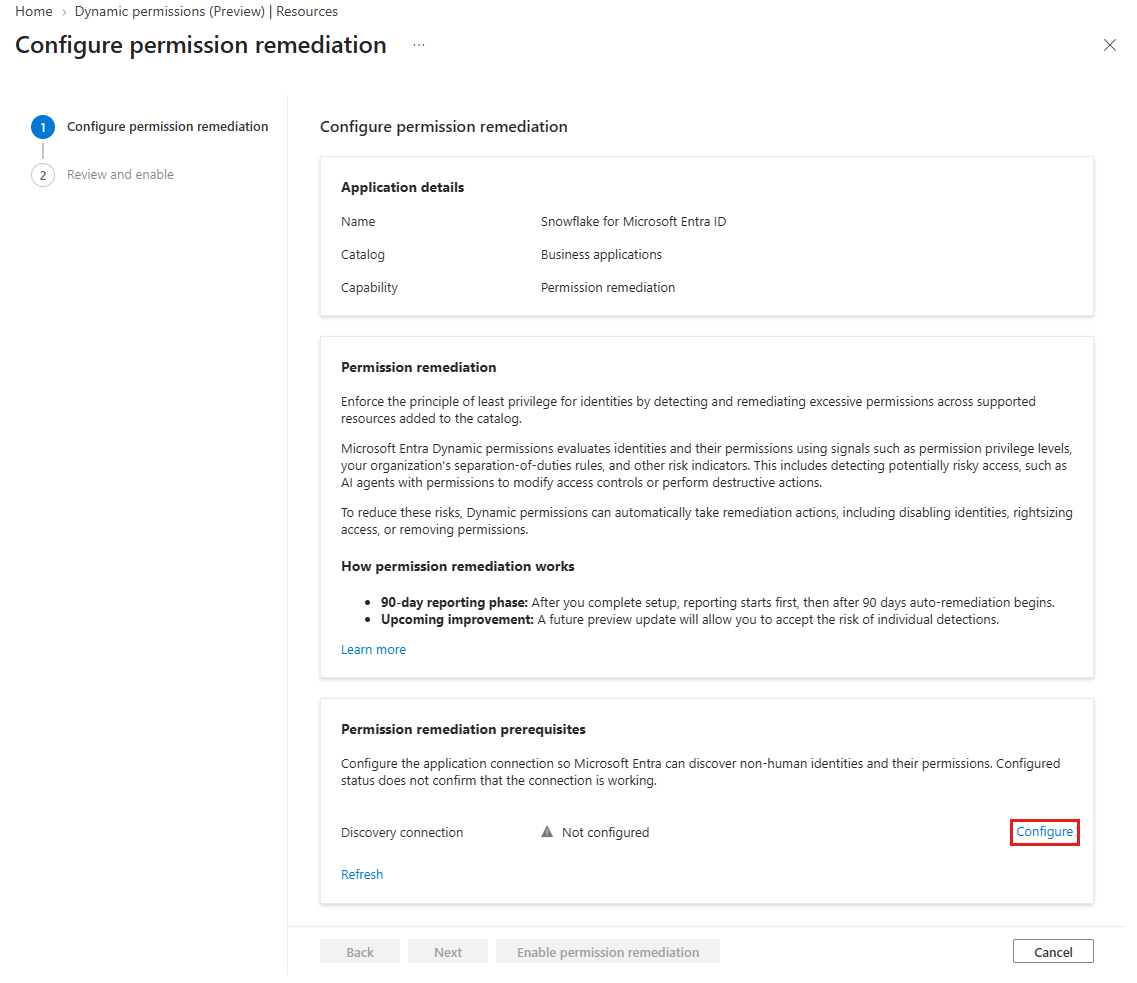
Enter the following connection information:
- Your Snowflake tenant URL in the format
https://<organization-name>-<account-name>.snowflakecomputing.com. In Snowsight, open View account details and copy Account/Server URL. For details, see Find your Snowflake account identifier. - The API token generated when you prepared your Snowflake account for discovery.
- The same Snowflake warehouse you specified in the script in Prepare your Snowflake account for discovery.
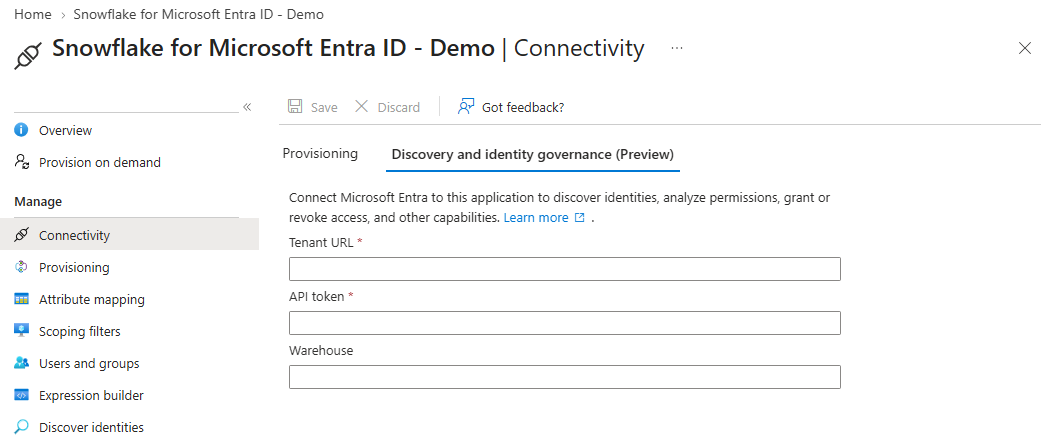
- Your Snowflake tenant URL in the format
Select Save.
Select X to close the connection configuration window and return to Configure permission remediation.
Select Next.
Select Enable permission remediation.
Note
Microsoft is partnering with Snowflake to move both the discovery connection and the SCIM connection between Snowflake and Microsoft Entra to workload identity-based authentication in a future update.
Start recurring discovery
After configuring permission remediation, return to the Resources page in Dynamic permissions (preview) to start recurring discovery for your Snowflake application.
Select the name of the Snowflake resource in your catalog to open its enterprise application page.
Select Provisioning.
Select Discover identities.
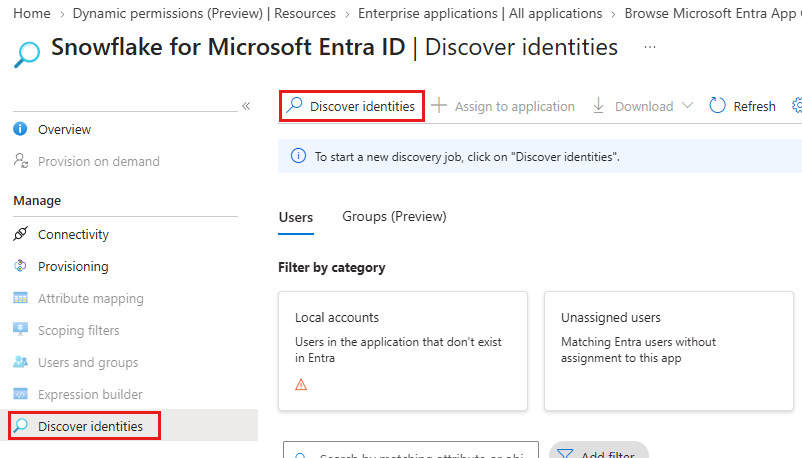
On the Discover identities page, select Discover identities to start discovery.
Note
Discovery starts immediately and then runs every 24 hours to refresh the data. The time needed to complete discovery depends on the number of identities and the amount of relevant data in the Snowflake application.
Add separation of duties rules for Snowflake (optional)
If you want to add separation of duties rules for Snowflake, follow Import separation of duties rules. Then return to this tutorial to see the resulting detections and remediations.
View detections and remediations
You can see the resulting detected non-human identities which triggered a rule for the catalog's resources, including planned remediation actions and remediation status for those identities.
Sign in to the Microsoft Entra admin center as at least an Identity Governance Administrator.
Browse to ID Governance > Dynamic permissions (preview).
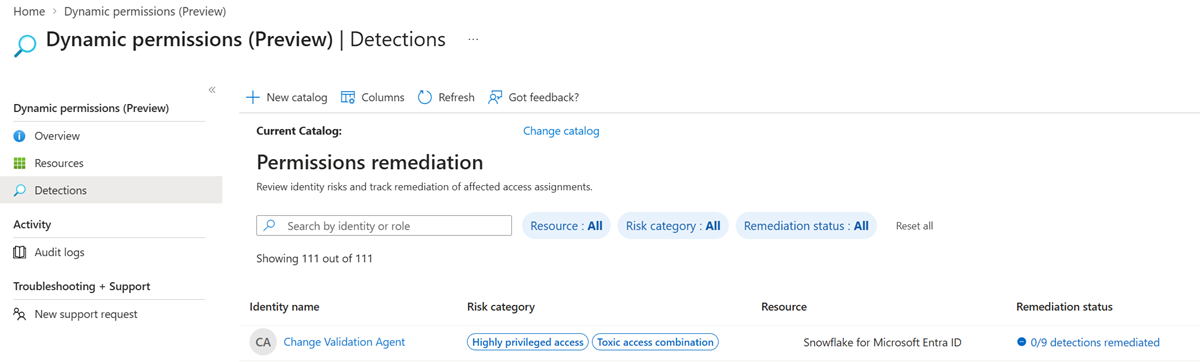
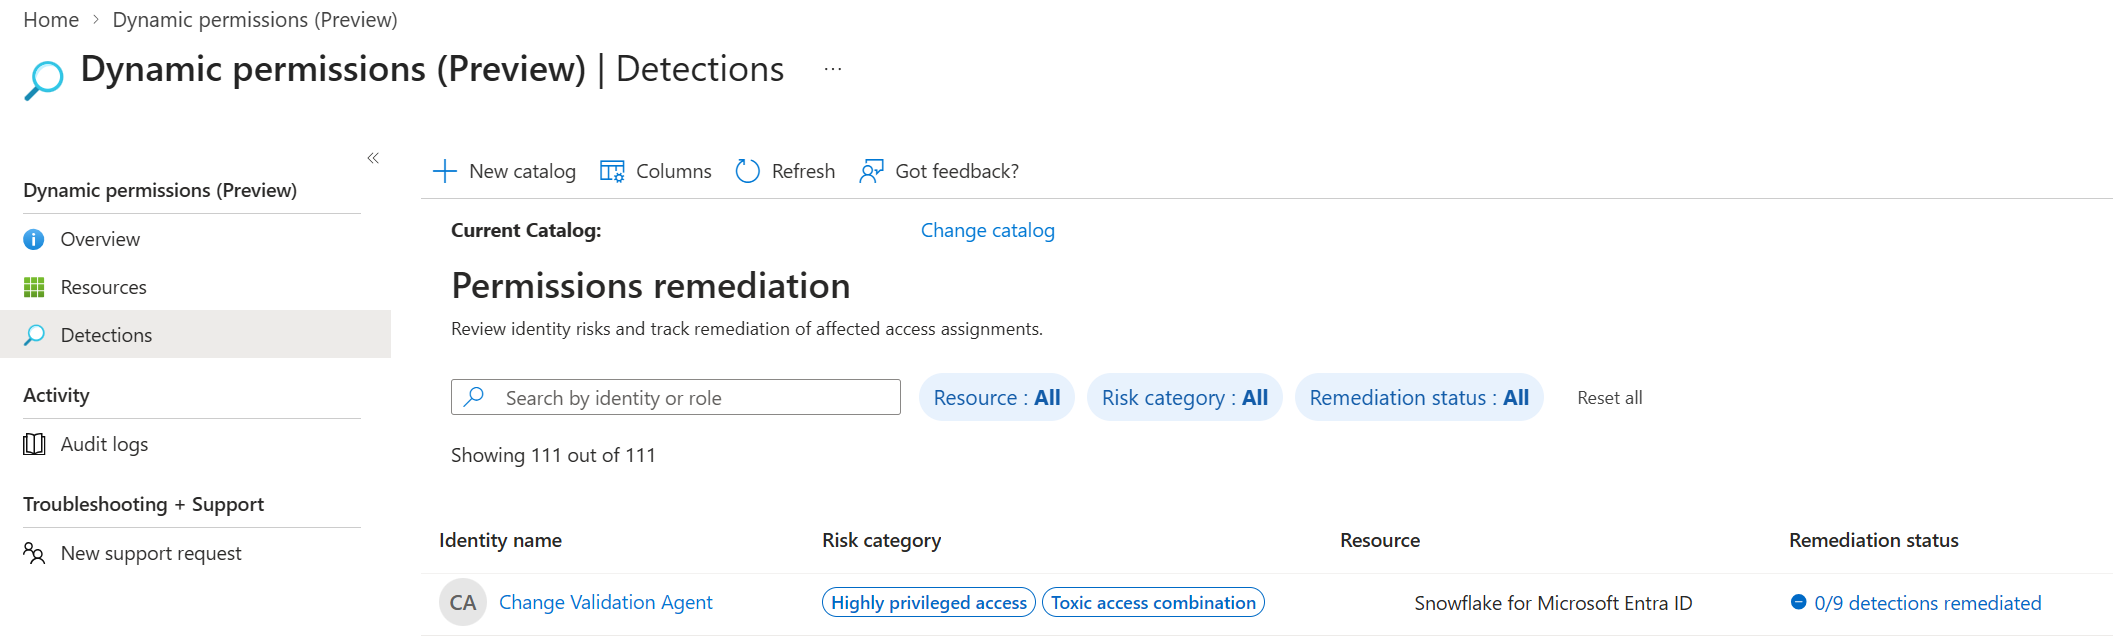
Select Detections.
Select the catalog you used in this tutorial. If another catalog is already selected, select Change catalog, and then select your catalog.
The detections are shown for an identity in a resource. Select an identity to view the detection details, including the planned remediation action and remediation status.