Note
Access to this page requires authorization. You can try signing in or changing directories.
Access to this page requires authorization. You can try changing directories.
This article describes how to configure a custom claims provider for a token issuance start event. Using an existing Azure Functions REST API, you'll register a custom authentication extension and add attributes that you expect it to parse from your REST API. To test the custom authentication extension, you'll register a sample OpenID Connect application to get a token and view the claims.
This video outlines the procedure of mapping claims from external systems into security tokens using Microsoft Entra custom claims provider.
Prerequisites
- An Azure subscription with the ability to create Azure Functions. If you don't have an existing Azure account, sign up for a free trial or use your Visual Studio Subscription benefits when you create an account.
- An HTTP trigger function configured for a token issuance event deployed to Azure Functions. If you don't have one, follow the steps in create a REST API for a token issuance start event in Azure Functions.
- A basic understanding of the concepts covered in Custom authentication extensions overview.
- A Microsoft Entra ID tenant. You can use either a customer or workforce tenant for this how-to guide.
- For external tenants, use a sign-up and sign-in user flow.
Step 1: Register a custom authentication extension
You'll now configure a custom authentication extension, which will be used by Microsoft Entra ID to call your Azure function. The custom authentication extension contains information about your REST API endpoint, the claims that it parses from your REST API, and how to authenticate to your REST API. Follow these steps to register a custom authentication extension to your Azure Function app.
Note
You can have a maximum of 100 custom extension policies.
Register a custom authentication extension
- Sign in to the Azure portal as at least an Application Administrator and Authentication Administrator.
- Search for and select Microsoft Entra ID and select Enterprise applications.
- Select Custom authentication extensions, and then select Create a custom extension.
- In Basics, select the TokenIssuanceStart event type and select Next.
- In Endpoint Configuration, fill in the following properties:
- Name - A name for your custom authentication extension. For example, Token issuance event.
- Target Url - The
{Function_Url}of your Azure Function URL. Navigate to the Overview page of your Azure Function app, then select the function you created. In the function Overview page, select Get Function Url and use the copy icon to copy the customauthenticationextension_extension (System key) URL. - Description - A description for your custom authentication extensions.
- Select Next.
- In API Authentication, select the Create new app registration option to create an app registration that represents your function app.
- Give the app a name, for example Azure Functions authentication events API.
- Select Next.
- In Claims, enter the attributes that you expect your custom authentication extension to parse from your REST API and will be merged into the token. Add the following claims:
- DateOfBirth
- CustomRoles
- ApiVersion
- CorrelationId
- Select Next, then Create, which registers the custom authentication extension and the associated application registration.
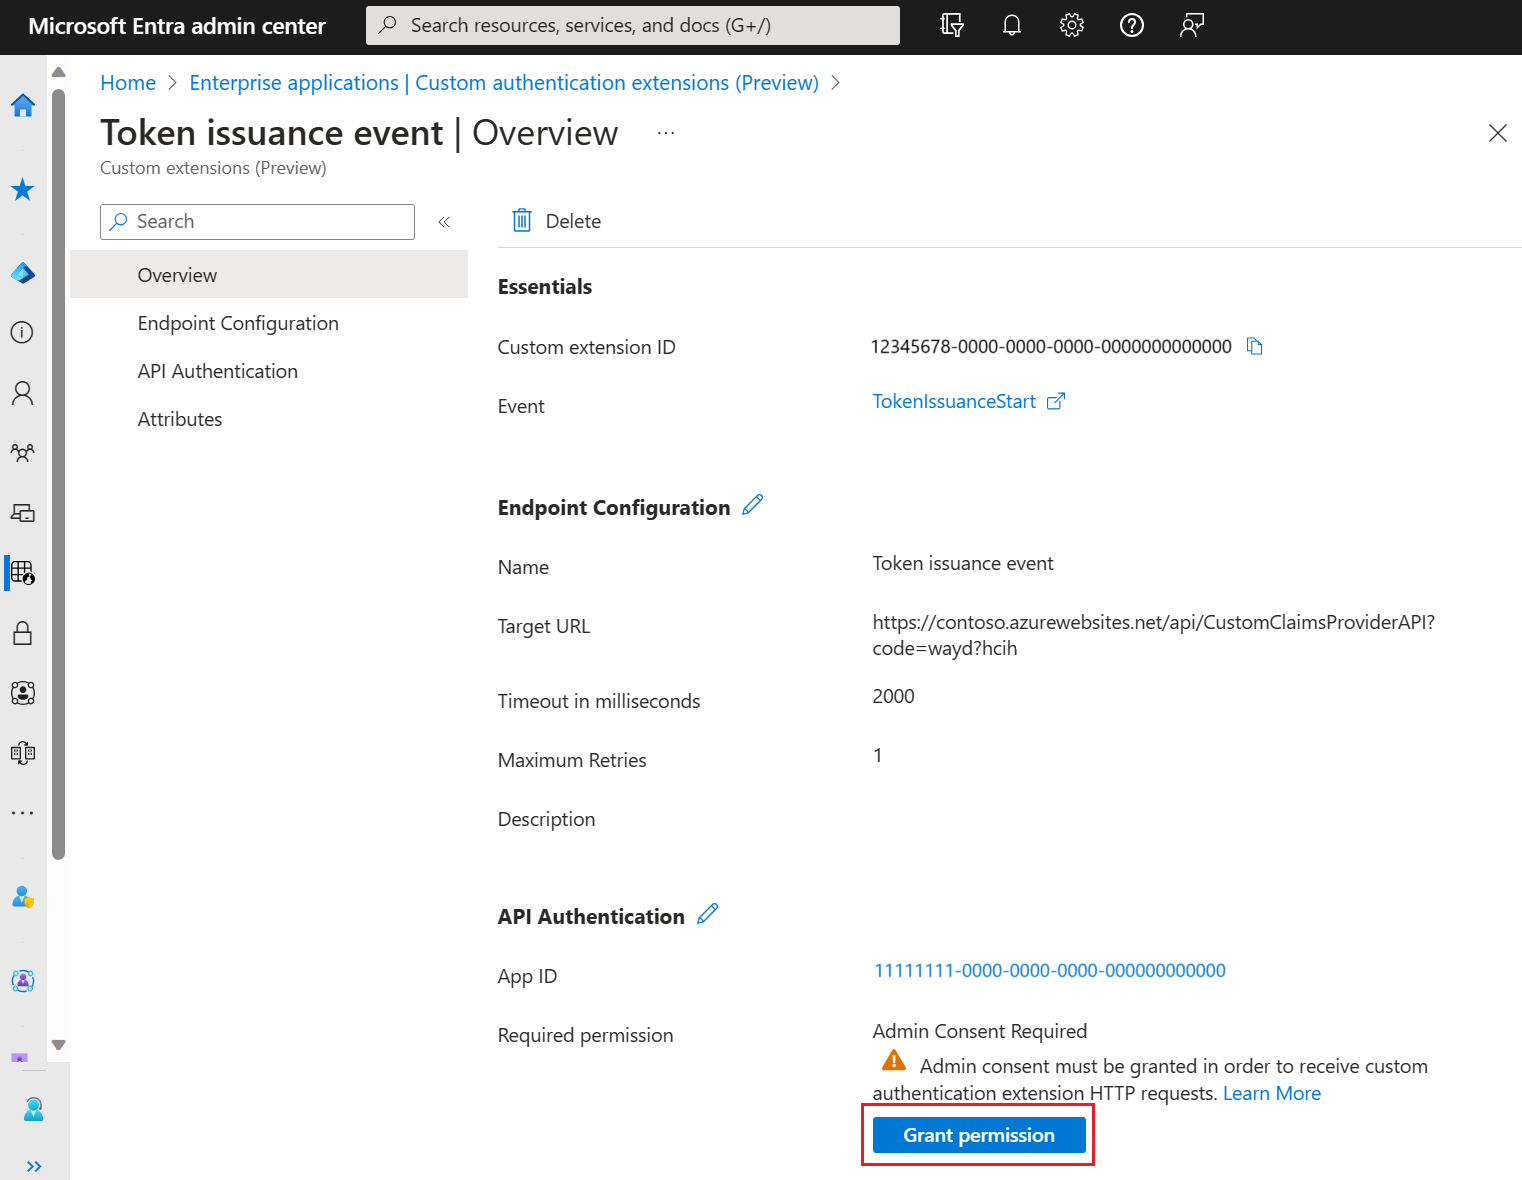
- Note the App ID under API Authentication, which is needed to configure authentication for your Azure Function in your Azure Function app.
1.2 Grant admin consent
Once the custom authentication extension is created, you need to grant permissions to the API. The custom authentication extension uses client_credentials to authenticate to the Azure Function App using the Receive custom authentication extension HTTP requests permission.
Open the Overview page of your new custom authentication extension. Take a note of the App ID under API Authentication, as it will be needed when adding an identity provider.
Under API Authentication, select Grant permission.
A new window opens, and once signed in, it requests permissions to receive custom authentication extension HTTP requests. This allows the custom authentication extension to authenticate to your API. Select Accept.

Step 2: Configure an OpenID Connect app to receive enriched tokens
To get a token and test the custom authentication extension, you can use the https://jwt.ms app. It's a Microsoft-owned web application that displays the decoded contents of a token (the contents of the token never leave your browser).
2.1 Register a test web application
Follow these steps to register the jwt.ms web application:
From the Home page in the Azure portal, select Microsoft Entra ID.
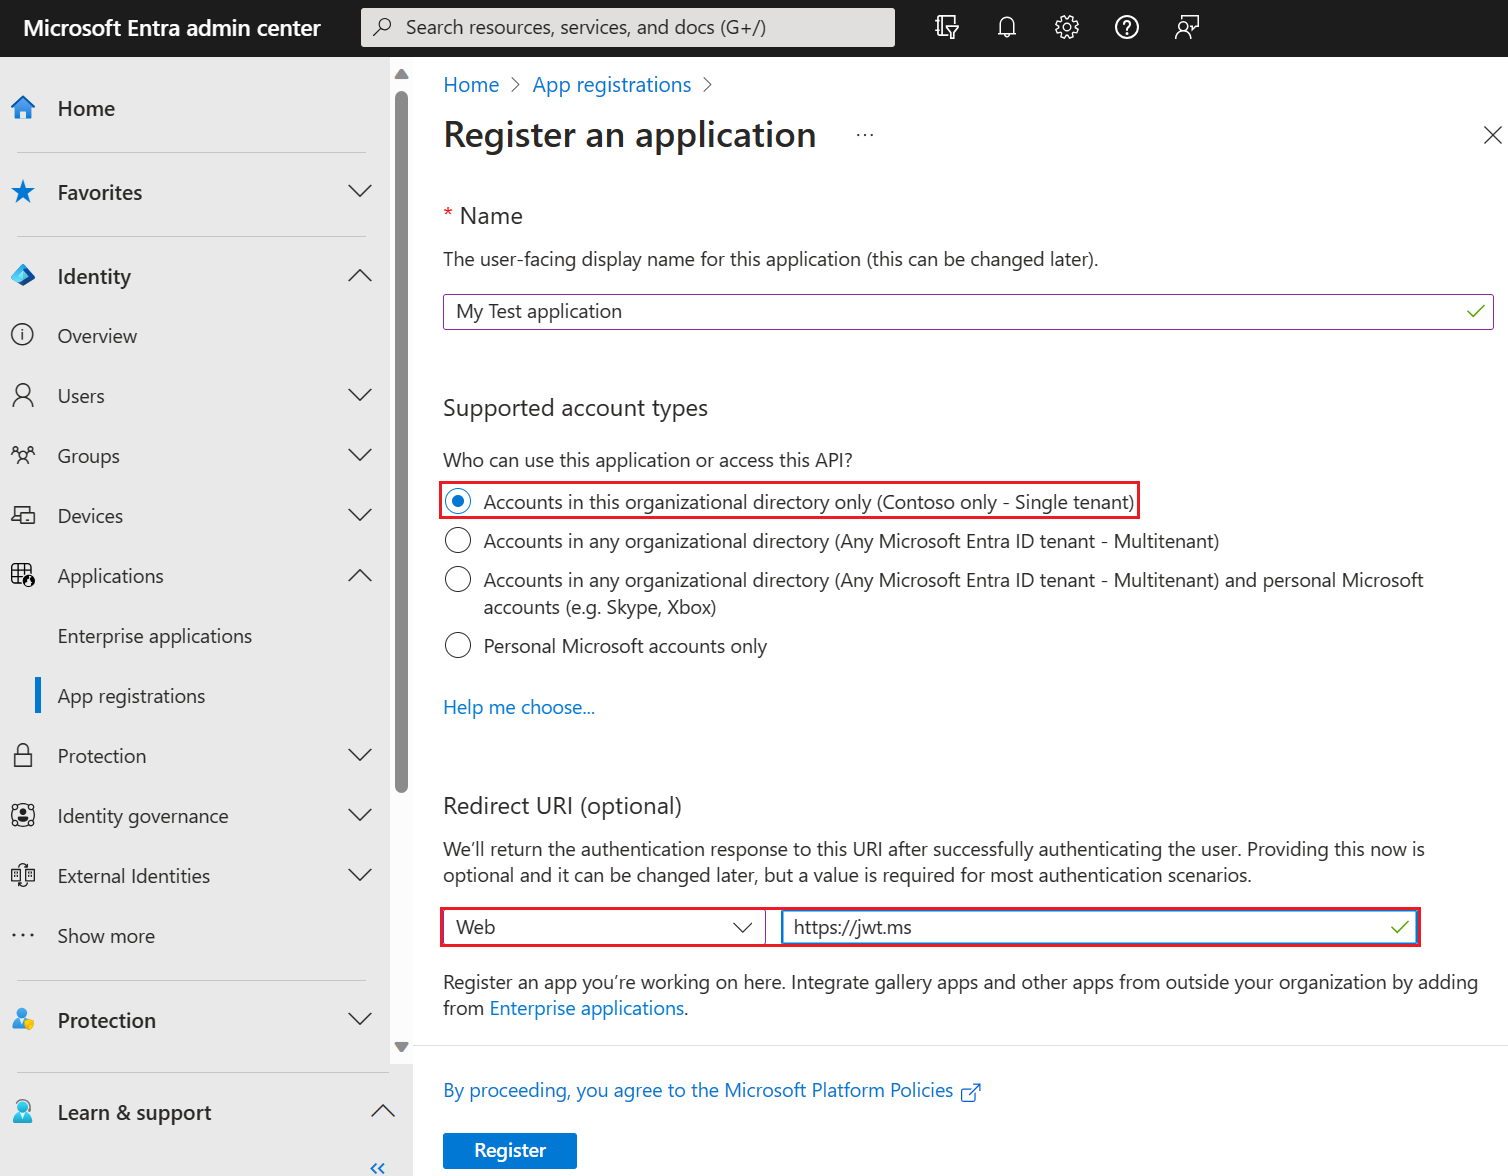
Select App registrations > New registration.
Enter a Name for the application. For example, My Test application.
Under Supported account types, select Accounts in this organizational directory only.
In the Select a platform dropdown in Redirect URI, select Web and then enter
https://jwt.msin the URL text box.Select Register to complete the app registration.
In the Overview page of your app registration, copy the Application (client) ID. The app ID is referred to as the
{App_to_enrich_ID}in later steps. In Microsoft Graph, it's referenced by the appId property.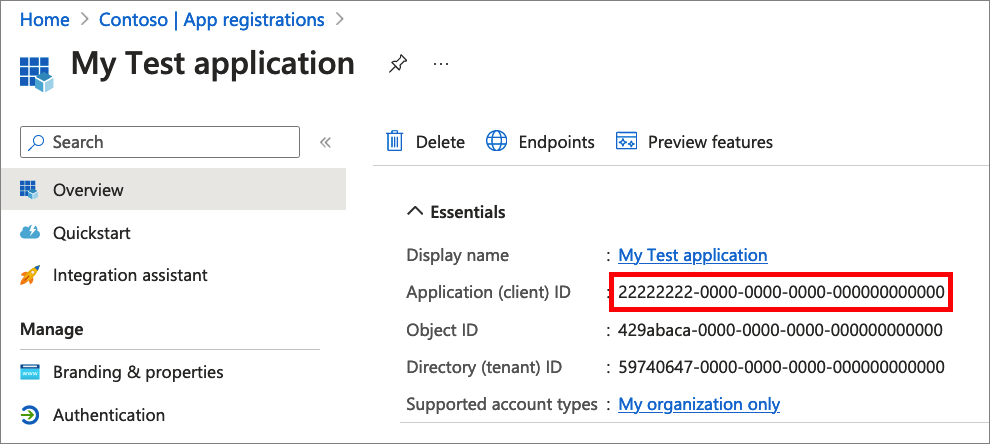
2.2 Enable implicit flow
The jwt.ms test application uses the implicit flow. Enable implicit flow in your My Test application registration:
Important
Microsoft recommends using the most secure authentication flow available. The authentication flow used for testing in this procedure requires a very high degree of trust in the application, and carries risks that are not present in other flows. This approach shouldn't be used for authenticating users to your production apps (learn more).
- Under Manage, select Authentication.
- Under Implicit grant and hybrid flows, select the ID tokens (used for implicit and hybrid flows) checkbox.
- Select Save.
2.3 Enable your App for a claims mapping policy
A claims mapping policy is used to select which attributes returned from the custom authentication extension are mapped into the token. To allow tokens to be augmented, you must explicitly enable the application registration to accept mapped claims:
- In your My Test application registration, under Manage, select Manifest.
- In the manifest, locate the
acceptMappedClaimsattribute, and set the value totrue. - Set the
requestedAccessTokenVersionto2. - Select Save to save the changes.
The following JSON snippet demonstrates how to configure these properties.
{
	"id": "22222222-0000-0000-0000-000000000000",
	"acceptMappedClaims": true,
	"requestedAccessTokenVersion": 2,
    ...
}
Warning
Do not set acceptMappedClaims property to true for multitenant apps, which can allow malicious actors to create claims-mapping policies for your app. Instead configure a custom signing key.
Continue to the next step, Assign a custom claims provider to your app.
Step 3: Assign a custom claims provider to your app
For tokens to be issued with claims incoming from the custom authentication extension, you must assign a custom claims provider to your application. This is based on the token audience, so the provider must be assigned to the client application to receive claims in an ID token, and to the resource application to receive claims in an access token. The custom claims provider relies on the custom authentication extension configured with the token issuance start event listener. You can choose whether all, or a subset of claims, from the custom claims provider are mapped into the token.
Note
You can only create 250 unique assignments between applications and custom extensions. If you wish to apply the same custom extension call to multiple apps, we recommend using authenticationEventListeners Microsoft Graph API to create listeners for multiple applications. This is not supported in the Azure portal.
Follow these steps to connect the My Test application with your custom authentication extension:
To assign the custom authentication extension as a custom claims provider source;
From the Home page in the Azure portal, select Microsoft Entra ID.
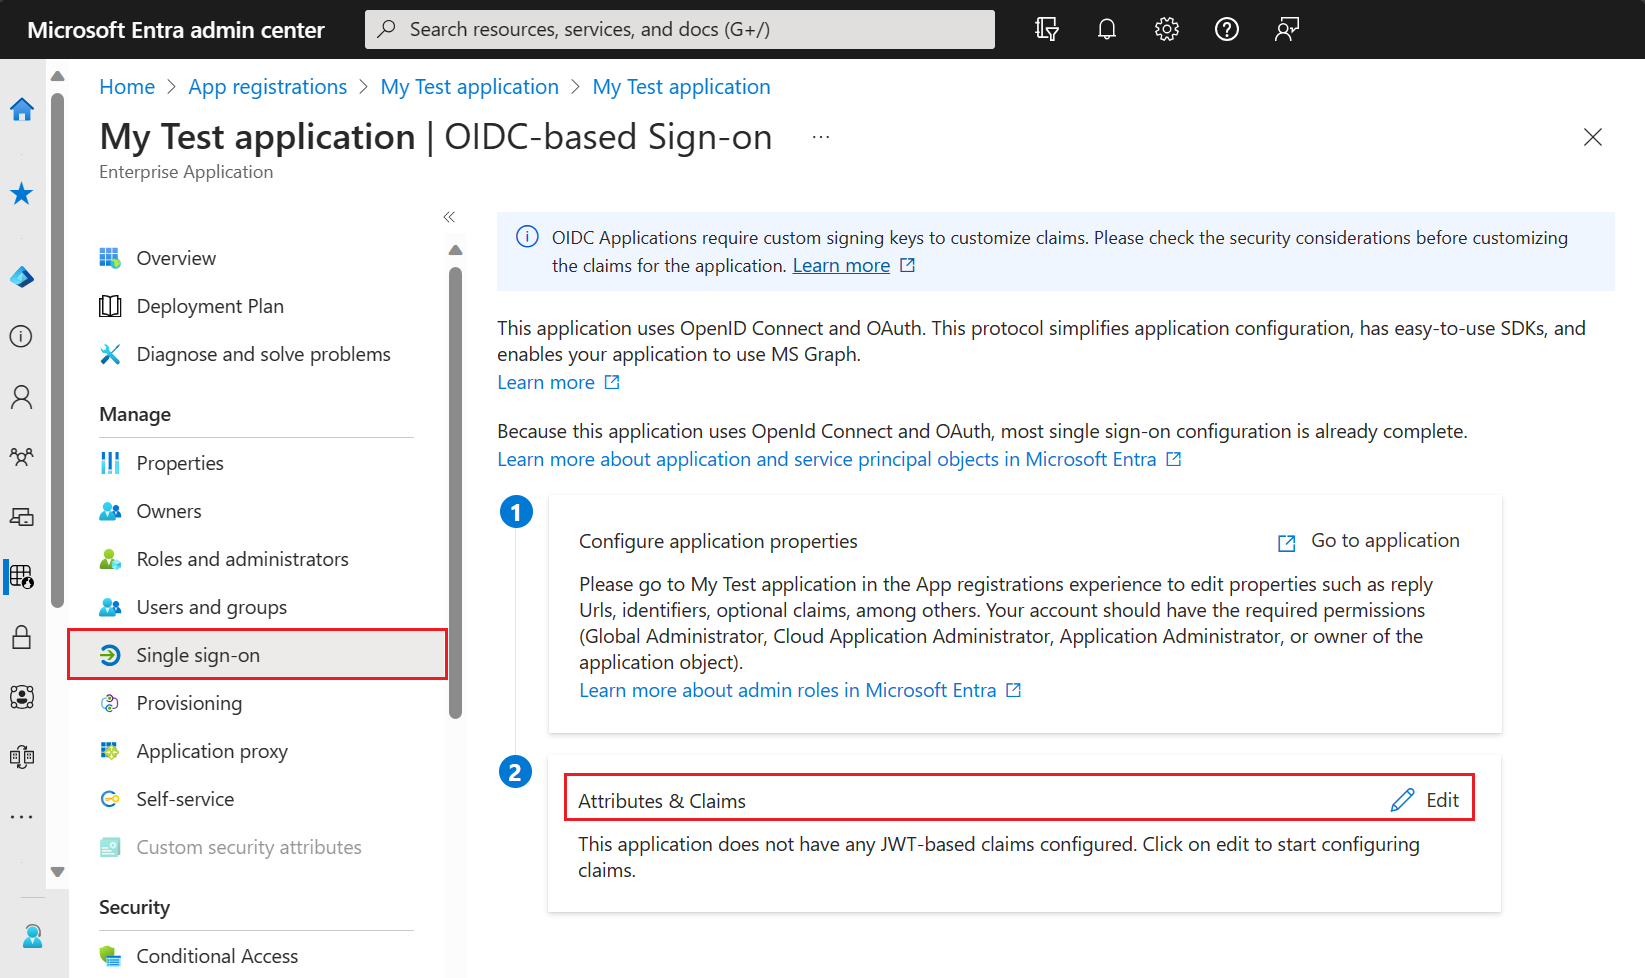
SelectEnterprise applications, then under Manage, select All applications. Find and select My Test application from the list.
From the Overview page of My Test application, navigate to Manage, and select Single sign-on.
Under Attributes & Claims, select Edit.
Expand the Advanced settings menu.
Next to Custom claims provider, select Configure.
Expand the Custom claims provider drop-down box, and select the Token issuance event you created earlier.
Select Save.

Next, assign the attributes from the custom claims provider, which should be issued into the token as claims:
Select Add new claim to add a new claim. Provide a name to the claim you want to be issued, for example DateOfBirth.
Under Source, select Attribute, and choose customClaimsProvider.DateOfBirth from the Source attribute drop-down box.

Select Save.
Repeat this process to add the customClaimsProvider.customRoles, customClaimsProvider.apiVersion and customClaimsProvider.correlationId attributes, and the corresponding name. It's a good idea to match the name of the claim to the name of the attribute.

Step 4: Protect your Azure Function
Microsoft Entra custom authentication extension uses server to server flow to obtain an access token that is sent in the HTTP Authorization header to your Azure function. When publishing your function to Azure, especially in a production environment, you need to validate the token sent in the authorization header.
To protect your Azure function, follow these steps to integrate Microsoft Entra authentication, for validating incoming tokens with your Azure Functions authentication events API application registration. Choose one of the following tabs based on your tenant type.
Note
If the Azure function app is hosted in a different Azure tenant than the tenant in which your custom authentication extension is registered, choose the Open ID Connect tab.
4.1 Using Microsoft Entra identity provider
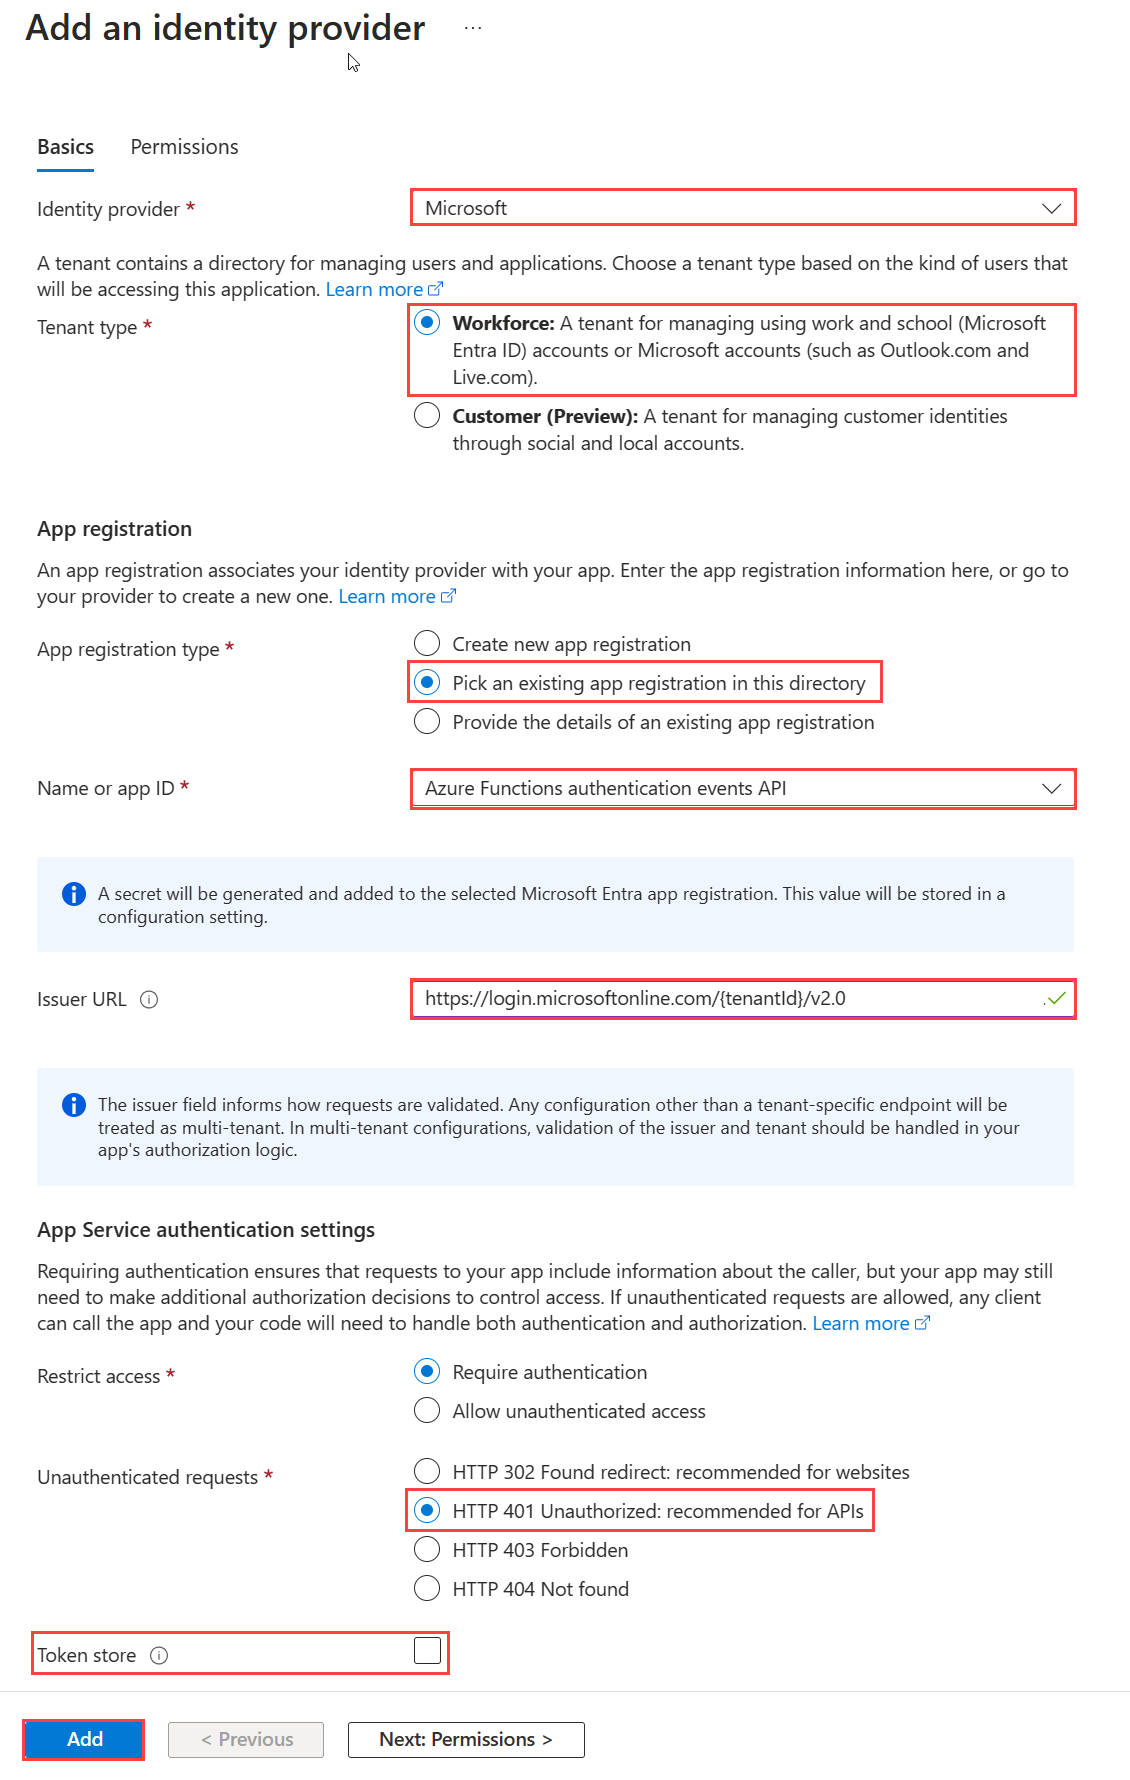
Use the following steps to add Microsoft Entra as an identity provider to your Azure Function app.
In the Azure portal, find and select the function app you previously published.
Under Settings, select Authentication.
Select Add Identity provider.
Select Microsoft as the identity provider.
Select Workforce as the tenant type.
Under App registration select Pick an existing app registration in this directory for the App registration type, and pick the Azure Functions authentication events API app registration you previously created when registering the custom claims provider.
Enter the following issuer URL,
https://login.microsoftonline.com/{tenantId}/v2.0, where{tenantId}is the tenant ID of your workforce tenant.Under Client application requirement, select Allow requests from specific client applications and enter
99045fe1-7639-4a75-9d4a-577b6ca3810f.Under Tenant requirement, select Allow requests from specific tenants and enter your workforce tenant ID.
Under Unauthenticated requests, select HTTP 401 Unauthorized as the identity provider.
Unselect the Token store option.
Select Add to add authentication to your Azure Function.


4.2 Using OpenID Connect identity provider
If you configured the Microsoft identity provider, skip this step. Otherwise, if the Azure Function is hosted under a different tenant than the tenant in which your custom authentication extension is registered, follow these steps to protect your function:
Create a client secret
- From the Home page of the Azure portal, select Microsoft Entra ID > App registrations.
- Select the Azure Functions authentication events API app registration you created previously.
- Select Certificates & secrets > Client secrets > New client secret.
- Select an expiration for the secret or specify a custom lifetime, add a description, and select Add.
- Record the secret's value for use in your client application code. This secret value is never displayed again after you leave this page.
Add the OpenID Connect identity provider to your Azure Function app.
Find and select the function app you previously published.
Under Settings, select Authentication.
Select Add Identity provider.
Select OpenID Connect as the identity provider.
Provide a name, such as Contoso Microsoft Entra ID.
Under the Metadata entry, enter the following URL to the Document URL. Replace the
{tenantId}with your Microsoft Entra tenant ID.https://login.microsoftonline.com/{tenantId}/v2.0/.well-known/openid-configurationUnder the App registration, enter the application ID (client ID) of the Azure Functions authentication events API app registration you created previously.
Return to the Azure Function, under the App registration, enter the Client secret.
Unselect the Token store option.
Select Add to add the OpenID Connect identity provider.
Step 5: Test the application
To test your custom claims provider, follow these steps:
Open a new private browser and navigate and sign-in through the following URL.
https://login.microsoftonline.com/{tenantId}/oauth2/v2.0/authorize?client_id={App_to_enrich_ID}&response_type=id_token&redirect_uri=https://jwt.ms&scope=openid&state=12345&nonce=12345Replace
{tenantId}with your tenant ID, tenant name, or one of your verified domain names. For example,contoso.onmicrosoft.com.Replace
{App_to_enrich_ID}with the My Test application client ID.After logging in, you'll be presented with your decoded token at
https://jwt.ms. Validate that the claims from the Azure Function are presented in the decoded token, for example,DateOfBirth.