Note
Access to this page requires authorization. You can try signing in or changing directories.
Access to this page requires authorization. You can try changing directories.
Applies to:  Workforce tenants External tenants (learn more)
In this quickstart, you use a sample single-page app (SPA) to show you how to sign in users by using the authorization code flow with Proof Key for Code Exchange (PKCE) and call the Microsoft Graph API. The sample uses the Microsoft Authentication Library to handle authentication.
Prerequisites
- An Azure account with an active subscription. If you don't already have one, Create an account for free.
- This Azure account must have permissions to manage applications. Any of the following Microsoft Entra roles include the required permissions:
- Application Administrator
- Application Developer
- A workforce tenant. You can use your Default Directory or set up a new tenant.
- Visual Studio Code or another code editor.
- Register a new app in the Microsoft Entra admin center, configured for Accounts in this organizational directory only. Refer to Register an application for more details. Record the following values from the application Overview page for later use:
- Application (client) ID
- Directory (tenant) ID
- Add the following redirect URIs using the Single-page application platform configuration. Refer to How to add a redirect URI in your application for more details.
- Redirect URI:
http://localhost:3000/
- Redirect URI:
- Node.js
Clone or download the sample application
To obtain the sample application, you can either clone it from GitHub or download it as a .zip file.
To clone the sample, open a command prompt and navigate to where you wish to create the project, and enter the following command:
git clone https://github.com/Azure-Samples/ms-identity-docs-code-javascript.gitDownload the .zip file. Extract it to a file path where the length of the name is fewer than 260 characters.
Configure the project
In your IDE, open the project folder, ms-identity-docs-code-javascript, containing the sample.
Open vanillajs-spa/App/public/authConfig.js and update the following values with the information recorded in the admin center.
/** * Configuration object to be passed to MSAL instance on creation. * For a full list of MSAL.js configuration parameters, visit: * https://github.com/AzureAD/microsoft-authentication-library-for-js/blob/dev/lib/msal-browser/docs/configuration.md */ const msalConfig = { auth: { clientId: "Enter_the_Application_Id_Here", // WORKFORCE TENANT authority: "https://login.microsoftonline.com/Enter_the_Tenant_Info_Here", // Replace the placeholder with your tenant info // EXTERNAL TENANT // authority: "https://Enter_the_Tenant_Subdomain_Here.ciamlogin.com/", // Replace the placeholder with your tenant subdomain redirectUri: '/', // You must register this URI on App Registration. Defaults to window.location.href e.g. http://localhost:3000/ navigateToLoginRequestUrl: true, // If "true", will navigate back to the original request location before processing the auth code response. }, cache: { cacheLocation: 'sessionStorage', // Configures cache location. "sessionStorage" is more secure, but "localStorage" gives you SSO. storeAuthStateInCookie: false, // set this to true if you have to support IE }, system: { loggerOptions: { loggerCallback: (level, message, containsPii) => { if (containsPii) { return; } switch (level) { case msal.LogLevel.Error: console.error(message); return; case msal.LogLevel.Info: console.info(message); return; case msal.LogLevel.Verbose: console.debug(message); return; case msal.LogLevel.Warning: console.warn(message); return; } }, }, }, }; /** * Scopes you add here will be prompted for user consent during sign-in. * By default, MSAL.js will add OIDC scopes (openid, profile, email) to any login request. * For more information about OIDC scopes, visit: * https://learn.microsoft.com/en-us/entra/identity-platform/permissions-consent-overview#openid-connect-scopes */ const loginRequest = { scopes: ["User.Read"], }; /** * An optional silentRequest object can be used to achieve silent SSO * between applications by providing a "login_hint" property. */ // const silentRequest = { // scopes: ["openid", "profile"], // loginHint: "example@domain.net" // }; // exporting config object for jest if (typeof exports !== 'undefined') { module.exports = { msalConfig: msalConfig, loginRequest: loginRequest, }; }clientId- The identifier of the application, also referred to as the client. Replace the text in quotes with the Application (client) ID value that was recorded earlier.authority- The authority is a URL that indicates a directory that MSAL can request tokens from. Replace Enter_the_Tenant_Info_Here with the Directory (tenant) ID value that was recorded earlier.redirectUri- The Redirect URI of the application. If necessary, replace the text in quotes with the redirect URI that was recorded earlier.
Run the application and sign in and sign out
Run the project with a web server by using Node.js:
To start the server, run the following commands from within the project directory:
cd vanillajs-spa/App
npm install
npm start
Copy the
httpsURL that appears in the terminal, for example,https://localhost:3000, and paste it into a browser. We recommend using a private or incognito browser session.Follow the steps and enter the necessary details to sign in with your Microsoft account. You'll be requested an email address so a one time passcode can be sent to you. Enter the code when prompted.
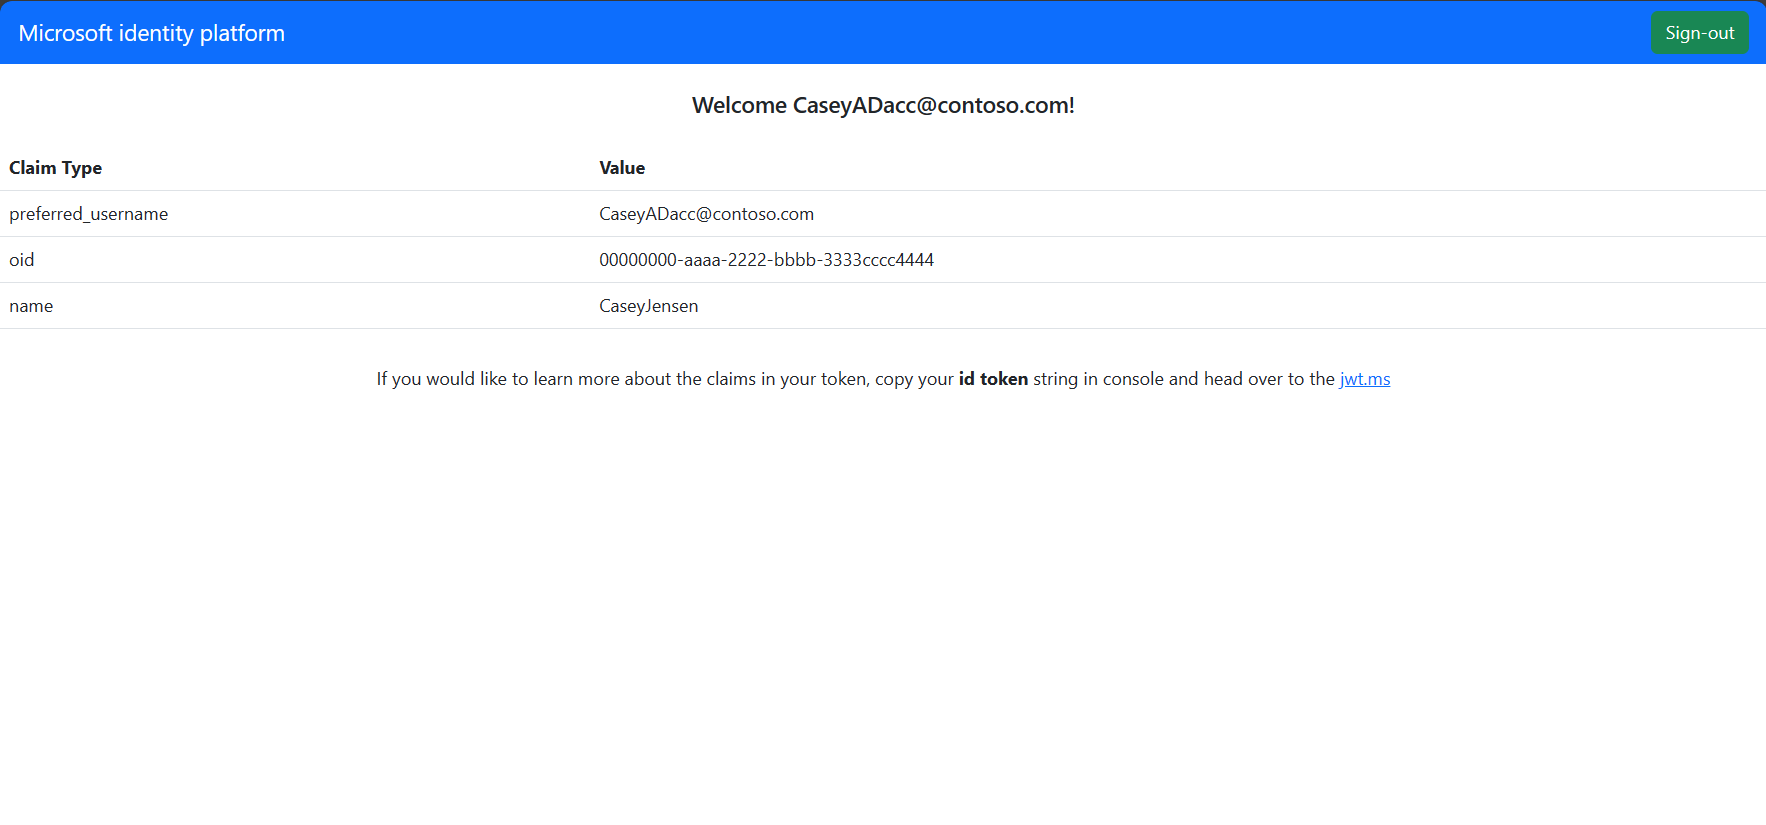
The application will request permission to maintain access to data you have given it access to, and to sign you in and read your profile. Select Accept. The following screenshot appears, indicating that you have signed in to the application and have accessed your profile details from the Microsoft Graph API.


Prerequisites
- An Azure account with an active subscription. If you don't already have one, Create an account for free.
- This Azure account must have permissions to manage applications. Any of the following Microsoft Entra roles include the required permissions:
- Application Administrator
- Application Developer
- An external tenant. To create one, choose from the following methods:
- Use the Microsoft Entra External ID extension to set up an external tenant directly in Visual Studio Code. (Recommended)
- Create a new external tenant in the Microsoft Entra admin center.
- A user flow. For more information, refer to create self-service sign-up user flows for apps in external tenants. This user flow can be used for multiple applications.
- Visual Studio Code or another code editor.
- Register a new app in the Microsoft Entra admin center, configured for Accounts in this organizational directory only. Refer to Register an application for more details. Record the following values from the application Overview page for later use:
- Application (client) ID
- Directory (tenant) ID
- Add the following redirect URIs using the Single-page application platform configuration. Refer to How to add a redirect URI in your application for more details.
- Redirect URI:
http://localhost:3000/
- Redirect URI:
- Add your application to the user flow
- Node.js
Clone or download sample SPA
To obtain the sample application, you can either clone it from GitHub or download it as a .zip file.
To clone the sample, open a command prompt and navigate to where you wish to create the project, and enter the following command:
git clone https://github.com/Azure-Samples/ms-identity-ciam-javascript-tutorial.gitDownload the sample. Extract it to a file path where the length of the name is fewer than 260 characters.
Configure the sample SPA
Open
App/public/authConfig.jsand replace the following with the values obtained from the Microsoft Entra admin center:Enter_the_Application_Id_Hereand replace it with the Application (client) ID of the app you registered earlier.Enter_the_Tenant_Subdomain_Hereand replace it with the Directory (tenant) subdomain. For example, if your tenant primary domain iscontoso.onmicrosoft.com, usecontoso. If you don't have your tenant name, learn how to read your tenant details.
Save the file.
Run your project and sign in
To start the server, run the following commands from within the project directory:
cd 1-Authentication\0-sign-in-vanillajs\App
npm install
npm start
Copy the
httpsURL that appears in the terminal, for example,https://localhost:3000, and paste it into a browser. We recommend using a private or incognito browser session.Sign-in with an account registered to the tenant.
The following screenshot appears, indicating that you have signed in to the application and have accessed your profile details from the Microsoft Graph API.


Sign out from the application
- Find the Sign out button on the page, and select it.
- You'll be prompted to pick an account to sign out from. Select the account you used to sign in.
A message appears indicating that you have signed out. You can now close the browser window.