Note
Access to this page requires authorization. You can try signing in or changing directories.
Access to this page requires authorization. You can try changing directories.
In this article, learn how to enable Microsoft Entra multifactor authentication and single sign-on (SSO) for an Oracle E-Business Suite (Oracle EBS) application via Datawiza.
Here are some benefits of integrating applications with Microsoft Entra ID via Datawiza:
- A Zero Trust security model adapts to modern environments and embraces a hybrid workplace while it helps protect people, devices, apps, and data.
- Single sign-on provides secure and seamless access for device users and apps from any location.
- Multifactor authentication prompts users during sign-in for forms of identification, such as a code on their device or a fingerprint scan.
- Conditional Access provides policies as if/then statements. If a user wants to access a resource, then they must complete an action.
- Datawiza provides authentication and authorization in Microsoft Entra ID with no code. Use web applications such as Oracle JDE, Oracle EBS, Oracle Siebel, and home-grown apps.
- Use the Datawiza Cloud Management Console (DCMC) to manage access to applications in public clouds and on-premises.
This article focuses on modern identity providers (IdPs) integrating with the legacy Oracle EBS application. The application requires a set of Oracle EBS service account credentials and an Oracle EBS database container (DBC) file.
Architecture
The solution has the following components:
- Microsoft Entra ID: Microsoft's cloud-based identity and access management service, which helps users sign in and access external and internal resources.
- Oracle EBS: The legacy application that Microsoft Entra ID will help protect.
- Datawiza Access Proxy (DAP): A lightweight container-based reverse proxy that implements OIDC/OAuth or SAML for user sign-on flow. It transparently passes identity to applications through HTTP headers.
- DCMC: A centralized management console that manages DAP. The console provides UI and RESTful APIs for administrators to manage the configurations of DAP and its granular access control policies.
Prerequisites
To complete the steps in this article, you need:
- An Azure subscription. If you don't have one, you can get an Azure free account.
- A Microsoft Entra tenant linked to the Azure subscription.
- A Application Administrator role.
- Docker and Docker Compose, to run DAP. For more information, see Get Docker and Docker Compose Overview.
- User identities synchronized from an on-premises directory to Microsoft Entra ID, or created in Microsoft Entra ID and flowed back to your on-premises directory. For more information, see Microsoft Entra Connect Sync: Understand and customize synchronization.
- An Oracle EBS environment.
Configure the Oracle EBS environment for SSO and create the DBC file
To enable SSO in the Oracle EBS environment:
Sign in to the Oracle EBS management console as an administrator.
Scroll down the navigation pane, expand User Management, and then select Users.
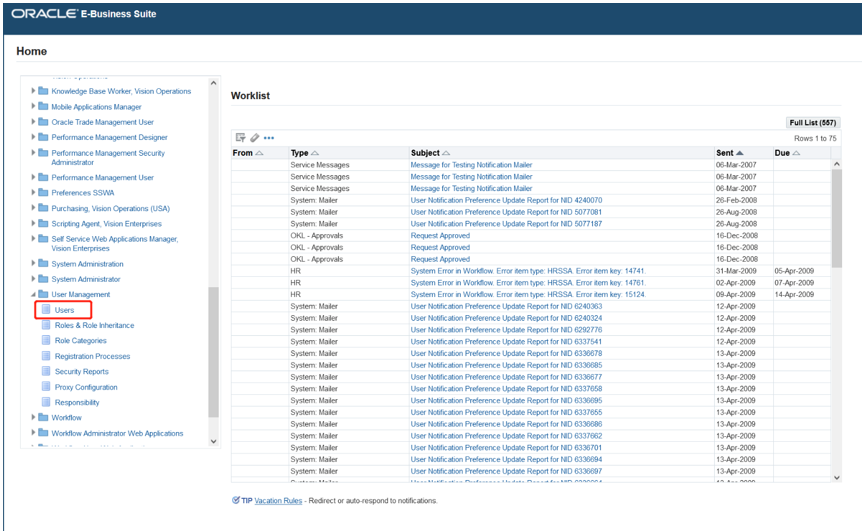
Add a user account. Select Create User > User Account.
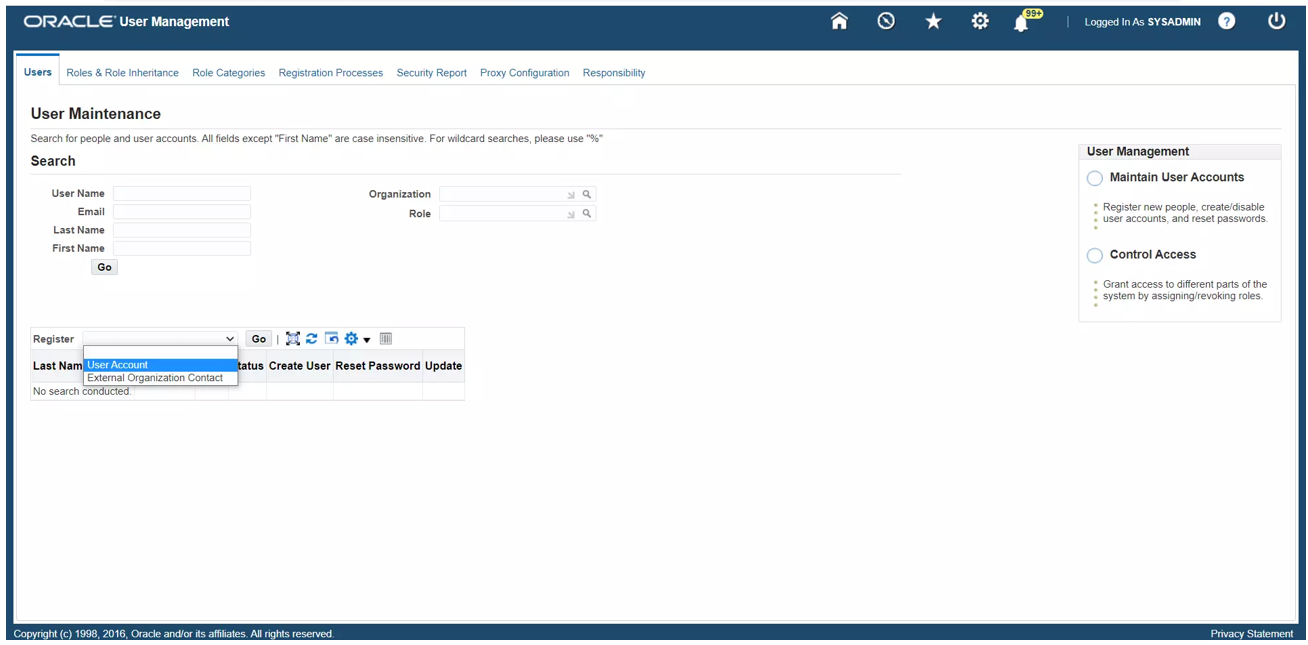
For User Name, enter DWSSOUSER.
For Password, enter a password.
For Description, enter DW User account for SSO.
For Password Expiration, select None.
Assign Apps Schema Connect Role to the user.


Register DAP with Oracle EBS
In the Oracle EBS Linux environment, generate a new DBC file for DAP. You need the app's user credentials and the default DBC file (under $FND_SECURE) that the application tier uses.
Configure the environment for Oracle EBS by using a command similar to
./u01/install/APPS/EBSapps.env run.Use the AdminDesktop utility to generate the new DBC file. Specify the name of a new desktop node for this DBC file:
java oracle.apps.fnd.security.AdminDesktop apps/apps CREATE NODE_NAME=\<ebs domain name> DBC=/u01/install/APPS/fs1/inst/apps/EBSDB_apps/appl/fnd/12.0.0/secure/EBSDB.dbcThis action generates a file called
ebsdb_\<ebs domain name>.dbcin the location where you ran the command.Copy the DBC file's content to a notebook. You'll use the content later.
Enable Oracle EBS for SSO
To integrate JDE with Microsoft Entra ID, sign in to the Datawiza Cloud Management Console.
The welcome page appears.
Select the orange Getting started button.

For Name, enter a name for the deployment.

For Description, enter a description of the deployment.
Select Next.
On Add Application, for Platform, select Oracle E-Business Suite.
For App Name, enter the app name.
For Public Domain, enter the external-facing URL of the application. For example, enter
https://ebs-external.example.com. You can use localhost DNS for testing.For Listen Port, select the port that DAP listens on. You can use the port in Public Domain if you aren't deploying the DAP behind a load balancer.
For Upstream Servers, enter the URL and port combination of the Oracle EBS implementation that you want to protect.
For EBS Service Account, enter the username from the service account (DWSSOUSER).
For EBS Account Password, enter the password for the service account.
For EBS User Mapping, the product decides the attribute to be mapped to the Oracle EBS username for authentication.
For EBS DBC Content, use the content that you copied.
Select Next.

IdP configuration
Use the DCMC one-click integration to help you complete Microsoft Entra configuration. With this feature, you can reduce management costs and the likelihood of configuration errors.

Docker Compose file
Configuration on the management console is complete. You're prompted to deploy DAP with your application. Make a note of the deployment Docker Compose file. The file includes the DAP image, PROVISIONING_KEY, and PROVISIONING_SECRET. DAP uses this information to pull the latest configuration and policies from DCMC.
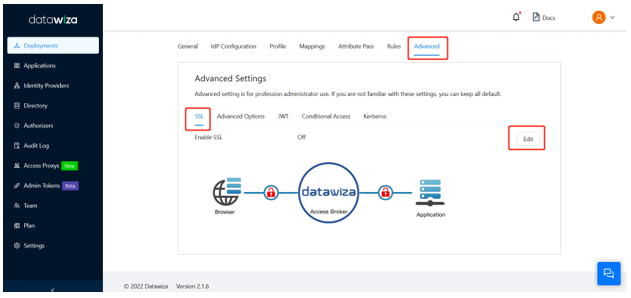
SSL configuration
For certificate configuration, select the Advanced tab on your application page. Then select SSL > Edit.
Turn on the Enable SSL toggle.
For Cert Type, select a certificate type.
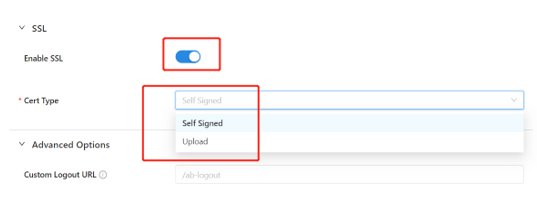
There's a self-signed certificate for localhost. To use that certificate for testing, select Self Signed.

Optionally, you can upload a certificate from a file. For Cert Type, select Upload. Then, for Select Option, select File Based.
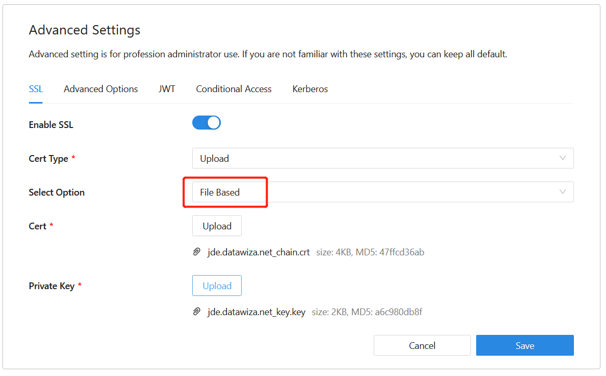
Select Save.


Optional: Enable multifactor authentication on Microsoft Entra ID
To provide more security for sign-ins, you can enable multifactor authentication in the Microsoft Entra admin center:
- Sign in to the Microsoft Entra admin center as an Application Administrator.
- Browse to Entra ID > Overview > Properties tab.
- Under Security defaults, select Manage security defaults.
- On the Security defaults pane, toggle the dropdown menu to select Enabled.
- Select Save.