Note
Access to this page requires authorization. You can try signing in or changing directories.
Access to this page requires authorization. You can try changing directories.
To publish an application that supports user provisioning in Microsoft Entra App Gallery, you need to show that your System for Cross-Domain Identity Management (SCIM) endpoint works with the Microsoft Entra provisioning service. You do that yourself, on your own schedule, by running a set of automated tests against your endpoint and submitting the results with your gallery submission.
Validation uses an Azure Logic Apps template that Microsoft provides. The template runs 25 tests across user provisioning, group provisioning, and SCIM compliance, and reports which operations your endpoint handled correctly.
After you finish, you have a Logic App run ID that represents a passing validation, and a submitted set of results that Microsoft reviews alongside your gallery submission.
Prerequisites
- A SCIM endpoint that meets the user provisioning requirements for Microsoft Entra App Gallery. If you're still building your endpoint, see Develop and plan provisioning for a SCIM endpoint.
- A Microsoft Entra tenant. To create one, see Create a new tenant.
- At least the Application Administrator role in that tenant.
- A Microsoft Entra ID P1 license if your application supports group provisioning only. A trial license works, and Microsoft Entra ID P1 is included with Microsoft 365 E3 and E5.
- An Azure subscription in the same tenant, with at least the Logic App Contributor role. The template uses the Standard hosting model, so expect a small cost, typically less than 10 USD per month on a pay-as-you-go subscription.
- A bearer token for your SCIM endpoint that stays valid for at least 24 hours. A validation run takes 60–90 minutes, so short-lived tokens cause tests to fail partway through.
Note
A long-lived bearer token is acceptable for validation only. To publish a provisioning integration to the gallery, your application must support the OAuth 2.0 client credentials grant or workload identity federation. For details, see SCIM authentication requirements.
Choose a validation method
Both methods produce the same result: a Logic App run that you submit to Microsoft. Choose based on how much of the setup you want to automate.
| Agent | Azure portal | |
|---|---|---|
| How it works | An AI agent creates the resources, deploys the Logic App, runs the tests, and diagnoses failures through a conversation. | You create each resource and configure the Logic App yourself in the Azure portal and the Microsoft Entra admin center. |
| Time | 30–60 minutes | 1–3 hours |
| Skills needed | Familiarity with an AI chat tool | Azure portal, Microsoft Entra admin center, PowerShell or Azure CLI |
| Best for | Faster setup, and automatic retries after fixable failures | Full control over every step |
To set up the Logic App yourself, see Set up the validation Logic App in the Azure portal.
Validate by using the SCIM onboarding agent
The SCIM onboarding agent is an instruction file that any AI coding agent can run. You supply the agent host and model; Microsoft supplies the agent.
The agent asks for your endpoint details, creates the Microsoft Entra application and Azure resources, deploys the Logic App, triggers the tests, and reports results. It also retries automatically after failures it can fix.
Prepare your agent host
Install the Azure CLI and sign in.
az loginChoose an AI coding agent that can read and write files, run CLI commands, and hold a conversation. Visual Studio Code with GitHub Copilot, Cursor, Windsurf, Cline, and Claude Code all work.
Choose a capable model. The agent reasons across multiple steps, so smaller or older models might skip required inputs or retry failures without diagnosing them.
Provider Minimum recommended model Anthropic Claude Opus 4 or later OpenAI GPT-4.1 or later Google Gemini 2.5 Pro or later Download scim-onboarding.agent.md from the SCIMReferenceCode repository.
Create a project folder and place the agent file where your host discovers it. For GitHub Copilot, use
.github/agents/.C:\scim-validation\ └── .github\ └── agents\ └── scim-onboarding.agent.mdOpen the folder in your agent host. GitHub Copilot discovers agents in
.github/agents/automatically, so you can invoke the agent with@scim-onboardingin Copilot Chat. For other hosts, load the file as a system prompt or custom instructions.
Run the validation
Send this message to the agent:
Validate my SCIM integration for Entra app gallery onboardingAnswer the agent's questions. Review and approve each command before it runs.
Question What to provide SCIM endpoint URL The base URL of your SCIM 2.0 endpoint, such as https://api.myapp.com/scim/v2. Don't include theaadOptscim062020feature flag. Configure that flag only in the Tenant URL field in the Microsoft Entra admin center.Bearer token A token that stays valid for at least 24 hours. Authentication method A static bearer token, or OAuth client credentials. If you choose client credentials, the agent also asks for your client ID, client secret, token endpoint, and scope. Azure subscription The subscription where the Logic App resources are created. The agent selects automatically if you have only one. Attribute mappings Keep the defaults that Microsoft Entra created, or customize them in the Microsoft Entra admin center and return to the agent. Testing doesn't start until you confirm the final schema. Attribute value restrictions Any values your SCIM server restricts, such as a jobTitlelimited toEngineer,Manager, orDirector. The agent checks your/Schemasendpoint first. Unreported restrictions cause schema validation failures.Wait for the run to finish. The agent creates the resources, triggers the tests, and reports which tests passed and failed.
If a test fails for a reason the agent can fix, it applies the fix and reruns without asking. The agent handles a stray aadOptscim062020 feature flag, missing Microsoft Graph permissions, canonical value mismatches, and missing fields in defaultUserProperties. For failures on your side, such as an unsupported SCIM filter or a 404 on an empty query, the agent explains what to change in your endpoint.
Review your validation results
The Logic App runs 25 tests: 7 user tests, 7 group tests, and 11 SCIM compliance tests. It detects what your application supports and skips tests that don't apply. For a description of each test, see SCIM validation test overview.
The agent fetches and displays results for you. If you set up the Logic App in the Azure portal, open your Logic App, go to Workflows > Orchestrator_Workflow > Run history, select your run, select the Final_TestResults action, and then select Show raw outputs.
Each result looks like this:
{
  "testName": "Create_User_Test",
  "testResult": "success",
  "provisioningErrorDetails": "",
  "recommendationUrl": "",
  "runLink": "https://portal.azure.com/#view/...",
  "message": "Click the runLink and search for the action Compose_Final_Results for more info."
}
| Field | What it tells you |
|---|---|
testName |
The test that ran, such as Create_User_Test or Update_Group_Test. |
testResult |
success if the test passed. On failure, the phase and action that broke, such as FAILED - [Delete Phase] Failed Action: Delete_Step5_Delete_Group_By_Id. |
provisioningErrorDetails |
Empty on success. On failure, the HTTP status code, response body, and error message from the Microsoft Graph or SCIM call. This field is the most useful one for debugging. |
recommendationUrl |
A link to documentation that might help you resolve the issue. |
runLink |
A direct link to the child workflow run in the Azure portal. |
message |
Where to find more detail in the workflow run. |
A testResult value of skipped means a prerequisite wasn't met. For example, User_Update_Manager_Test is skipped when the manager attribute isn't in your target schema, and Federated_Identity_Test is skipped when OAuth isn't configured.
Understand what passing means
All applicable tests must pass before you submit. These exceptions don't block onboarding:
Validate_Credentials_TestorFederated_Identity_Testfails because you used a static bearer token. At least one of the two must pass, and production requires OAuth or workload identity federation.User_Update_Manager_TestandSCIM_Update_Manager_Testare skipped because the manager attribute isn't in the target directory schema.Delete_User_Test,Delete_Group_Test,Restore_Group_Test, andSCIM_Group_Pagination_Testreturn warnings. These tests are optional.
Because of these exceptions, overallResult can read Failed even when your integration is ready to submit. Check the individual test results rather than relying on the overall value.
If a test fails for a reason not listed here, see Troubleshoot user provisioning validation.
Find your Logic App run ID
You submit the run ID of a run in which all applicable tests passed.
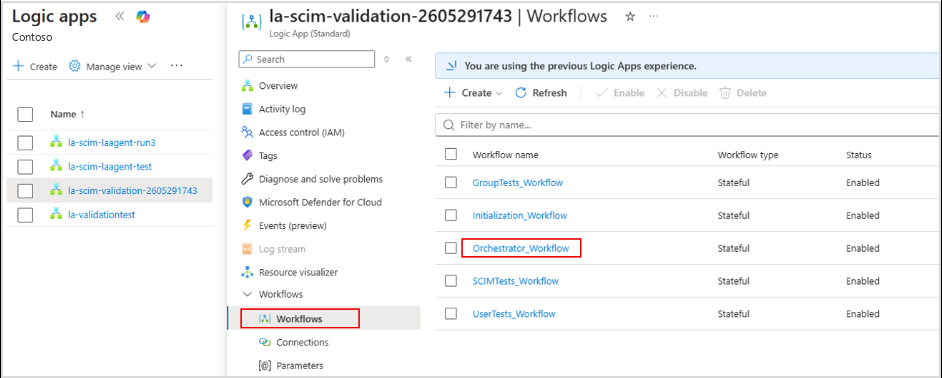
Sign in to the Azure portal.
Search for Logic apps, and then select the Logic App used for validation.
Select Workflows > Orchestrator_Workflow.
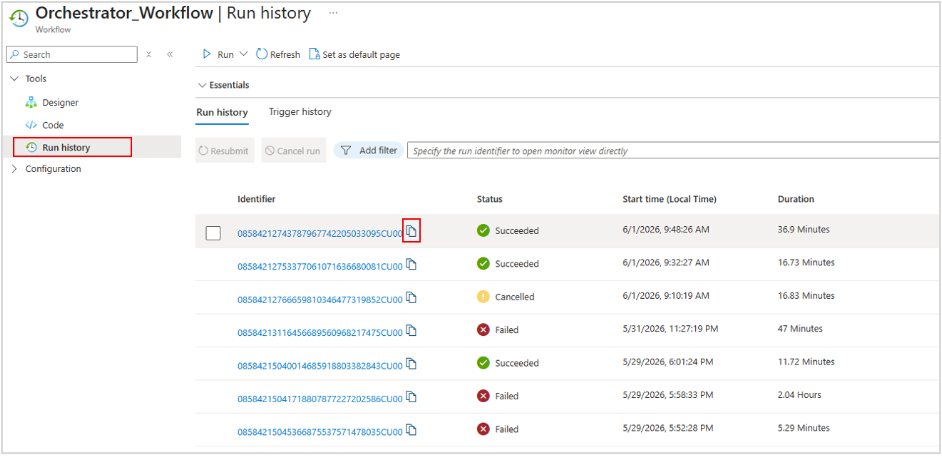
Select Run history, find your most recent run with a status of Succeeded, and then select the copy icon in the Identifier column.
To confirm the run passed, select the identifier link and scroll to the
Final_TestResultsstage in the designer view. A stage that completed without errors means the run passed all validation tests.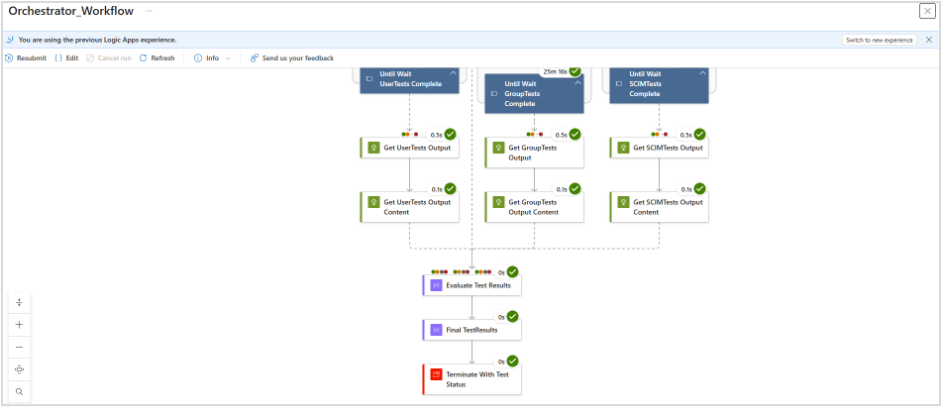
Submit your validation results
Submitting makes your results available to Microsoft and links them to your gallery submission. This step is required whether you used the agent or set up the Logic App in the Azure portal.
Sign in to the Microsoft Entra admin center.
Browse to Enterprise applications > All applications, and then select the application you validated. The agent creates this application for you, or you created it in the Microsoft Entra admin center.
Select Provisioning > Submit validation results, and then select Submit validation results.
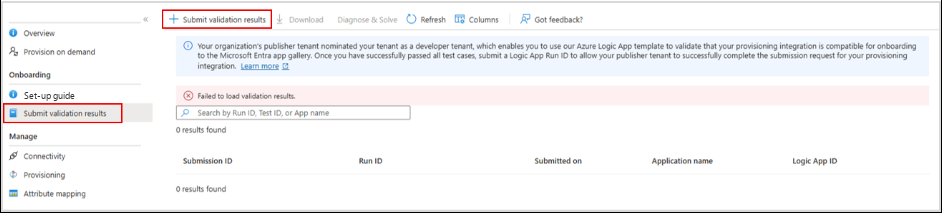
On the Validation results tab, enter your submission request ID. This ID maps your validation results to your gallery submission. To find it, see Publish your app to Microsoft Entra App Gallery.
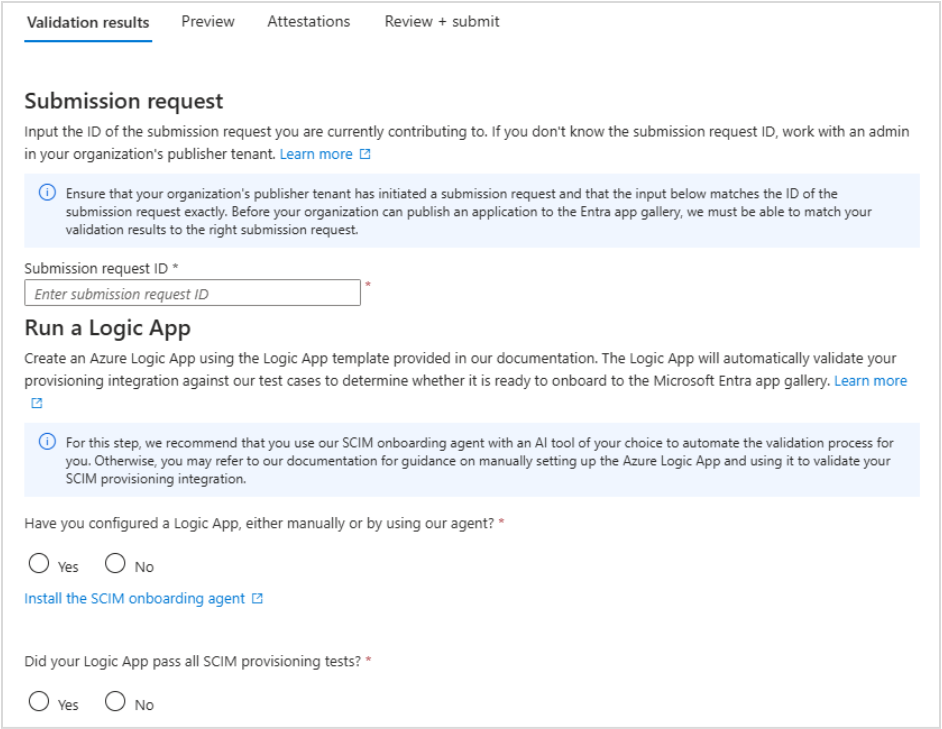
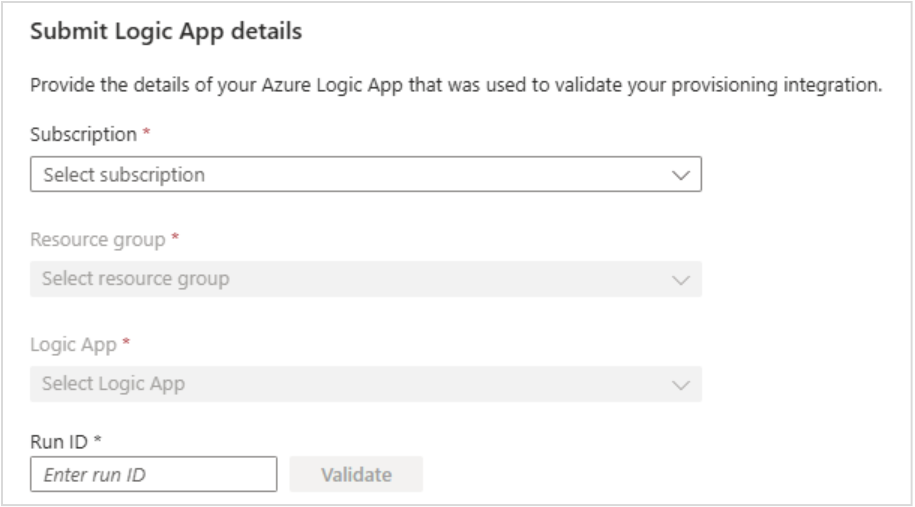
Under Run a Logic App, select Yes, and then enter the subscription, resource group, and name of the Logic App you used.
Enter the run ID you copied, and then select Validate.
On the Preview tab, review the application details extracted from your results, including attribute mappings and job settings. You can't edit the form after you submit it.
On the Attestations tab, answer Yes to every requirement. These attestations cover security requirements that the Logic App can't check programmatically, so you can't continue until you confirm all of them.
On the Review + submit tab, select Submit.
After you submit, Microsoft matches your validation results to your submission request and continues the publishing workflow. Track the status of your submission in the publishing experience.
Clean up resources
If you no longer need the validation resources, delete the resource group that contains your Logic App. Deleting the resource group removes the Logic App and its workflows, which stops any further cost.
Keep the resources until Microsoft finishes reviewing your submission. If your integration changes materially after validation, validate it again before you resubmit.