Note
Access to this page requires authorization. You can try signing in or changing directories.
Access to this page requires authorization. You can try changing directories.
In this article, you learn how to integrate ADP with Microsoft Entra ID. When you integrate ADP with Microsoft Entra ID, you can:
- Control in Microsoft Entra ID who has access to ADP.
- Enable your users to be automatically signed-in to ADP with their Microsoft Entra accounts.
- Manage your accounts in one central location.
Prerequisites
The scenario outlined in this article assumes that you already have the following prerequisites:
- A Microsoft Entra user account with an active subscription. If you don't already have one, you can Create an account for free.
- One of the following roles:
- ADP single sign-on (SSO) enabled subscription.
Note
This integration is also available to use from Microsoft Entra US Government Cloud environment. You can find this application in the Microsoft Entra US Government Cloud Application Gallery and configure it in the same way as you do from public cloud.
Scenario description
In this article, you configure and test Microsoft Entra SSO in a test environment.
- ADP supports IDP initiated SSO.
Note
Identifier of this application is a fixed string value so only one instance can be configured in one tenant.
Add ADP from the gallery
To configure the integration of ADP into Microsoft Entra ID, you need to add ADP from the gallery to your list of managed SaaS apps.
- Sign in to the Microsoft Entra admin center as at least a Cloud Application Administrator.
- Browse to Entra ID > Enterprise apps > New application.
- In the Add from the gallery section, type ADP in the search box.
- Select ADP from results panel and then add the app. Wait a few seconds while the app is added to your tenant.
Alternatively, you can also use the Enterprise App Configuration Wizard. In this wizard, you can add an application to your tenant, add users/groups to the app, assign roles, and walk through the SSO configuration as well. Learn more about Microsoft 365 wizards.
Configure and test Microsoft Entra SSO for ADP
Configure and test Microsoft Entra SSO with ADP using a test user called B.Simon. For SSO to work, you need to establish a link relationship between a Microsoft Entra user and the related user in ADP.
To configure and test Microsoft Entra SSO with ADP, perform the following steps:
- Configure Microsoft Entra SSO - to enable your users to use this feature.
- Create a Microsoft Entra test user - to test Microsoft Entra single sign-on with B.Simon.
- Assign the Microsoft Entra test user - to enable B.Simon to use Microsoft Entra single sign-on.
- Configure ADP SSO - to configure the single sign-on settings on application side.
- Create ADP test user - to have a counterpart of B.Simon in ADP that's linked to the Microsoft Entra representation of user.
- Test SSO - to verify whether the configuration works.
Configure Microsoft Entra SSO
Follow these steps to enable Microsoft Entra SSO.
Sign in to the Microsoft Entra admin center as at least a Cloud Application Administrator.
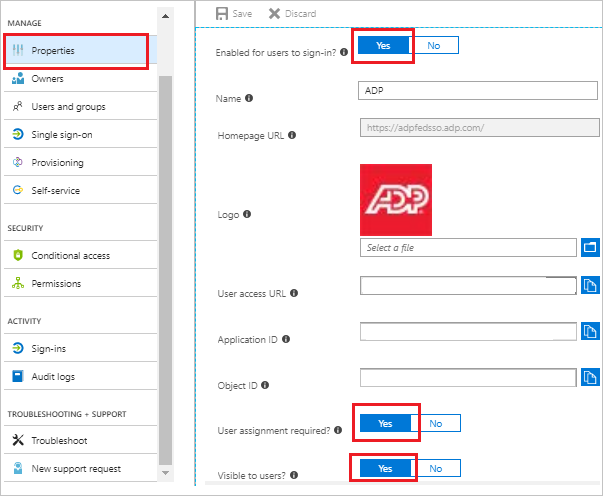
Browse to Entra ID > Enterprise apps > ADP application integration page, select Properties tab and perform the following steps:
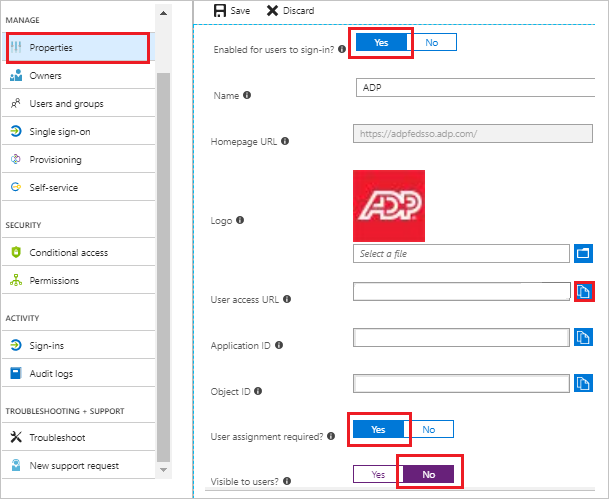
a. Set the Enabled for users to sign-in field value to Yes.
b. Copy the User access URL and you have to paste it in Configure Sign-on URL section, which is explained later in the article.
c. Set the User assignment required field value to Yes.
d. Set the Visible to users field value to No.
Sign in to the Microsoft Entra admin center as at least a Cloud Application Administrator.
Browse to Entra ID > Enterprise apps > ADP application integration page, find the Manage section and select Single sign-on.
On the Select a Single sign-on method page, select SAML.
On the Set up Single Sign-On with SAML page, select the pencil icon for Basic SAML Configuration to edit the settings.
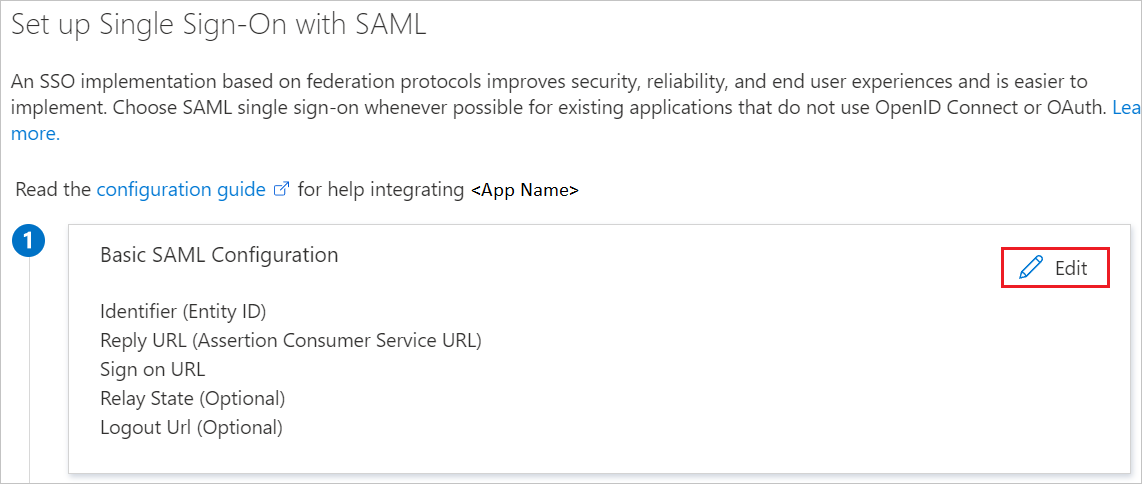
On the Basic SAML Configuration section, perform the following steps:
In the Identifier (Entity ID) text box, type the URL:
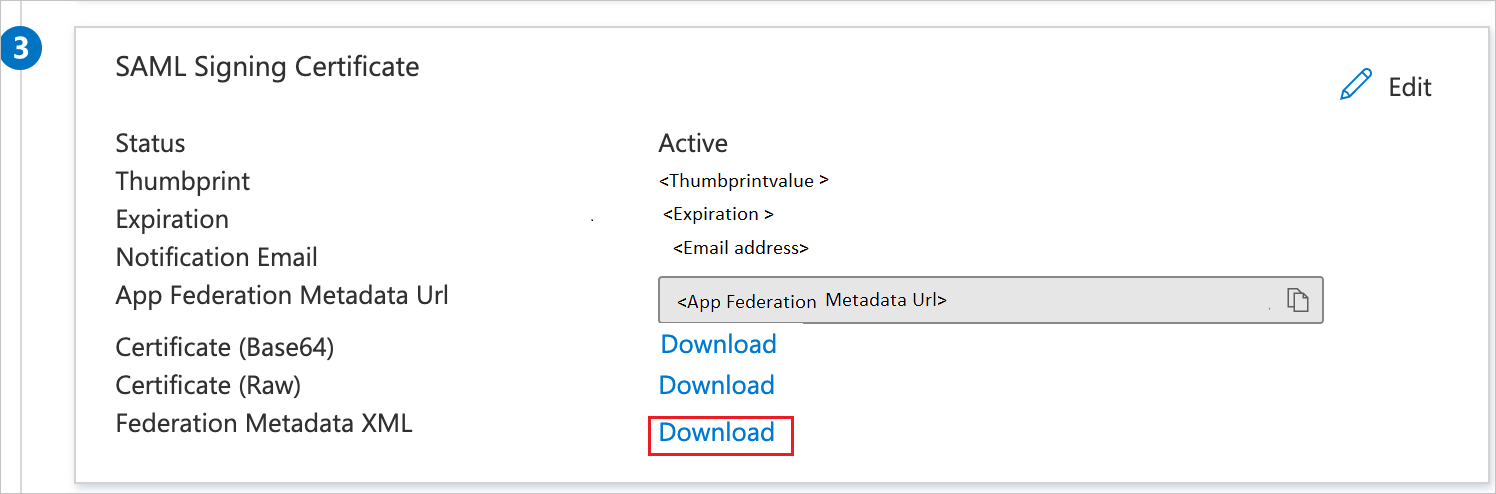
https://fed.adp.comOn the Set up Single Sign-On with SAML page, in the SAML Signing Certificate section, find Federation Metadata XML and select Download to download the certificate and save it on your computer.
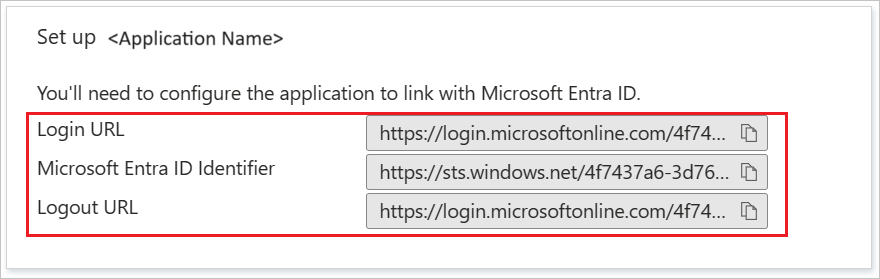
On the Set up ADP section, copy the appropriate URL(s) based on your requirement.
Create and assign Microsoft Entra test user
Follow the guidelines in the create and assign a user account quickstart to create a test user account called B.Simon.
Configure ADP SSO
In a different web browser window, sign in to your up ADP company site as an administrator
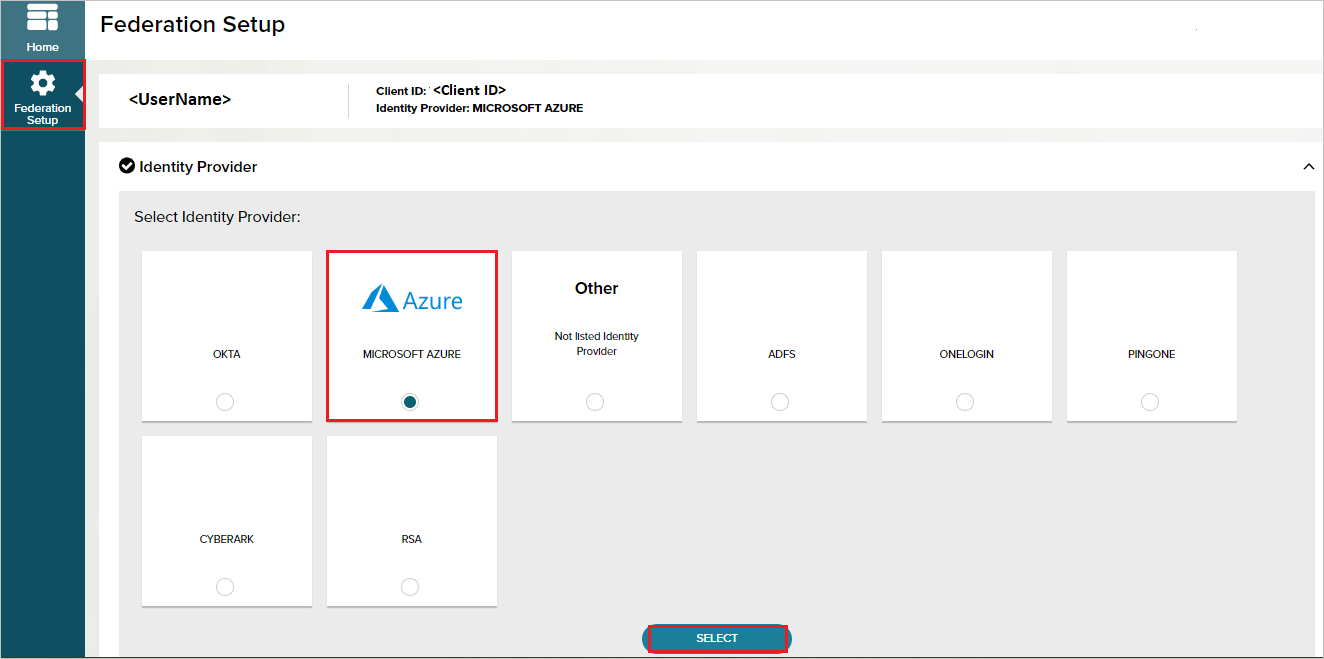
Select Federation Setup and go to Identity Provider then, select the Microsoft Azure.
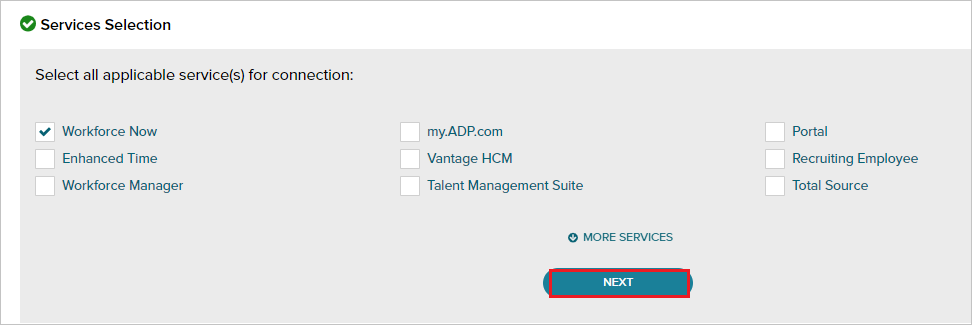
In the Services Selection, select all applicable service(s) for connection, and then select Next.
In the Configure section, select the Next.
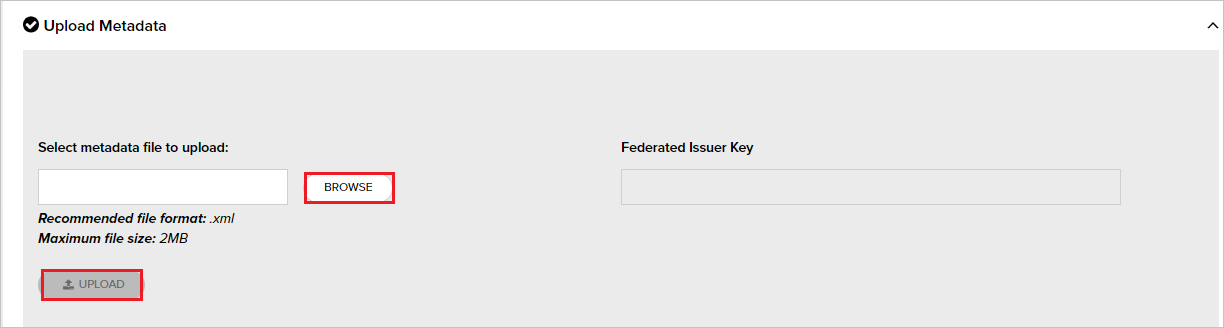
In the Upload Metadata, select Browse to upload the metadata XML file which you have downloaded and select UPLOAD.
Configure your ADP service(s) for federated access
Important
Your employees who require federated access to your ADP services must be assigned to the ADP service app and subsequently, users must be reassigned to the specific ADP service. Upon receipt of confirmation from your ADP representative, configure your ADP service(s) and assign/manage users to control user access to the specific ADP service.
- Sign in to the Microsoft Entra admin center as at least a Cloud Application Administrator.
- Browse to Entra ID > Enterprise apps > New application.
- In the Add from the gallery section, type ADP in the search box.
- Select ADP from results panel and then add the app. Wait a few seconds while the app is added to your tenant.
Alternatively, you can also use the Enterprise App Configuration Wizard. In this wizard, you can add an application to your tenant, add users/groups to the app, assign roles, and walk through the SSO configuration as well. Learn more about Microsoft 365 wizards.
Sign in to the Microsoft Entra admin center as at least a Cloud Application Administrator.
Browse to Entra ID > Enterprise apps.
Select the ADP application integration page, select Properties tab and perform the following steps:
Set the Enabled for users to sign-in field value to Yes.
Set the User assignment required field value to Yes.
Set the Visible to users field value to Yes.
Sign in to the Microsoft Entra admin center as at least a Cloud Application Administrator.
Browse to Entra ID > Enterprise apps > ADP application integration page, find the Manage section and select Single sign-on.
On the Select a Single sign-on method dialog, select Mode as Linked to link your application to ADP.
Navigate to the Configure Sign-on URL section, perform the following steps:

Paste the User access URL, which you have copied from above properties tab (from the main ADP app).
Following are the 5 apps that support different Relay State URLs. You have to append the appropriate Relay State URL value for particular application manually to the User access URL.
ADP Workforce Now
<User access URL>&relaystate=https://fed.adp.com/saml/fedlanding.html?WFNADP Workforce Now Enhanced Time
<User access URL>&relaystate=https://fed.adp.com/saml/fedlanding.html?EETDC2ADP Vantage HCM
<User access URL>&relaystate=https://fed.adp.com/saml/fedlanding.html?ADPVANTAGEADP Enterprise HR
<User access URL>&relaystate=https://fed.adp.com/saml/fedlanding.html?PORTALMyADP
<User access URL>&relaystate=https://fed.adp.com/saml/fedlanding.html?REDBOX
Save your changes.
Upon receipt of confirmation from your ADP representative, begin test with one or two users.
Assign few users to the ADP service App to test federated access.
Test is successful when users access the ADP service app on the gallery and can access their ADP service.
On confirmation of a successful test, assign the federated ADP service to individual users or user groups, which is explained later in the article and roll it out to your employees.
Configure ADP to support multiple instances in the same tenant
Go to Basic SAML Configuration section and enter any instance specific URL in the Identifier (Entity ID) textbox.
Note
Please note that this can be any random value which you feel relevant for your instance.
To support multiple instances in the same tenant, please follow the below steps:

Navigate to Attributes & Claims section > Advanced settings > Advanced SAML claims options and select Edit.
Enable Append application ID to issuer checkbox.
Enable Override audience claim checkbox.
In the Audience claim value textbox, enter
https://fed.adp.comand select Save.
Navigate to Properties tab under Manage section and copy Application ID.

Download and open the Federation Metadata XML file and edit the entityID value by adding Application ID manually at the end.

Save the xml file and use in the ADP side.
Create ADP test user
The objective of this section is to create a user called B.Simon in ADP. Work with ADP support team to add the users in the ADP account.
Test SSO
In this section, you test your Microsoft Entra single sign-on configuration with following options.
Select Test this application, and you should be automatically signed in to the ADP for which you set up the SSO.
You can use Microsoft My Apps. When you select the ADP tile in the My Apps, you should be automatically signed in to the ADP for which you set up the SSO. For more information about the My Apps, see Introduction to the My Apps.
Related content
Once you configure ADP you can enforce session control, which protects exfiltration and infiltration of your organization’s sensitive data in real time. Session control extends from Conditional Access. Learn how to enforce session control with Microsoft Defender for Cloud Apps.