Tutorial: Microsoft Entra SSO integration with ExpenseIn
In this tutorial, you'll learn how to integrate ExpenseIn with Microsoft Entra ID. When you integrate ExpenseIn with Microsoft Entra ID, you can:
- Control in Microsoft Entra ID who has access to ExpenseIn.
- Enable your users to be automatically signed-in to ExpenseIn with their Microsoft Entra accounts.
- Manage your accounts in one central location.
Prerequisites
To get started, you need the following items:
- A Microsoft Entra subscription. If you don't have a subscription, you can get a free account.
- ExpenseIn single sign-on (SSO) enabled subscription.
Scenario description
In this tutorial, you configure and test Microsoft Entra SSO in a test environment.
- ExpenseIn supports SP and IDP initiated SSO.
Add ExpenseIn from the gallery
To configure the integration of ExpenseIn into Microsoft Entra ID, you need to add ExpenseIn from the gallery to your list of managed SaaS apps.
- Sign in to the Microsoft Entra admin center as at least a Cloud Application Administrator.
- Browse to Identity > Applications > Enterprise applications > New application.
- In the Add from the gallery section, type ExpenseIn in the search box.
- Select ExpenseIn from results panel and then add the app. Wait a few seconds while the app is added to your tenant.
Alternatively, you can also use the Enterprise App Configuration Wizard. In this wizard, you can add an application to your tenant, add users/groups to the app, assign roles, as well as walk through the SSO configuration as well. Learn more about Microsoft 365 wizards.
Configure and test Microsoft Entra SSO for ExpenseIn
Configure and test Microsoft Entra SSO with ExpenseIn using a test user called B.Simon. For SSO to work, you need to establish a link relationship between a Microsoft Entra user and the related user in ExpenseIn.
To configure and test Microsoft Entra SSO with ExpenseIn, perform the following steps:
- Configure Microsoft Entra SSO to enable your users to use this feature.
- Create a Microsoft Entra test user to test Microsoft Entra single sign-on with B.Simon.
- Assign the Microsoft Entra test user to enable B.Simon to use Microsoft Entra single sign-on.
- Configure ExpenseIn SSO to configure the SSO settings on application side.
- Create ExpenseIn test user to have a counterpart of B.Simon in ExpenseIn that is linked to the Microsoft Entra representation of user.
- Test SSO to verify whether the configuration works.
Configure Microsoft Entra SSO
Follow these steps to enable Microsoft Entra SSO.
Sign in to the Microsoft Entra admin center as at least a Cloud Application Administrator.
Browse to Identity > Applications > Enterprise applications > ExpenseIn application integration page, find the Manage section and select Single sign-on.
On the Select a Single sign-on method page, select SAML.
On the Set up Single Sign-On with SAML page, click the pencil icon for Basic SAML Configuration to edit the settings.
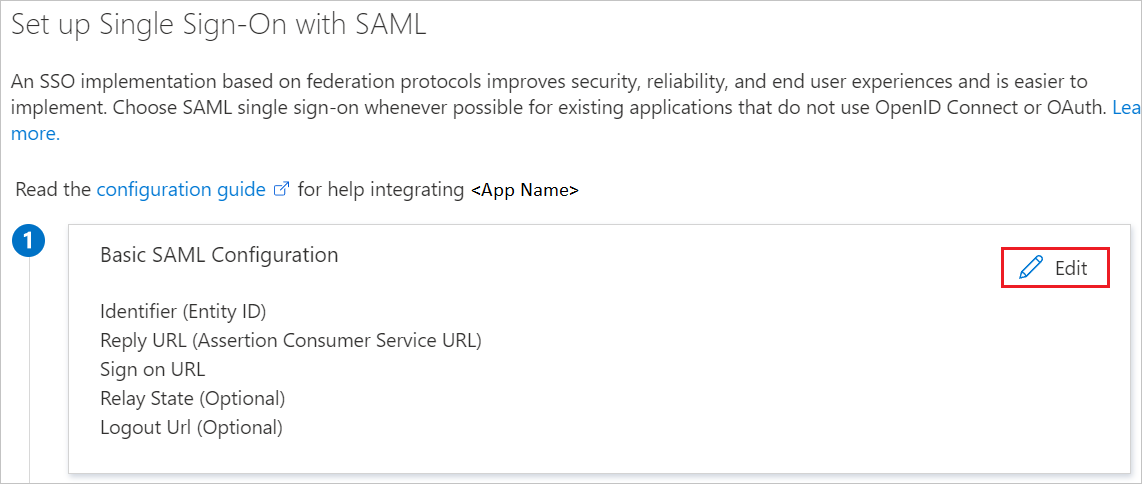
On the Basic SAML Configuration section, the user does not have to perform any steps as the app is already pre-integrated with Azure.
Click Set additional URLs and perform the following step if you wish to configure the application in SP initiated mode:
In the Sign-on URL text box, type the URL:
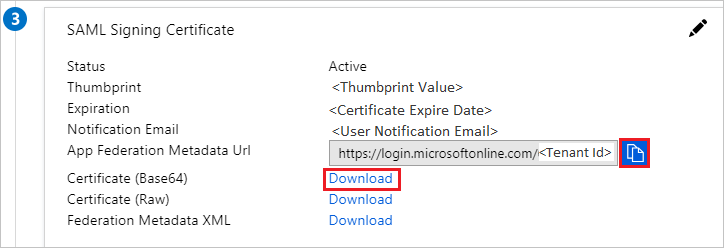
https://app.expensein.com/samlOn the Set up Single Sign-On with SAML page, in the SAML Signing Certificate section, click copy button to copy App Federation Metadata Url and click Download to download the Certificate (Base64) and save it on your computer.
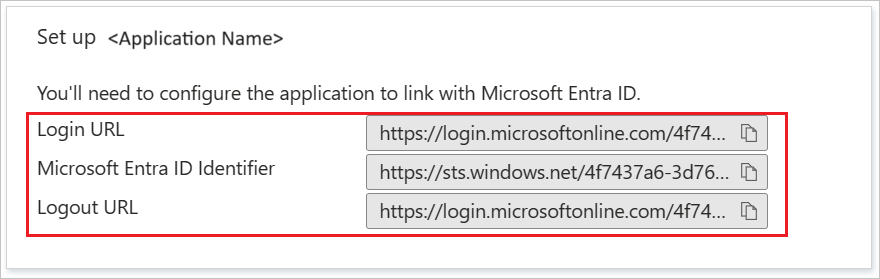
On the Set up ExpenseIn section, copy the appropriate URL(s) based on your requirement.
Create a Microsoft Entra test user
In this section, you'll create a test user called B.Simon.
- Sign in to the Microsoft Entra admin center as at least a User Administrator.
- Browse to Identity > Users > All users.
- Select New user > Create new user, at the top of the screen.
- In the User properties, follow these steps:
- In the Display name field, enter
B.Simon. - In the User principal name field, enter the username@companydomain.extension. For example,
B.Simon@contoso.com. - Select the Show password check box, and then write down the value that's displayed in the Password box.
- Select Review + create.
- In the Display name field, enter
- Select Create.
Assign the Microsoft Entra test user
In this section, you'll enable B.Simon to use single sign-on by granting access to ExpenseIn.
- Sign in to the Microsoft Entra admin center as at least a Cloud Application Administrator.
- Browse to Identity > Applications > Enterprise applications > ExpenseIn.
- In the app's overview page, find the Manage section and select Users and groups.
- Select Add user, then select Users and groups in the Add Assignment dialog.
- In the Users and groups dialog, select B.Simon from the Users list, then click the Select button at the bottom of the screen.
- If you're expecting any role value in the SAML assertion, in the Select Role dialog, select the appropriate role for the user from the list and then click the Select button at the bottom of the screen.
- In the Add Assignment dialog, click the Assign button.
Configure ExpenseIn SSO
In a different web browser window, sign in to your ExpenseIn company site as an administrator
Click on Admin on the top of the page then navigate to Single Sign-On and click Add provider.
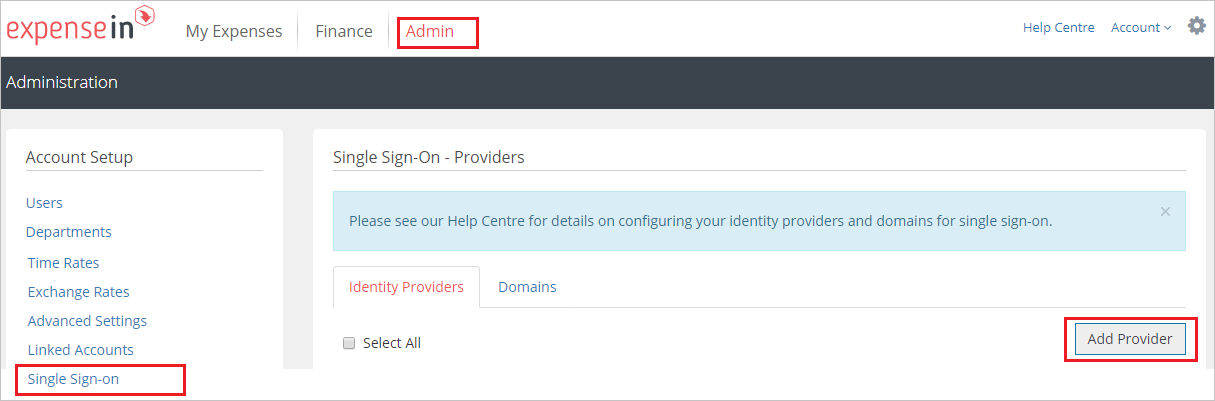
On the New Identity Provider pop-up, Perform the following steps:
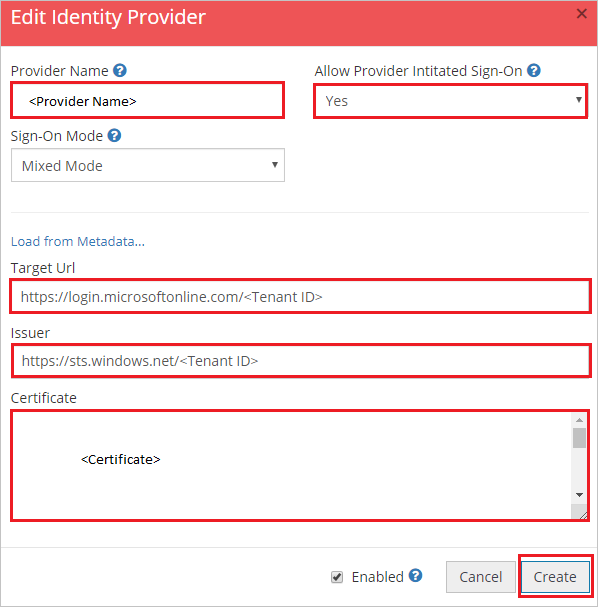
a. In the Provider Name text box, type the name; for example, Azure.
b. Select Yes for Allow Provider Initiated Sign-On.
c. In the Target Url text box, paste the value of Login URL.
d. In the Issuer text box, paste the value of Microsoft Entra Identifier.
e. Open the Certificate (Base64) in Notepad, copy its content and paste it in the Certificate text box.
f. Click Create.
Create ExpenseIn test user
To enable Microsoft Entra users to sign in to ExpenseIn, they must be provisioned into ExpenseIn. In ExpenseIn, provisioning is a manual task.
To provision a user account, perform the following steps:
Sign in to ExpenseIn as an Administrator.
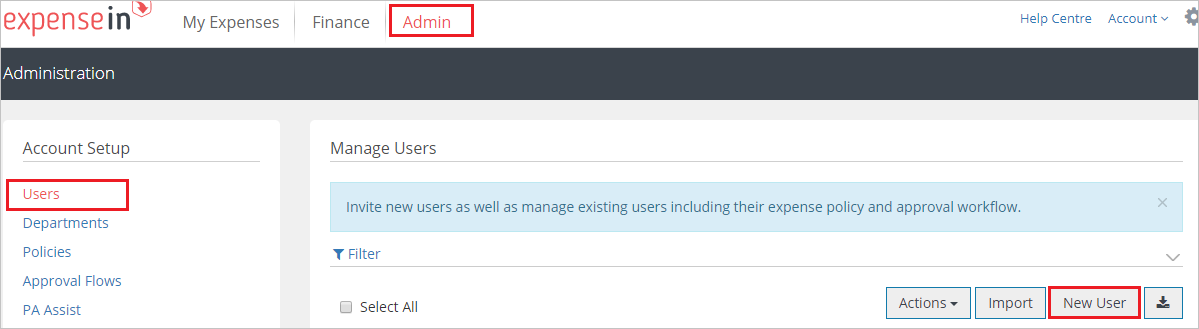
Click on Admin on the top of the page then navigate to Users and click New User.
On the Details pop-up, perform the following steps:
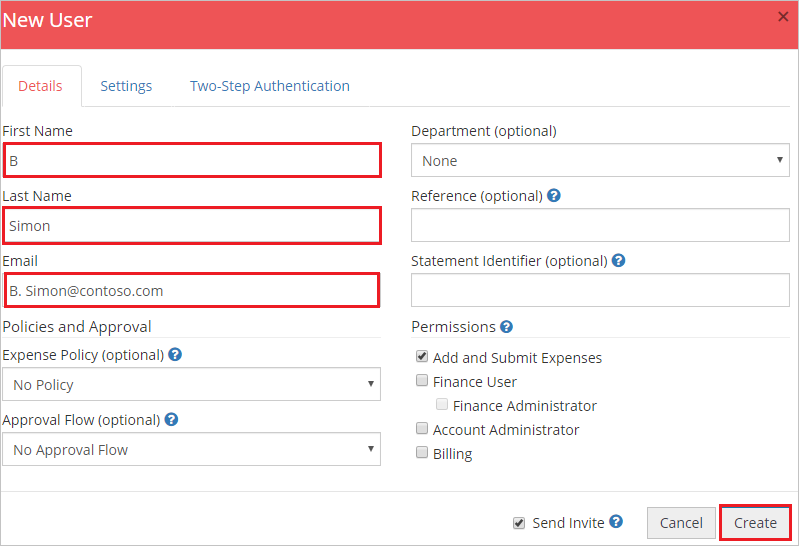
a. In First Name text box, enter the first name of user like B.
b. In Last Name text box, enter the last name of user like Simon.
c. In Email text box, enter the email of user like
B.Simon@contoso.com.d. Click Create.
Test SSO
In this section, you test your Microsoft Entra single sign-on configuration with following options.
SP initiated:
Click on Test this application, this will redirect to ExpenseIn Sign on URL where you can initiate the login flow.
Go to ExpenseIn Sign-on URL directly and initiate the login flow from there.
IDP initiated:
- Click on Test this application, and you should be automatically signed in to the ExpenseIn for which you set up the SSO.
You can also use Microsoft My Apps to test the application in any mode. When you click the ExpenseIn tile in the My Apps, if configured in SP mode you would be redirected to the application sign on page for initiating the login flow and if configured in IDP mode, you should be automatically signed in to the ExpenseIn for which you set up the SSO. For more information, see Microsoft Entra My Apps.
Next steps
Once you configure ExpenseIn you can enforce session control, which protects exfiltration and infiltration of your organization’s sensitive data in real time. Session control extends from Conditional Access. Learn how to enforce session control with Microsoft Defender for Cloud Apps.
Feedback
Coming soon: Throughout 2024 we will be phasing out GitHub Issues as the feedback mechanism for content and replacing it with a new feedback system. For more information see: https://aka.ms/ContentUserFeedback.
Submit and view feedback for