Note
Access to this page requires authorization. You can try signing in or changing directories.
Access to this page requires authorization. You can try changing directories.
In this article, you learn how to integrate Meraki Dashboard with Microsoft Entra ID. When you integrate Meraki Dashboard with Microsoft Entra ID, you can:
- Control in Microsoft Entra ID who has access to Meraki Dashboard.
- Enable your users to be automatically signed-in to Meraki Dashboard with their Microsoft Entra accounts.
- Manage your accounts in one central location.
Prerequisites
The scenario outlined in this article assumes that you already have the following prerequisites:
- A Microsoft Entra user account with an active subscription. If you don't already have one, you can Create an account for free.
- One of the following roles:
- Meraki Dashboard single sign-on (SSO) enabled subscription.
Scenario description
In this article, you configure and test Microsoft Entra SSO in a test environment.
- Meraki Dashboard supports IDP initiated SSO.
Note
Identifier of this application is a fixed string value so only one instance can be configured in one tenant.
Adding Meraki Dashboard from the gallery
To configure the integration of Meraki Dashboard into Microsoft Entra ID, you need to add Meraki Dashboard from the gallery to your list of managed SaaS apps.
- Sign in to the Microsoft Entra admin center as at least a Cloud Application Administrator.
- Browse to Entra ID > Enterprise apps > New application.
- In the Add from the gallery section, type Meraki Dashboard in the search box.
- Select Meraki Dashboard from results panel and then add the app. Wait a few seconds while the app is added to your tenant.
Alternatively, you can also use the Enterprise App Configuration Wizard. In this wizard, you can add an application to your tenant, add users/groups to the app, assign roles, and walk through the SSO configuration as well. Learn more about Microsoft 365 wizards.
Configure and test Microsoft Entra SSO for Meraki Dashboard
Configure and test Microsoft Entra SSO with Meraki Dashboard using a test user called B.Simon. For SSO to work, you need to establish a link relationship between a Microsoft Entra user and the related user in Meraki Dashboard.
To configure and test Microsoft Entra SSO with Meraki Dashboard, perform the following steps:
- Configure Microsoft Entra SSO - to enable your users to use this feature.
- Create a Microsoft Entra test user - to test Microsoft Entra single sign-on with B.Simon.
- Assign the Microsoft Entra test user - to enable B.Simon to use Microsoft Entra single sign-on.
- Configure Meraki Dashboard SSO - to configure the single sign-on settings on application side.
- Create Meraki Dashboard Admin Roles - to have a counterpart of B.Simon in Meraki Dashboard that's linked to the Microsoft Entra representation of user.
- Test SSO - to verify whether the configuration works.
Configure Microsoft Entra SSO
Follow these steps to enable Microsoft Entra SSO.
Sign in to the Microsoft Entra admin center as at least a Cloud Application Administrator.
Browse to Entra ID > Enterprise apps > Meraki Dashboard > Single sign-on.
On the Select a single sign-on method page, select SAML.
On the Set up single sign-on with SAML page, select the edit/pen icon for Basic SAML Configuration to edit the settings.
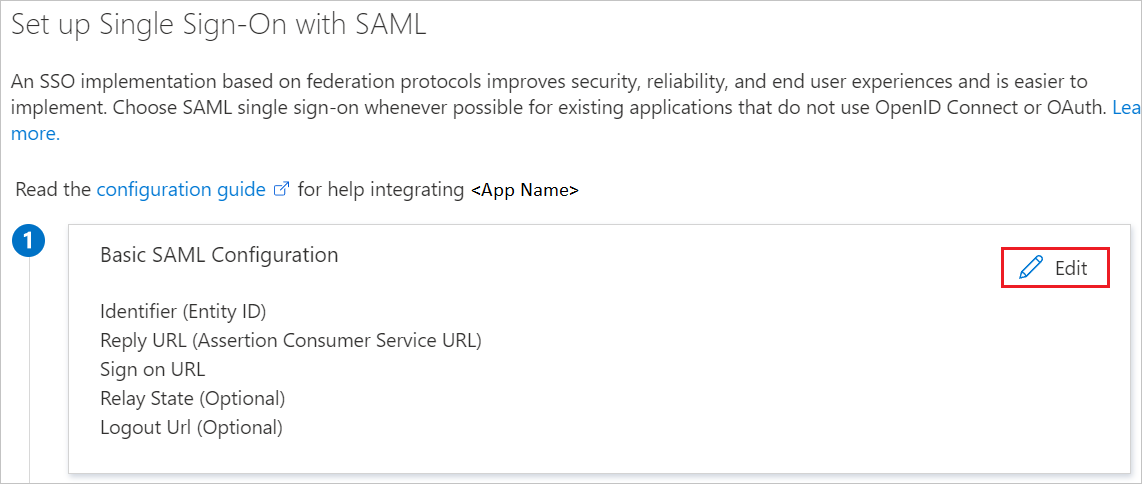
On the Basic SAML Configuration section, perform the following steps:
In the Reply URL textbox, type a URL using the following pattern:
https://n27.meraki.com/saml/login/m9ZEgb/< UNIQUE ID >Note
The Reply URL value isn't real. Update this value with the actual Reply URL value, which is explained later in the article.
Select the Save button.
Meraki Dashboard application expects the SAML assertions in a specific format, which requires you to add custom attribute mappings to your SAML token attributes configuration. The following screenshot shows the list of default attributes.
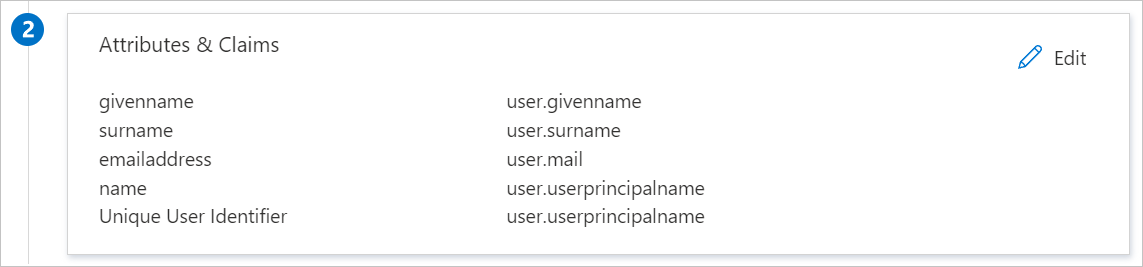
In addition to above, Meraki Dashboard application expects few more attributes to be passed back in SAML response which are shown below. These attributes are also pre populated but you can review them as per your requirements.
Name Source Attribute https://dashboard.meraki.com/saml/attributes/usernameuser.userprincipalname https://dashboard.meraki.com/saml/attributes/roleuser.assignedroles Note
To understand how to configure roles in Microsoft Entra ID, see here.
In the SAML Signing Certificate section, select Edit button to open SAML Signing Certificate dialog.
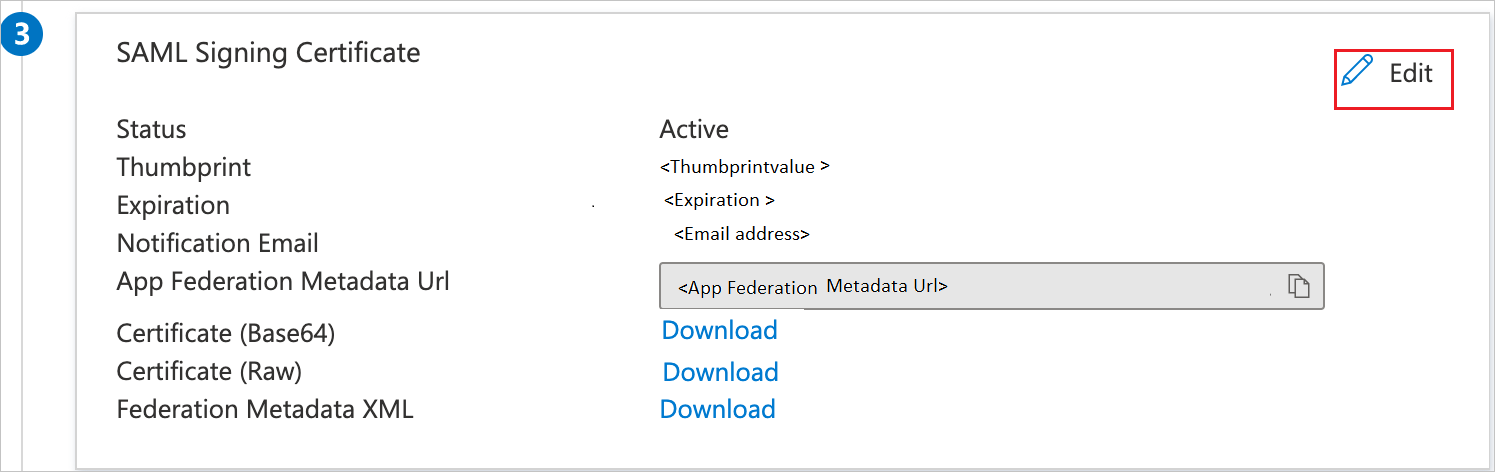
In the SAML Signing Certificate section, copy the Thumbprint Value and save it on your computer. This value needs to be converted to include colons in order for the Meraki dashboard to understand it . For example, if the thumbprint from Azure is
C2569F50A4AAEDBB8Eit will need to be changed toC2:56:9F:50:A4:AA:ED:BB:8Eto use it later in Meraki Dashboard.
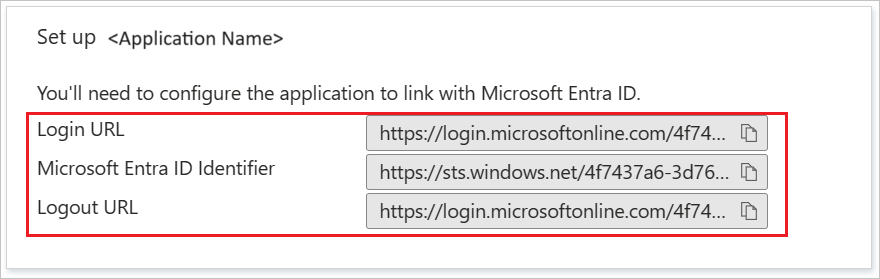
On the Set up Meraki Dashboard section, copy the Logout URL value and save it on your computer.
Create and assign Microsoft Entra test user
Follow the guidelines in the create and assign a user account quickstart to create a test user account called B.Simon.
Configure Meraki Dashboard SSO
In a different web browser window, sign in to your Meraki Dashboard company site as an administrator
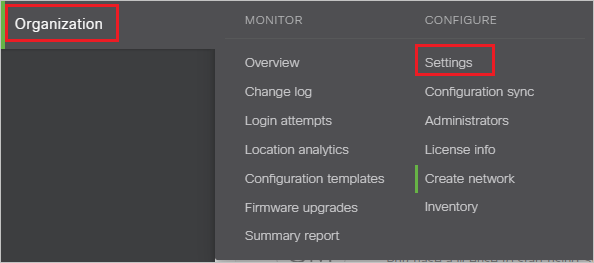
Navigate to Organization > Settings.
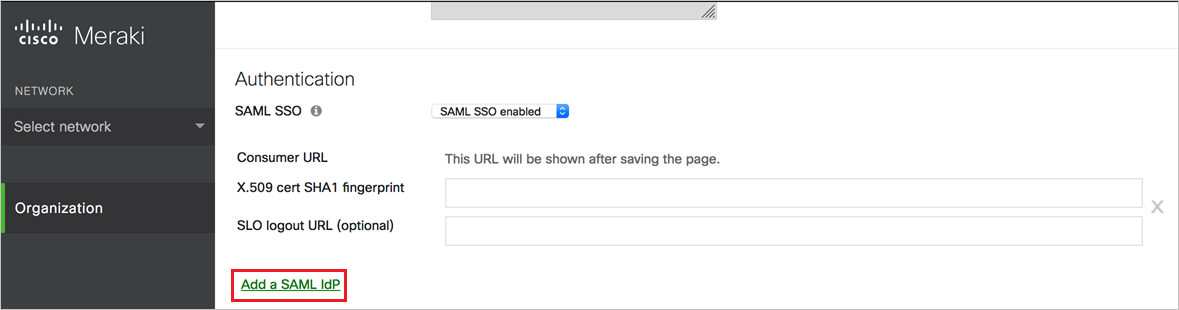
Under Authentication, change SAML SSO to SAML SSO enabled.

Select Add a SAML IdP.
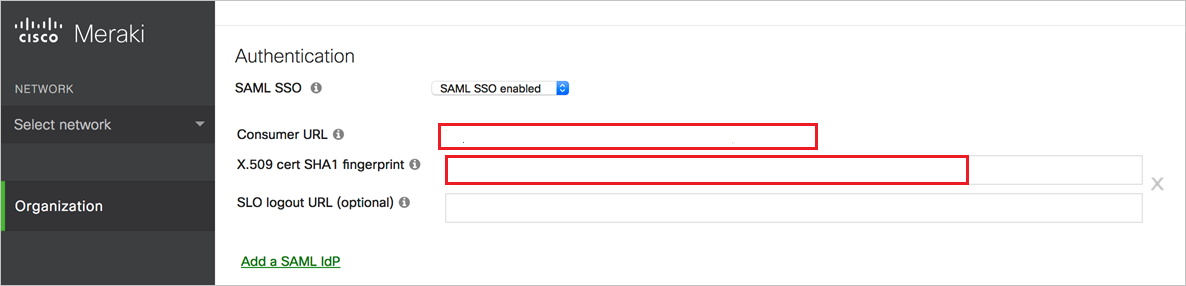
Paste the converted Thumbprint Value, which you have copied and converted in specified format as mentioned in step 9 of previous section into X.590 cert SHA1 fingerprint textbox. Then select Save. After saving, the Consumer URL will show up. Copy Consumer URL value and paste this into Reply URL textbox in the Basic SAML Configuration Section.
Create Meraki Dashboard Admin Roles
In a different web browser window, sign into meraki dashboard as an administrator.
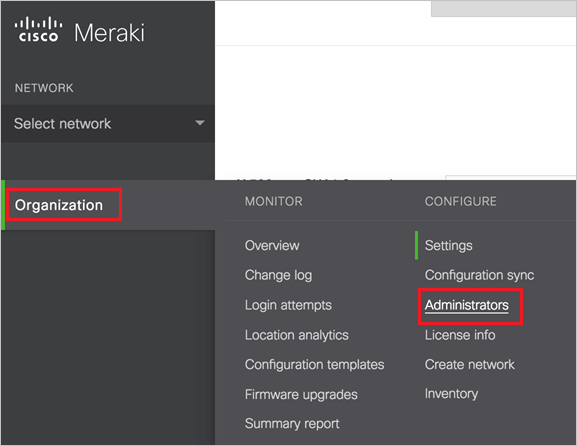
Navigate to Organization > Administrators.
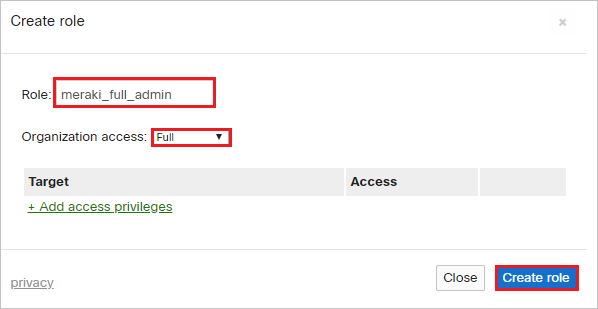
In the SAML administrator roles section, select the Add SAML role button.

Enter the Role meraki_full_admin, mark Organization access as Full and select Create role. Repeat the process for meraki_readonly_admin, this time mark Organization access as Read-only box.
Follow the below steps to map the Meraki Dashboard roles to Microsoft Entra SAML roles:
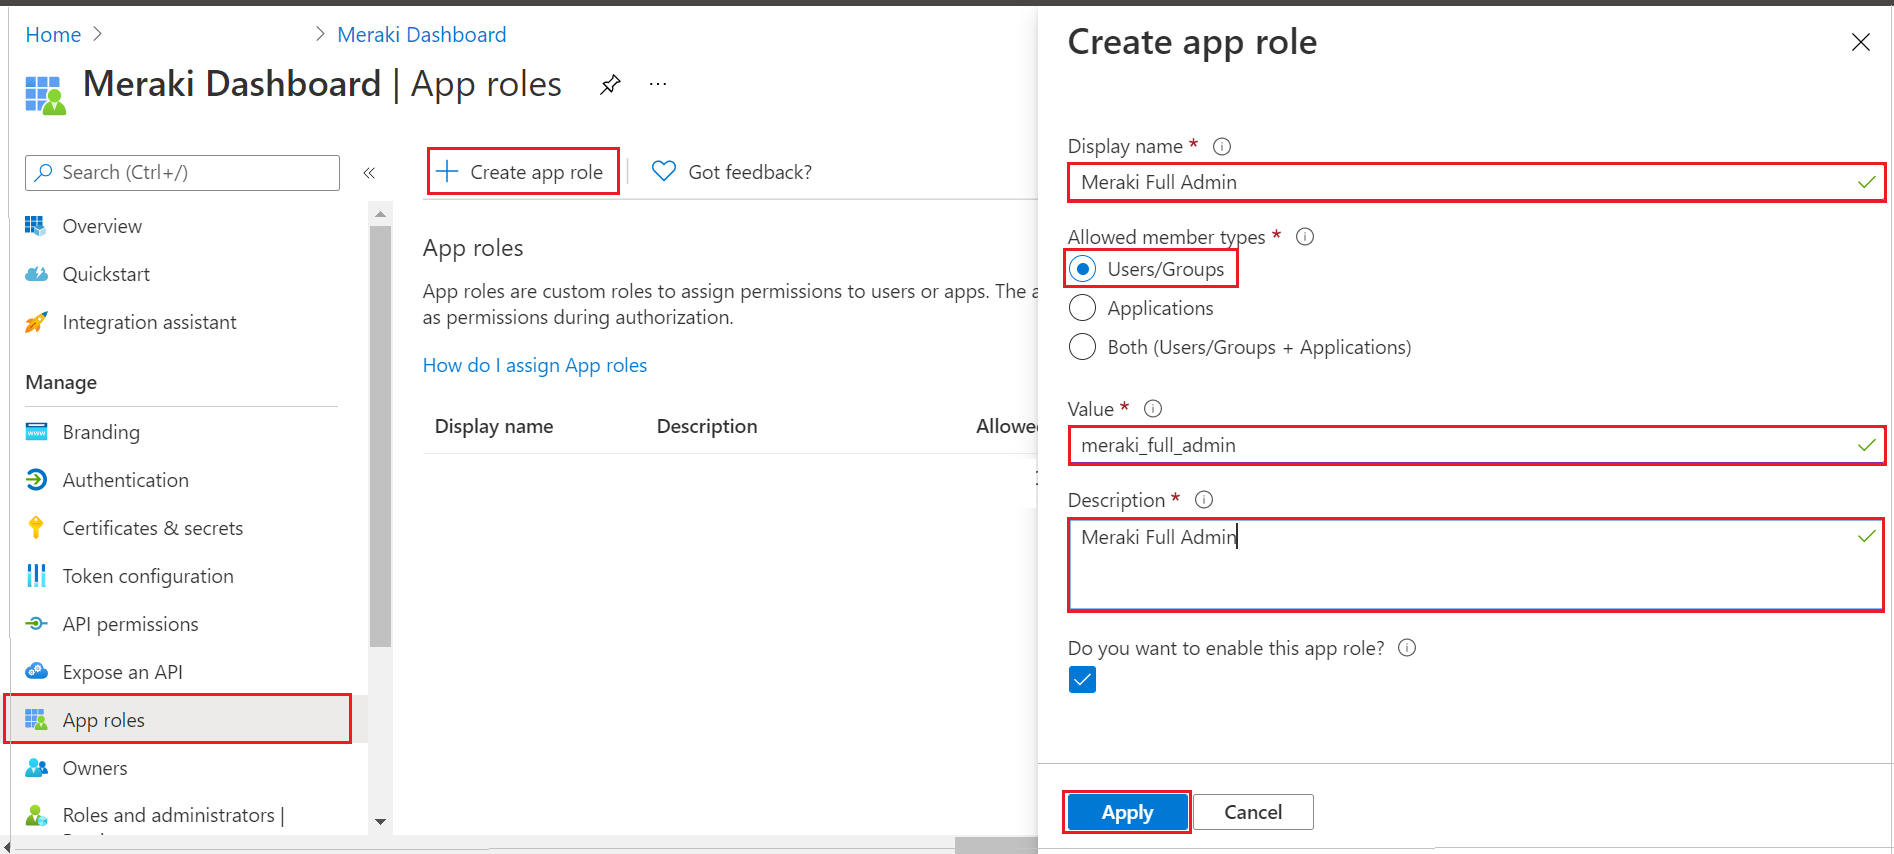
a. In the Azure portal, select App Registrations.
b. Select All Applications and select Meraki Dashboard.
c. Select App Roles and select Create App role.
d. Enter the Display name as
Meraki Full Admin.e. Select Allowed Members as
Users/Groups.f. Enter the Value as
meraki_full_admin.g. Enter the Description as
Meraki Full Admin.h. Select Save.
Test SSO
In this section, you test your Microsoft Entra single sign-on configuration with following options.
Select Test this application, and you should be automatically signed in to the Meraki Dashboard for which you set up the SSO
You can use Microsoft My Apps. When you select the Meraki Dashboard tile in the My Apps, you should be automatically signed in to the Meraki Dashboard for which you set up the SSO. For more information about the My Apps, see Introduction to the My Apps.
Related content
Once you configure Meraki Dashboard you can enforce session control, which protects exfiltration and infiltration of your organization’s sensitive data in real time. Session control extends from Conditional Access. Learn how to enforce session control with Microsoft Defender for Cloud Apps.