Microsoft Entra single sign-on (SSO) integration with Muzeek
In this article, you'll learn how to integrate Muzeek with Microsoft Entra ID. When you integrate Muzeek with Microsoft Entra ID, you can:
Use Microsoft Entra ID to control who can access Muzeek. Enable your users to be automatically signed in to Muzeek with their Microsoft Entra accounts. Manage your accounts in one central location: the Azure portal.
Prerequisites
To get started, you need the following items:
- A Microsoft Entra subscription. If you don't have a subscription, you can get a free account.
- Muzeek single sign-on (SSO) enabled subscription.
Add Muzeek from the gallery
To configure the integration of Muzeek into Microsoft Entra ID, you need to add Muzeek from the gallery to your list of managed SaaS apps.
Sign in to the Microsoft Entra admin center as at least a Cloud Application Administrator.
Browse to Identity > Applications > Enterprise applications > New application.
In the Add from the gallery section, enter Muzeek in the search box.
Select Muzeek in the results panel and then add the app. Wait a few seconds while the app is added to your tenant.
Configure Microsoft Entra SSO
Follow these steps to enable Microsoft Entra SSO in the Microsoft Entra admin center.
Sign in to the Microsoft Entra admin center as at least a Cloud Application Administrator.
Browse to Identity > Applications > Enterprise applications > Muzeek > Single sign-on.
Perform the following steps in the below section:
a. Click Go to application.
b. Copy Application (client) ID and Directory (tenant) ID, use it later in the Muzeek side configuration.

Navigate to Authentication tab on the left menu and perform the following steps:
a. Enable the Access tokens and ID tokens
b. click Save.
Note
The Redirect URIs value is auto populate, you don't need to perform any manual configuration here.
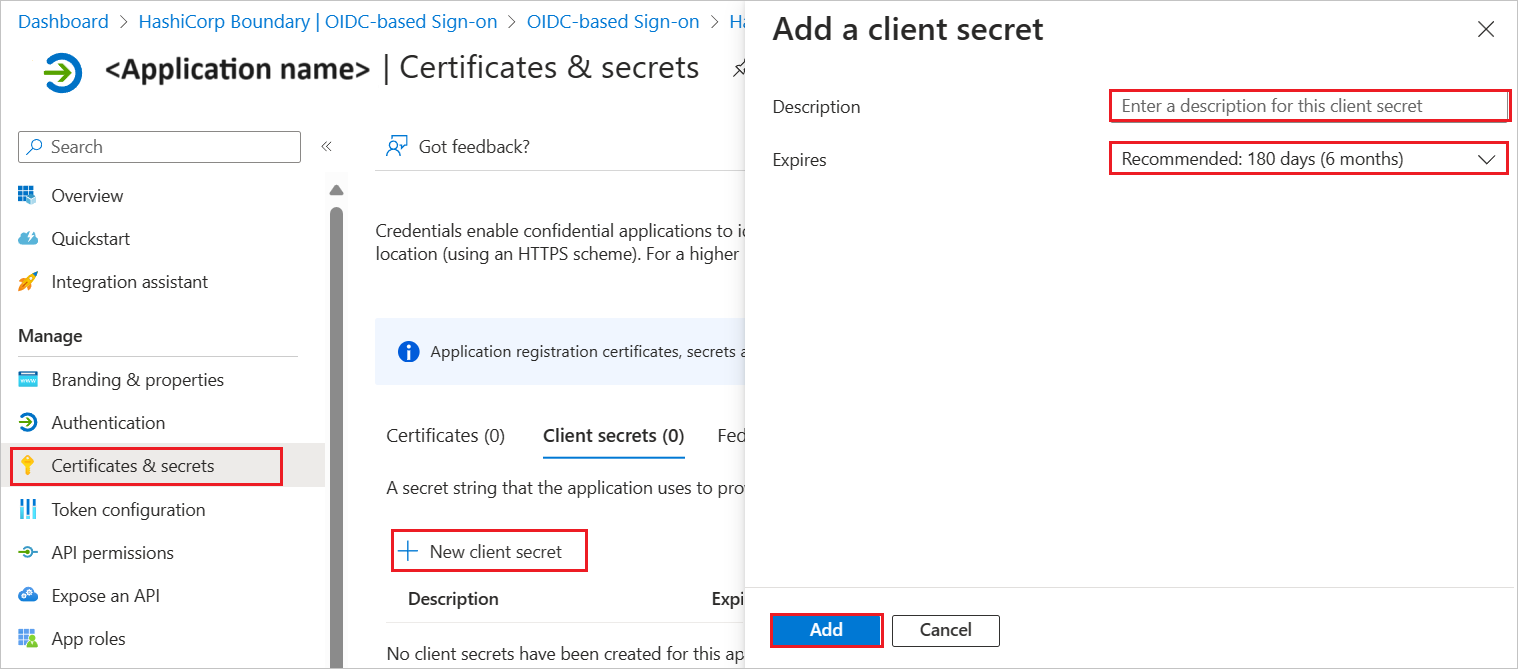
Navigate to Certificates & secrets on the left menu and perform the following steps:
Create a Microsoft Entra test user
In this section, you'll create a test user called B.Simon.
- Sign in to the Microsoft Entra admin center as at least a User Administrator.
- Browse to Identity > Users > All users.
- Select New user > Create new user, at the top of the screen.
- In the User properties, follow these steps:
- In the Display name field, enter
B.Simon. - In the User principal name field, enter the username@companydomain.extension. For example,
B.Simon@contoso.com. - Select the Show password check box, and then write down the value that's displayed in the Password box.
- Select Review + create.
- In the Display name field, enter
- Select Create.
Assign the Microsoft Entra test user
In this section, you'll enable B.Simon to use single sign-on by granting access to Muzeek.
- Sign in to the Microsoft Entra admin center as at least a Cloud Application Administrator.
- Browse to Identity > Applications > Enterprise applications > Muzeek.
- In the app's overview page, select Users and groups.
- Select Add user/group, then select Users and groups in the Add Assignment dialog.
- In the Users and groups dialog, select B.Simon from the Users list, then click the Select button at the bottom of the screen.
- If you are expecting a role to be assigned to the users, you can select it from the Select a role dropdown. If no role has been set up for this app, you see "Default Access" role selected.
- In the Add Assignment dialog, click the Assign button.
Configure Muzeek SSO
Below are the configuration steps to complete the OIDC federation setup:
Sign into the Muzeek site as an administrator.
Click Settings icon at the bottom of the page and perform of the below steps.
a. Go to the Integrations tab.
b. In the ENTRA Domain field, enter the domain URL value using the following pattern:
https://login.microsoftonline.com/<Tenant_ID>/oauth2/v2.0/authorizeNote
The domain URL value is not real, replace the Tenant_ID value with actual Directory (tenant) ID, which you have copied from Entra side.
c. In the ENTRA Client ID field, paste the Application ID value, which you have copied from Entra page.
d. In the ENTRA Client Secret field, paste the value, which you have copied from Certificates & secrets section at Entra side.
e. Click Save Changes.
f. Once saved, Muzeek populates the Home Page URL which can be used later in Connect SSO via MyApps section.

Connect SSO via MyApps
To connect your MyApps account to Muzeek in the Microsoft Entra admin center, please follow the below steps:
Navigate to App Registrations > Muzeek > Branding & Properties.

Paste the Home Page URL you copied from Muzeek portal into the Home Page URL field in Microsoft Entra admin center.
Click Save and wait for 10 - 15 minutes for the change to propagate in the system.
Once done, you should now be able to successfully navigate to your Muzeek account while logged into MyApps, and any users you have added to your tenant should be able to do so as well.


