Note
Access to this page requires authorization. You can try signing in or changing directories.
Access to this page requires authorization. You can try changing directories.
In this article, you learn how to integrate Rackspace SSO with Microsoft Entra ID. When you integrate Rackspace SSO with Microsoft Entra ID, you can:
- Control in Microsoft Entra ID who has access to Rackspace SSO.
- Enable your users to be automatically signed-in to Rackspace SSO with their Microsoft Entra accounts.
- Manage your accounts in one central location.
Prerequisites
The scenario outlined in this article assumes that you already have the following prerequisites:
- A Microsoft Entra user account with an active subscription. If you don't already have one, you can Create an account for free.
- One of the following roles:
- Rackspace SSO single sign-on enabled subscription.
Scenario description
In this article, you configure and test Microsoft Entra single sign-on in a test environment.
- Rackspace SSO supports IDP initiated SSO.
Note
Identifier of this application is a fixed string value so only one instance can be configured in one tenant.
Add Rackspace SSO from the gallery
To configure the integration of Rackspace SSO into Microsoft Entra ID, you need to add Rackspace SSO from the gallery to your list of managed SaaS apps.
- Sign in to the Microsoft Entra admin center as at least a Cloud Application Administrator.
- Browse to Entra ID > Enterprise apps > New application.
- In the Add from the gallery section, type Rackspace SSO in the search box.
- Select Rackspace SSO from results panel and then add the app. Wait a few seconds while the app is added to your tenant.
Alternatively, you can also use the Enterprise App Configuration Wizard. In this wizard, you can add an application to your tenant, add users/groups to the app, assign roles, and walk through the SSO configuration as well. Learn more about Microsoft 365 wizards.
Configure and test Microsoft Entra SSO for Rackspace SSO
In this section, you configure and test Microsoft Entra single sign-on with Rackspace SSO based on a test user called Britta Simon. When using single sign-on with Rackspace, the Rackspace users are automatically created the first time they sign in to the Rackspace portal.
To configure and test Microsoft Entra single sign-on with Rackspace SSO, you need to perform the following steps:
- Configure Microsoft Entra SSO - to enable your users to use this feature.
- Create a Microsoft Entra test user - to test Microsoft Entra single sign-on with Britta Simon.
- Assign the Microsoft Entra test user - to enable Britta Simon to use Microsoft Entra single sign-on.
- Configure Rackspace SSO - to configure the Single Sign-On settings on application side.
- Set up Attribute Mapping in the Rackspace Control Panel - to assign Rackspace roles to Microsoft Entra users.
- Test SSO - to verify whether the configuration works.
Configure Microsoft Entra SSO
Follow these steps to enable Microsoft Entra SSO.
Sign in to the Microsoft Entra admin center as at least a Cloud Application Administrator.
Browse to Entra ID > Enterprise apps > Rackspace SSO > Single sign-on.
On the Select a single sign-on method page, select SAML.
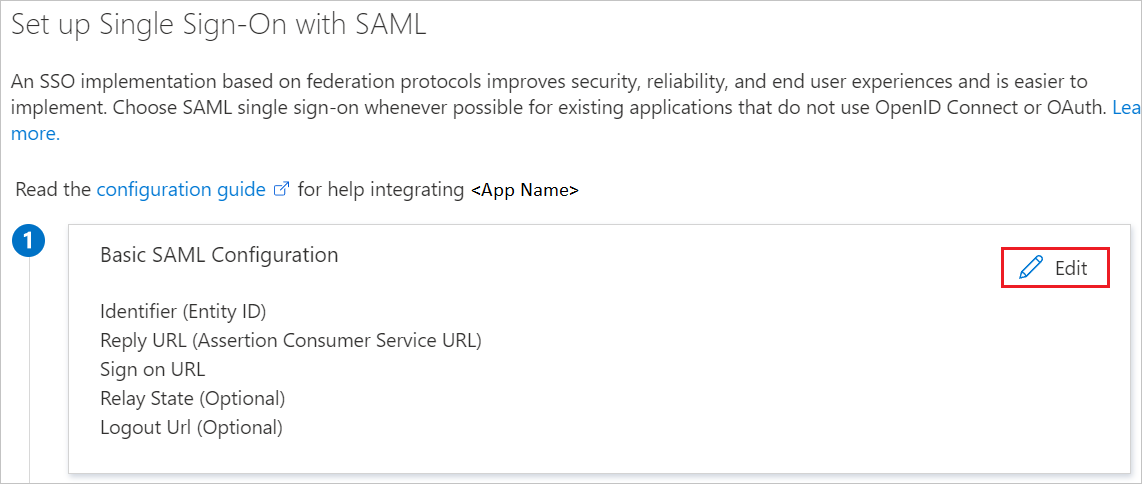
On the Set up single sign-on with SAML page, select the pencil icon for Basic SAML Configuration to edit the settings.

On the Basic SAML Configuration section, upload the Service Provider metadata file which you can download from the URL and perform the following steps:
a. Select Upload metadata file.

b. Select folder logo to select the metadata file and select Upload.

c. Once the metadata file is successfully uploaded, the necessary URLs get auto populated automatically.
On the Set up Single Sign-On with SAML page, in the SAML Signing Certificate section, select Download to download the Federation Metadata XML from the given options as per your requirement and save it on your computer.

This file is uploaded to Rackspace to populate required Identity Federation configuration settings.
Create and assign Microsoft Entra test user
Follow the guidelines in the create and assign a user account quickstart to create a test user account called B.Simon.
Configure Rackspace SSO
To configure single sign-on on Rackspace SSO side:
- See the documentation at Add an Identity Provider to the Control Panel
- It will lead you through the steps to:
- Create a new Identity Provider.
- Specify an email domain that users will use to identify your company when signing in.
- Upload the Federation Metadata XML previously downloaded from the Azure control panel.
This will correctly configure the basic SSO settings needed for Azure and Rackspace to connect.
Set up Attribute Mapping in the Rackspace control panel
Rackspace uses an Attribute Mapping Policy to assign Rackspace roles and groups to your single sign-on users. The Attribute Mapping Policy translates Microsoft Entra SAML claims into the user configuration fields Rackspace requires. More documentation can be found in the Rackspace Attribute Mapping Basics documentation. Some considerations:
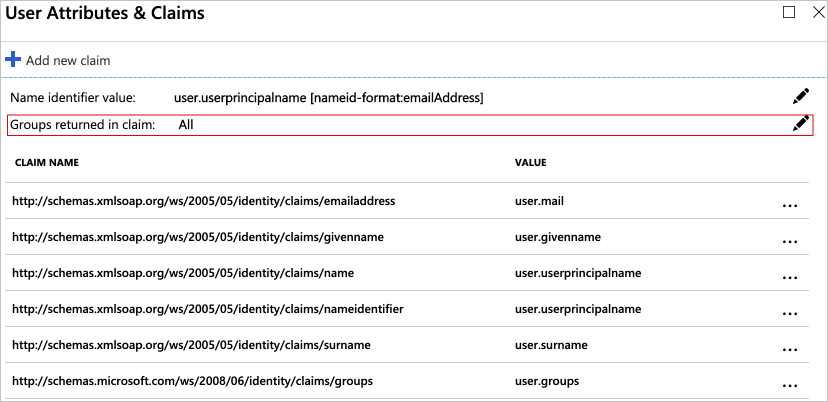
If you want to assign varying levels of Rackspace access using Microsoft Entra groups, you need to enable the Groups claim in the Azure Rackspace SSO Single Sign-on settings. The Attribute Mapping Policy will then be used to match those groups to desired Rackspace roles and groups:

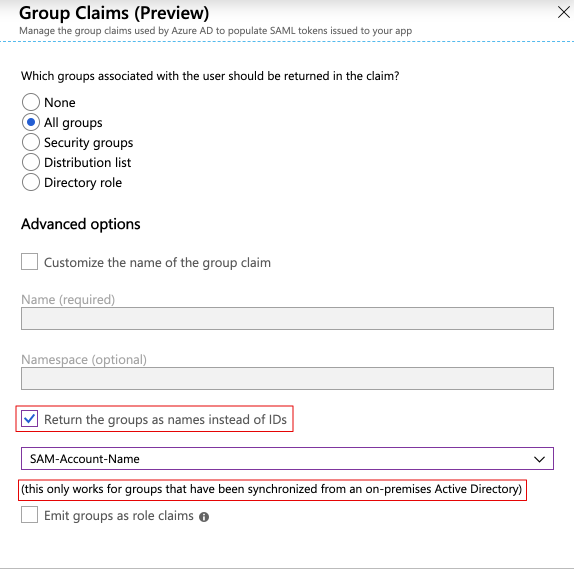
By default, Microsoft Entra ID sends the UID of Microsoft Entra groups in the SAML claim, versus the name of the Group. However, if you're synchronizing your on-premises Active Directory to Microsoft Entra ID, you have the option to send the actual names of the groups:

The following example Attribute Mapping Policy demonstrates:
- Setting the Rackspace user's name to the
user.nameSAML claim. Any claim can be used, but it's most common to set this to a field containing the user's email address. - Setting the Rackspace roles
adminandbilling:adminon a user by matching a Microsoft Entra group, by either Group Name or Group UID. A substitution of"{0}"in therolesfield is used, and is replaced by the results of theremoterule expressions. - Using the
"{D}"default substitution to let Rackspace retrieve additional SAML fields by looking for standard and well-known SAML claims in the SAML exchange.
---
mapping:
    rules:
    - local:
        user:
          domain: "{D}"
          name: "{At(http://schemas.xmlsoap.org/ws/2005/05/identity/claims/name)}"
          email: "{D}"
          roles:
              - "{0}"
          expire: "{D}"
      remote:
          - path: |
              (
                if (mapping:get-attributes('http://schemas.microsoft.com/ws/2008/06/identity/claims/groups')='7269f9a2-aabb-9393-8e6d-282e0f945985') then ('admin', 'billing:admin') else (),
                if (mapping:get-attributes('http://schemas.microsoft.com/ws/2008/06/identity/claims/groups')='MyAzureGroup') then ('admin', 'billing:admin') else ()
              )
            multiValue: true
  version: RAX-1
Tip
Ensure that you use a text editor that validates YAML syntax when editing your policy file.
See the Rackspace Attribute Mapping Basics documentation for more examples.
Test SSO
In this section, you test your Microsoft Entra single sign-on configuration with following options.
Select Test this application, and you should be automatically signed in to the Rackspace SSO for which you set up the SSO.
You can use Microsoft My Apps. When you select the Rackspace SSO tile in the My Apps, you should be automatically signed in to the Rackspace SSO for which you set up the SSO. For more information, see Microsoft Entra My Apps.
You can also use the Validate button in the Rackspace SSO Single sign-on settings:

Related content
Once you configure Rackspace SSO you can enforce session control, which protects exfiltration and infiltration of your organization’s sensitive data in real time. Session control extends from Conditional Access. Learn how to enforce session control with Microsoft Defender for Cloud Apps.