Configure and test Microsoft Entra SSO for Trelica
Configure and test Microsoft Entra SSO with Trelica by using a test user called B.Simon. For SSO to work, you must establish a linked relationship between a Microsoft Entra user and the related user in Trelica.
To configure and test Microsoft Entra SSO with Trelica, perform the following steps:
Browse to Identity > Applications > Enterprise applications > Trelica application integration page, go to the Manage section. Select Single sign-on.
On the Select a single sign-on method page, select SAML.
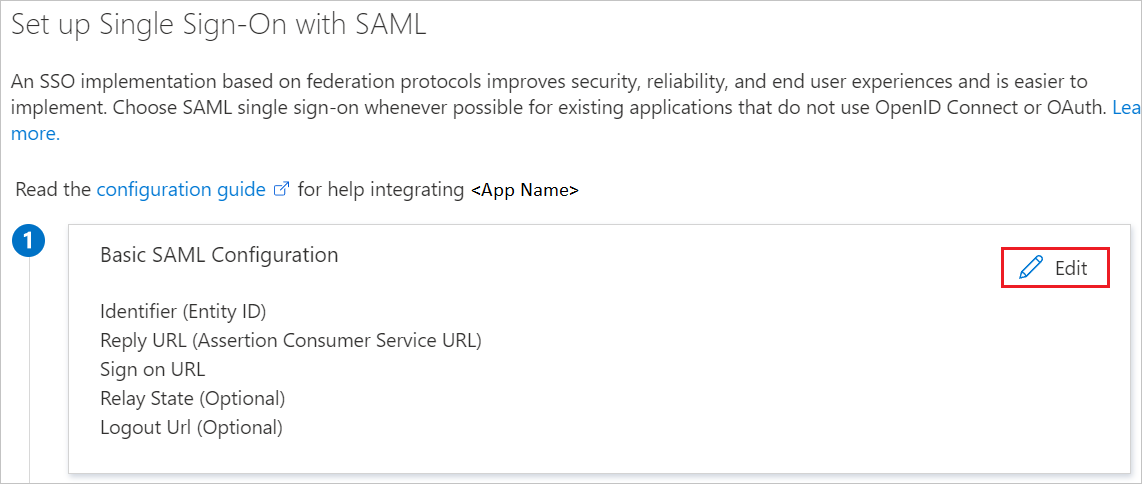
On the Set up Single Sign-on with SAML page, click the pencil icon for Basic SAML Configuration to edit the settings.
On the Basic SAML Configuration section, perform the following steps:
In the Identifier box, type the URL:
https://app.trelica.com.
In the Reply URL box, type a URL using the following pattern:
https://app.trelica.com/Id/Saml2/<CUSTOM_IDENTIFIER>/Acs.
Note
The Reply URL value is not real. Update this value with the actual Reply URL (also known as the ACS).
You can find this by logging in to Trelica and going to the SAML identity providers configuration page (Admin > Account > SAML). Click on the copy button next to the Assertion Consumer Service (ACS) URL to put this onto the clipboard, ready for pasting into the Reply URL text box in Microsoft Entra ID.
Read the Trelica help documentation or contact the Trelica Client support team if you have questions.
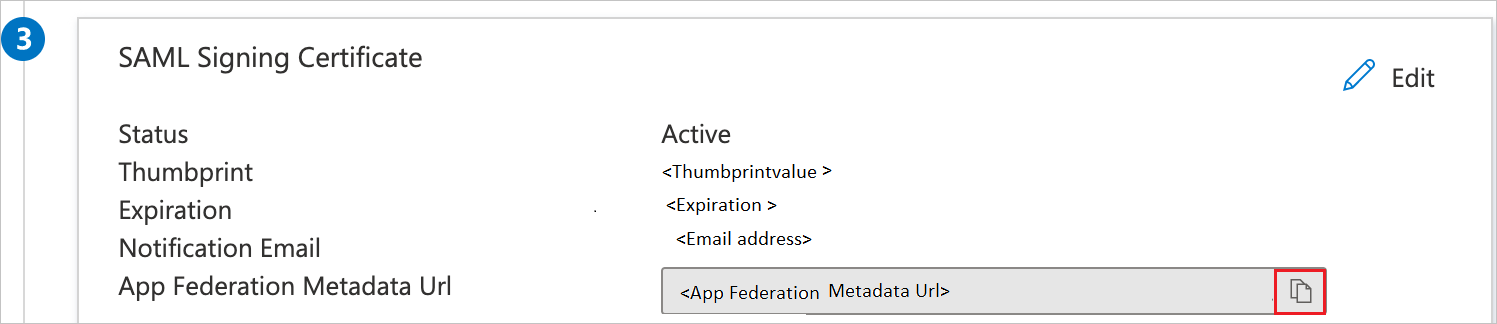
On the Set up single sign-on with SAML page, In the SAML Signing Certificate section, click the copy button to copy App Federation Metadata Url and save it on your computer.
Create a Microsoft Entra test user
In this section, you create a test user called B.Simon.
Select New user > Create new user, at the top of the screen.
In the User properties, follow these steps:
In the Display name field, enter B.Simon.
In the User principal name field, enter the username@companydomain.extension. For example, B.Simon@contoso.com.
Select the Show password check box, and then write down the value that's displayed in the Password box.
Select Review + create.
Select Create.
Assign the Microsoft Entra test user
In this section, you enable B.Simon to use Azure single sign-on by granting access to Trelica.
Browse to Identity > Applications > Enterprise applications.
In the applications list, select Trelica.
In the app's overview page, go to the Manage section, and select Users and groups.
Select Add user. In the Add Assignment dialog box, select Users and groups.
In the Users and groups dialog box, select B.Simon from the users list. Then choose the Select button at the bottom of the screen.
If you expect any role value in the SAML assertion, in the Select Role dialog box, select the appropriate role for the user from the list. Then choose the Select button at the bottom of the screen.
In the Add Assignment dialog box, select Assign.
Configure Trelica SSO
To configure single sign-on on the Trelica side, go to the SAML identity providers configuration page (Admin > Account > SAML). Click on the New button. Enter Microsoft Entra ID as the Name and choose Metadata from url for the Metadata type. Paste the App Federation Metadata Url you took from Microsoft Entra ID into the Metadata url field in Trelica.
Trelica supports just-in-time user provisioning, which is enabled by default. There's no action for you to take in this section. If a user doesn't already exist in Trelica, a new one is created after authentication.
Test SSO
In this section, you test your Microsoft Entra single sign-on configuration with following options.
Click on Test this application, and you should be automatically signed in to the Trelica for which you set up the SSO.
You can use Microsoft My Apps. When you click the Trelica tile in the My Apps, you should be automatically signed in to the Trelica for which you set up the SSO. For more information, see Microsoft Entra My Apps.
Deploying and monitoring enterprise applications to Azure solutions can ensure security. Explore how to deploy on-premises and cloud based apps to users.