Note
Access to this page requires authorization. You can try signing in or changing directories.
Access to this page requires authorization. You can try changing directories.
Overview
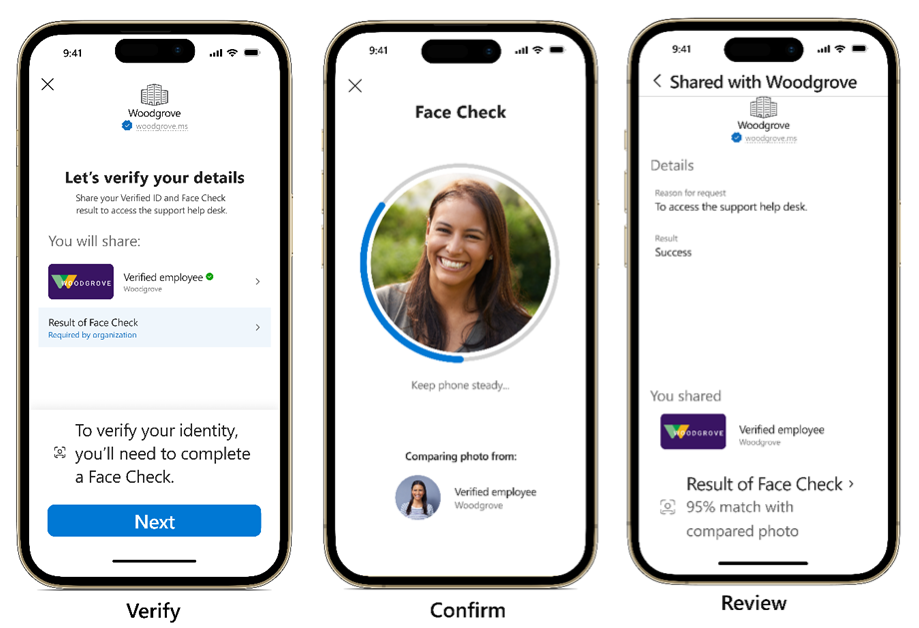
Face Check is a privacy-respecting facial matching. It allows enterprises to perform high-assurance verifications securely, simply, and at scale. Face Check adds a critical layer of trust by performing facial matching between a user’s real-time selfie and a photo. The facial matching is powered by Azure AI services. Face Check protects user privacy by sharing only the match results and not any sensitive identity data, while allowing organizations to be sure the person claiming an identity is really them.
Prerequisites
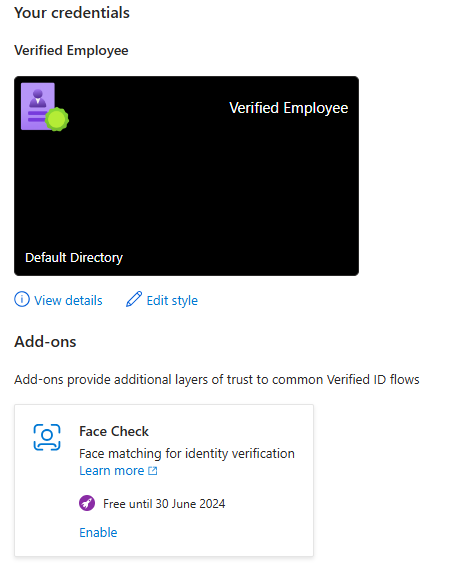
Face Check is a premium feature within Verified ID. You need to enable the Face Check Add-on in your Microsoft Entra Verified ID setup before doing Face Check verifications.
- Make sure Microsoft Entra Verified ID is set up in your tenant before using Face Check.
- Associate or add an Azure subscription to your Microsoft Entra tenant
- Make sure the user setting up Face Check has Contributor role for the Azure subscription
Set up Face Check with Microsoft Entra Verified ID
The Face Check Add-on can be enabled in two ways from the Microsoft Entra Admin Center or by using the Azure Resource Manager (ARM) Rest API via CLI. If you're going to use Face Check in a tenant with the Microsoft Entra Suite license, Face Check is enabled at the tenant level, and the configuration applies to all authorities within that tenant. For any other licenses, you can enable Face Check individually by each authority on your tenant using the Azure Resource Manager (ARM) Rest API.
Note
The ARM Rest API for Microsoft Entra Verified ID is currently in preview.
Set up Face Check with Microsoft Entra Verified ID in the Admin Center
In the Verified ID overview page, scroll down to the new Add-ons section and Enable the Face Check add-on.
In the Link a subscription step, select a Subscription, a Resource group, and the Resource location. Then select Validate. If there are no subscriptions listed, see What if I can't find a subscription?
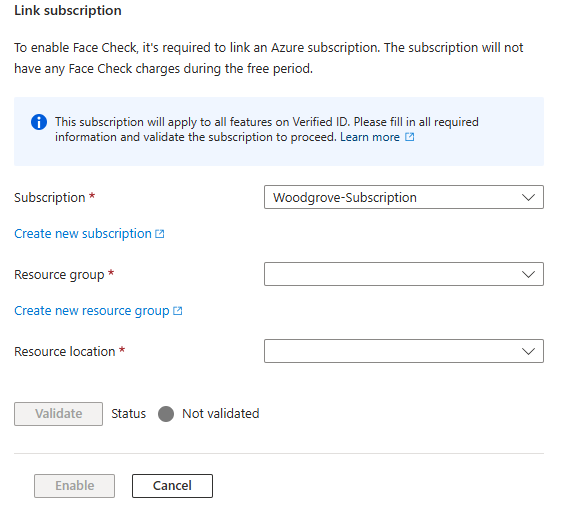
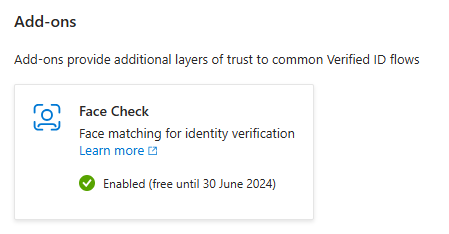
Once validated, you can Enable the add-on.
Now you can start using Face Check in your enterprise applications.
Set up Face Check with Microsoft Entra Verified ID using the Azure Resource Manager (ARM) Rest API
Note
The ARM Rest API for Microsoft Entra Verified ID is currently in preview.
To set up the Face Check Add-on on a given authority, you must have the Azure PowerShell tools in your machine. This mechanism wraps the REST call. You can alternatively use the Azure Resource Manager (ARM) Rest API PUT accordingly.
Run the following command in PowerShell.
az login --tenant <tenant ID>Select the subscription that you want to enable Face Check billing on.
Run the following command.
az rest --method PUT --uri /subscriptions/<subscription-id>/resourceGroups/<resource-group-name>/providers/Microsoft.VerifiedId/authorities/<authority-id>?api-version=2024-01-26-preview --body "{'location':'<rp-location>'}"- replace
<subscription-id>with your subscription ID - replace
<resource-group-name>with your resource group name - replace
<authority-id>with your authority ID. You can obtain theauthority-idusing the GET Authorities call from the Admin API. - replace
<rp-location>using one of the following two values:- For EU tenants, use
northeurope - For Non-EU use
westus2
- For EU tenants, use
- replace
The Face Check Add-on is now enabled in your tenant.
Get started with Face Check using MyAccount
You can easily get started using Face Check by using MyAccount, which can issue VerifiedEmployee credentials, and a public test app that Microsoft provides. To get started, you need to perform the following steps:
- Create a test user in your Microsoft Entra tenant and upload a photo of yourself
- Go to MyAccount, sign in as the test user and issue a
VerifiedEmployeecredential for the user. - Use the public test app to present your
VerifiedEmployeecredential using Face Check.
When the Microsoft Authenticator gets a presentation request including a Face Check, there's an extra item after the credential type the user is asked to share. When the user selects on that item, the actual Face Check is performed and the user can then share the requested credential and the confidence score of the check with the public test app (relying party). You can review the results on the Test app.
Note
MyAccount uses the Microsoft Entra ID user profile photo when issuing the VerifiedEmployee credential. You can retrieve your photo via Microsoft Graph API https://graph.microsoft.com/v1.0/me/photos/240x240/$value
Get started with Face Check using Request Service API
Apps can use Request Service API to create request for users to perform a Face Check against a VerifiedEmployee credential, State Issued Government ID, or a custom digital credential with a trusted photo. For example, a help desk service can request a Face Check against a VerifiedEmployee credential to verify the identity quickly and securely to enable a wide variety of self-service scenarios including activating a Passkey or resetting a password. To reduce compliance risk, apps receive a confidence score for match against the photo from the desired credential, without gaining access to liveness data.
Issuing a Verified ID credential with a photo
Custom credential types using the idTokenHint attestation flow can also issue a Verified ID credential containing a photo. The credential definition needs to have the display and rules definition for the photo claim.
The display definition for the photo claim should have the type set to image/jpg;base64url in order to let Microsoft Authenticator understand that it should be rendered as a photo correctly.
{
  "claim": "vc.credentialSubject.photo",
  "label": "User picture",
  "type": "image/jpg;base64url"
}
When setting the actual claim value of the photo, it should be in format UrlEncode(Base64Encode(JPEG image)).
{
  "outputClaim": "photo",
  "required": false,
  "inputClaim": "photo",
  "indexed": false
}
Note
When issuing a custom credential with a photo, it's the app's responsibility to provide the JPEG to be used and encode it.
Presentation requests including Face Check
The JSON payload to the Request Service API for creating a presentation request needs to specify that a Face Check should be performed. The claim containing the photo must be named and you might optionally specify your confidence threshold as an integer between 50-100. The default is 70.
// POST https://verifiedid.did.msidentity.com/v1.0/verifiableCredentials/createPresentationRequest
...
  "requestedCredentials": [
    {
      "type": "VerifiedEmployee",
      "acceptedIssuers": [ "did:web:verifiedid.contoso.com" ],
      "configuration": {
        "validation": {
          "allowRevoked": false,
          "validateLinkedDomain": true,
          "faceCheck": {
            "sourcePhotoClaimName": "photo",
            "matchConfidenceThreshold": 70
          }
        }
Successful Face Check presentation_verified callback event
The JSON payload for the presentation_verified has more data in the response when a Face Check was performed successfully during a Verified ID credential presentation. The faceCheck section is added which contains a matchConfidenceScore. Note, that it isn't possible to request and receive the presentation receipt when the request includes faceCheck.
  "verifiedCredentialsData": [
    {
      "issuer": "did:web:verifiedid.contoso.com",
      "type": [ "VerifiableCredential", "VerifiedEmployee" ],
      "claims": {
        ...
      },
      ...
      "faceCheck": {
        "matchConfidenceScore": 86.314159,
        "sourcePhotoQuality": "HIGH"
      }
    }
  ],
Face Check presentation_verified callback event receipt
If the presentation request was created with asking for a receipt,
then the presentation_verified callback will contain an attribute named faceCheck.
{
  "requestId": "11111111-2222-3333-4444-55555555",
  "requestStatus": "presentation_verified",
  "receipt": {
    ...
    "faceCheck": "eyJhbGc...svw"
  },
  ...
}
The value of the faceCheck attribute is a signed JWT token that is source data for the liveness check. Base64-decoding the JWT token gives a verifiable credential of type MicrosoftFaceCheckReceipt. The sourceVcJti is the identity of the credential used to match the liveness check.
...
    "type": [
      "VerifiableCredential",
      "MicrosoftFaceCheckReceipt"
    ],
    "credentialSubject": {
      "faceCheckResults": [
        {
          "sourceVcJti": "urn:pic:4f741111222233334444000000000000",
          "matchConfidenceThreshold": 70,
          "matchConfidenceScore": 86.314159,
          "sourcePhotoQuality": "HIGH"
        }
      ]
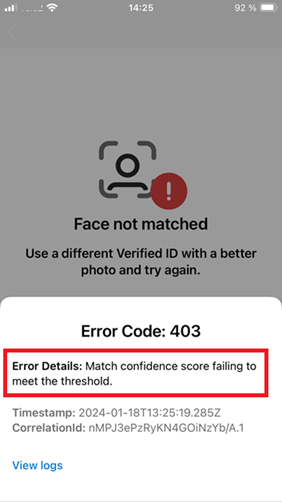
Failed Face Check callback event
When the confidence score is lower than the threshold, the presentation request is failed and a presentation_error is returned. The verifying application doesn't get the score returned.
{
  "requestId": "...",
  "requestStatus": "presentation_error",
  "state": "...",
  "error": {
    "code": "claimValidationError",
    "message": "Match confidence score failing to meet the threshold."
  }
}
The Authenticator displays an error message informing the user that the confidence score failed to meet the threshold.
Frequently asked questions for Face Check with Microsoft Entra Verified ID
What is Face Check?
Face Check with Microsoft Entra Verified ID is a premium feature within Verified ID used for privacy-respecting facial matching. It allows enterprises to perform high-assurance verifications securely, simply, and at scale. Face Check adds a critical layer of trust by performing facial matching between a user’s real-time selfie and a photo. The facial matching is powered by Azure AI services.
What is the difference between Face Check and Face ID?
Face ID is a vision based biometric security option offer on Apple products for unlocking a device to access to a mobile app. Face Check is a Microsoft Entra Verified ID feature that also uses vision based AI technology, but compares the user to the presented Verified ID. Face Check determines the user identity across a wide range of online scenarios where high-assurance access is required. Some examples of that are high value business processes or access to sensitive company information. Both mechanisms require a user to face a camera in the process but operate in different ways.
Is the Face Check biometric vision check performed on the mobile device?
No. The biometric check between the photo and the liveness data captured is performed in the cloud, using Azure AI Vision Face API. The user selfie capture during the process isn't shared with the requesting ID verifying site.
What is Face Liveness Check?
Face Check with Microsoft Entra Verified ID uses Azure AI Vision Face API liveness check to verify that it's a real person in the selfie footage from the camera on the user’s device. This check helps ensure that a static photo or a 2D video of a user can't be used in place of their live self.
What happens to the liveness data taken?
When the camera is turned on the mobile device, live footage is captured on the mobile device. This footage is then passed to Verified ID who uses it to invoke services of Azure AI services.
Data isn't stored by or kept by any of the services Microsoft Authenticator, Verified ID, or Azure AI. Furthermore, the footage isn't shared with the verifier application either. The verifier application only gets the confidence score in return. In an AI based system, the confidence score is the probability percentage answer for a query to the system. For this scenario, the confidence score is the likelihood the Verified ID user photo matches user capture on the mobile device. For more information, see Data and privacy for Azure AI Services.
How much does Face Check cost?
For the latest information about usage billing and pricing, see Microsoft Entra pricing.
What if I can't find a subscription?
If no subscriptions are available in the Link a subscription pane, here are some possible reasons:
You don't have the appropriate permissions. Be sure to sign in with the Azure account at least has the Contributor role within the subscription or a resource group within the subscription.
A subscription exists, but it isn't associated with your directory yet. You can associate an existing subscription to your tenant and then repeat the steps for linking it to your tenant.
No subscription exists. In the Link a subscription pane, you can create a subscription by selecting the link if you don't already have a subscription you might create one here. After you create a new subscription, you'll need to create a resource group in the new subscription, and then repeat the steps for linking it to your tenant.
Frequently asked questions for Face Check Developers
Does Face Check Require MS Authenticator?
Yes. Face Check is limited to Verified ID usage with MS Authenticator. This limitation is in place to prevent injection attack on Face Check. For non-Face Check scenarios, a Wallet SDK is available other Verified ID solutions. For more information, see Using the Wallet Library.
What is the confidence percentage match and what does confidence mean?
Organizations can choose their confidence score threshold for their application to accept a Face Check verification. A higher threshold means that it's less likely for an impersonator to be falsely accepted. At the default confidence score of 50%, the chance that the person in the live selfie isn't the rightful credential owner is one in 100,000. The required level depends on the specific scenario, how public the entry point is and the planned users. At a 90% confidence score, that false positive user chance is one in a billion. A higher threshold results in the increased potential for an authorized user being rejected due to the higher sensitivity of the application. It's important to find the right balance between setting a high confidence score threshold that secures your application while not making it so high that it often rejects authorized users due to slight changes in appearance or the visual conditions of their surroundings such as lighting.
Learn more about Azure Face API.
What is Azure AI Vision Face API?
Azure AI is a suite of cloud services on the Azure Platform. The Azure AI Vision Face API offers services for face detection, face recognition, face match, and liveness check. Microsoft Entra Verified ID uses face detection, face match, and face liveness check services when performing the FaceCheck. For more information, see Azure AI Vision Face API.
How fair is Azure AI Vision Face API?
Microsoft has conducted fairness testing of the Face API. The Azure AI services team is continuously striving to ensure responsible and inclusive use of AI. The Face API Fairness report is available here.
Are you iBeta Level 2 conformant?
Yes. Azure Face API AI and Face Check are iBeta Level 2 conformant to be resistant to various presentation styles of attack to impersonate a user. Learn more about iBeta’s ISO Presentation Attack Detection testing.
If a user recently got a haircut, shaved their facial hair, or otherwise changed their physical appearance, will they be unable to complete a Face Check verification?
Face Check compares a user’s live selfie to the photo associated with your Verified ID. The less the user looks like that photo, the lower their match score is. Whether the Face Check verification is accepted or not will depend on how differently the user currently appears from their previously saved photo and how high of a confidence score threshold the application has. If your application has a relatively high threshold, it's recommended that users keep a physical appearance that is consistent with their uploaded Verified ID photo or replace the photo with one that reflects the user’s current appearance.
Once I use Face Check, where does my data go? Where is it stored?
Images used during Face Check aren't stored long term. During a Face Check request, a selfie is captured from the user’s mobile device. This image is then passed to Verified ID which uses it to invoke Azure Face API AI services. Once done processing, the selfie image is discarded and not saved on any device or service. Microsoft Authenticator, Verified ID, and Azure AI services will NOT store or keep this data. Furthermore, the captured selfie image isn't shared with the verifier application either. The verifier application only receives a confidence score of the resulting match.
For more information, see Data and privacy for Azure AI services.
Does the Face Check with Microsoft Entra Verified ID verification happen in the wallet, or on the cloud?
The Verified ID service executes the verification process in the cloud, not on the device. Credentials are stored on a user’s device so that they have full control of a credential’s usage. A user must choose to share a credential with a verifier for it to be processed for verification.
What are the requirements for the photo in the Verified ID?
The photo should be clear and sharp in quality and no smaller than 200 pixels x 200 pixels. The face should be centered within the image and unobstructed from view. The maximum size of the photo in the credential is 1 MB. Note that having a larger image doesn't guarantee a better result. A good smaller photo is better than a large bad one.
For more information on how to improve the photo processing accuracy, see Face API characteristics and limitations.
For more information on verifiable credentials sizing limits, see Verified ID FAQ.
Next steps
- Learn how to configure your tenant for Microsoft Entra Verified ID and use MyAccount.
- Learn how to issue Microsoft Entra Verified ID credentials from a web application.
- Learn how to verify Microsoft Entra Verified ID credentials.