Note
Access to this page requires authorization. You can try signing in or changing directories.
Access to this page requires authorization. You can try changing directories.
SPIFFE (Secure Production Identity Framework for Everyone) is a set of open-source standards that give software workloads a platform-agnostic identity, called a SPIFFE ID. A workload proves that identity by presenting a short-lived credential called an SVID. SPIRE is the reference implementation of the SPIFFE standards.
A workload that runs outside Azure normally authenticates with a stored secret or certificate that you must protect and rotate, and that can cause an outage if it expires before you replace it. Workload identity federation removes that stored credential: instead of holding a secret, the workload presents its existing SPIFFE identity and exchanges it for a Microsoft Entra token.
In this tutorial, you set up SPIRE in a Kubernetes cluster, give a sample workload a SPIFFE ID, and federate that identity with Microsoft Entra ID. After the trust relationship is in place, the workload exchanges its SPIFFE JWT-SVID for a Microsoft Entra access token and calls an Azure resource, such as Azure Blob Storage, without storing any secrets or certificates.
The tutorial has four sequential parts that build to one completed scenario. Each part depends on the output of the part before it.
In this tutorial, you:
- Deploy SPIRE with JWT-SVID and OIDC discovery support in a Kubernetes cluster.
- Deploy a sample workload and assign it a SPIFFE ID.
- Configure a Microsoft Entra application to trust the SPIFFE ID.
- Exchange a SPIFFE JWT-SVID for a Microsoft Entra access token and access an Azure resource.
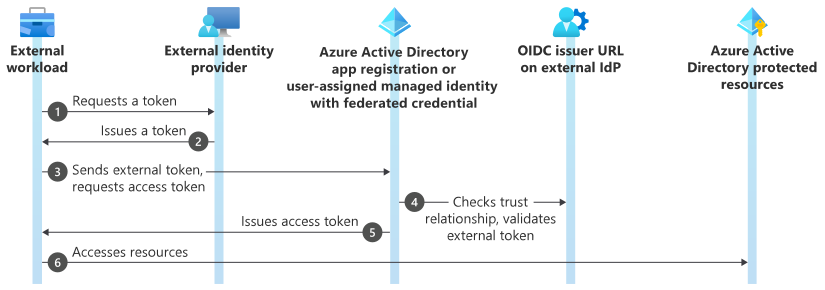
The following diagram shows the workload identity federation flow: a workload gets a token from an external identity provider, exchanges it with the Microsoft identity platform for an access token, and uses that access token to reach an Azure resource. In this tutorial, the external identity provider is SPIRE and the token is a SPIFFE JWT-SVID.
Prerequisites
- A Microsoft Entra tenant and an Azure subscription. If you don't have an Azure subscription, create a free account before you begin.
- A Kubernetes cluster that can host the SPIRE server, the SPIRE agents, and the OIDC discovery provider. The cluster must expose a service through an external IP address.
- A registered domain name that you control for the OIDC discovery endpoint, and the ability to manage its DNS records. This tutorial uses the placeholder
oidc.contoso.comfor the OIDC discovery domain. - A container registry to hold your sample workload image. This tutorial uses the placeholder
<your-registry>for the registry name. - The
kubectl,docker, and Azure CLI (az) command-line tools installed and configured to reach your cluster, registry, and tenant. - Permission to add a federated identity credential to an app registration or managed identity. To add a federated credential to an app registration, your account must be an owner of the app or hold one of the Application Administrator, Application Developer, or Cloud Application Administrator roles, or have the
microsoft.directory/applications/credentials/updatepermission.
This tutorial uses the SPIFFE trust domain example.org. example.org is the example trust domain used throughout the official SPIRE quickstarts; replace it with your own trust domain in a real deployment. The SPIRE configuration files referenced in the following steps (server-configmap-oidc.yaml, agent-configmap.yaml, and so on) come from your SPIRE deployment manifests. Base your SPIRE server, agent, and OIDC discovery provider configuration on the current official SPIRE documentation and Kubernetes quickstart so that your node attestor and image versions stay current.
Part 1: Deploy SPIRE with JWT and OIDC discovery support
In this part, you deploy the SPIRE server, the SPIRE agents, and the OIDC discovery provider. The OIDC discovery provider publishes a standard OpenID Connect discovery document and a JWKS endpoint so that Microsoft Entra ID can validate SPIFFE JWT-SVIDs.
Customize the SPIRE configuration files for your environment:
server-configmap-oidc.yaml: set the OIDC discovery domain FQDN (for example,oidc.contoso.com) and your cluster name.agent-configmap.yaml: set your cluster name.oidc-ingress.yaml: set the OIDC discovery FQDN.oidc-dp-configmap.yaml: set the OIDC discovery FQDN, a contact email, andset_key_use = true.
Important
The SPIRE OIDC discovery provider can add the
"use": "sig"parameter to the published signing keys when you setset_key_use = trueinoidc-dp-configmap.yaml. Enable it, because Microsoft Entra ID expects this parameter on the signing keys in the OIDC discovery document's JWKS.Important
Microsoft Entra ID supports external issuers whose tokens are signed with the RS256 algorithm. SPIRE issues JWT-SVIDs signed with EC (ES256) by default, so configure the SPIRE server certificate authority to issue RS256-signed JWT-SVIDs (for example, by setting the server CA
jwt_key_typeto an RSA key type) so that the Microsoft identity platform accepts the tokens. For more information, see the supported signing algorithms and issuers guidance in Important considerations and restrictions for federated identity credentials.Deploy the SPIRE server:
kubectl apply -f spire-namespace.yaml
kubectl apply -f server-account.yaml -f spire-bundle-configmap.yaml -f server-cluster-role.yaml
kubectl apply -f server-configmap-oidc.yaml -f server-statefulset.yaml -f server-service.yaml
Deploy the SPIRE agents:
kubectl apply -f agent-account.yaml -f agent-cluster-role.yaml
kubectl apply -f agent-configmap.yaml -f agent-daemonset.yaml
Verify that the SPIRE pods are running. Expect a
spire-server-0pod and onespire-agent-*pod per node, all in theRunningstate.kubectl get pods -n spireRegister the agent node identity so the SPIRE server trusts the agents. Replace
<your-cluster-name>with your cluster name.kubectl exec -n spire spire-server-0 -- /opt/spire/bin/spire-server entry create \ -spiffeID spiffe://example.org/ns/spire/sa/spire-agent \ -selector k8s_sat:cluster:<your-cluster-name> \ -selector k8s_sat:agent_ns:spire \ -selector k8s_sat:agent_sa:spire-agent -nodeDeploy the SPIRE OIDC discovery provider. Use a current provider image that supports the
set_key_useoption so the published keys include"use": "sig", per the official SPIRE OIDC discovery provider documentation.kubectl apply -f oidc-account.yaml -f oidc-dp-configmap.yaml kubectl apply -f oidc-ingress.yaml -f oidc-service.yaml kubectl apply -f oidc-deployment.yamlRegister the OIDC provider identity:
kubectl exec -n spire spire-server-0 -- /opt/spire/bin/spire-server entry create \
  -spiffeID spiffe://example.org/oidc-discovery \
  -parentID spiffe://example.org/ns/spire/sa/spire-agent \
  -selector k8s:ns:spire -selector k8s:sa:spire-oidc
The OIDC discovery service runs as a
LoadBalancerwith an external IP address. Point your OIDC discovery domain's DNSArecord at that external IP address.Verify that the discovery endpoints resolve. The discovery document lists the
issuer,jwks_uri, andid_token_signing_alg_values_supportedvalues, and the JWKS lists the signing keys.https://oidc.contoso.com/.well-known/openid-configurationhttps://oidc.contoso.com/keys
Confirm that each key in the JWKS at
/keysincludes"use": "sig". Microsoft Entra ID expects this parameter on the signing keys.
Part 2: Deploy a sample workload and assign it a SPIFFE ID
In this part, you build and deploy your sample workload, then assign it a SPIFFE ID based on its Kubernetes namespace and service account.
Build your sample workload container image and push it to your registry. Replace
<your-registry>with your registry name.docker build -f deployment/docker/dockerfile -t spiffe-demo . docker tag spiffe-demo <your-registry>.azurecr.io/spiffe-demo:v1 az acr login -n <your-registry>.azurecr.io docker push <your-registry>.azurecr.io/spiffe-demo:v1Edit
deployment.yamlto reference your image (for example,<your-registry>.azurecr.io/spiffe-demo:v1), then deploy the workload:kubectl apply -f demo-namespace.yaml kubectl apply -f serviceaccount.yaml kubectl apply -f deployment.yaml kubectl apply -f service.yamlAssign the workload a SPIFFE ID based on its namespace and service account:
kubectl exec -n spire spire-server-0 -- /opt/spire/bin/spire-server entry create \
  -spiffeID spiffe://example.org/ns/demo-spiffe/sa/demo-sa \
  -parentID spiffe://example.org/ns/spire/sa/spire-agent \
  -selector k8s:ns:demo-spiffe -selector k8s:sa:demo-sa
The workload now has the SPIFFE ID spiffe://example.org/ns/demo-spiffe/sa/demo-sa. You use this value as the subject of the federated identity credential in Part 3, where you configure the Microsoft Entra application.
Part 3: Configure a Microsoft Entra application to trust the SPIFFE ID
In this part, you add a federated identity credential to a Microsoft Entra app registration so that Microsoft Entra ID trusts tokens issued for your workload's SPIFFE ID. A federated identity credential needs three inputs:
- issuer: the OIDC discovery URL, for example
https://oidc.contoso.com. - subject: the workload's SPIFFE ID,
spiffe://example.org/ns/demo-spiffe/sa/demo-sa. - audiences:
["api://AzureADTokenExchange"].
Create a file named
credential.jsonwith the following content. Replace the issuer and subject values with your own.{ "name": "AccessUsingSpiffe", "issuer": "https://oidc.contoso.com", "subject": "spiffe://example.org/ns/demo-spiffe/sa/demo-sa", "audiences": ["api://AzureADTokenExchange"], "description": "Federated credential for SPIFFE workload" }Add the federated identity credential to your app registration. Replace
<your-app-id>with the object ID of your app.az ad app federated-credential create --id <your-app-id> --parameters credential.json
You can also add the federated credential in the Microsoft Entra admin center by selecting the Other issuer scenario and supplying the OIDC discovery URL as the issuer and the SPIFFE ID as the subject. For the detailed steps, see Configure an app to trust an external identity provider. To configure the credential on a user-assigned managed identity instead of an app registration, see Configure a user-assigned managed identity to trust an external identity provider.
Grant your app or managed identity access to the Azure resources that your workload calls, such as a role assignment on your storage account.
Part 4: Exchange a JWT-SVID for a Microsoft Entra access token
In this part, your workload fetches a SPIFFE JWT-SVID and exchanges it for a Microsoft Entra access token, which it uses to call an Azure resource.
SPIFFE defines a Workload API that a workload uses to fetch its SVIDs from the local SPIRE agent. To identify to Microsoft Entra ID, the workload fetches a JWT-SVID with the audience api://AzureADTokenExchange. This audience must match the audience on the federated identity credential you configured on the Microsoft Entra app registration in Part 3.
Fetch a JWT-SVID from the SPIFFE Workload API. The following illustrative snippet requests a JWT-SVID for the
api://AzureADTokenExchangeaudience and returns the SVID string. The concept is the same in any language that has a SPIFFE Workload API client.async function getSpiffeJwt() { const svid = await workloadApiClient.fetchJwtSvid({ audience: ["api://AzureADTokenExchange"], }); return svid.token; }Exchange the JWT-SVID for a Microsoft Entra token by using
ClientAssertionCredentialfrom the Azure Identity SDK.ClientAssertionCredentialtakes a callback that returns the federated assertion — in this case, the JWT-SVID.import { ClientAssertionCredential } from "@azure/identity"; const credential = new ClientAssertionCredential(tenantId, clientId, getSpiffeJwt);Use the credential with any Azure SDK client. For example, to call Azure Blob Storage:
const { BlobServiceClient } = require("@azure/storage-blob");

const blobClient = new BlobServiceClient(blobUrl, credential);
When the client needs a token, it invokes the callback to fetch a fresh JWT-SVID, exchanges the JWT-SVID with Microsoft identity platform for an access token, and caches the resulting access token. Because ClientAssertionCredential supplies the federated assertion through a callback, your workload never stores a secret.
ClientAssertionCredential is available across the Azure Identity SDKs, including .NET, Java, JavaScript, Python, and Go. The MSAL libraries also support client assertions if you need lower-level control over the token exchange.
Your SPIFFE/SPIRE workload can now access Microsoft Entra protected resources with no stored secrets.
Clean up resources
If you no longer need the resources you created in this tutorial, remove them to avoid ongoing charges:
Delete the SPIRE and demo workloads from your cluster:
kubectl delete namespace demo-spiffe
kubectl delete namespace spire
Remove the DNS
Arecord you created for your OIDC discovery domain.Delete the container image from your registry, and delete the cluster if you created it only for this tutorial.
Delete the federated identity credential from your app registration:
az ad app federated-credential delete --id <your-app-id> --federated-credential-id AccessUsingSpiffe
Related content
- Workload identity federation
- Configure an app to trust an external identity provider
- Configure a user-assigned managed identity to trust an external identity provider
- Important considerations and restrictions for federated identity credentials
- Create a federatedIdentityCredential (Microsoft Graph)
- SPIFFE (Secure Production Identity Framework for Everyone)