Note
Access to this page requires authorization. You can try signing in or changing directories.
Access to this page requires authorization. You can try changing directories.
Note
Apache Airflow job is powered by Apache Airflow.
In this tutorial, you build a directed acyclic graph to run a Microsoft Fabric item such as data pipelines and notebooks.
Prerequisites
To get started, you must complete the following prerequisites:
Note
Make sure Apache Airflow job is available in the capacity region you are using for your workspace. For more information, see available capacity regions.
Create a Microsoft Entra ID app if you don't have one.
Tenant level admin account must enable the setting 'Allow user consent for apps'. To configure user consent settings through the Microsoft Entra admin center:
Sign in to the Microsoft Entra admin center as a Privileged Role Administrator.
Browse to Identity > Applications > Enterprise applications > Consent and permissions > User consent settings.
Under User consent for applications, select which consent setting you want to configure for all users.
Select Save to save your settings.
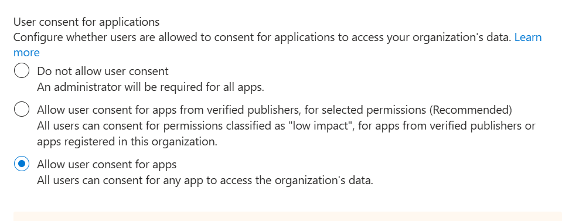
For more information, Refer to: Configure user consent
Ensure that the account used for generating the refresh tokens has contributor permissions on the workspace that contains the data pipeline and notebook.
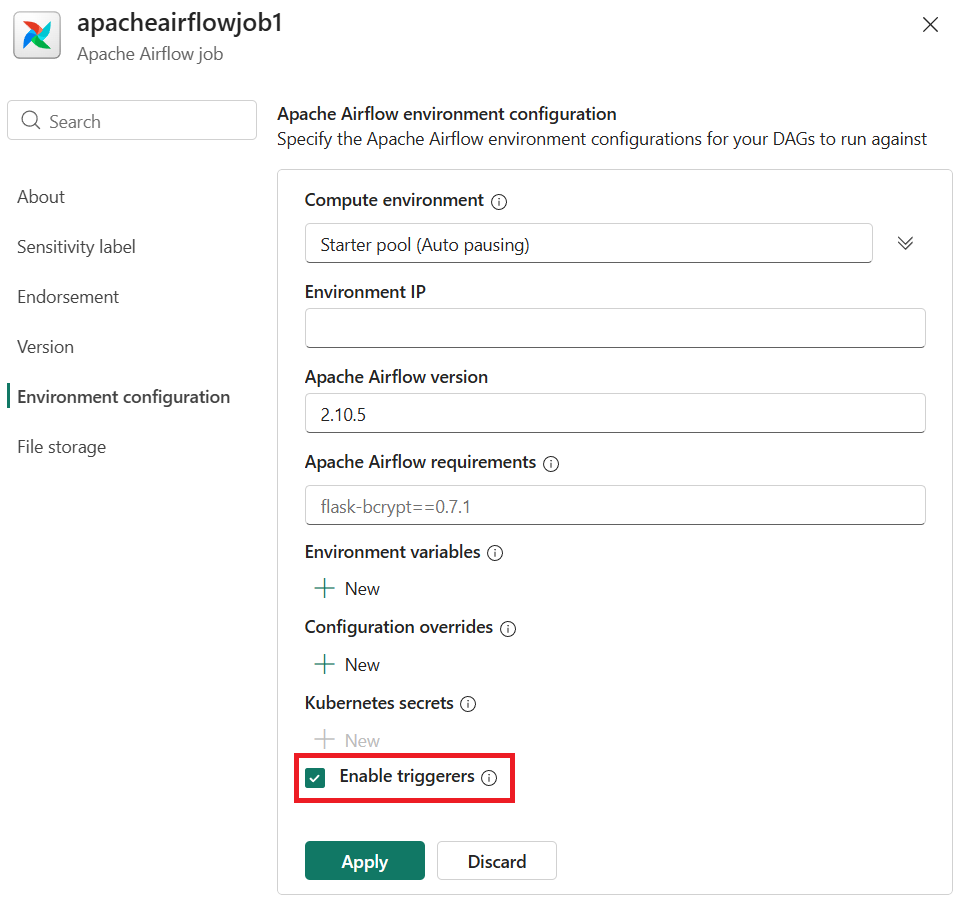
Enable the Triggers in data workflows to allow the usage of deferrable operators.


Apache Airflow plugin
To trigger an on-demand Microsoft Fabric item run, this tutorial uses the apache-airflow-microsoft-fabric-plugin which is preinstalled in the Apache Airflow job requirements.
Authentication
To call Microsoft Fabric APIs, an app must obtain an access token from the Microsoft identity platform. This access token includes information about whether the app is authorized to access Microsoft Fabric items on behalf of signed-in user or with its own identity. This section provides the raw HTTP requests involved for an app to get access on behalf of a user using a popular flow called the OAuth 2.0 authorization code grant flow.
You must complete the following steps to obtain the refresh token, that would be later used in Apache Airflow connection:
Before proceeding with the steps in this article, Save the following values from the app registration you created initially:
- Client ID: A unique identifier of your application assigned by the Microsoft identity platform.
- Client Secret: (Optional) A password that your app uses to authenticate with the Microsoft identity platform. This property isn't required for public clients like native, mobile, and single page applications.
- Tenant ID: A unique identifier for your tenant in the Microsoft identity platform.
- Redirect URI/URL: Endpoints at which your app receives responses from the Microsoft Identity platform. In these steps, you receive authorization code at registered redirect URI.
Step 1: Request authorization
Authorization endpoint
The first step in the authorization code flow is for the user to authorize the app to act on their behalf. By sending the 'GET' request to '/authorize' endpoint, Microsoft Entra ID signs the user in and requests their consent for the permissions that the app requests. Replace the placeholders with your values and paste the following URL in your browser.
The plugin requires the following scopes for authentication:
- itemType.Execute.All (for example: Notebook.Execute.All, Pipeline.Execute.All): Calling Application is allowed to execute all artifacts of '<itemtype>' that the user has access to.
- itemType.Read.All (for example: Notebook.Execute.All, Pipeline.Execute.All): Calling application is allowed to read all artifacts of type '<itemType>' that the user has access to.
- offline_access: Standard OIDC scope requested so that the app can get a refresh token. The app can use the refresh token to get a new access token when the current one expires.
// Line breaks for legibility only
// This request uses Item.Execute.All, Item.Read.All and offline_access scopes. You can update them as per your requirements.


https://login.microsoftonline.com/{tenant}/oauth2/v2.0/authorize?
client_id={client_id}
&response_type=code
&redirect_uri={redirect_uri}
&response_mode=query
&scope=https%3A%2F%2Fapi.fabric.microsoft.com%2FItem.Execute.All%20https%3A%2F%2Fapi.fabric.microsoft.com%2FItem.Read.All%20offline_access
&state=12345
&code_challenge=YTFjNjI1OWYzMzA3MTI4ZDY2Njg5M2RkNmVjNDE5YmEyZGRhOGYyM2IzNjdmZWFhMTQ1ODg3NDcxY2Nl
&code_challenge_method=S256
To know more about parameters, refer to Request authorization code.
User consent Experience
After the app sends the authorization request, the user is asked to enter their credentials to authenticate with Microsoft. The Microsoft identity platform v2.0 endpoint ensures that the user consents to the permissions indicated in the scope query parameter. The following screenshot is an example of the consent dialog box presented for a Microsoft account user.

Authorization response
If the user consents to the permissions requested by the app, the Microsoft identity platform sends an authorization code to the app's redirect URI. Here's an example of a successful response to the previous request. Because the response_mode parameter in the request was set to query, the response is returned in the query string of the redirect URL. For the next step, copy the 'code' value from the response.
HTTP/1.1 200 OK

https://localhost/myapp/?
code=M0ab92efe-b6fd-df08-87dc-2c6500a7f84d...
&state=12345
&session_state=fe1540c3-a69a-469a-9fa3-8a2470936421#
Step 2: Request an access token
The app uses the authorization code received in the previous step to request an access token by sending a POST request to the /token endpoint. Make sure your scope and redirect_uri match the values you used in the previous step. You can paste the following request in a tool like Insomnia to send the request.
// Line breaks for legibility only
// This request uses Item.Execute.All, Item.Read.All and offline_access scopes. You can update them as per your requirements.

POST /{tenant}/oauth2/v2.0/token HTTP/1.1
Host: https://login.microsoftonline.com
Content-Type: application/x-www-form-urlencoded

client_id={client_id}
&scope=https%3A%2F%2Fapi.fabric.microsoft.com%2FItem.Execute.All%2FItem.Read.All%20offline_access
&code=OAAABAAAAiL9Kn2Z27UubvWFPbm0gLWQJVzCTE9UkP3pSx1aXxUjq3n8b2JRLk4OxVXr...
&redirect_uri={redirect_uri}
&grant_type=authorization_code
&code_verifier=WuiPvLwjYU6ehi--Gv5P58u7NOd4dJgE8BSQzZ-7nT3xq4OrVp2cxADyUvYJqkH2sfLhPjuqUCbbbk4x11cfzLCKADIE8mht3vwyGoSL7DnMhC4SFAunOx_mJ99hVeKh
&client_secret={client_secret}   // NOTE: (Optional) Only required for web apps.
To know more about parameters, refer to Request an access token.
Access token response
The access token contains a list of the permissions that the access token is good for in the scope parameter. The response is similar to the following sample. Copy the 'refresh_token' value from the response for use in the Apache Airflow connection.
HTTP/1.1 200 OK
Content-type: application/json

{
    "token_type": "Bearer",
    "scope": "Mail.Read User.Read",
    "expires_in": 3736,
    "ext_expires_in": 3736,
    "access_token": "eyJ0eXAiOiJKV1QiLCJhbGciOiJSUzI1NiIsIng1dCI6Ik5HVEZ2ZEstZnl0aEV1Q...",
    "refresh_token": "AwABAAAAvPM1KaPlrEqdFSBzjqfTGAMxZGUTdM0t4B4..."
}
Set up Apache Airflow connection
Apache Airflow connection is used to store the credentials required to authenticate with Microsoft Fabric APIs.
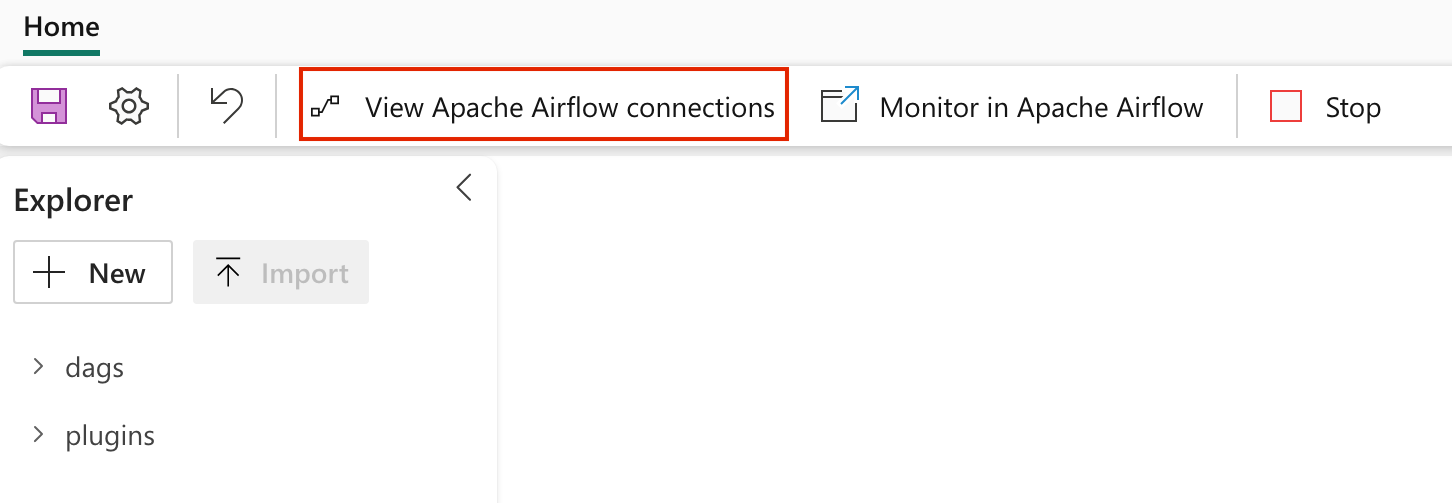
Navigate to "View Airflow connections" to add a new Apace Airflow connection.
Add a new connection and fill the following details:
Connection ID: Name of the Connection ID.
Connection Type: Generic
Sign in: The Application (client) ID assigned to your app.
Password: The refresh token fetched in previous step.
Extra: This field contains the following parameters:
- tenantId: (Required) The {tenant} value in the path of the request can be used to control who can sign into the application.
- clientSecret: (Optional, only required for web apps) The client secret of the app registration.
- scopes: (Required) Space separated string of scopes required for the app to access the Microsoft Fabric APIs.
Copy the following json object format, update the values, remove the comment and paste it in the Extra field.
{
    "tenantId": "{tenant}",
    "scopes": "https://api.fabric.microsoft.com/Item.Execute.All https://api.fabric.microsoft.com/Item.Read.All offline_access",
    "clientSecret": "{client-secret}" // (Optional) NOTE: Only required for web apps.
}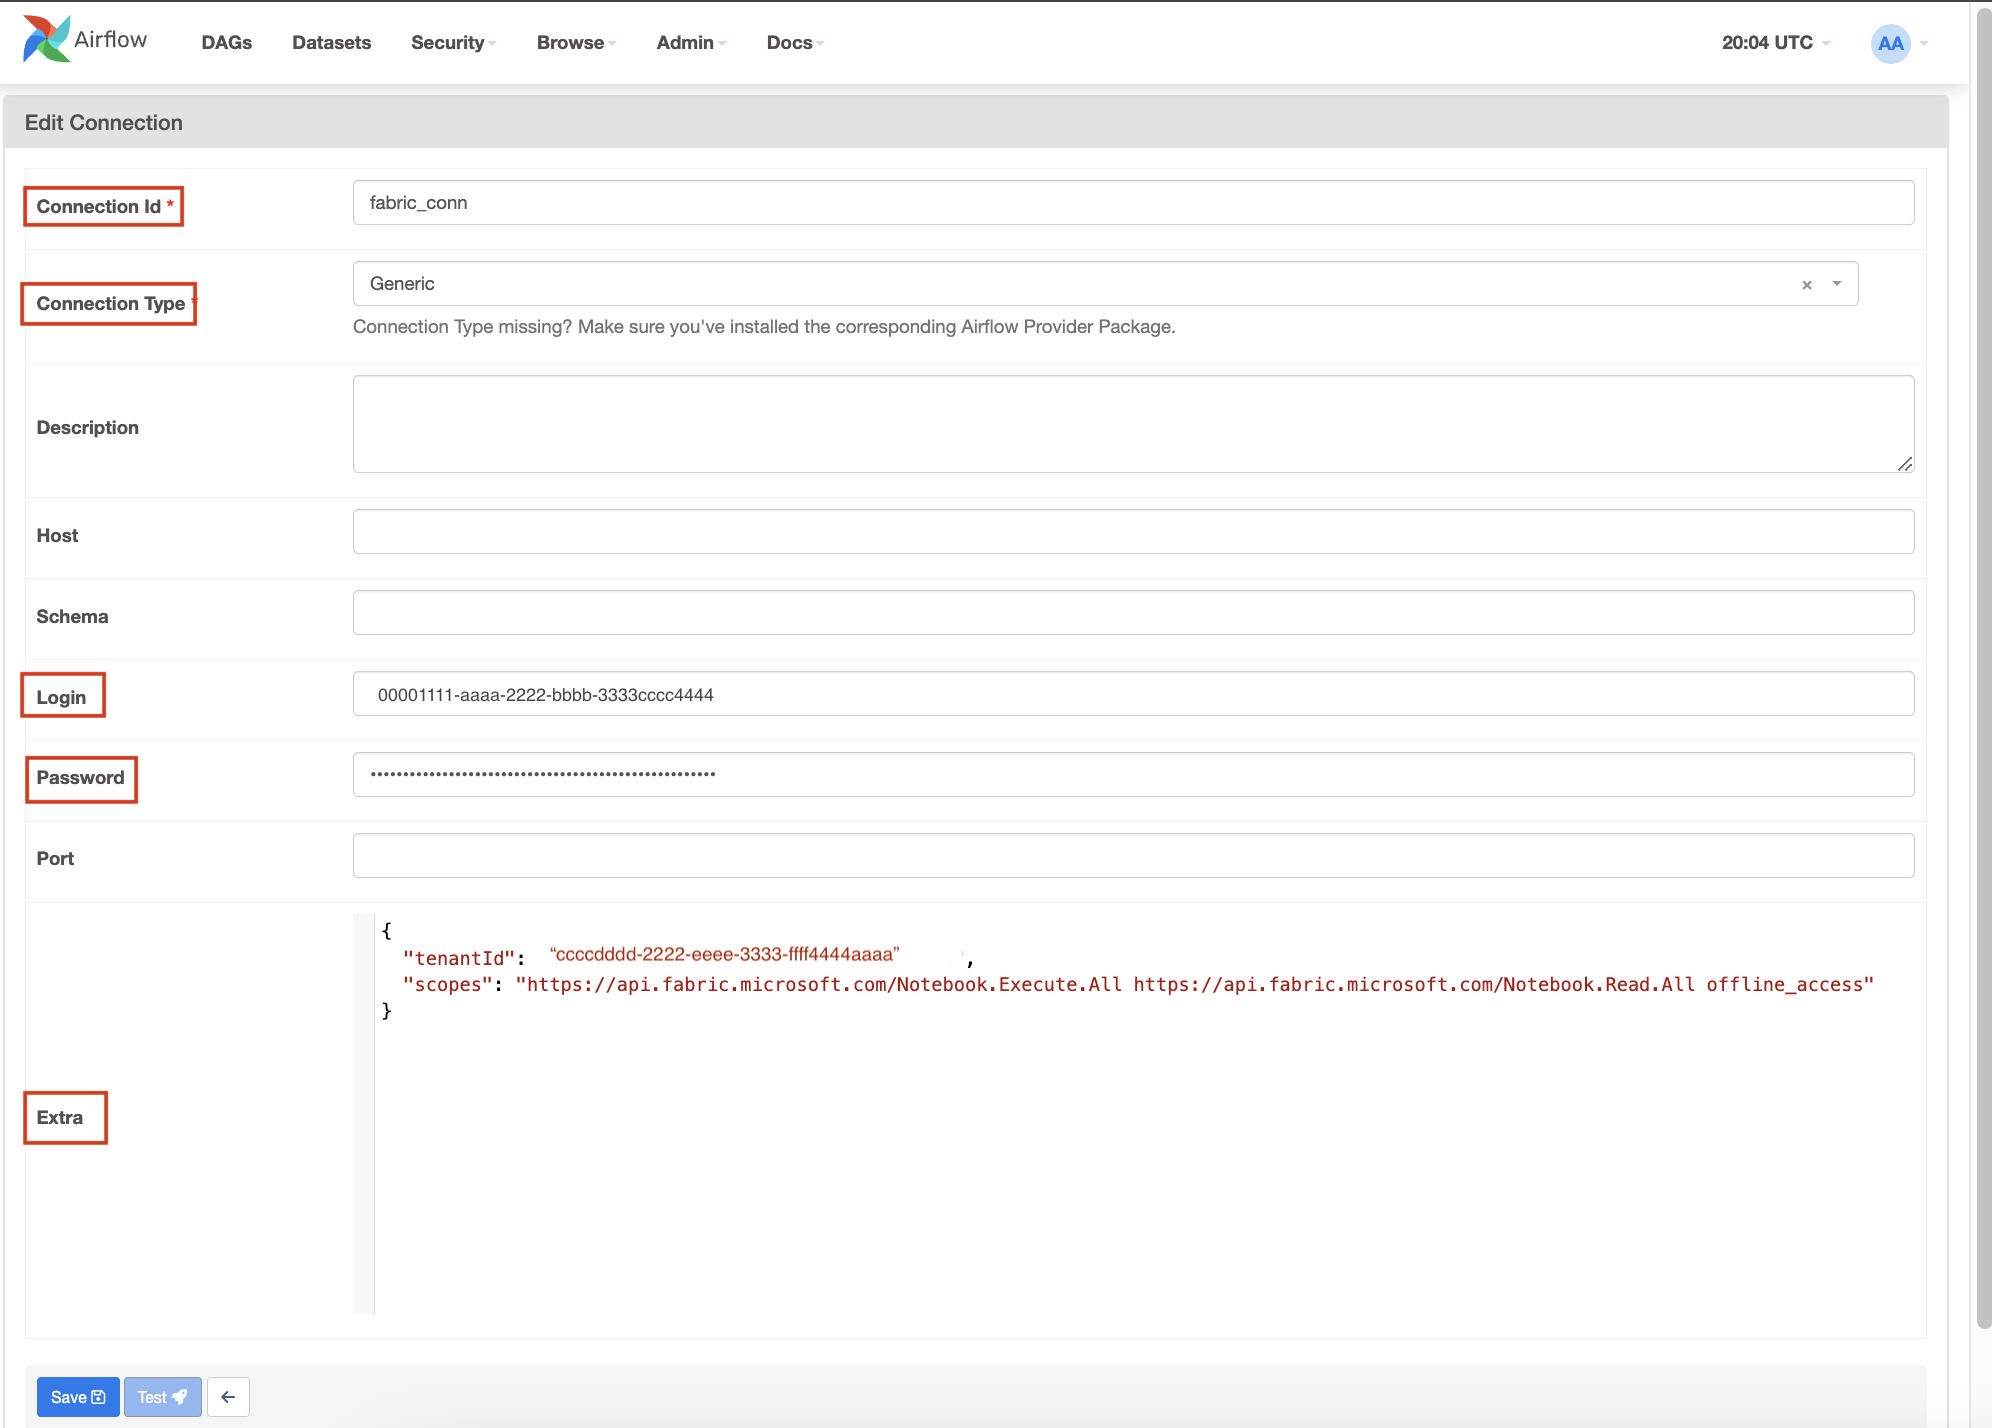
Select Save.


Create a DAG to trigger Microsoft Fabric item run
Create a new DAG file in the 'dags' folder in Fabric managed storage with the following code. Replace the following placeholders:
fabric_conn_id: The connection ID you created in the previous step.workspace_id: The workspace ID where the item is located.item_id: The item ID of the item you want to run. For example, a Notebook ID or a Pipeline ID.job_type: The type of item you want to run. For example, for notebook use "RunNotebook", for Spark Job Definitions use "sparkjob" and for pipelines use "Pipeline". This is case sensitive.wait_for_termination: If set to True, the operator waits for the item run to complete before proceeding to the next task.deferrable: If set to True, the operator can free up resources while waiting for the item run to complete.
from airflow import DAG
from datetime import datetime
from apache_airflow_microsoft_fabric_plugin.operators.fabric import FabricRunItemOperator

with DAG(
  dag_id="Run_Fabric_Item",
  schedule_interval="@daily",
  start_date=datetime(2023, 8, 7),
  catchup=False,
) as dag:

  run_fabric_item = FabricRunItemOperator(
    task_id="run_fabric_item",
    fabric_conn_id="fabric_conn",
    workspace_id="<workspace_id>",
    item_id="<item_id>",
    job_type="<job_type>",
    wait_for_termination=True,
    deferrable=True,
  )

  run_fabric_item
Create a plugin file for the custom operator
If you want to include an external monitoring link for Microsoft Fabric item runs, create a plugin file as follows:
Create a new file in the plugins folder with the following code:
   from airflow.plugins_manager import AirflowPlugin

   from apache_airflow_microsoft_fabric_plugin.hooks.fabric import FabricHook
   from apache_airflow_microsoft_fabric_plugin.operators.fabric import FabricRunItemLink

   class AirflowFabricPlugin(AirflowPlugin):
      """
      Microsoft Fabric plugin.
      """

      name = "fabric_plugin"
      operator_extra_links = [FabricRunItemLink()]
      hooks = [
          FabricHook,
      ]
Monitor your DAG
In Apache Airflow Job UI
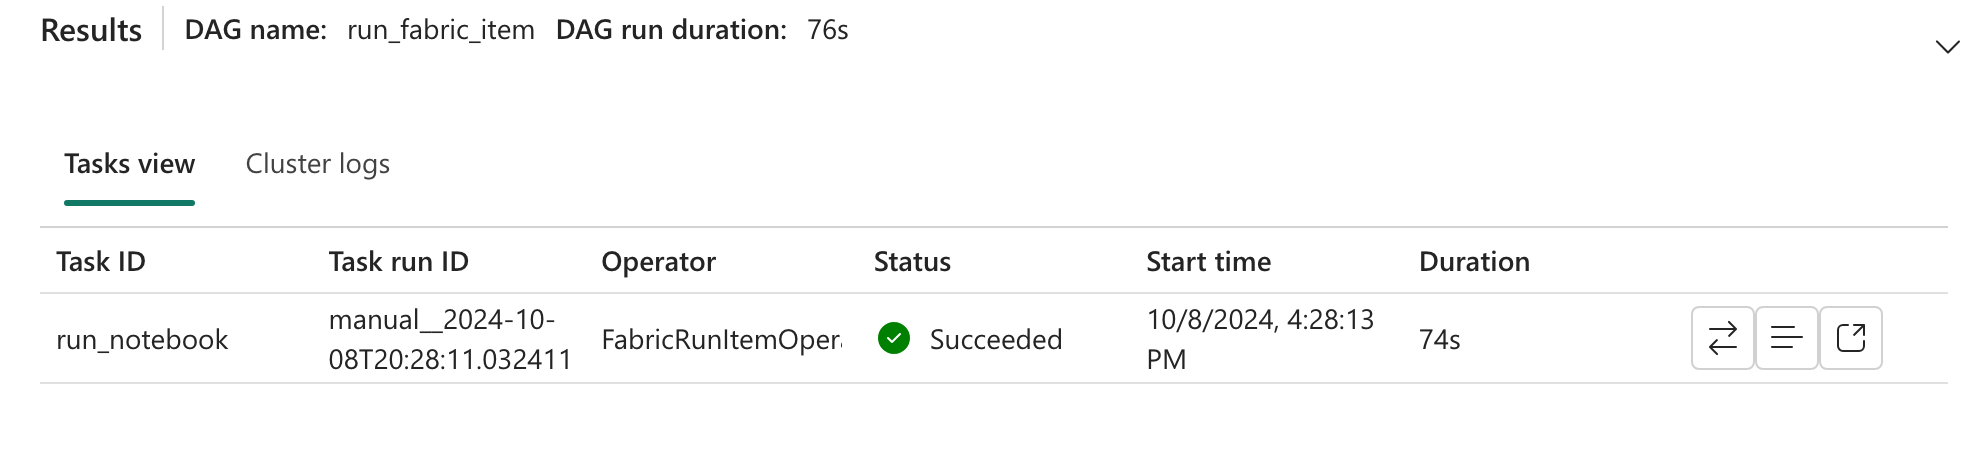
- When you open your DAG file in Fabric Managed Storage, "Results" appears at the bottom. Select on the arrow to view the results of the DAG run.

In Apache Airflow UI
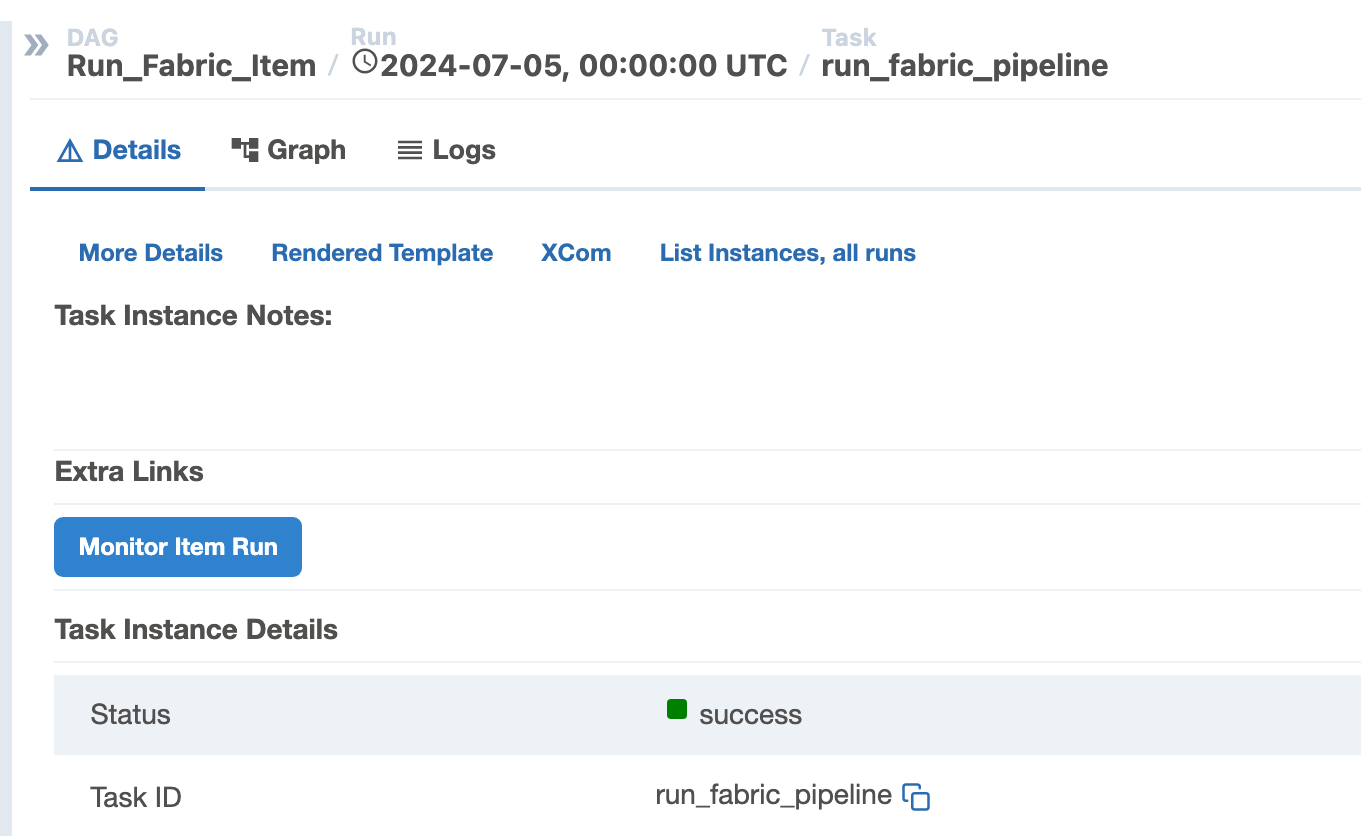
Go to the Airflow UI and select the DAG you created.
If you add the plugin, you see an external monitoring link. Select on it to navigate to the item run.
Xcom Integration: Trigger the DAG to view task outputs in the Xcom tab.


Related Content
Quickstart: Create an Apache Airflow Job Apache Airflow Job workspace settings