Note
Access to this page requires authorization. You can try signing in or changing directories.
Access to this page requires authorization. You can try changing directories.
Applies to: ✅ SQL database in Microsoft Fabric
In this tutorial, you learn how to work with your SQL database in Fabric by using Fabric git integration source control.
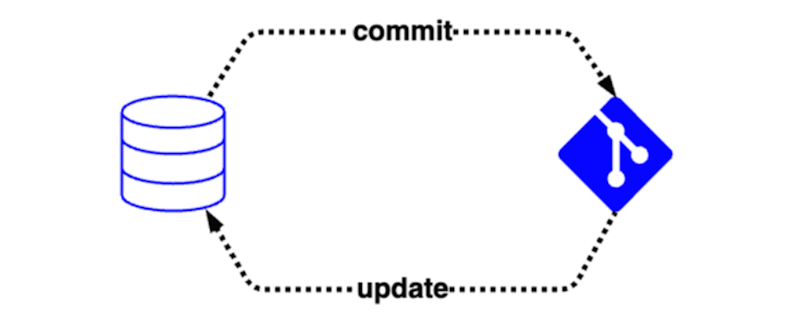
A SQL database in Microsoft Fabric has source control integration, or "git integration," so that users can track the definitions of their database objects over time. This integration enables a team to:
- Commit the database to source control, which automatically converts the live database into code in the configured source control repository (such as Azure DevOps).
- Update database objects from the contents of source control, which validates the code in the source control repository before applying a differential change to the database.
If you're unfamiliar with git, here are a few recommended resources:
This article presents a series of useful scenarios that you can use individually or in combination to manage your development process with SQL database in Fabric:
- Convert the Fabric SQL database into code in source control
- Update the Fabric SQL database from source control
- Create a branch workspace
- Merge changes from one branch into another
- Manage static data with a post-deployment script
The scenarios in this article are covered in an episode of Data Exposed. Watch the video for an overview of the source control integration in Fabric:
Note
Database-level settings such as collation and compatibility level aren't included in the source control and deployment pipelines integration at this time. For database settings that you can set by using T-SQL after database creation, you can modify the database with scripts after deployment.
Prerequisites
- You need an existing Fabric capacity. If you don't, start a Fabric trial.
- Make sure that you Enable Git integration tenant settings.
- Create a new workspace or use an existing Fabric workspace.
- Create or use an existing SQL database in Fabric. If you don't have one already, create a new SQL database in Fabric.
- Optional: Install Visual Studio Code, the MSSQL extension, and the SQL projects extension for VS Code.
Setup
This repository connection applies at the workspace level, such that a single branch in the repository is associated with that workspace. The repository can have multiple branches, but only the code in the branch selected in workspace settings directly impacts the workspace.
For steps to connect your workspace to a source control repository, see Get started with Git integration. Your workspace can be connected to an Azure DevOps or GitHub remote repository.
Add the Fabric SQL database to source control
In this scenario, you commit database objects to source control. You might be developing an application where you're creating objects directly in a test database and track that database in source control just like your application code. As a result, you have access to the history of your database object definitions and can use Git concepts like branching and merging to customize your development process.
- Connect to your SQL database in the Fabric SQL editor, SQL Server Management Studio, the MSSQL extension for Visual Studio Code, or other external tools.
- Create a new table, stored procedure, or other object in the database.
- Select the Source control button to open the source control panel.
- Select the checkbox next to the desired database. Select Commit. The Fabric service reads object definitions from the database and writes them to the remote repository.
- You can now view the history of database objects in code repository source view.
As you continue to edit the database, including editing existing objects, commit those changes to source control by following the preceding steps.
SQL project file
The SQL project file in the source control repository contains metadata about the database. Fabric source control integration uses this file to bring more functionality into source control and deployment pipelines. Fabric source control integration automatically generates and updates the project file. Avoid manual edits to the project file because your edits to the project file are overwritten by Fabric source control integration on the next commit from Fabric. However, if you want to build a SQL project locally by using SQL tools such as SQL Server Management Studio or the SQL projects extension for Visual Studio Code, you can add a reference to the master.dacpac file in your project file.
The Fabric integration with SQL projects adds these metadata properties to the project file:
- Excludes the
.sharedQueriesfolder from the database project build. This exclusion allows you to track the scripts in source control without impacting the database model validation. - Pre-deployment and post-deployment scripts from the .sharedQueries folder
- System object references as a package reference to the master.dacpac file
The system object references capability is set up automatically with no action required. The Fabric query editor provides pre-deployment and post-deployment scripts under the Shared Queries folder.
Update the Fabric SQL database from source control
In this scenario, you create database objects as code in the SQL projects extension in Visual Studio Code, then commit the files to source control before updating the Fabric SQL database from the source control integration. This scenario is targeted towards developers who prefer to work in Visual Studio Code, have existing applications using SQL projects, or have more advanced CI/CD pipeline requirements.
- Make sure you install the latest release of Visual Studio Code and the MSSQL and SQL projects extensions for Visual Studio Code.
- Create a new SQL database in your workspace and commit it to source control without adding any objects. This step adds the empty SQL project and SQL database item metadata to the repository.
- Clone the source control repository to your local machine.
- If you're using Azure DevOps, select the
...context menu for the source control project. Select Clone to copy your Azure DevOps repository to your local machine. If you're new to Azure DevOps, see the Code with git guide for Azure DevOps. - If you're using GitHub, select the Code button in the repository and copy the URL to clone the repository to your local machine. If you're new to GitHub, see the cloning a repository guide.
- If you're using Azure DevOps, select the
- Open the cloned folder in Visual Studio Code. The branch associated with your workspace might not be the default. You should see a folder named
<yourdatabase>.SQLDatabasein Visual Studio Code after switching the branch. - Create a
.sqlfile for at least one table you want to create in the database within the folder structure for your database. The file should contain theCREATE TABLEstatement for the table. For example, create a file namedMyTable.sqlin the folderdbo/Tableswith the following content:CREATE TABLE dbo.MyTable ( Id INT PRIMARY KEY, ExampleColumn NVARCHAR(50) ); - To ensure the syntax is valid, validate the database model with the SQL project. After adding the files, use the Database Projects view in Visual Studio Code to Build the project.
- After a successful build, Commit the files to source control by using the source control view in Visual Studio Code or your preferred local git interface.
- Push/sync your commit to the remote repository. Check that your new files appear in Azure DevOps or GitHub.
- Return to the Fabric web interface and open the Source control panel in the workspace. You might already have an alert that "you have pending changes from git". Select the Update (Update All) button to apply the code from your SQL project to the database.
- You might see the database immediately indicate it is "Uncommitted" after the update. This state happens because the Git Integration feature does a direct comparison of all the file content generated for an item definition, and some unintentional differences are possible. One example is inline attributes on columns. In these cases, you need to commit back to source control in the Fabric web interface to sync the definition with what is generated as part of a commit operation.
- Once the update completes, use a tool of your choice to connect to the database. The objects you added to the SQL project are visible in the database.
Note
When you make changes to the local SQL project, if there's a syntax error or use of unsupported features in Fabric, the database update fails. You must manually revert the change in source control before you can continue.
Updating a SQL database in Fabric from source control combines a SQL project build and SqlPackage publish operation. The SQL project build validates the syntax of the SQL files and generates a .dacpac file. The SqlPackage publish operation determines the changes necessary to update the database to match the .dacpac file. Because of the streamlined nature of the Fabric interface, the following options are applied to the SqlPackage publish operation:
/p:ScriptDatabaseOptions = false/p:DoNotAlterReplicatedObjects = false/p:IncludeTransactionalScripts = true/p:GenerateSmartDefaults = true
You can also clone the source controlled SQL project to your local machine for editing in Visual Studio Code, SQL Server Management Studio, or other SQL project tools. Build the SQL project locally to validate changes before committing them to source control.
Create a branch workspace
In this scenario, you set up a new development environment in Fabric by having Fabric create a duplicate set of resources based on the source control definition. The duplicate database includes the database objects that you checked into source control. This scenario is for developers who are continuing their application development lifecycle in Fabric and are utilizing the source control integration from Fabric.
- Complete the scenario convert the Fabric SQL database into code in source control.
- You should have a branch in a source control repository with both a SQL project and the Fabric object metadata.
- In the Fabric workspace, open the source control panel. From the Branches tab of the Source control menu, select Branch out to new workspace.
- Specify the names of the branch and workspace to create. The branch is created in the source control repository and is populated with the committed contents of the branch associated with the workspace you are branching from. The workspace is created in Fabric.
- Go to the newly created workspace in Fabric. When the database creation completes, the newly created database now contains the objects specified in your code repo. If you open the Fabric query editor and navigate in Object explorer, your database has new (empty) tables and other objects.
Merge changes from one branch into another
In this scenario, you use the source control repository to review database changes before they're available for deployment. This scenario is for developers who are working in a team environment and are using source control to manage their database changes.
Create two workspaces with associated branches in the same repository, as described in the previous scenario.
- With the database on the secondary branch, make changes to the database objects.
- For example, modify an existing stored procedure or create a new table.
- Check in these changes to source control by using the Commit button on the source control panel in Fabric.
- In Azure DevOps or GitHub, create a pull request from the secondary branch to the primary branch.
- In the pull request, you can see the changes in the database code between the primary workspace and the secondary workspace.
- Once you complete the pull request, the source control is updated, but the database in Fabric on the primary workspace isn't changed. To change the primary database, update the primary workspace from source control using the Update button on the source control panel in Fabric.
Manage static data with a post-deployment script
In this scenario, you control the rows in a lookup table in your database with source control. The capability that enables this functionality, pre-deployment and post-deployment scripts, also applies to deployment pipelines, so you can use the same scripts to manage static data in both scenarios.
From a SQL database in Fabric that is connected to source control, identify or create a table that you want to manage static data for. For example, you might have a
dbo.Colorstable that is used by your application and has a known set of values that don't change frequently.Create a new Query in the SQL database editor in Fabric. In the query editor, add a
MERGEstatement to manage the contents of theColorstable. For example:MERGE dbo.Colors AS target USING (VALUES (1, 'Red'), (2, 'Green'), (3, 'Blue') ) AS source (Id, Name) ON target.Id = source.Id WHEN MATCHED THEN UPDATE SET Name = source.Name WHEN NOT MATCHED BY TARGET THEN INSERT (Id, Name) VALUES (source.Id, source.Name) WHEN NOT MATCHED BY SOURCE THEN DELETE;Rename the query to
Post-Deployment-StaticData.sqland move it to Shared Queries.Once in Shared Queries, select the ... menu for the query and select Set as Post-deployment Script.
This query automatically runs as part of any update from source control or deployment pipeline deployment, so you can manage the static data in the Colors table by using source control. You can edit the query in the Fabric query editor and commit changes to source control to manage changes to the static data over time. Additionally, because pre-deployment and post-deployment scripts are included in the SQL project, you can also edit the query from your local machine by using Visual Studio Code or other SQL project tools, then commit those changes to source control. Learn more about pre-deployment and post-deployment scripts in the SQL projects documentation.