Note
Access to this page requires authorization. You can try signing in or changing directories.
Access to this page requires authorization. You can try changing directories.
Microsoft Fabric policies (preview) help administrators govern Fabric by automatically enforcing rules that control user actions across Fabric resources and activities. This article explains how to enable Fabric policies, create a policy set, add policy rules, activate the policy, and manage active policies in the Policies center.
To learn more about Fabric policies, see What are Fabric policies?
Prerequisites for creating a Fabric policy
- The Policies tenant setting is enabled. See the next section, Enable the Policies feature in the tenant settings.
- A Fabric workspace assigned to a capacity.
- Contributor, Member, or Admin access to the workspace so that you can create a policy item type.
- The appropriate admin role to activate the policy:
- Fabric administrator: Can create and activate policies for tenant-scope policies.
- Capacity administrator: Can create and activate policies for capacity-scope policies.
- Entra security groups for any user-based rule conditions.
- Microsoft Purview Information Protection enabled if you plan to use sensitivity-label conditions.
- Understand the best practices for creating a policy.
Note
Creating or saving a policy doesn't start enforcement. The policy must be activated by an admin of its assigned scope.
Enable the Policies feature in the tenant settings
When you enable the Policies tenant setting, authorized users can create policies.
In the Fabric portal, open the OneLake catalog.
Select the Govern tab.
Select Configurations.
Filter by the keyword Policies.
Expand the Policies section and set the toggle to Enabled.
Under Apply to, select either The entire organization or specific security groups. For either option, you can also create exceptions by selecting Except specific security groups and choosing the relevant groups.
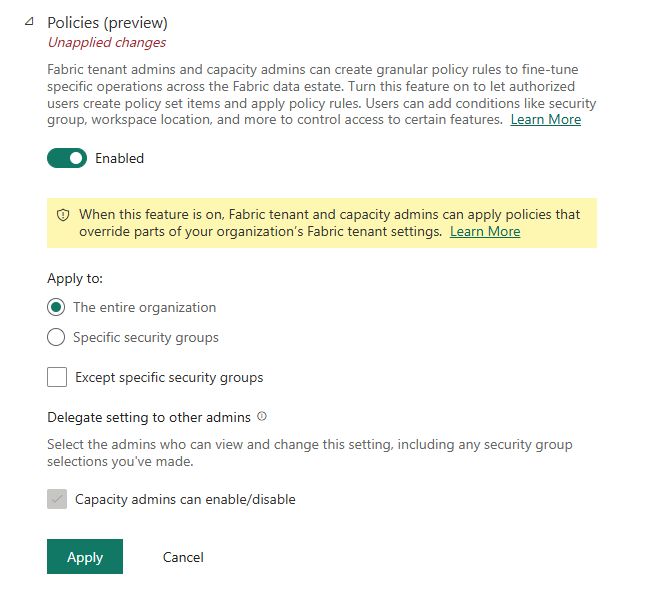
Select Apply to save the changes.
Create a policy item
In Fabric, a dedicated Fabric item called a policy set holds a policy and its rules. When you create the item, choose whether the policy applies at the tenant or capacity scope. You can't change the scope later.
In the Fabric portal, select Workspaces and open a workspace that's assigned to a Fabric capacity.
Select New item.
In the item gallery, search for and select Policy set. If there are no results, select All items and search again.
In New policy set dialog, enter a unique, descriptive Name for the policy set. You can't use spaces.
Under Policy set scope, select the appropriate scope:
- Select Fabric tenant for policies that a Fabric administrator activates and apply at the tenant scope.
- Select A capacity for policies that a capacity administrator activates for a specific capacity.
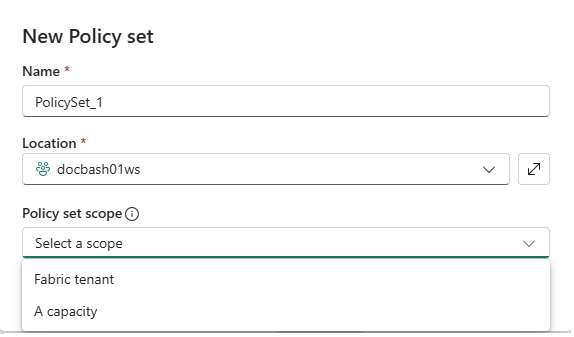
Select Create to create the policy set item in the workspace.
The new policy set is inactive and initially shows each supported policy in its system-default state.
Important
You can't change the admin scope after the policy set is created. If you select the wrong scope, create a new policy set with the correct scope.
Review the policy defaults
Before you add a rule, review the default behavior shown for the policy.
- Allowed means the governed action follows the system default and remains available to users who otherwise have permission.
- Blocked means the governed action is denied.
- Advanced means Fabric evaluates the configured allow rules.
Policies with Allow behavior use the rules configured in Advanced settings as an allow list:
- If any rule matches, Fabric allows the operation.
- If no rule matches, Fabric denies the operation.
- Conditions in one rule use AND logic.
- Separate rules use OR logic.
Caution
Adding a narrowly scoped allow rule blocks any operations that don't match it. Add rules for all required allow scenarios before activating the policy set.
Add policy rules
You can apply a single Allowed or Blocked behavior, or choose the Advanced option to use the no-code conditions builder for granular rules.
Open the workspace, and then open the policy item.
Locate the policy that you want to configure.
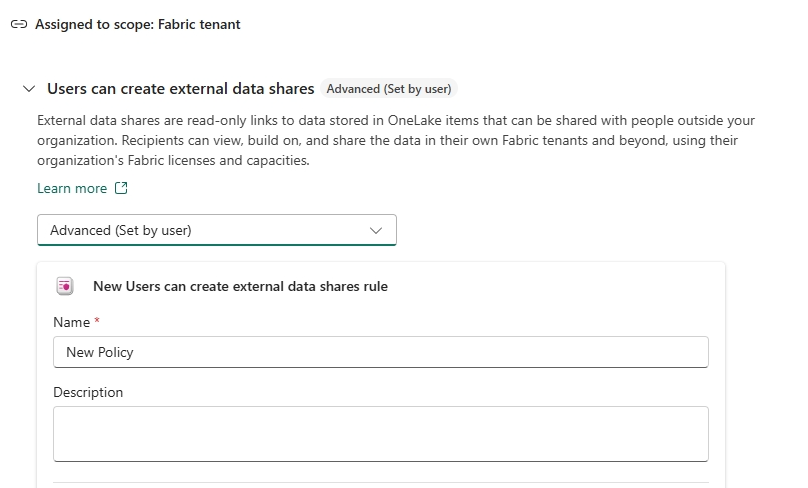
Select Allowed, Blocked, or Advanced (Set by user) to change the policy behavior. If you select Advanced, the rules configuration is enabled.
To create an advanced rule, select Add rule or Create rule.
Enter a clear rule Name and Description that explains who the rule applies to, what it allows, and where it applies:
Under Condition type, choose a condition type supported by the policy.
Condition Purpose Recipient email domain Match an external recipient domain for external data sharing. Security groups Match the acting user's Entra security-group membership. Sensitivity labels Match the Microsoft Purview sensitivity label applied to an item. Workspaces Match the workspace where the governed operation occurs. Item type Match the Fabric item type being created. 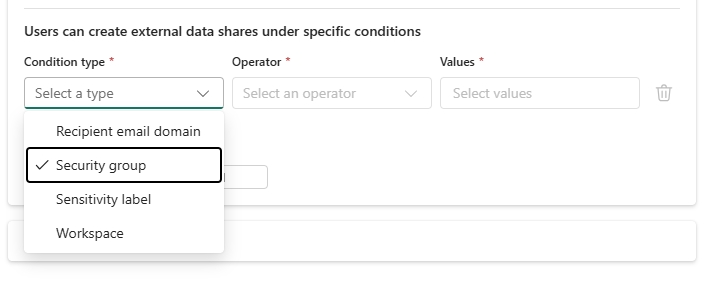
Note
If you omit a condition, the rule isn't restricted by that condition type. For example, a rule without a workspace condition can match operations in any workspace within the policy's admin scope.
Select an operator:
- Is any of matches when at least one configured value matches.
- Is none of matches when none of the configured values match.
Select or enter one or more Values that match the selected condition type.
Repeat the condition steps until the rule describes the complete allow scenario.
Review the rule. All conditions in the rule must be true for the rule to match.
Select Apply.
The rule is added to the policy set. If you need to allow a different combination of users, workspaces, item types, labels, or domains, create another rule.
Assign and activate the policy set
Only an administrator of the selected scope can activate a policy set. Only one policy set can be active for an admin scope at a time.
Caution
Activating a policy set can immediately change which operations users are allowed to perform after propagation. Validate the rules and affected user groups before activation.
Open the policy set from its workspace. Review each configured policy and rule, and then select Active:
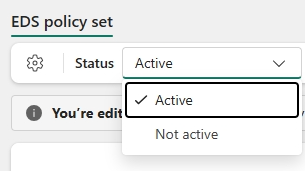
For a capacity-scoped policy set, select the target capacity and review the confirmation message.
If another policy set is active for the scope, confirm that you want to replace it and confirm the activation.
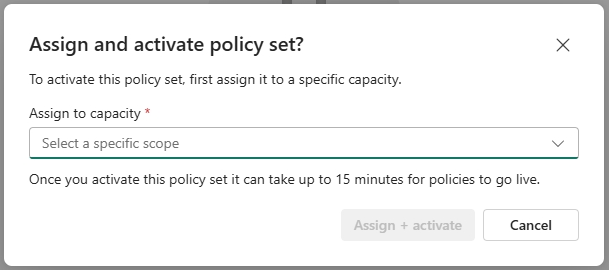
The policy set becomes active. Policy changes can take up to 15 minutes to take effect.
Validate policy enforcement
We recommend validating policy enforcement with test accounts after waiting up to 15 minutes for changes to take effect. Confirm that an eligible user who matches a rule is allowed and that an eligible user who doesn't match any rule is denied. You can also test a user outside the configured security groups and review the Fabric audit logs to verify the enforcement results.
Deactivate or replace a policy set
You can deactivate or replace an active policy set from the workspace where the policy set is stored. Only an administrator of the policy set's admin scope can deactivate or replace it.
Deactivate a policy set
- Open the active policy set.
- Select Deactivate.
- Confirm the deactivation.
Deactivation stops the policy set from being evaluated and returns the scope to the applicable system-default behavior. The policy set remains in the workspace.
Replace an active policy set
- Create and configure the replacement policy set in a workspace.
- Review all allow scenarios in the replacement.
- Select Activate.
- Confirm that the existing active policy set will be replaced.
The previous policy set becomes inactive, and the replacement takes effect within 15 minutes.
Monitor enforcement with Fabric audit logs
Fabric records each policy decision so you can verify that enforcement matches your intent. Track these decisions through Fabric audit logs.
Open the Fabric audit logs.
Review the recorded policy enforcement decisions to confirm that Fabric applies your policies as expected.
Considerations and limitations
- You can currently create policy sets only from the item creation experience in a workspace.
- Use the Policies Center for centralized policy management, not for policy-set creation.
- Only workspaces assigned to a Fabric capacity can store policy sets.
- You can't change a policy set's admin scope after creation.
- Only one policy set can be active for an admin scope at a time.
- Policy and tenant-setting changes can take time to propagate.
- Conditions support Any of and None of in the current preview.
- A condition supports up to 50 values.
- Tenant-scoped policies support up to 100 rules per policy.
- Capacity-scoped policies support up to 50 rules per policy.
- Domain and workspace admin scopes aren't currently available.
- You can't activate a policy set through Git.