Note
Access to this page requires authorization. You can try signing in or changing directories.
Access to this page requires authorization. You can try changing directories.
In this article, you learn how to create an Azure Data Lake Storage (ADLS) Gen2 shortcut inside a Microsoft Fabric lakehouse. When you create shortcuts to Azure Data Lake Storage (ADLS) Gen2 storage accounts, the target path can point to any folder within the hierarchical namespace. At a minimum, the target path must include a container name.
For an overview of shortcuts, see OneLake shortcuts. To create shortcuts programmatically, see OneLake shortcuts REST APIs.
Prerequisites
- A lakehouse. If you don't have one, create one by following these steps: Create a lakehouse with OneLake.
- You must enable Hierarchical Namespaces on your ADLS Gen2 storage account.
Create a shortcut
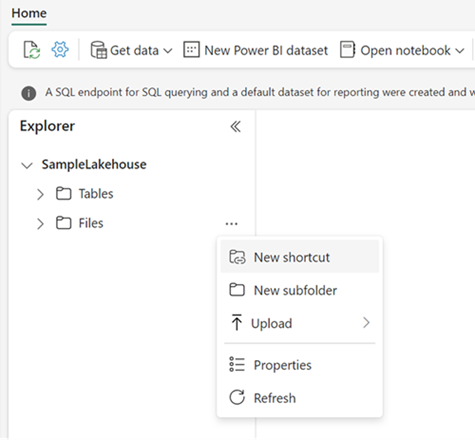
Open a lakehouse.
Right-click on a directory within the Lake view of the lakehouse.
Select New shortcut.
Under External sources, select Azure Data Lake Storage Gen2.
Enter the Connection settings and Connection credentials for the storage account.
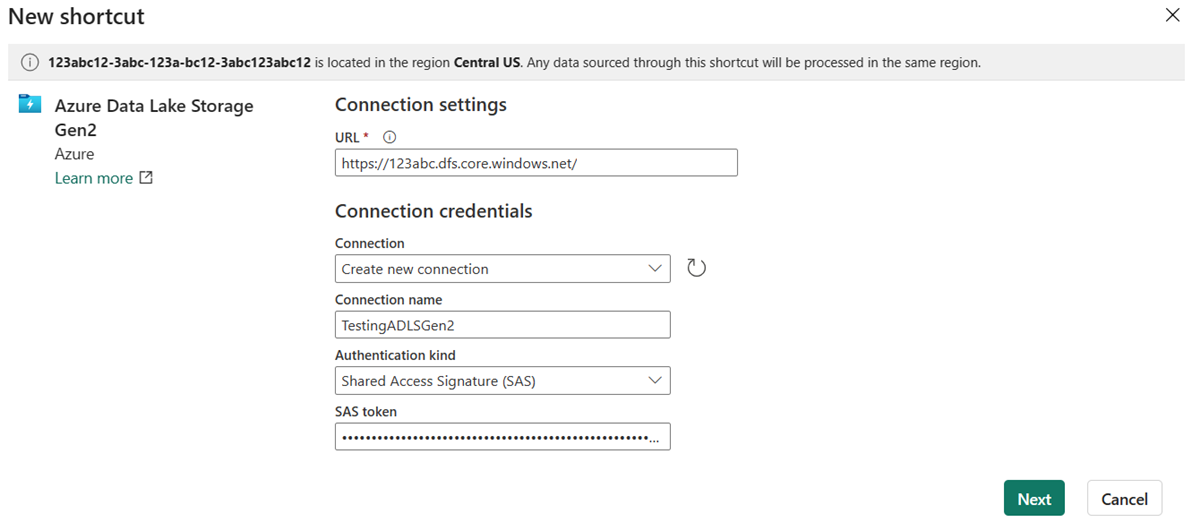
Field Description URL The DFS endpoint for your storage account.
https://<STORAGE_ACCOUNT_NAME>.dfs.core.windows.netConnection Select an existing connection for the specified storage location from the drop-down menu. Or if no connections exist, select Create new connection. Connection name A name for your Azure Data Lake Storage Gen2 connection. Authentication kind Select your preferred authorization model from the drop-down menu: Organizational account, Account key, Shared Access Signature (SAS), Service principal, or Workspace Identity. For more information, see Authorization.
Once you select an authentication kind, fill in the required credentials.Select Next.
Browse to the target location for the shortcut.
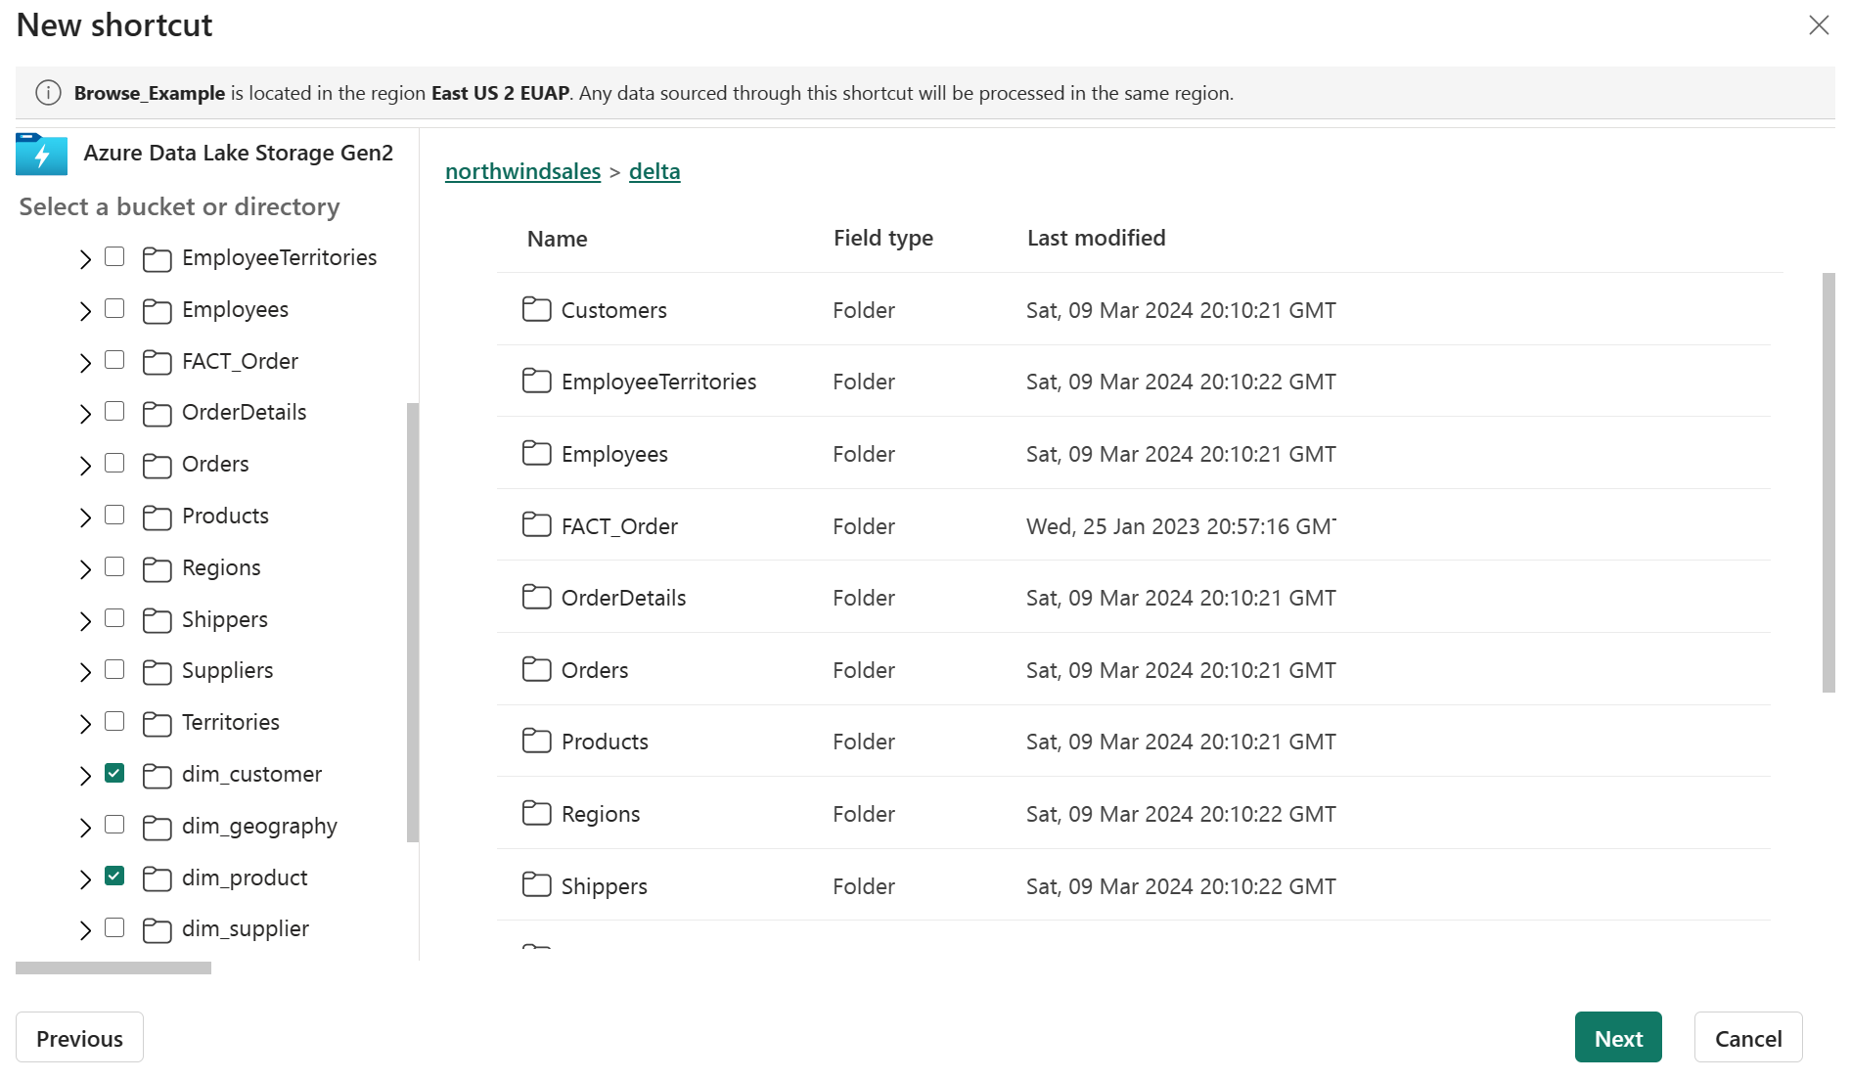
If you just used the storage account in the connection URL, all of your available containers appear in the left navigation view. If you specified a container in connection URL, only the specified container and its contents appear in the navigation view.
Navigate the storage account by selecting a folder or the expansion arrow next to a folder.
In this view, you can select one or more shortcut target locations. Choose target locations by selecting the checkbox next a folder in the left navigation view.
Select Next
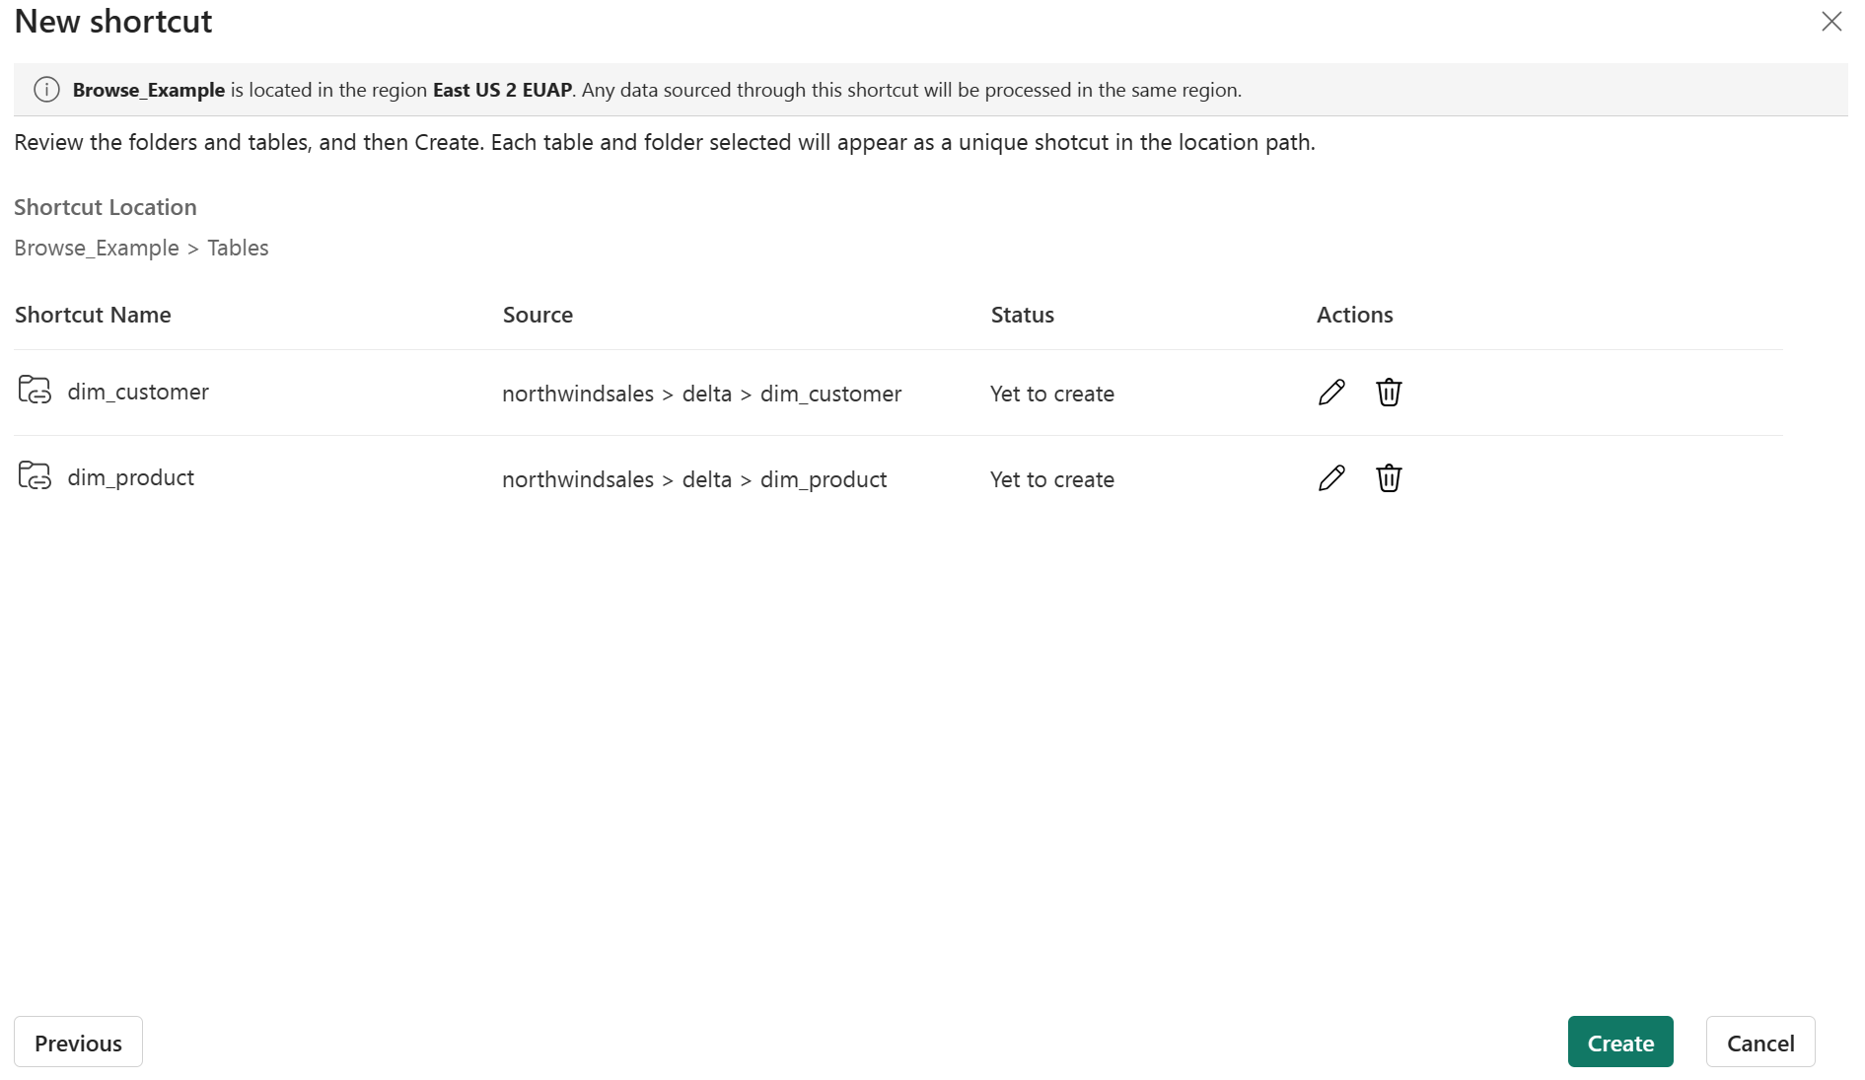
The review page allows you to verify all of your selections. Here you can see each shortcut that will be created. In the action column, you can select the pencil icon to edit the shortcut name. You can select the trash can icon to delete shortcut.
Select Create.
The lakehouse automatically refreshes. The shortcut appears in the left Explorer pane.


Access
ADLS shortcuts must point to the DFS endpoint for the storage account.
Example: https://accountname.dfs.core.windows.net/
If a storage firewall protects your storage account, you can configure trusted service access. For more information, see Trusted workspace access.
Authorization
ADLS shortcuts use a delegated authorization model. In this model, the shortcut creator specifies a credential for the ADLS shortcut and all access to that shortcut is authorized by using that credential. ADLS shortcuts support the following delegated authorization types:
- Organizational account - must have Storage Blob Data Reader, Storage Blob Data Contributor, or Storage Blob Data Owner role on the storage account; or Delegator role on the storage account plus file or directory access granted within the storage account.
- Service principal - must have Storage Blob Data Reader, Storage Blob Data Contributor, or Storage Blob Data Owner role on the storage account; or Delegator role on the storage account plus file or directory access granted within the storage account.
- Workspace identity - must have Storage Blob Data Reader, Storage Blob Data Contributor, or Storage Blob Data Owner role on the storage account; or Delegator role on the storage account plus file or directory access granted within the storage account.
- Shared Access Signature (SAS) - must include at least the following permissions: Read, List, and Execute.
- Account key - the storage account access key. Account keys grant full access to the storage account, so use this option with caution and protect your keys appropriately.
Microsoft Entra ID delegated authorization types (organizational account, service principal, or workspace identity) require the Generate a user delegation key action at the storage account level. This action is included as part of the Storage Blob Data Reader, Storage Blob Data Contributor, Storage Blob Data Owner, and Delegator roles. If you don't want to give a user reader, contributor, or owner permissions for the whole storage account, assign them the Delegator role instead. Then, define detailed data access rights using Access control lists (ACLs) in Azure Data Lake Storage.
Important
The Generate a user delegation key requirement isn't currently enforced when a workspace identity is configured for the workspace and the ADLS shortcut auth type is Organizational Account, Service Principal, or Workspace Identity. However, this behavior will be restricted in the future. Make sure that all delegated identities have the Generate a user delegation key action to ensure that your users' access isn't affected when this behavior changes.
Limitations
The following limitations apply to ADLS shortcuts:
- ADLS shortcuts to storage accounts in a different Microsoft Entra tenant than your Fabric tenant require using a service principal or SAS token for authentication. Organizational account and workspace identity authentication don't work across tenants. For sharing data across Fabric tenants, consider using external data sharing instead, which requires Fabric capacity in both tenants.
- ADLS shortcut target paths can't contain any reserved characters from RFC 3986 section 2.2. For allowed characters, see RFC 3968 section 2.3.
- ADLS shortcuts don't support the Copy Blob API.
- Copy function doesn't work on shortcuts that directly point to ADLS containers. It's recommended to create ADLS shortcuts to a directory that is at least one level below a container.
- OneLake shortcuts don't support connections to ADLS Gen2 storage accounts that use managed private endpoints. For more information, see managed private endpoints for Fabric.
- You can't create more shortcuts inside ADLS shortcuts.
- ADLS gen 2 shortcuts aren't supported for storage accounts that use Microsoft Purview Data Sharing.