Build a Power BI report by streaming events from Azure IoT Hub to Microsoft Fabric
If you have IoT devices that are connected to your Azure IoT Hub, you can ingest and transform your IoT data using Eventstream in Microsoft Fabric. In this tutorial, we walk you through the process of setting up an eventstream to ingest real-time data from Azure IoT Hub to Kusto database. You learn to build a Power BI report to monitor the health of your IoT devices in real time.
Prerequisites
Before you begin, make sure you have:
- Access to a premium workspace with Contributor or above permissions where your Eventstream and KQL database are located.
- An Azure IoT hub with event data and the necessary permission to access the policy keys. The IoT hub must be publicly accessible and not behind a firewall or secured in a virtual network.
Create a KQL database and an eventstream
Follow these steps to create a KQL database and an eventstream in your workspace:
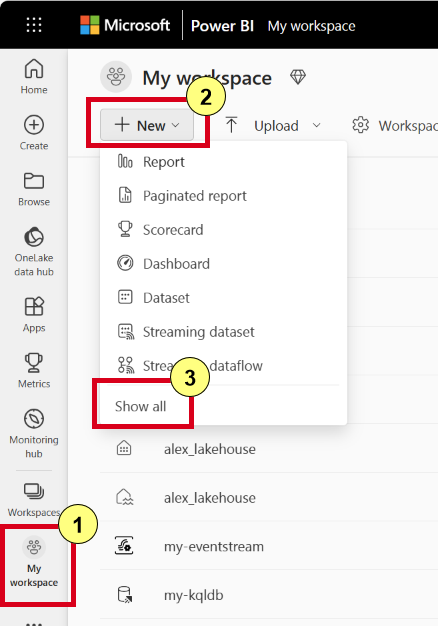
Navigate to My workspace, and under the New drop-down menu, select Show all.
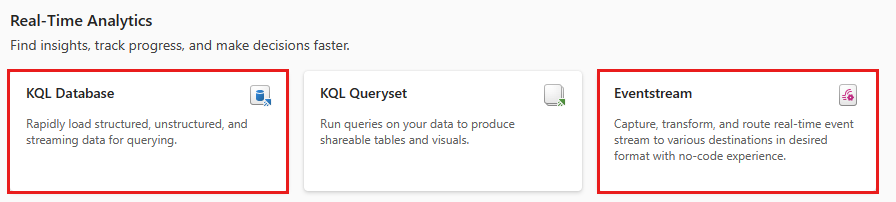
Scroll down to the Real-Time Analytics section, select KQL Database or Eventstream.
Enter the name for the new KQL database or eventstream, and then select Create. The examples in this article use my-kqldb for the KQL database and my-eventstream for the eventstream. Confirm that these two items appear in your workspace.

Add an IoT source to the eventstream
In the Eventstream editor, expand the New source drop-down menu within the node and choose Azure IoT Hub.

On the Azure IoT Hub configuration pane, enter the following details:
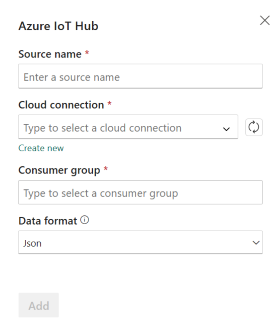
- Source name: Enter a name for your Azure IoT Hub, such as iothub-source.
- Cloud connection: Select an existing cloud connection that links your Azure IoT Hub to Microsoft Fabric. If you don't have one, proceed to step 3 to create a new cloud connection.
- Data format. Choose a data format (AVRO, JSON, or CSV) for streaming your IoT Hub data into the eventstream.
- Consumer group. Choose a consumer group from your Azure IoT Hub, or leave it as $Default. Then select Add to finish the Azure IoT Hub configuration.
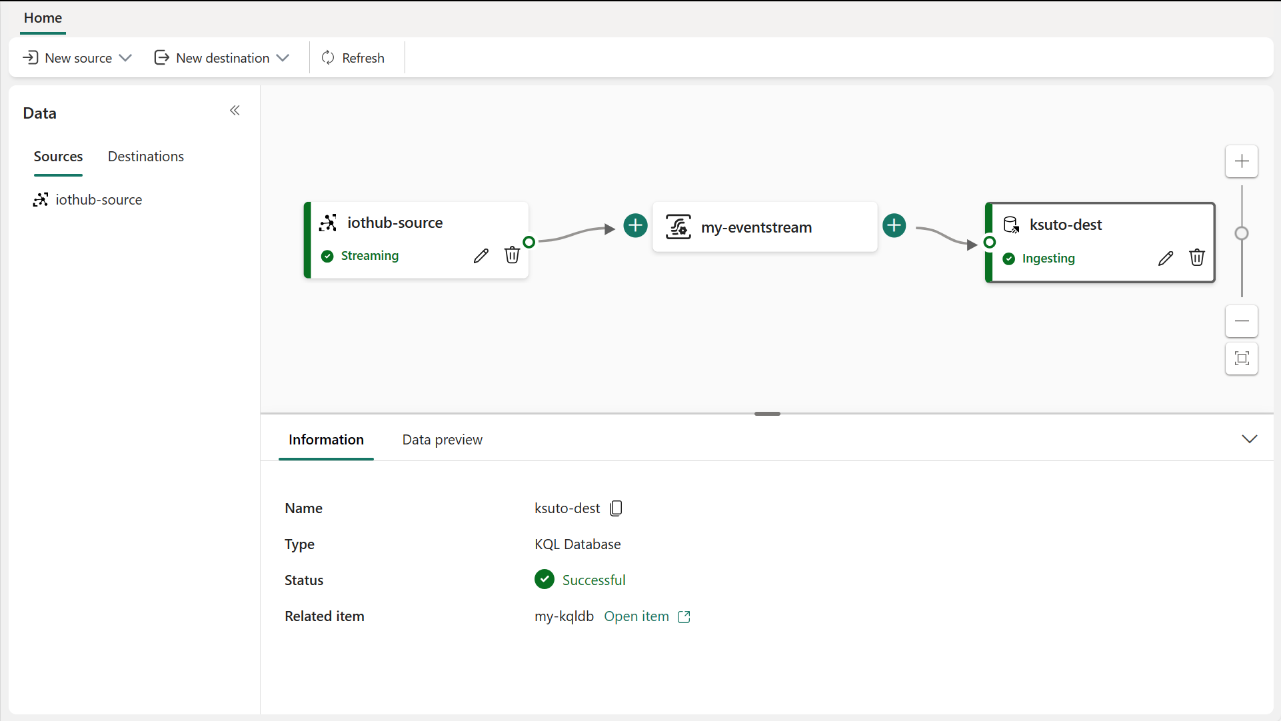
Once it's added successfully, you can see an Azure IoT Hub source added to your eventstream in the editor.

To create a new cloud connection for your Azure IoT Hub, follow these steps:
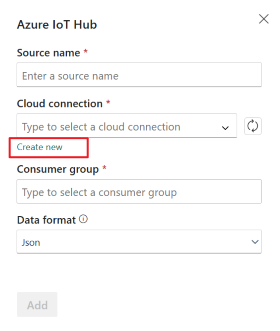
Select Create new connection from the drop-down menu, fill in the Connection settings and Connection credentials of your Azure IoT Hub, and then select Create.
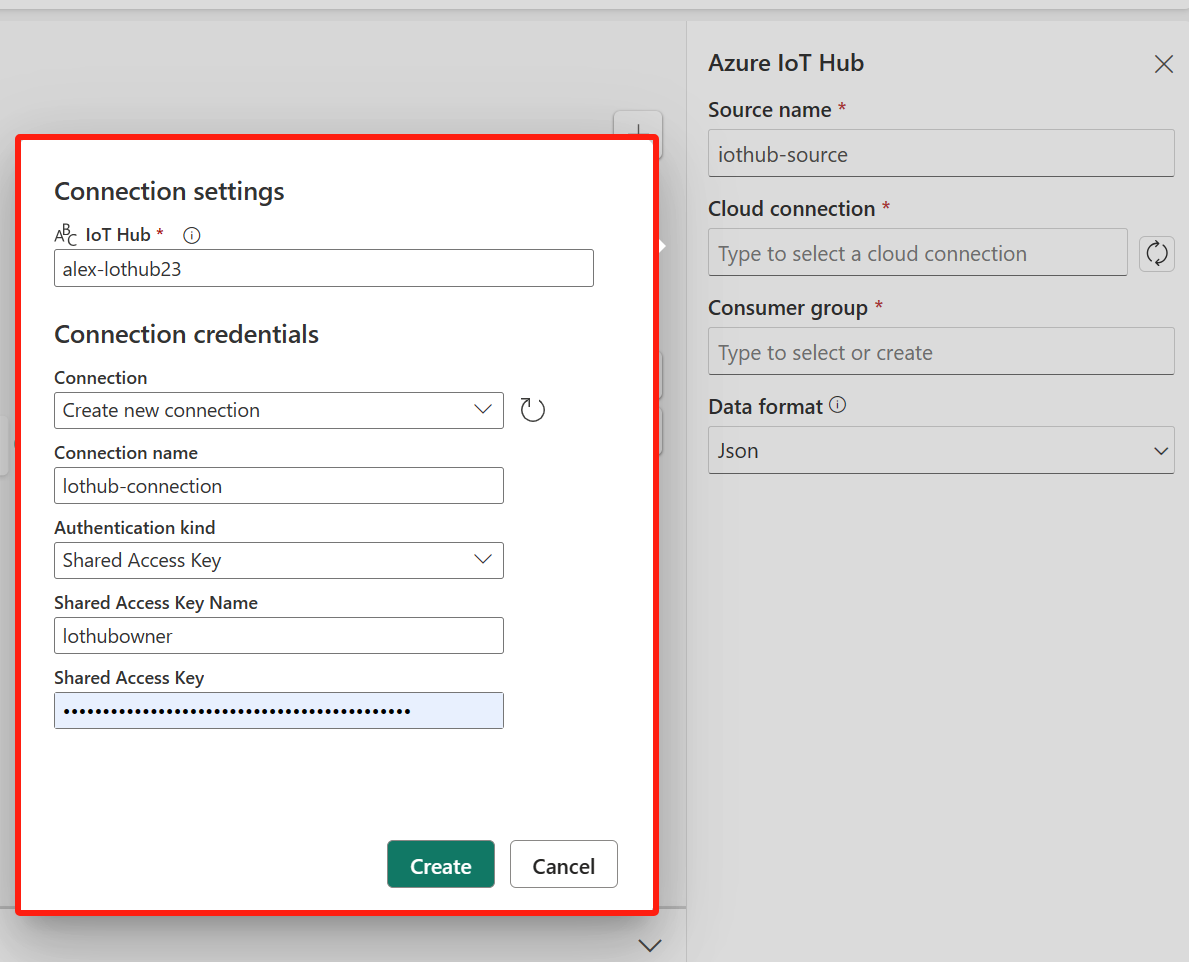
IoT Hub. Enter the name of the IoT Hub in the Azure portal.
Connection name. Enter a name for the new cloud connection, such as iothub-connection.
Shared access key name and Shared access key. Enter the connection credentials for your Azure IoT Hub. You can find it under Shared access policies in the Azure portal. You must have appropriate permissions to access any of the IoT Hub endpoints.

Return to the Azure IoT Hub configuration pane and select Refresh to load the new cloud connection.

Once the Azure IoT Hub is added to your eventstream, select Preview data to verify successful configuration. You should be able to preview incoming data to your eventstream.


Add a Kusto destination to the eventstream
In the Eventstream editor, expand the New destination drop-down menu within the destination node and choose KQL Database.

On the KQL Database configuration pane, select Direct ingestion, and enter the details for your Kusto database:

- Destination name: Enter a name for this new destination, such as kusto-dest.
- Workspace: Select the workspace associated with your Kusto database.
- KQL Database: Select your Kusto database from the drop-down menu, and then Create and configure.
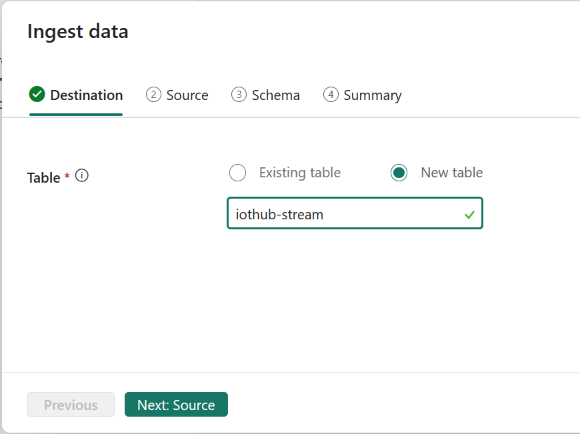
You see a popup window helping you to complete the Kusto configuration. Select an existing table or create a new one for your IoTHub data stream. Enter the table name and select Next.
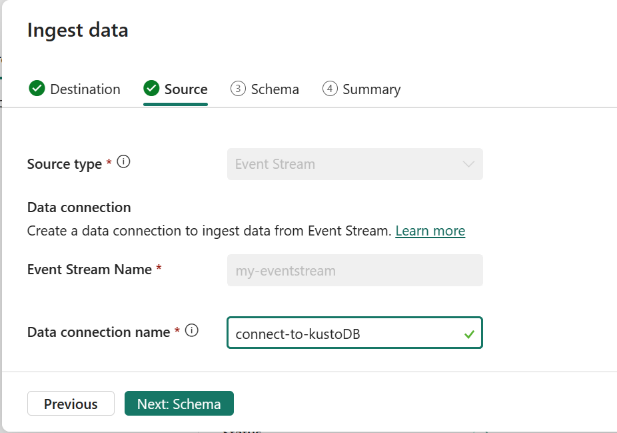
Set up a data connection linking your eventstream to the Kusto database. Enter a name for this new data connection and select Next.
Choose the correct data format of your IoTHub data stream, and change the schema data type to suit your requirement for this new table within the Kusto database.

Once the configuration is complete, you can see the KQL Database is added to your eventstream.


Build a Power BI report
In the Eventstream editor, select the KQL Database you've added, then choose Open item. This action directs you to the Kusto database within Fabric.

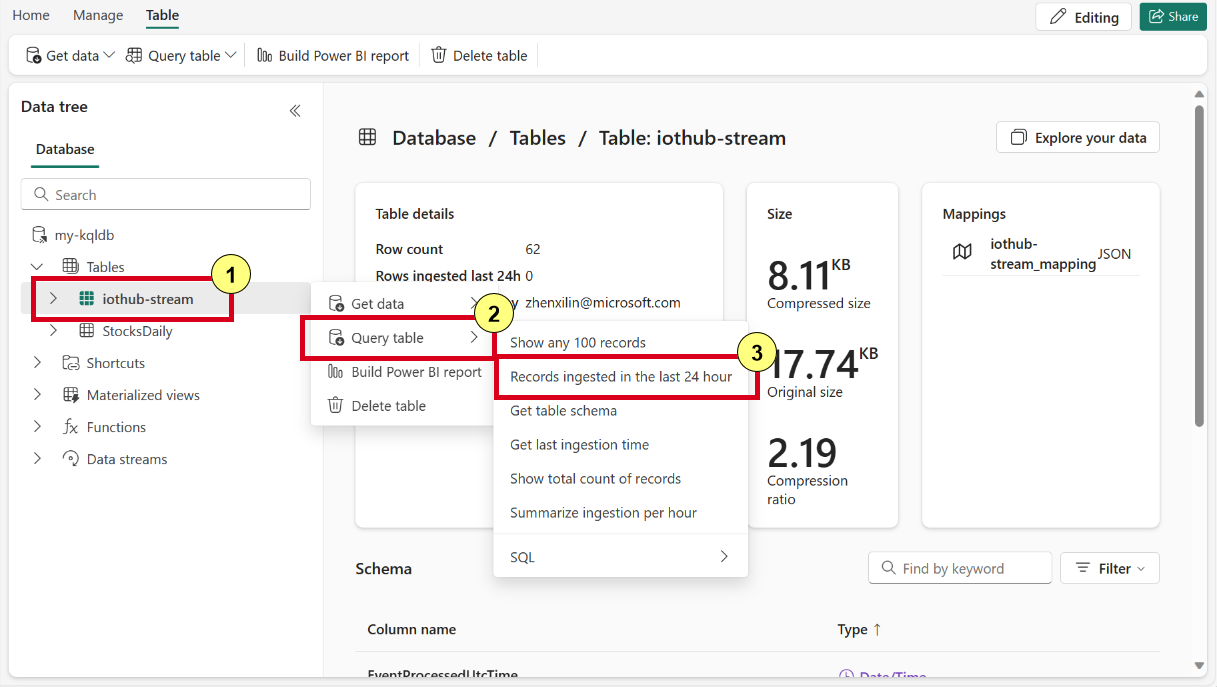
In the Kusto database interface, find the iothub-stream table, select Query table, and then choose Records ingested in the last 24 hour. This action opens the query editor with the results at the bottom.
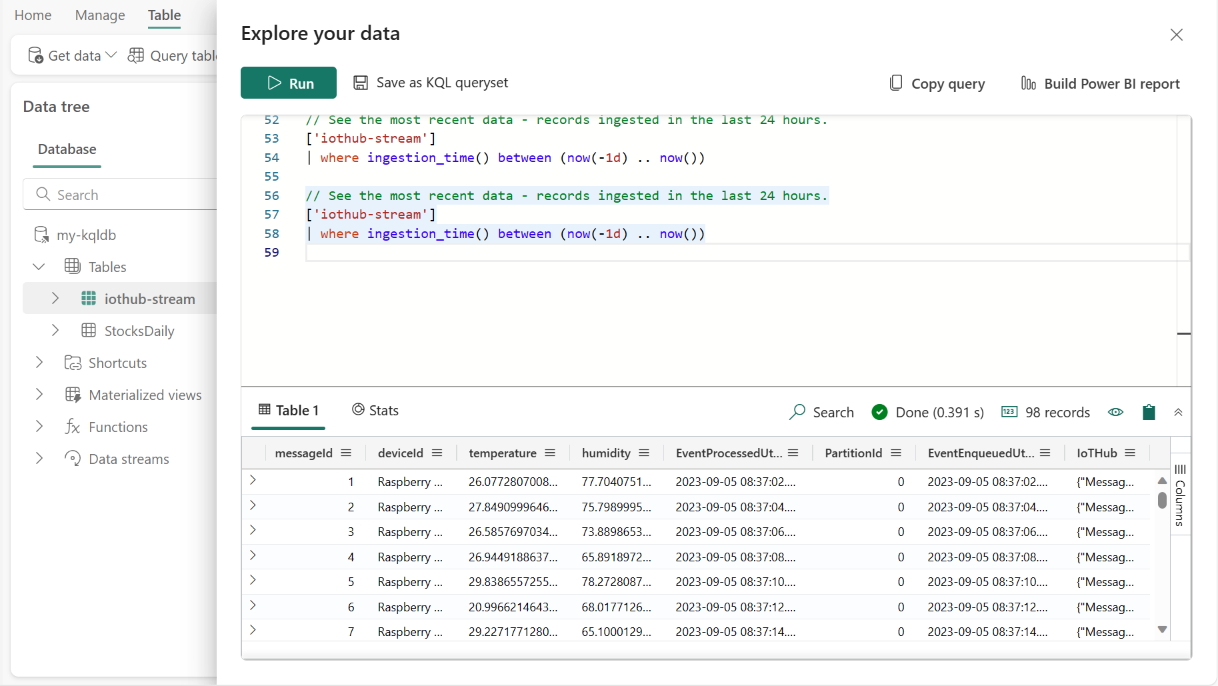
Select Build Power BI report in the top right corner of the editor to start building a report for your IoTHub data stream.
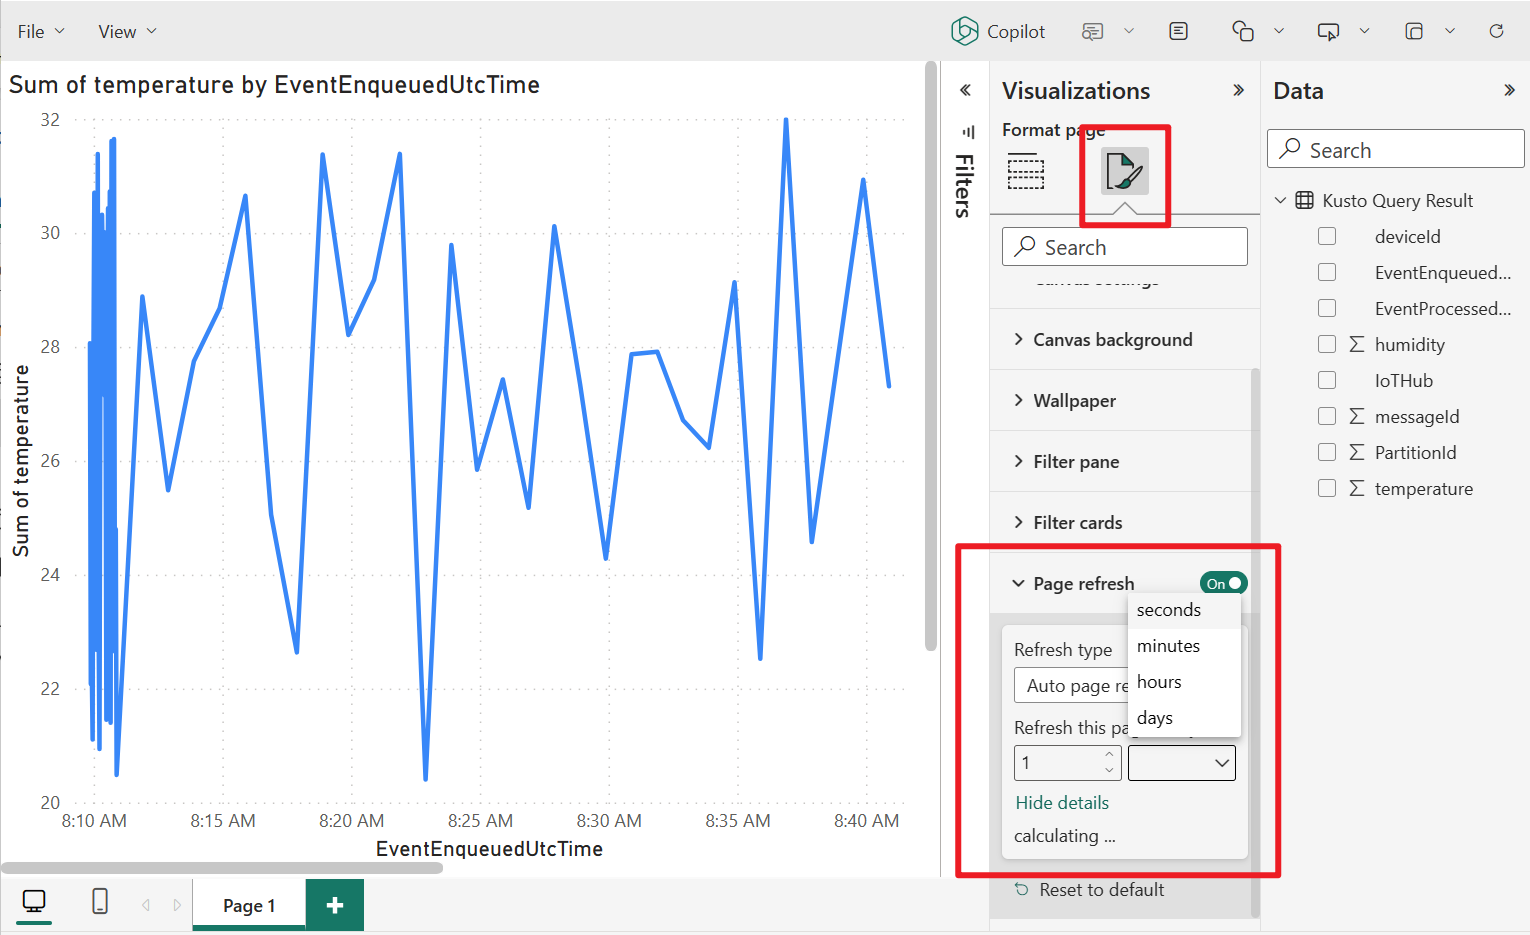
Select the Line chart for your report and drag the schema of the IoTHub table onto the X and Y axes. In this example, the report shows the temperature data of IoT devices. Any anomalies detected in the report enable you to make timely decisions.

To enable data refreshes for real-time monitoring, select Format page, and turn-on Page refresh. Change the refresh interval to 1 second. With these settings in place, you're able to monitor the temperature of your IoT device in real-time.
Note
You may need to change the Power BI settings to adjust the minimum refresh interval.
After you finish building the report, select File > Save to save this report to your workspace.
Congratulations! You've successfully learned how to build a report by using Eventstream to ingest and monitor your IoTHub data stream. Additionally, Eventstream offers the capability to process your data before it's sent to your database.
Related content
If you want to learn more about ingesting and processing real-time using Eventstream, check out the following resources:
Feedback
Coming soon: Throughout 2024 we will be phasing out GitHub Issues as the feedback mechanism for content and replacing it with a new feedback system. For more information see: https://aka.ms/ContentUserFeedback.
Submit and view feedback for