Basics of a PlayFab game server
PlayFab operates game servers as containerized applications. This tutorial describes how game servers are packaged and integrated with PlayFab systems.
Containerizing and packaging game servers
Windows
On Windows, typically you package the game server executable and other files as zip files, and upload them as game assets. Assets are combined with a container image to create your game server build. The base container image provides the Windows operating system files, and the execution environment that allows the game to run. PlayFab provides a set of managed container images to use for Windows builds.
When a Windows build is created through Game Manager or APIs like CreateBuildWithManagedContainer(), you specify the assets and where they should be mounted within the container's file system. You also specify the shell command to start the game (StartGameCommand), this might be similar to what is shown below.
C:\GameCoreApp\GameServer.exe -mode RETAIL
The StartGameCommand must start an application that uses the PlayFab Game Server SDK, to call ReadyForPlayers when ready to serve game clients. The container will be terminated and recycled when the application process exits.
Linux
On Linux, you create the container image yourself by packaging game executable and assets. Usage of assets that are combined with the container image at runtime is optional.
When a Linux build is created through Game Manager or APIs like CreateBuildWithCustomContainer(), you can optionally specify the assets and where they should be mounted within the container's file system. Specification of the shell command to start the game (StartGameCommand) is also optional, since this command can also be included in the container image.
Note
Check this page for more information regarding creating Linux container images for PlayFab Multiplayer Servers
Managed Containers for Windows
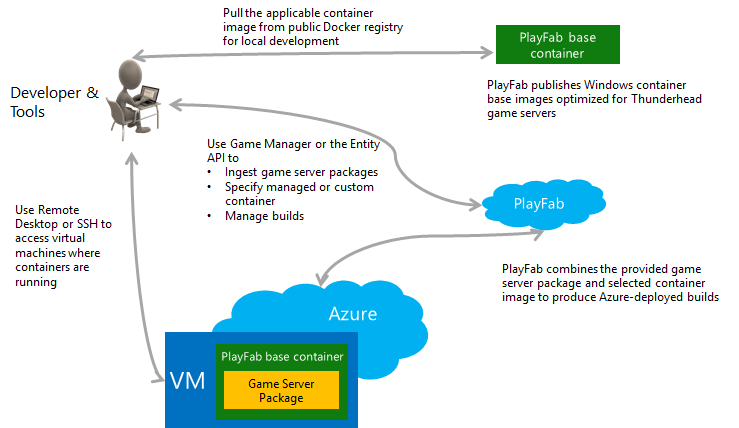
PlayFab currently supports one managed container; the PlayFab Multiplayer container image, based on Windows Server Core. You can download this container through Docker Hub so that your local environment matches the runtime environment in Azure.
There are debugging tools that allow you to step through the multiplayer server state machine locally on your dev box.
For more information, check out Locally debugging game servers and integration with PlayFab.
The following image shows the key flows for uploading a game server and combining this package with a selected container.
Managed container updates
Managed containers are the easiest integration option for Windows projects, and a good place to start if you are unfamiliar with containers.
A key feature of managed containers is that PlayFab will automatically update the base image with critical security fixes to ensure reliable play. Generally, security updates happen every month, and should not cause service interruption. To learn more, see OS patch updates for Windows.
During an upgrade, standing-by sessions that are naturally being recycled will be replaced with an updated container image and the same game server package.
When PlayFab intends to update a managed container image that you are using, you will receive PlayStream events.
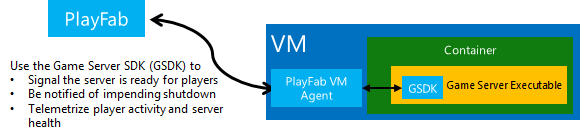
Integrating the PlayFab Game Server SDK
Learn more at: Integrating game servers with the PlayFab Game Server SDK (GSDK)
The PlayFab Game Server SDK (GSDK) is provided in multiple programming languages, like C++, C# and Java. The GSDK connects your game server to a local agent installed on the VM. This agent facilitates key server interactions with the PlayFab control infrastructure.
When your game server is initialized, it will be put into a preparing state, with PlayFab waiting for your game server to call ReadyForPlayers().
Once this is called, the game server is put into a standing by state, and waits for allocation requests from your matchmaking service into PlayFab via the RequestMultiplayerServer method.
The image displayed below shows the States of a PlayFab multiplayer server.
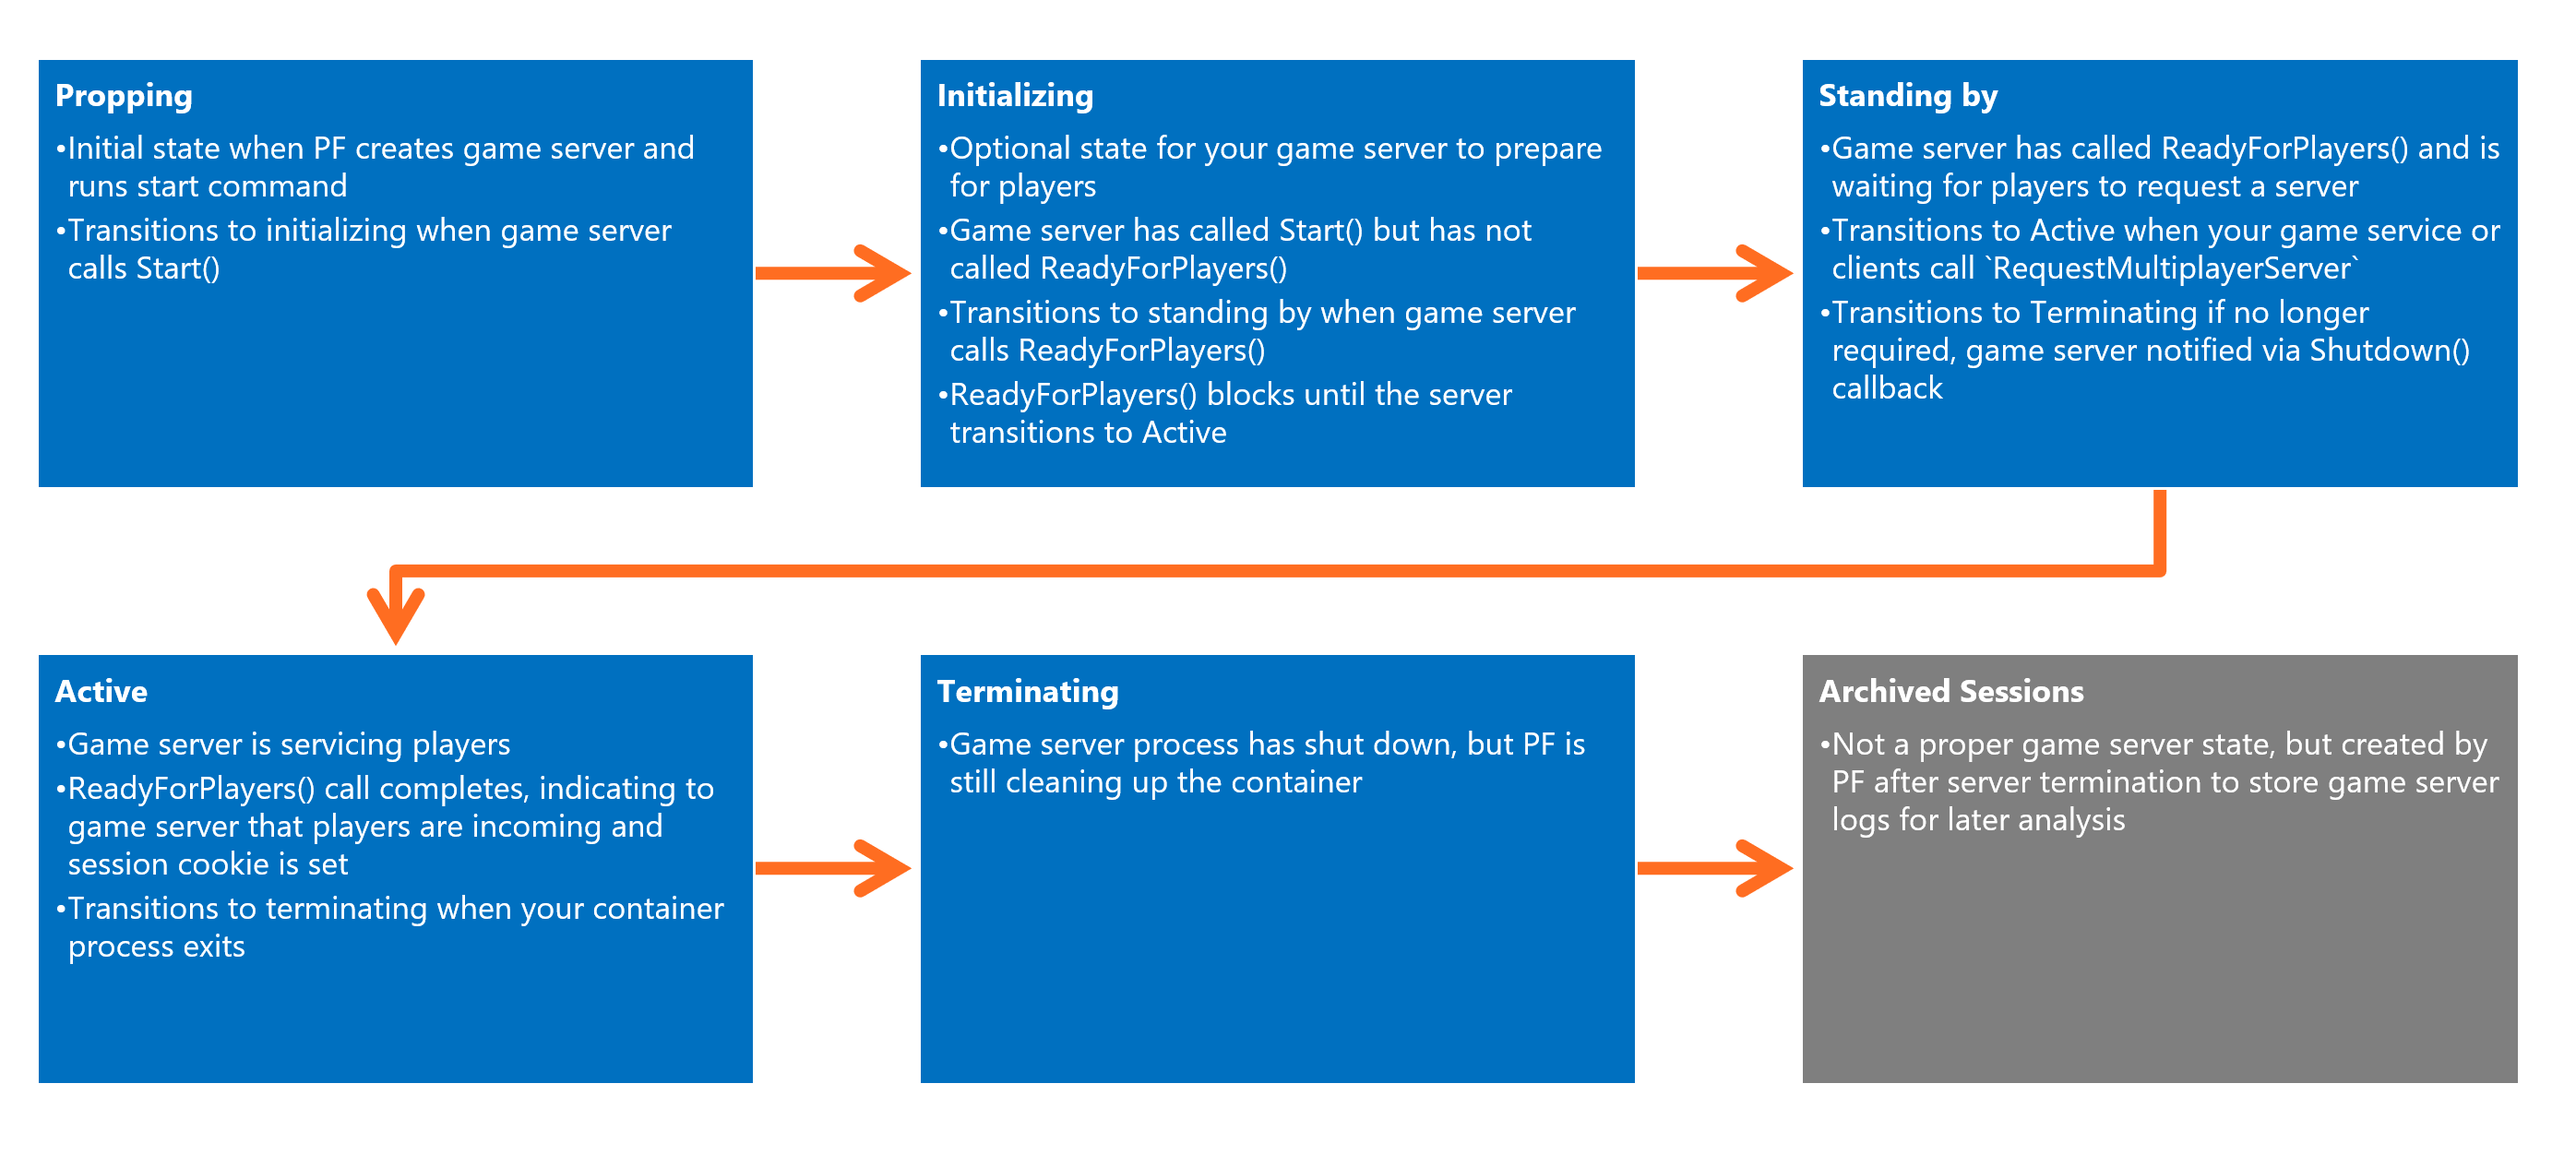
Ostensibly, calling ReadyForPlayers() is the only requirement to get your game server to run and continue running. However, there are several callbacks/events that you may want to process in order to provide the best user experience.
Server scripts and PlayFab-configured environment variables
In some cases you may want game servers to run a CMD, PowerShell or bash script (a "bootstrapper"), which then launches your compiled game server executable. This script may configure the container's internal environment, pass command-line arguments to the executable, or any other task you don't want to execute in the game server executable itself.
As a convenience, PlayFab configures some build information as the following environmental variables in the container. These can also be accessed through the GSDK, but using the environmental variables can be easier from a script.
- PF_TITLE_ID - Title Id for the session host
- PF_BUILD_ID - Build Id for the session host
- PF_REGION - Azure Region for the session host
- PUBLIC_IPV4_ADDRESS - Public IP Address for the VM
- PF_VM_ID - Unique identifier for the VM (like 'xcloudeau4u4yyxj4xymu:AustraliaEast:1E03_6f27ad88-9bc3-4ea3-8d16-75480aba4637:tvmps_0e05c37e0bbdca298a09fb0d597bd666eb7c5fd0ebcf1fed4c52e608a39a7c9c_d')
- CERTIFICATE_FOLDER - Folder containing game certificates
- PF_SERVER_LOG_DIRECTORY - Folder containing game logs
- PF_SERVER_INSTANCE_NUMBER - Instance number for the server. First server on VM is 0, second is 1, third is 2, etc.