Note
Access to this page requires authorization. You can try signing in or changing directories.
Access to this page requires authorization. You can try changing directories.
This article outlines specific steps to help you create and deploy Linux container images.
As described in Create VMs, you configure VMs to be automatically spun up as game servers globally according to your budget and demand when using our service. In order to do so, you don't explicitly create VMs but define parameters that determine how they get created on your behalf. This process is called deploying or creating a build.
PlayFab Multiplayer Servers can deploy both Linux-based and Windows-based game servers. The way builds are deployed for Linux containers are similar to Windows containers with a few important differences. To learn more, see Windows and Linux container image differences. If you want to use PowerShell/API to manage Linux containers, see Manage Linux container images using APIs.
When using Linux-based game servers, instead of using a managed container image, you have to create and upload your container image to a container registry. To make it easy for you to upload containers, your account comes with an Azure container registry.
Required knowledge
Set up your Windows development device
This step is needed only if you want to use Windows development device to create Linux container images. Alternatively, you can use Linux OS devices, VMs, or dual-OS systems with Docker installed.
Windows Subsystem for Linux (WSL) enables you to use your development device in the familiar Windows environment to author and manage Linux container images. Using WSL means that you wouldn't need an overhead of a traditional Linux virtual machine or dual-boot setup.
- Install WSL 2. Make sure that you've restarted your machine and are using WSL 2. You also need to have successfully installed the Linux kernel update package.
- Install a Linux distribution that uses WSL. Although our VMs use Ubuntu, you can select any distribution you want for your container image. Consider using Ubuntu 20.04 LTS or later versions.
- Install Docker Desktop for Windows with WSL 2. For direct download link, go to Docker Desktop for Windows (external).
Verify WSL 2 set up
- Open PowerShell
- Run wsl -l -v to check that both docker-desktop and ubuntu applications are running WSL 2 (version 2)
Verify Docker set up properly for WSL
- Open WSL terminal
- Run docker version to confirm that Docker is installed and OS used is Linux
Tip
For developing and debugging Linux C++ applications, use WSL in Visual Studio 2019.
Get your PlayFab container registry sign-in credentials
The Azure container registry account is associated with your PlayFab account. Only you have access to the containers uploaded there. This Azure container registry is free of charge.
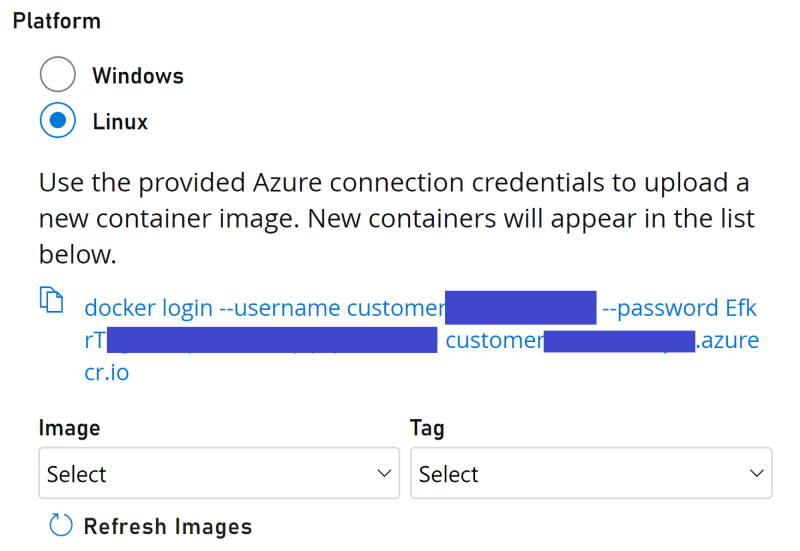
- In Game Manager, select your game title, then Multiplayer > Servers. Next, select New build on the right to open the build creation page.
- Select Linux as the virtual machine operating system.
- Take note of the sign-in credentials—name, password, and customer5555555.azurecr.io, as this information is needed later
If you wish to use PowerShell/API, call the GetContainerRegistryCredentials API to retrieve a container registry address, user name, and password.
Create and push Linux container images to Azure Container Registry
These steps help you create and push your custom Linux container image.
Integrate your game server application with GSDK
Similar to using Windows servers, you have to integrate your game server code with the PlayFab Multiplayer Server SDK (GSDK). This can be part of your container image.
For instructions, see Author a game server build and Integrating your title with PlayFab Game Server SDK (GSDK).
Create a Dockerfile
A Dockerfile is a text file with no extension and contains all commands needed to build a given container image.
- Open Notepad or any suitable editor
- Add specific commands needed to run and build a container. For an example of this file, see the DockerFile provided in Wrapper sample. For more information on how to create this file, see Dockerfile format (external) and Best practices when creating Dockerfile (external)
- Save file as a Dockerfile, ideally in an empty folder/directory. You should add other files that are needed to build the container image into this folder.
Saving instructions when using Notepad:
- Select File> Save as... to open up the save options
- Go to the folder you want to save the file in
- Under File name:, use "Dockerfile", including the quotes.
- For Save as type:, select All Files
- Select UTF-8 encoding
- Select Save
Build and upload Linux container image
- Open your Linux terminal, making sure that you have installed Docker.
- Run the following Docker commands using the sign-in credentials obtained from the earlier step. Then follow the instructions on screen to enter your username and password.
docker login customer5555555.azurecr.io
docker sign in logs you into the Azure container registry as shown in Game Manager.
username: customer5555555
password: HRDFOdIebJkvBAS+usa55555555
- Build the container image
Run the command below to build the container image using the Dockerfile in the folder/directory you are in. Note that there's a "." at the end of docker build command.
The -t flag specifies the name:tag information for your new container image. They'll be used if the build succeeds. If there are build errors, you have to fix them before moving on to the next step.
In the example below, the repository name is customer5555555.azurecr.io/pvp_gameserver and tag is v1. For more information, see docker build command reference (external link) and Building Dockerfile (external link).
When using WSL, the Windows C: drive is mounted at /mnt/c.
- Then run cd /mnt/c/path/to/your/Dockerfile to switch to the path where your Dockerfile is. For more information, see Accessing C drive.
docker build -t customer5555555.azurecr.io/pvp_gameserver:v1 .
Tip
When using Linux, run pwd to find out which directory you are currently at.
- Upload the container image
Run the below commands to push the image to your Azure PlayFab Container registry. Select a meaningful and helpful name:tag combination for your uploaded container image. Then use docker push or another container registry client, to upload your container to the Azure PlayFab operated registry.
docker tag hello-world customer5555555.azurecr.io/pvp_gameserver:v1
docker push customer5555555.azurecr.io/pvp_gameserver:v1
Check that your container is uploaded
After the container is uploaded, go back to the New Build page in Game Manager and select Refresh Images. You would be able to see the image in the list and select it. Alternatively, you can use the ListContainerImages API call to list your uploaded container images.
Now you're ready to deploy servers. For instructions, see PlayFab portal—Game Manager and Using PowerShell/API.
Windows and Linux container image differences
For many developers, using Windows managed container is the preferred simple and default choice. However, Linux container images deployed on virtual machines enjoy a cheaper hourly rate.
Note
You are able to fully customize your game servers whether you are using Windows or Linux container images. When using Windows servers, you customize the managed container image by uploading assets.
The table below lists some differences when creating and using them.
| Developer options | Windows | Linux |
|---|---|---|
| Development device OS | Windows OS | Windows Subsystem for Linux (WSL) or Linux OS (using dual-OS or VMs) |
| Container image | Straightforward deployment using our managed container image. You can still customize the container by uploading additional files as assets. | Additional work is needed because you have to create your own custom container image that gives you complete control. |
Manage Linux container images using APIs
You can use APIs to manage Linux container images. For the rest of build lifecycle (viewing usage, updating regions and standingBy configurations, deletion), manage them using Game Manager.
- GetContainerRegistryCredentials: Retrieve a container registry address, user name, and password
- ListContainerImages and ListContainerImageTags: Ensure your new image and tag are listed (sometimes it might take a couple of minutes for image to be fully registered in the system)
- CreateBuildWithCustomContainer: Create a build with a custom container. Specify the tagged image you uploaded earlier. Ensure the following properties are set on the request:
- ContainerImageReference - The image name and tag that was uploaded earlier (and is visible in ListContainerImages and ListContainerImageTags above).
- ContainerFlavor - "CustomLinux"
- ContainerRunCommand (Optional) - In case your container doesn't have a default command that it runs, this can be used to provide the command to run, along with any arguments.