Overview
What is Project Prague?
Project Prague is an SDK (software development kit) that allows you to create NUI (natural user interface) experiences based on hand gesture input. We provide APIs (application programming interfaces) for C#, C++ (including UWP and .NET Core flavors), enabling you to easily design and implement your own customized hand gestures and integrate them into your applications. Visit our GitHub samples repository to explore some hand gesture experiences and get acquainted with our programming model.
The building blocks of a gesture are hand poses and hand motions. Using simple constraints specified in an intuitive language, we allow you to define any hand pose and any hand motion you like. You can string together a sequence of hand poses and hand motions to specify a gesture. Once your gesture is defined and registered with our runtime, we will notify you every time we detect that your user has performed the gesture with their hand. At this point you can run the desired logic to respond to the detected gesture.
Using Project Prague, you can provide your users with hand gestures to intuitively control music and video playback, bookmark and like web content, send an emoji on IM (instant messaging) applications, interact with a digital assistant, create and run PowerPoint slideshows, manipulate three-dimensional objects, play games using their hands alone, and much more.
Getting started with Project Prague
Supported depth cameras
You need to have a depth camera to run Project Prague on your machine. We currently support the following camera brands:
| Brand | Gesture Detection Range | Experience |
|---|---|---|
| Intel® RealSense™ SR300 camera | 20-60 [cm] | Best |
| Intel® RealSense™ F200 camera | 20-60 [cm] | Good |
| Kinect for Windows v2 | 60-110 [cm] | Good |
For optimal performance, we recommend you use the Intel® RealSense™ SR300 camera.
Hardware and software requirements
Please make sure your system meets the following requirements before you proceed to set up Project Prague:
| Category | Recommended | Minimal |
|---|---|---|
| CPU | Intel® Core™ i7 series, 8 logical cores | Intel® Core™ i5 series, 4 logical cores |
| Free RAM | 2GB or more | 1GB |
| Operating System | Windows 10 with Creator Update installed | Windows 10 |
Setting up Project Prague on your machine
To get Project Prague running on your machine you will need to:
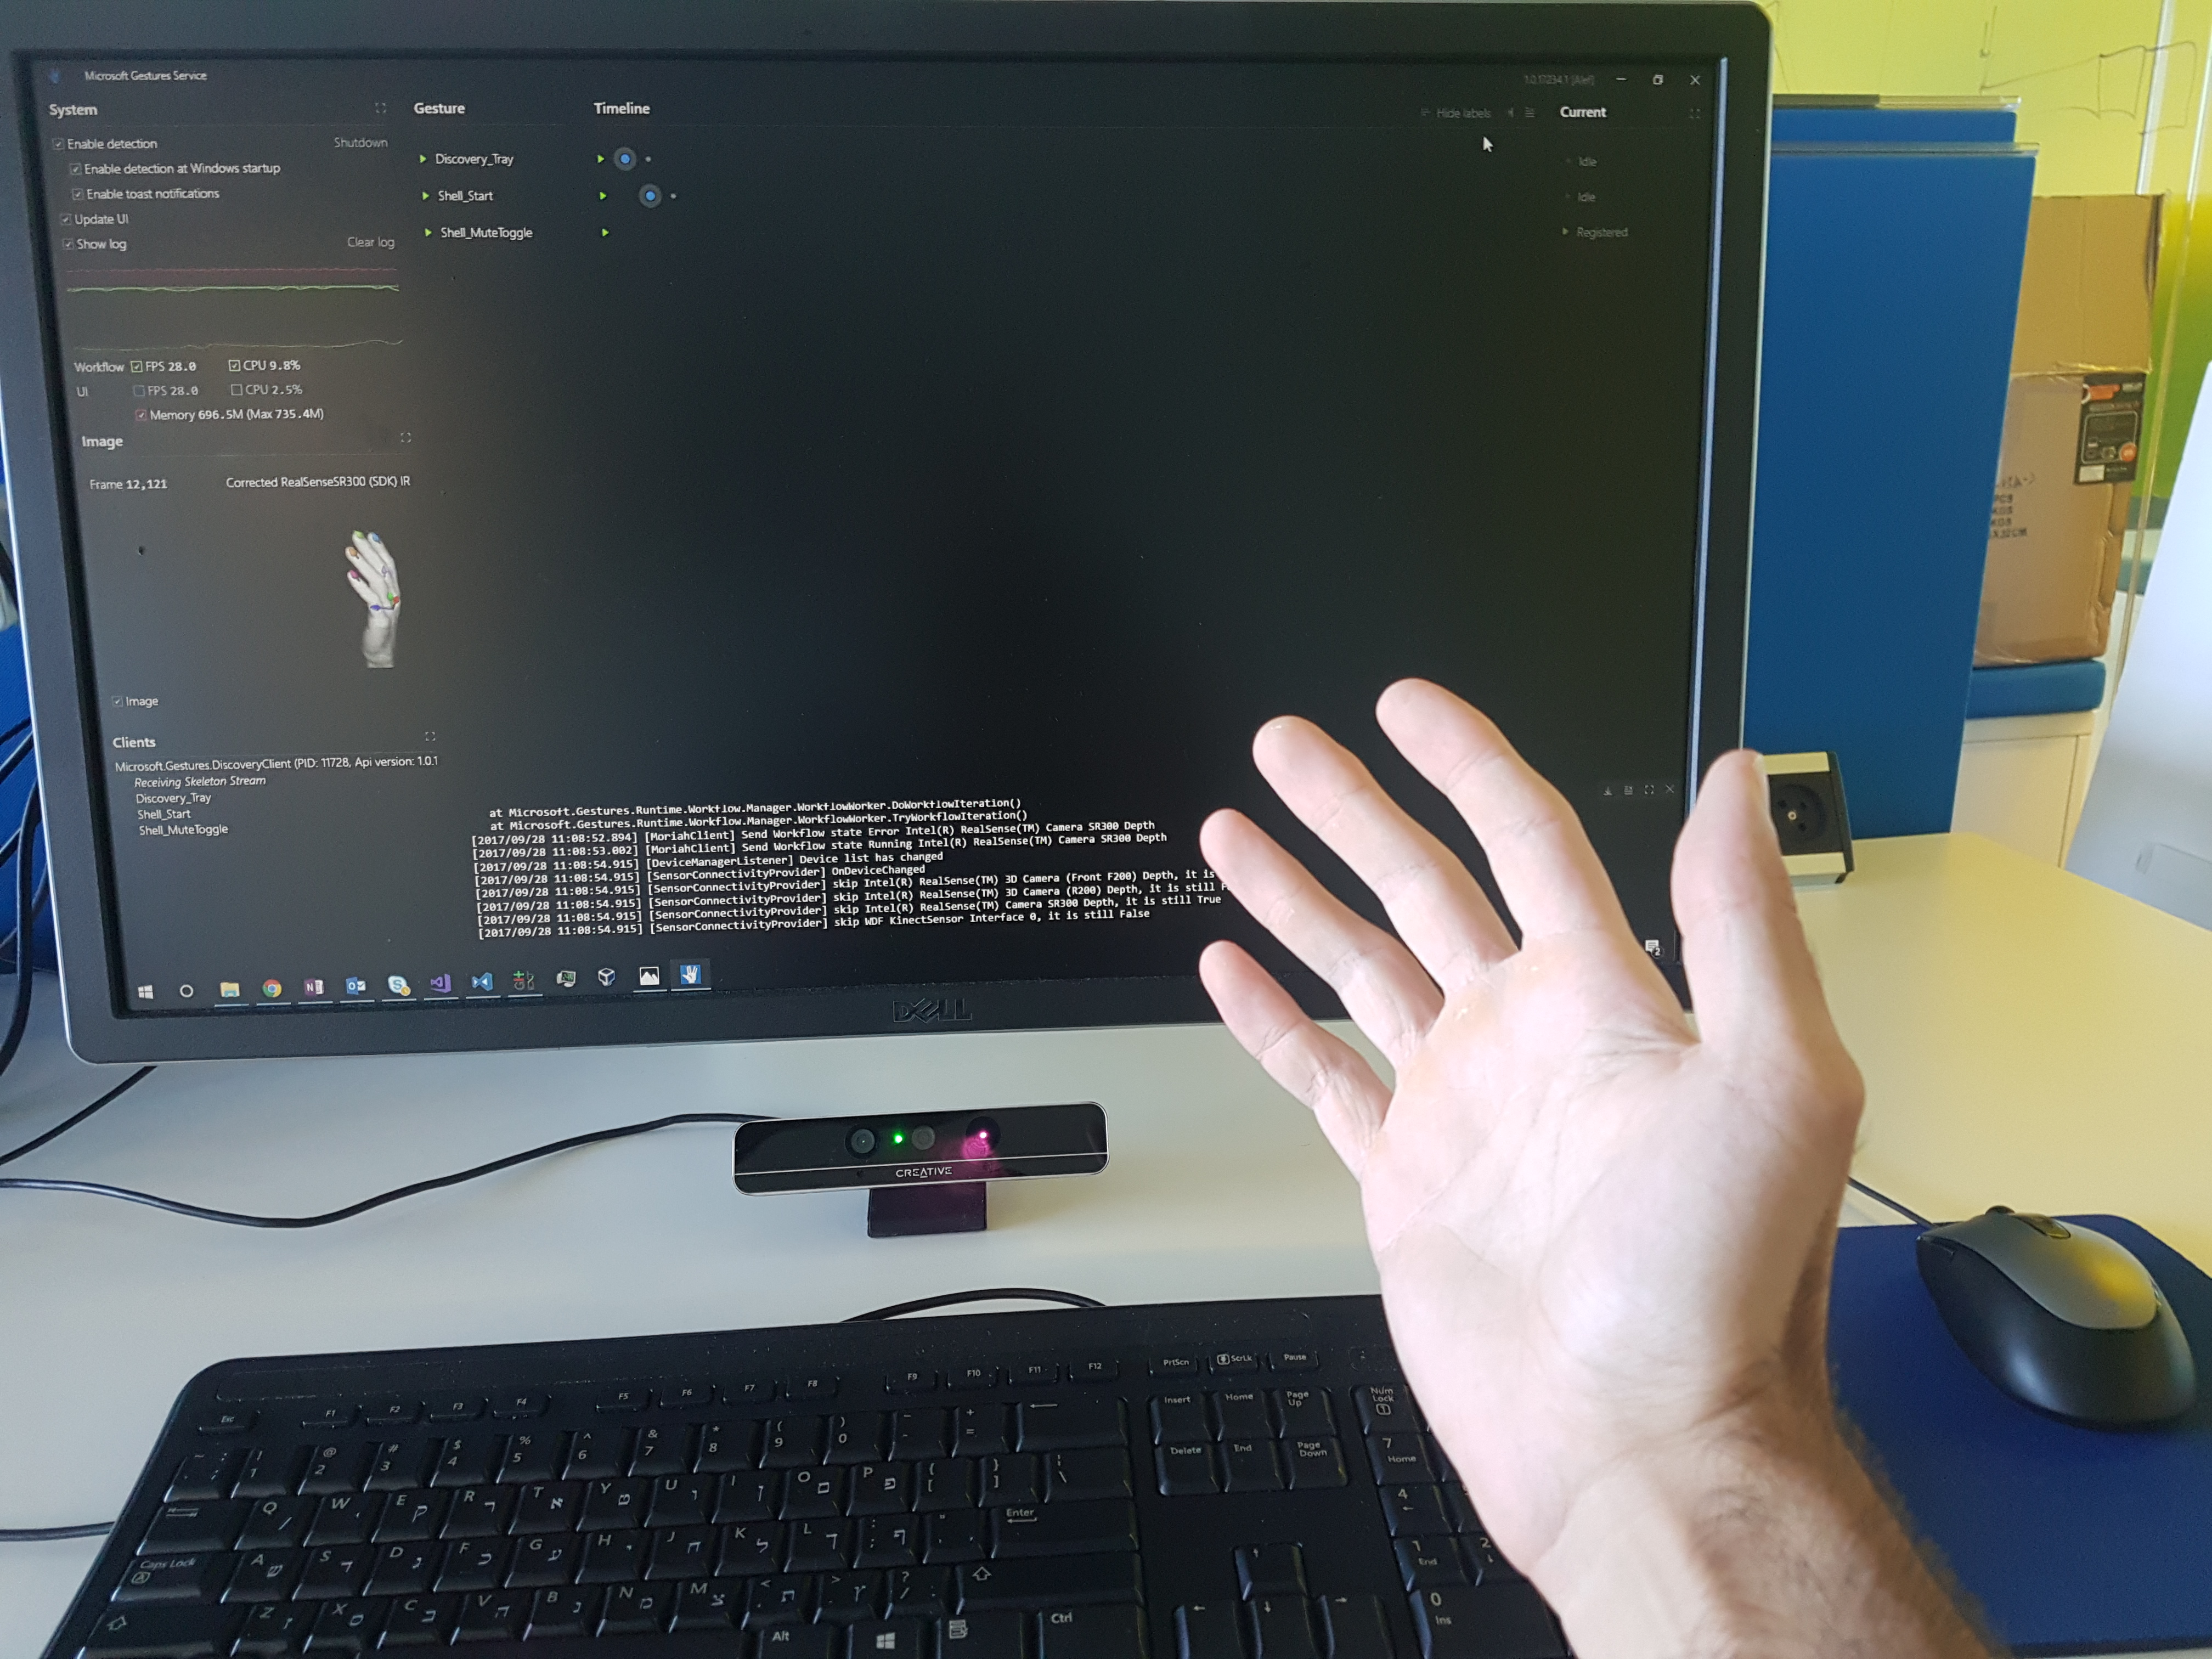
Plug your depth camera in to a USB 3.0 port and place it below your computer's monitor, as illustrated in the image below:
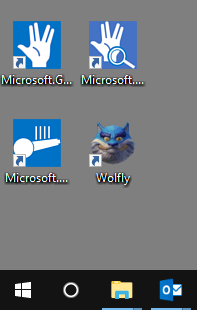
Download and install Project Prague runtime from aka.ms/gestures/download. The installation will place shortcuts on your desktop pointing to our compiled demo applications:
Our demo applications are:
Application Description | Runs our [gesture detection service](getting-started-gestures-service.md) Microsoft.Gestures.Service| Provides gesture integration for Windows shell, PowerPoint, Skype and more
 Microsoft.Gestures.DiscoveryClient| Displays the RGB stream from the camera, adding gesture-triggered
 Microsoft.Gestures.Camera.Viewer
animated overlays| Runs a gestures driven game made with Unity® Wolfly
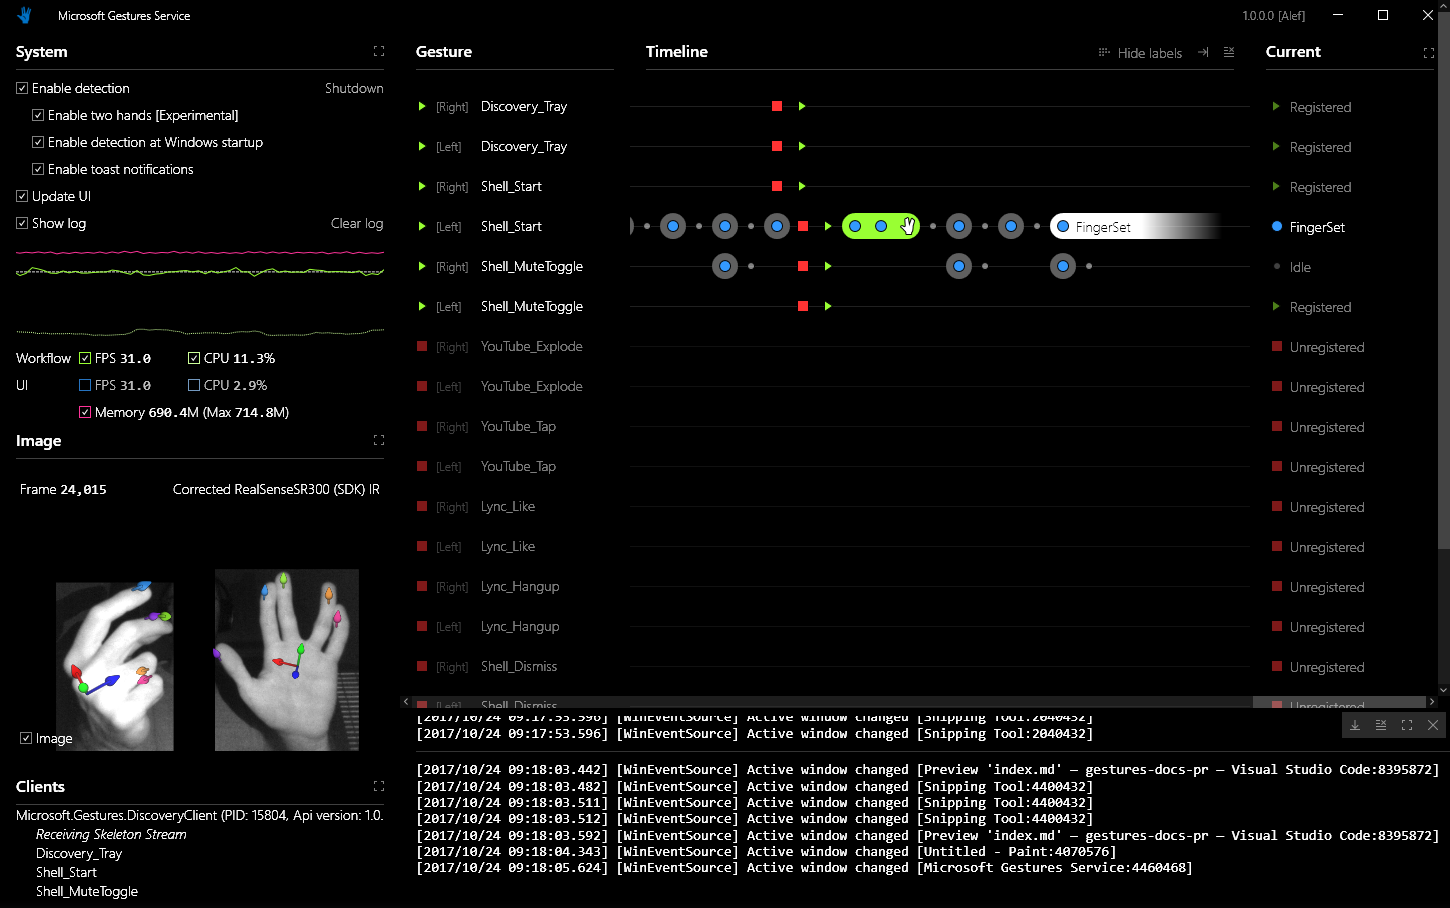
When installation is complete, a window titled Microsoft Gestures Service will be launched. This is our real-time gesture and pose detection dashboard. Make sure that your fingers are detected successfully, as demonstrated below:
Note
By default, only right hand detection is enabled. To enable both hands, check the Enable two hands box in the System section of the Gestures Service window.
Note that Project Prague setup has configured the following two applications to launch on Windows startup and run in the background:
- Microsoft.Gestures.Sync - keeps the Gestures Service running and pulls updates when we publish them.
- Microsoft.Gestures.DiscoveryClient - provides gesture integration for various contexts: Windows shell, PowerPoint, Skype, YouTube, Photos and Visual Studio.
You can modify this configuration any time in the Startup tab of the Task Manager.
Understanding gestures in Project Prague
Before you start writing gestures, you should get familiar with the basic building blocks of a gesture - hand poses and hand motions.
Hand pose
A hand pose refers to a snapshot of the hand at a given moment. The hand pose contains a complete description of the state of the palm and the fingers in that snapshot. In our API, a hand pose is represented by the HandPose class, which is made up of various constraints as illustrated below:
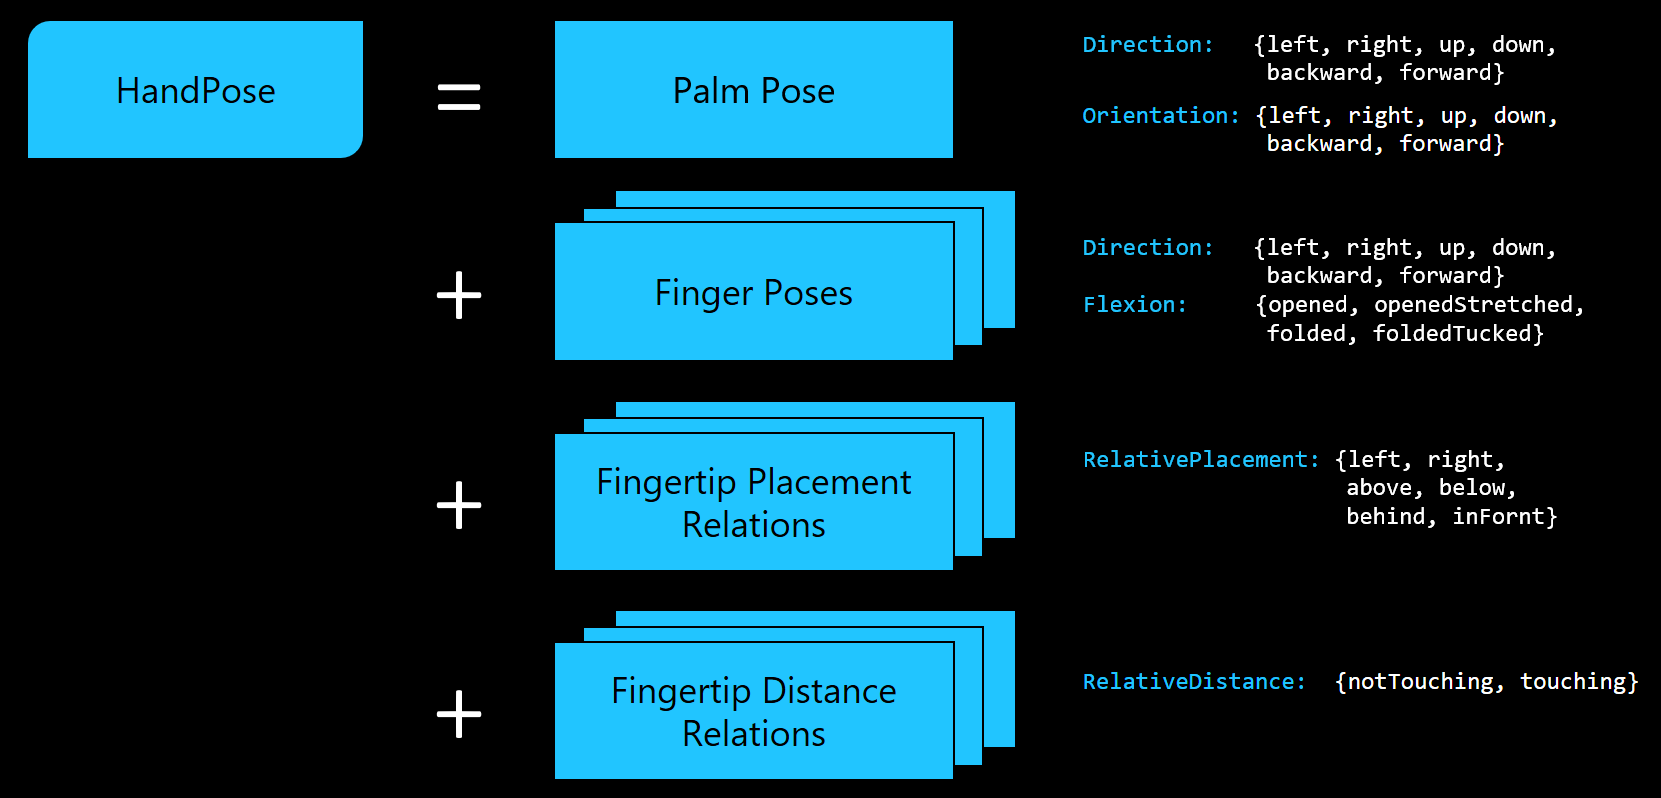
You can express any hand pose by characterizing all the constraints involved in that pose, as illustrated below:
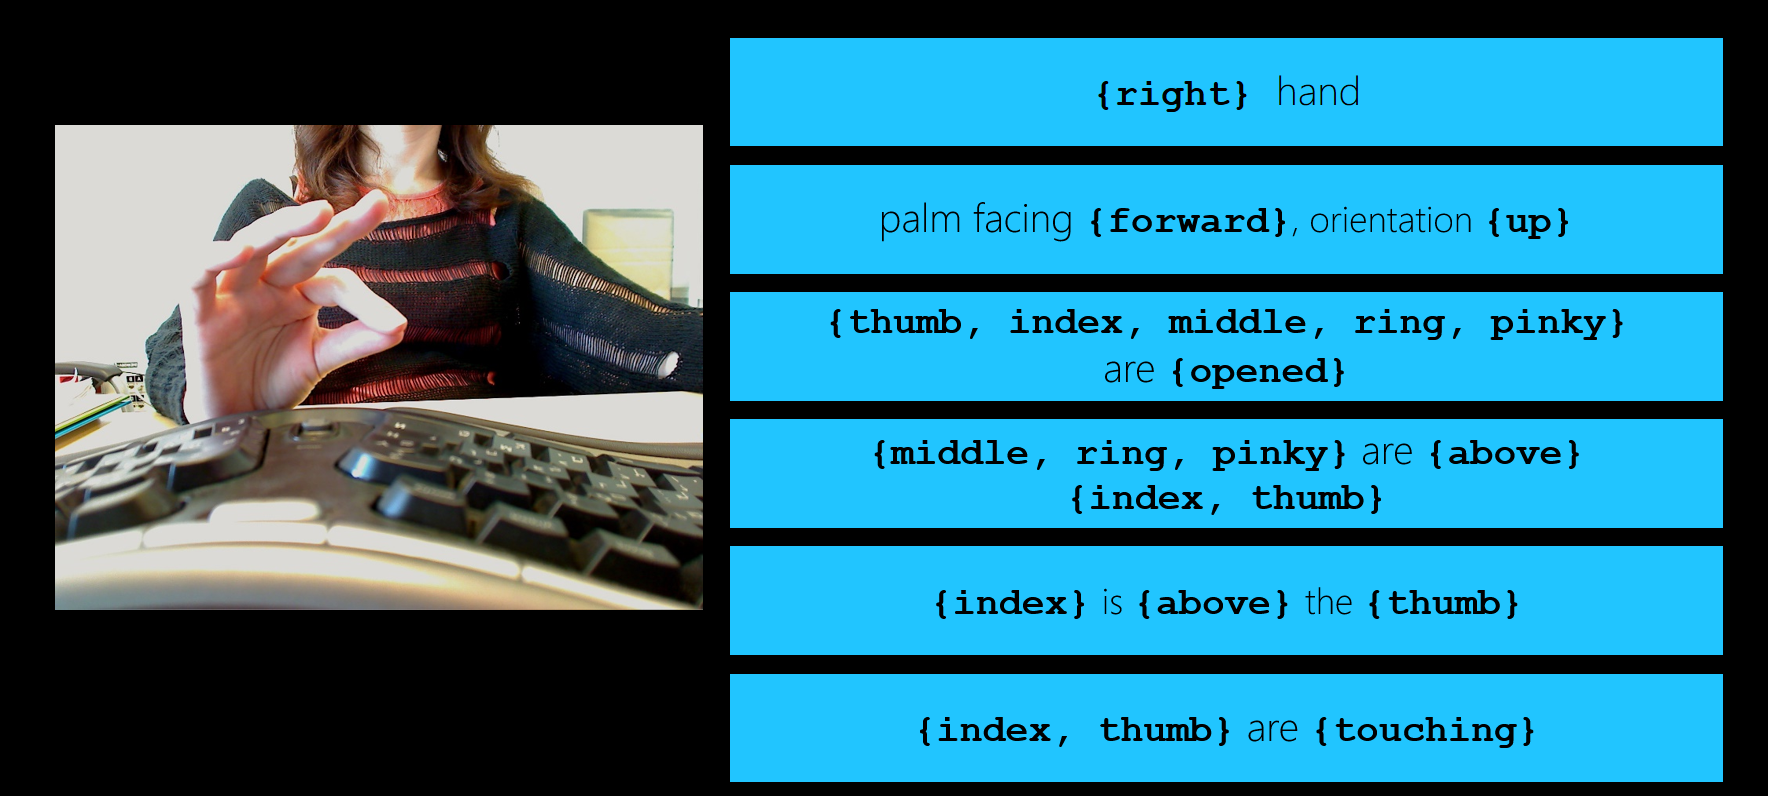
The example above demonstrates all the constraints you can reasonably associate with the snapshot on the left. This example is given for educational purposes only, to show you the meaning of the different terms used to specify constraints in the Project Prague language. In practice, you would never use such a large number of constraints to specify a hand pose. You should try, instead, to find the minimal number of constraints that capture the essence of the hand pose. The following example is a practical way to describe the same pose:
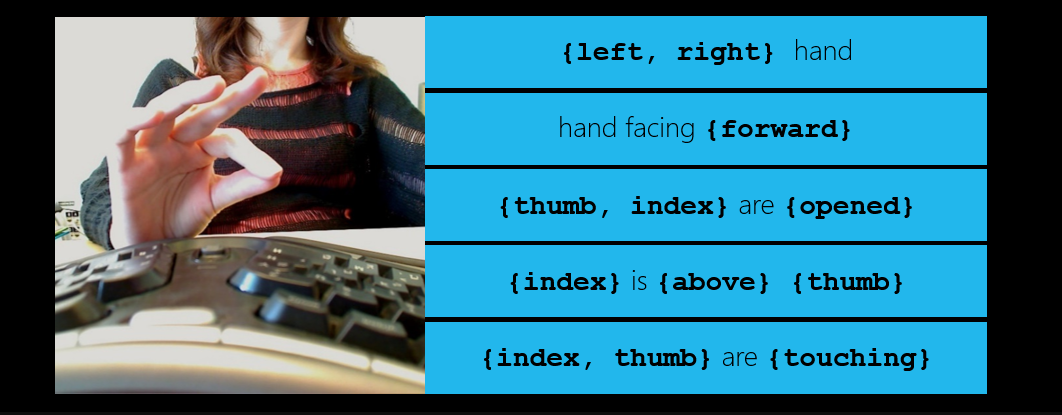
This last example captures well the essence of the pose in the snapshot: The pinching action performed by the thumb and index fingers. Notice that the middle, ring and pinky fingers are absent from the description of the hand pose, as they do not participate in the pinching action and are, therefore, not necessary to express the essence of the pose.
Using too many constraints when you define a hand pose (i.e., overfitting) can produce a pose which is hard to detect. This is because your users will have to adjust their hand to a very specific posture to satisfy all the constraints. Using too few constraints when you define a hand pose (i.e., underfitting) can make it too easy for the pose to get detected, and your user may perform the pose unintentionally.
Hand motion
As you move your hand, your fingertips trace a curve through space. We refer to this curve as a "hand motion", and in our API, it is represented by the HandMotion class. A hand motion is associated with a hand part (either the center of the palm or one of the fingertips) and made up of a sequence of motion building blocks. The available building blocks are illustrated below:
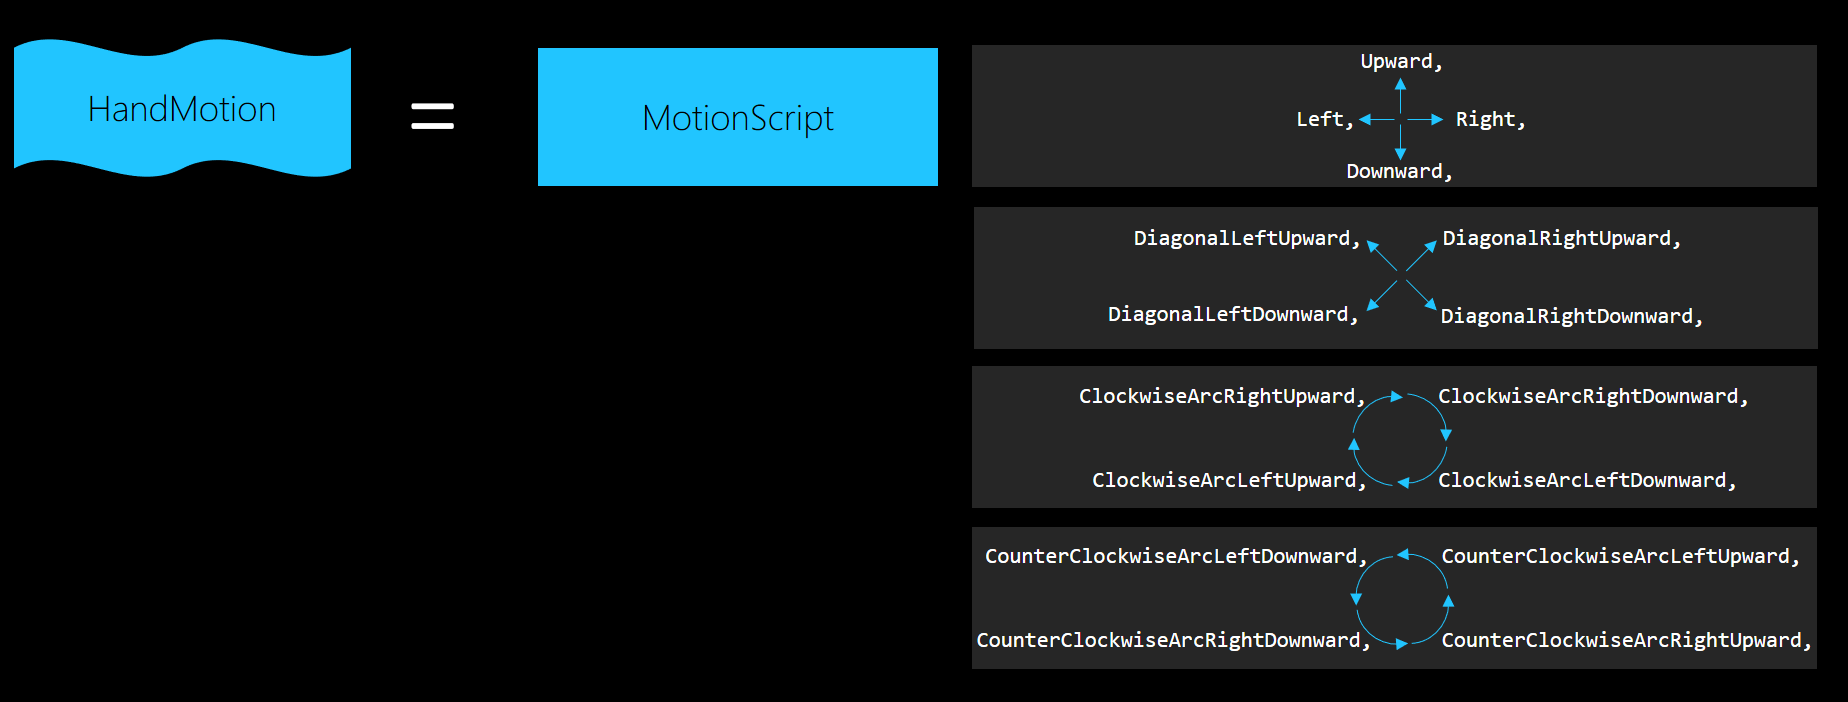
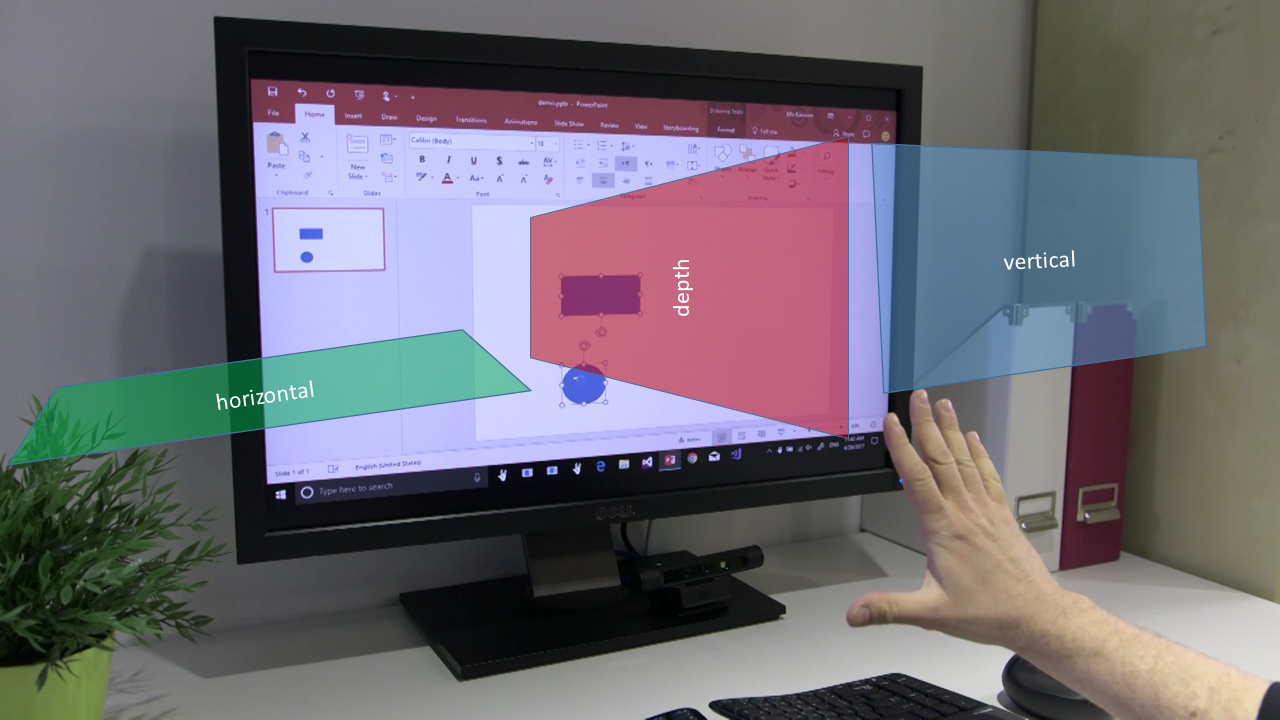
As you can see, all the building blocks describe motion which is two-dimensional. In other words - the entire motion is contained within a single plane. We have introduced this limitation intentionally, in order to provide a better user experience, since unconstrained three-dimensional hand motion can be difficult to execute accurately. You can choose one of three available planes to contain your hand motion, as illustrated below:
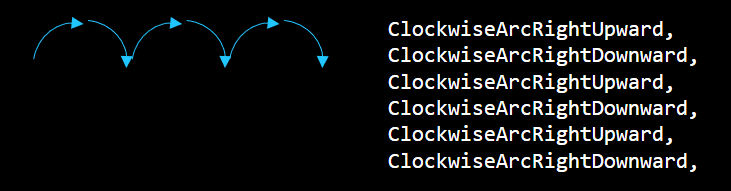
Once you've decided which hand part should execute the motion and chosen a plane to contain it, all that is left is to specify the motion as a sequence of motion building blocks, for example:
Gesture
We think of a gesture as a state-machine whose states represent hand poses, hand motions, or even other gestures. In this state-machine there are initial states and receiving states. A path starting with an initial state and ending with a receiving state represents a sequence of actions (hand poses, hand motions and hand gestures) the user must carry out in order to trigger the detection of the corresponding gesture.
In our API, a gesture is represented by the Gesture class. The following example illustrates a gesture whose state-machine is a simple sequence of hand poses and hand motions:
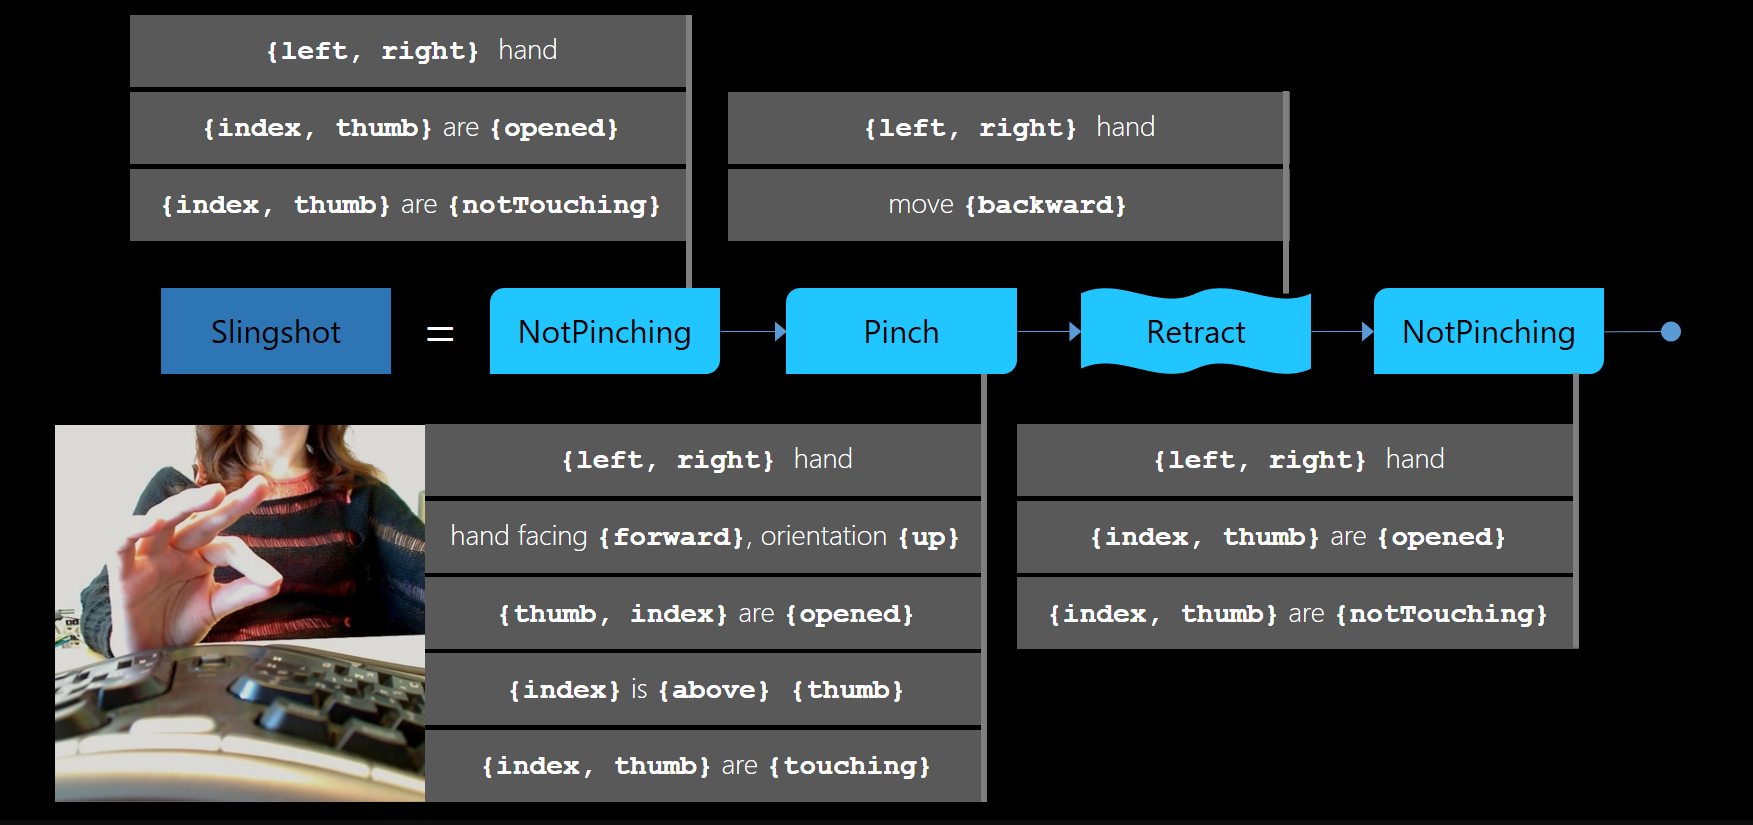
The Slingshot gesture in the example is made up of a single hand motion, named Retract, and three hand poses - two instances of NotPinching and one instance of Pinch. The Slingshot gesture corresponds to the following action sequence: Imagine you are holding a slingshot in your left hand, now grasp its pocket with the thumb and index fingers of your right hand and pull it back to stretch the slingshot band, finally - spread the index and thumb fingers apart to release the pocket and let the imaginary projectile fly.
Creating gestures in Project Prague
We will now give an example illustrating how to program a simple gesture using the Project Prague API.
Important
The root namespace for all Project Prague .NET entities is Microsoft.Gestures and, accordingly, Microsoft::Gestures for all native entities.
We will implement the RotateRight gesture:
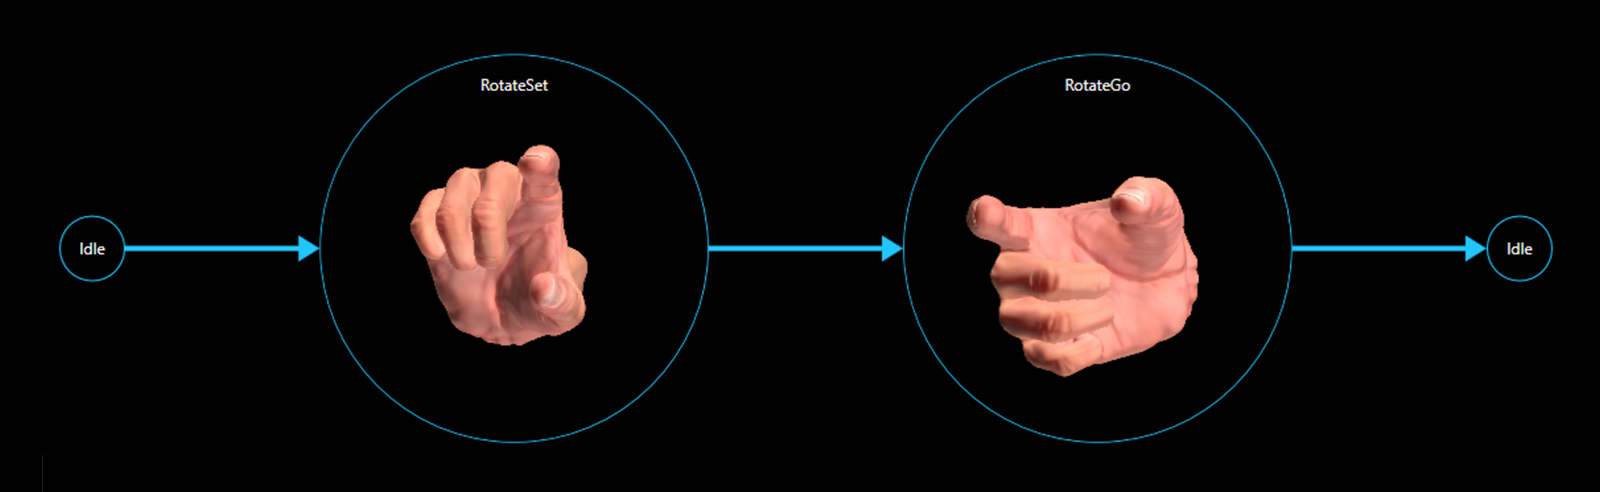
Intuitively, when performing the RotateRight gesture, a user may expect some object in the foreground application will rotate right by 90°. We have used this gesture, for instance, in our Discovery Client, to trigger the rotation of an image in a PowerPoint slideshow.
The following code demonstrates the suggested way to define the RotateRight gesture:
Warning
It looks like the sample you are looking for has moved! Rest assured we are working on resolving this.
Whe specify the RotateRight gesture as a sequence of two hand poses - RotateSet and RotateGo. Both poses require the thumb and index to be open, pointing forward and not touching each other. The difference between the poses is that RotateSet specifies that the index finger should be above the thumb and RotateGo specifies it should be right of the thumb. The transition between RotateSet and RotateRight, therefore, corresponds to a rotation of the hand to the right.
Note that the middle, ring and pinky fingers do not participate in the definition of the RotateRight gesture. This makes sense because we do not wish to constrain the state of these fingers in any way. In other words, these fingers are free to assume any pose during the execution of the RotateRight gesture.
Having defined the gesture, you need to hook up the event indicating gesture detection to the appropriate handler in your target application:
Warning
It looks like the sample you are looking for has moved! Rest assured we are working on resolving this.
The detection itself is performed in the Microsoft.Gestures.Service.exe process (associated with the "Microsoft Gestures Service" window discussed above). This process runs in the background and acts as a service for gesture detection. We provide you with the GesturesServiceEndpoint class in order to communicate with the service. The following code snippet instantiates a GesturesServiceEndpoint object and registers the RotateRight gesture for detection:
Warning
It looks like the sample you are looking for has moved! Rest assured we are working on resolving this.
When you wish to stop the detection of the RotateRight gesture, you can un-register it as follows:
Warning
It looks like the sample you are looking for has moved! Rest assured we are working on resolving this.
And your handler will no longer be triggered when the user executes the RotateRight gesture.
When you are finished working with gestures, you should dispose of the GesturesServiceEndpoint object:
Warning
It looks like the sample you are looking for has moved! Rest assured we are working on resolving this.
Please note that in order for the above code to compile, you will need to reference the following assemblies, located in the directory indicated by the MicrosoftGesturesInstallDir environment variable:
- Microsoft.Gestures.dll
- Microsoft.Gestures.Endpoint.dll
- Microsoft.Gestures.Protocol.dll
To experiment with a complete open source code sample utilizing the RotateRight gesture, please refer to the RotateSample in our GitHub samples repository. You can also find more advanced samples in this repository, demonstrating applications for gestures in C# and C++ (including UWP and .Net Core flavors).