Note
Access to this page requires authorization. You can try signing in or changing directories.
Access to this page requires authorization. You can try changing directories.
Microsoft Graph Data Connect (Data Connect) augments transactional APIs with an intelligent way to access rich data at scale. Data Connect is ideal for big data applications and machine learning as it allows you to develop applications for analytics, intelligence, and business process optimization by extending Microsoft 365 data into Microsoft Azure. Through this offering, you'll be able to take advantage of the vast suite of compute and storage in Azure while staying compliant with industry standards and keeping your data secure.
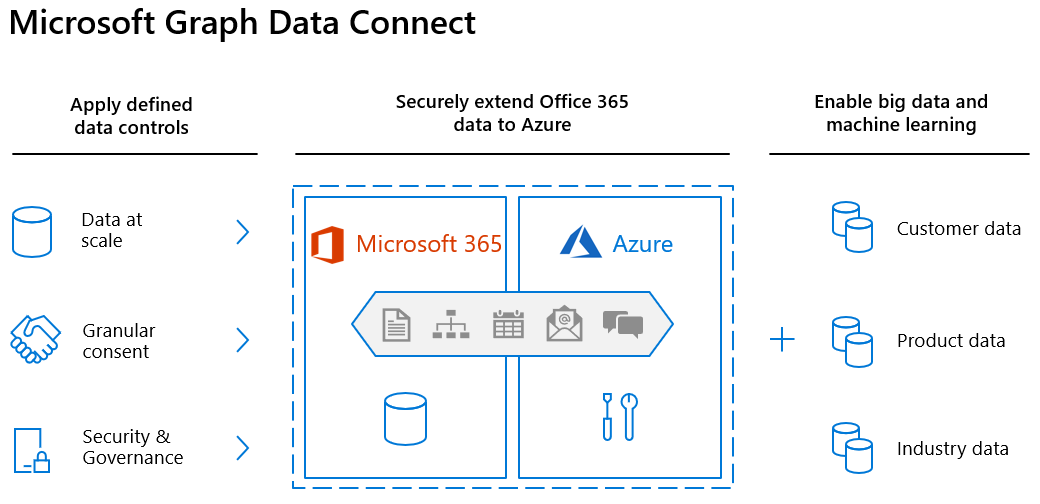
Data Connect uses Microsoft Fabric, Azure Synapse, or Azure Data Factory to copy Microsoft 365 data to your application's storage at configurable intervals. It also provides a set of tools to streamline the delivery of this data to Azure, letting you access the most applicable development and hosting tools available.
Data Connect also grants a more granular control and consent model: you can manage data, see who is accessing it, and request specific properties of an entity. This enhances the Microsoft Graph model, which grants or denies applications access to entire entities.
Additionally, you can use Data Connect to enable machine learning scenarios for your organization. In these scenarios, you can create applications that provide valuable information to your stakeholders, train machine learning models, and even perform forecasting based on large amounts of acquired data.
Get started
In this tutorial, you'll create your first single-tenant Data Connect application. The following general flow explains the Data Connect onboarding process.
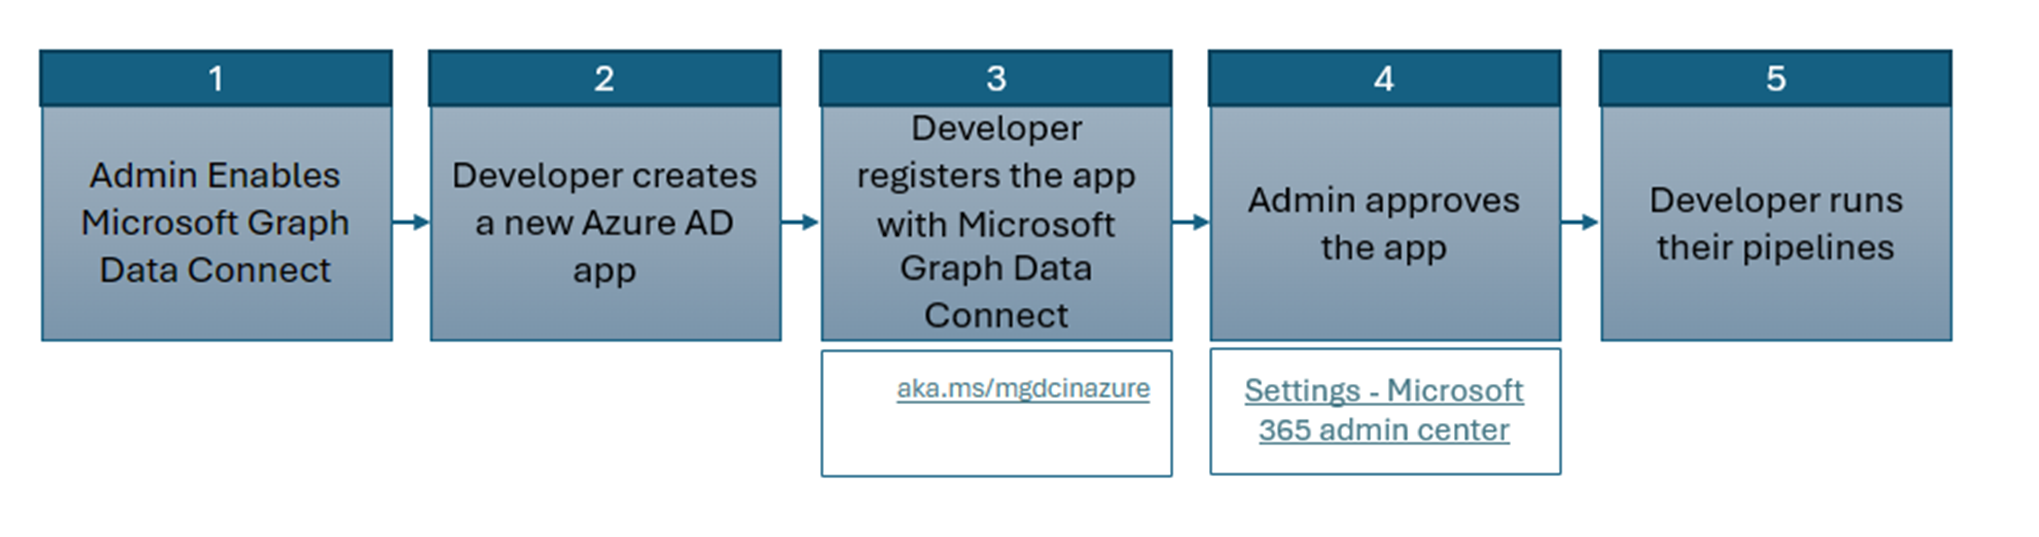
Admin enables Data Connect: The first step in onboarding is for your global administrator to enable Data Connect.
Developer creates a new Microsoft Entra application: The developer needs to first create a new Microsoft Entra application.
Developer registers the application with Data Connect: Once the Microsoft Entra application is created, the developer needs to register the application with Data Connect using the new registration portal for Microsoft Graph Data Connect applications. In this step, the developer specifies what data they require for their application.
Admin approves the application: After the developer has registered their application with Data Connect, the global administrator can use the new portal for Data Connect application consent to review the registered application and approve it.
Developer runs their pipelines: After the administrator has consented to the application, the developer might run their pipelines without any stalling for runtime consent. The pipeline creation and run via Azure Data Factory or Azure Synapse remains the same.
Note
If you're working in a new tenant that doesn't have Data Connect enabled, you don't need to take any action. If you have an existing tenant that already has Microsoft Graph Data Connect enabled, before you complete this tutorial, ask your global administrator to toggle Microsoft Graph Data Connect off and then on again in the admin portal.
Prerequisites
To complete this tutorial, you need the following subscriptions or licenses.
- For this tutorial, we strongly recommend that you use a Microsoft 365 developer tenant.
- Your Microsoft 365 and Azure tenants must be in the same Microsoft Entra tenancy.
- The Azure subscription must be in the same tenant as the Microsoft 365 tenant.
- One user in your Microsoft 365 tenant has the Global Administrator role enabled. Going forward, this tutorial refers to this user as the "admin". Only an "admin" user can approve the test application.
- A different user in your Microsoft 365 tenant with Application Administrator or Application Developer role. Going forward, this tutorial refers to this user as the "developer". The developer user does the majority of this tutorial.
Microsoft 365 tenancy
- If you don't have a Microsoft 365 tenant, you might qualify for one through the Microsoft 365 Developer Program; for details, see the FAQ. Alternatively, you can sign up for a 1-month free trial or purchase a Microsoft 365 plan.
Note
You can't approve your own test application using the same account. Make sure that you have another member (or account) in your tenant that acts as an admin.
Microsoft Azure subscription
- If you don't have a Microsoft Azure subscription, visit the following link to get one (for free): Create your Azure Free Account.
- Your Azure subscription must be in the same tenant as your Microsoft 365 tenant and both must be in the same Microsoft Entra tenancy.
- If your Azure subscription isn't in the same tenant as your Microsoft 365 tenant, you can associate your subscription with Microsoft Entra ID in your Microsoft 365 tenant by following the steps listed in Associate or add an Azure subscription to your Microsoft Entra tenant.
Note
The screenshots and examples used in this tutorial are from a Microsoft 365 developer tenant with a sample email from test users. You can use your own Microsoft 365 tenant to perform the same steps. No data is written to Microsoft 365. A copy of email data is extracted from all users in a Microsoft 365 tenant and copied to an Azure Blob Storage account. You maintain control over who has access to the data within the Azure Blob Storage.
Set up your Microsoft 365 tenant and enable Microsoft Graph Data Connect
Before you use Microsoft Graph Data Connect (Data Connect) for the first time, please work with your Microsoft 365 tenant admin to enable the Data Connect service for your tenant.
For this tutorial, please ensure that you have an account with admin privileges available. You must complete this step to set up your first pipeline. We recommend having at least two users in your Microsoft 365 tenant with the global administrator role enabled.
Enable Microsoft Graph Data Connect in your Microsoft 365 tenant
Set up your Microsoft 365 tenant to enable the usage of Microsoft Graph Data Connect.
Open a browser, go to your Microsoft 365 admin portal, and sign in with your admin user.
Select Settings > Org settings. You might have to choose Show all before you're able to view Settings.
In the Services tab (which should be the default selection), select Microsoft Graph Data Connect.
Select the checkbox to Turn Microsoft Graph Data Connect on or off for your entire organization and choose Save.
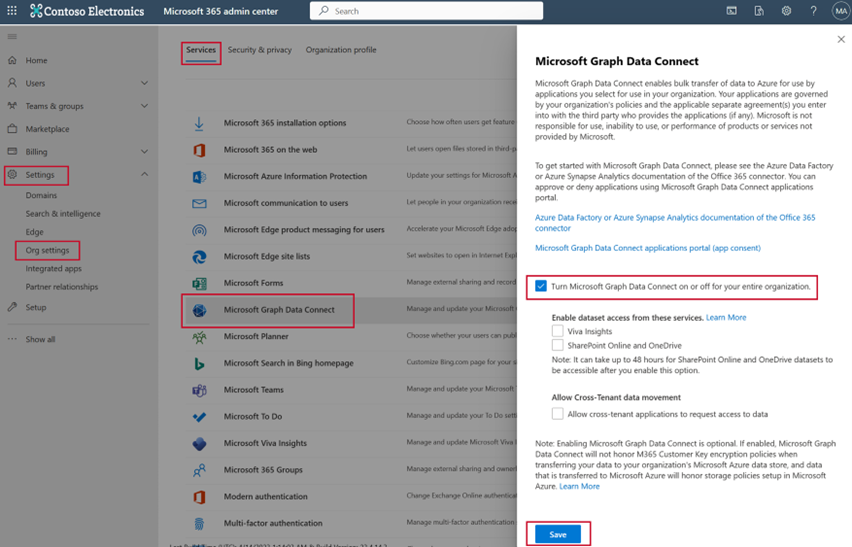
Congratulations, you just enabled Microsoft Graph Data Connect for your organization!
Set up your Microsoft Entra application
In this exercise, you learn how to create a Microsoft Entra application. This serves as the security principal to run the data extraction process with Microsoft Graph Data Connect.
Sign in to the Microsoft Entra admin center with at least the Application Administrator orApplication Developer role.
Expand the Identity menu > select Applications > App registrations > New registration.
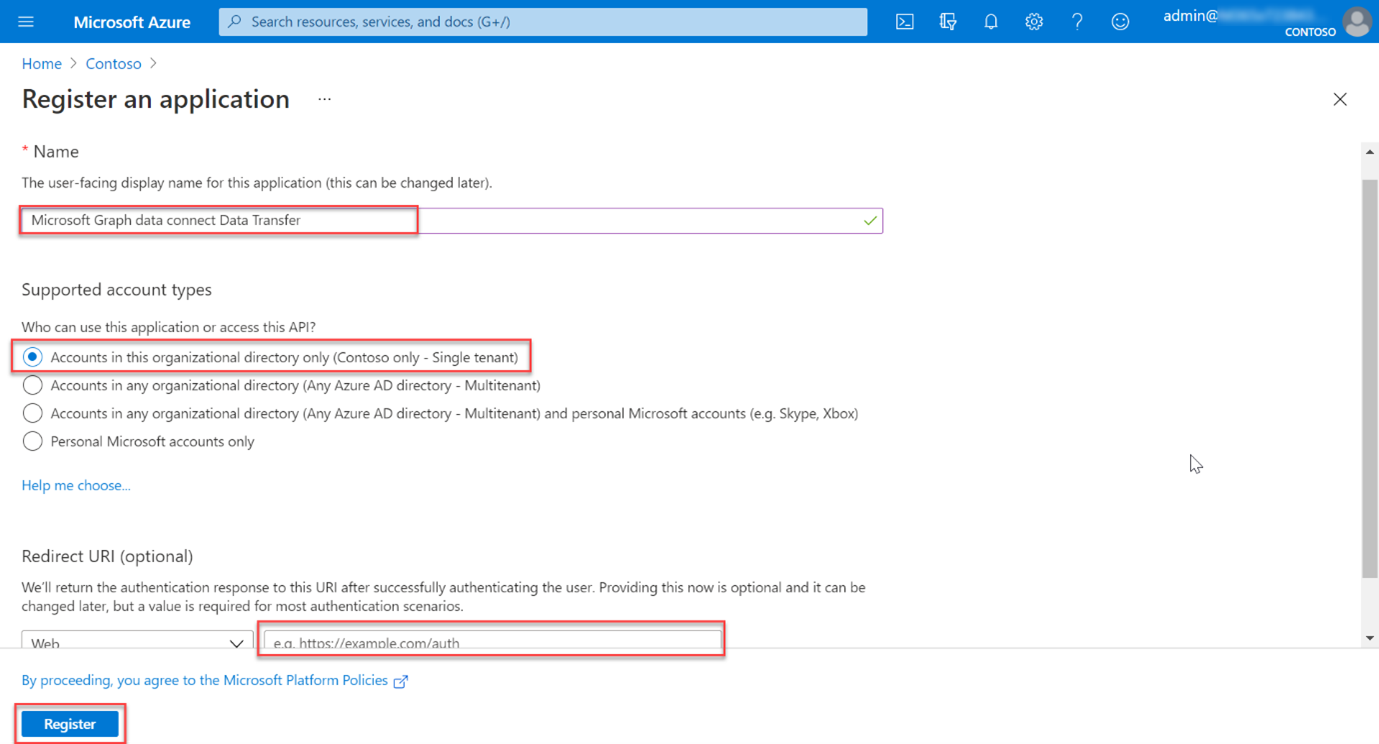
Use the following values to create a new Microsoft Entra application and select Register.
- Name: Microsoft Graph Data Connect Data Transfer (provide the name of your choice).
- Supported account types: Accounts in this organizational directory only.
- Redirect URI: Leave the default values.
Locate the Application (client) ID and copy it as you need it later in this tutorial. Going forward, this is referred to as the service principal ID.
Locate the Directory (tenant) ID and copy it as you need it later in this tutorial. Going forward, this is referred to as the tenant ID.
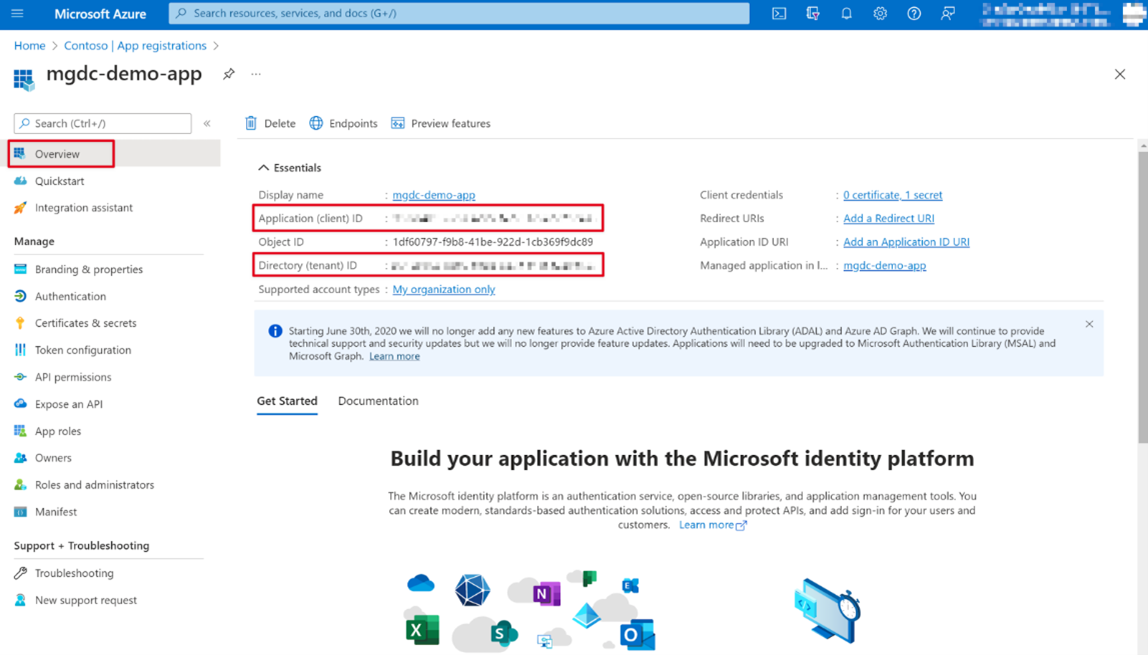
On the left navigation pane, select Certificates & secrets under Manage.
Select the New client secret button. Set Description to any name, set Expires to any value in the dropdown, and choose Add.
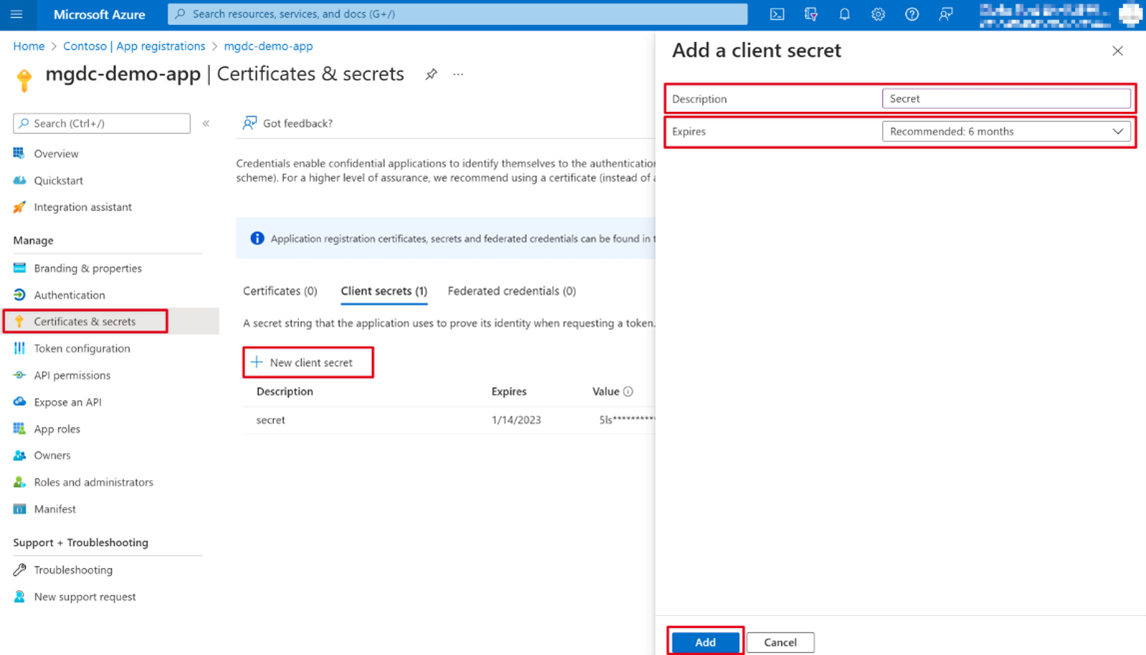
- After the client secret is created, make sure you save the Value somewhere safe, as it will no longer be available later; otherwise, you'll need to create a new one.
- Going forward, the client secret is referred as the service principal key.
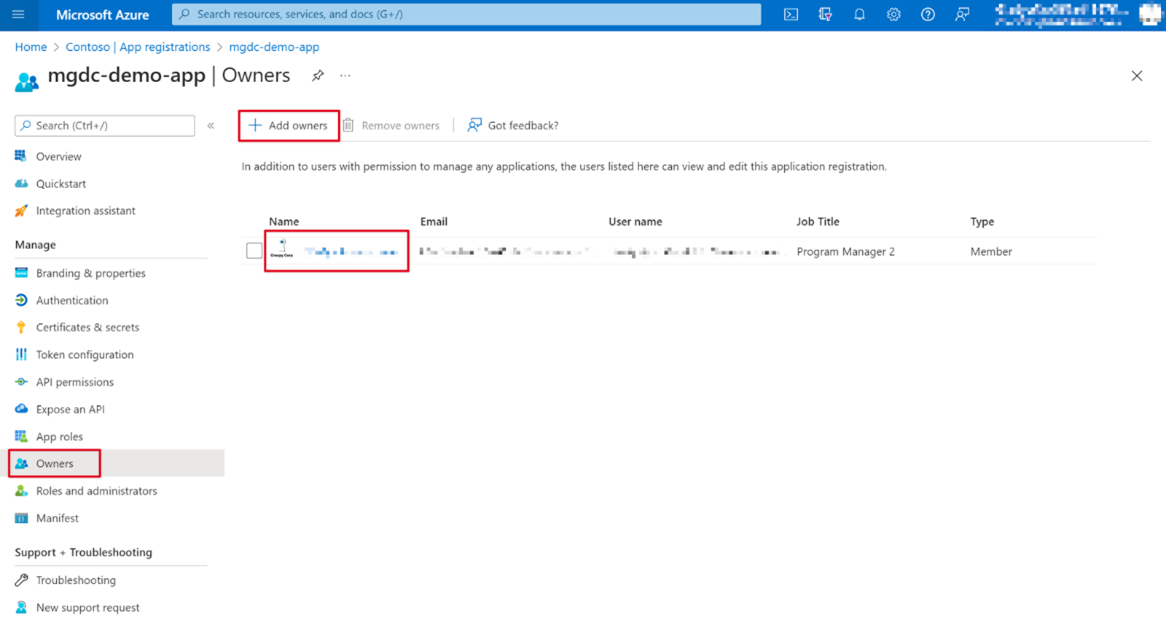
On the left navigation pane for the application, select Owners.
Ensure that your account (if you're using a developer tenant use the Global admin account) meets the following requirements to be an application owner:
- Your user account corresponds to a valid user in the tenant who isn't a service principal name.
- Your account must have an Exchange Online license assigned (must have a mailbox).
- Alongside the Exchange Online license, your account must also have a working E5 subscription/license.
Verify that your account is listed as an application owner. If that isn't the case, add it to the list.
Set up your Azure Storage resource
In this step you will create an Azure Storage account where Microsoft Graph Data Connect will store the data extracted from Microsoft 365 for further processing.
Open a browser and go to your Azure portal.
Sign in using an account with an Application developer role to your Azure portal.
On the sidebar navigation, select Create a resource.
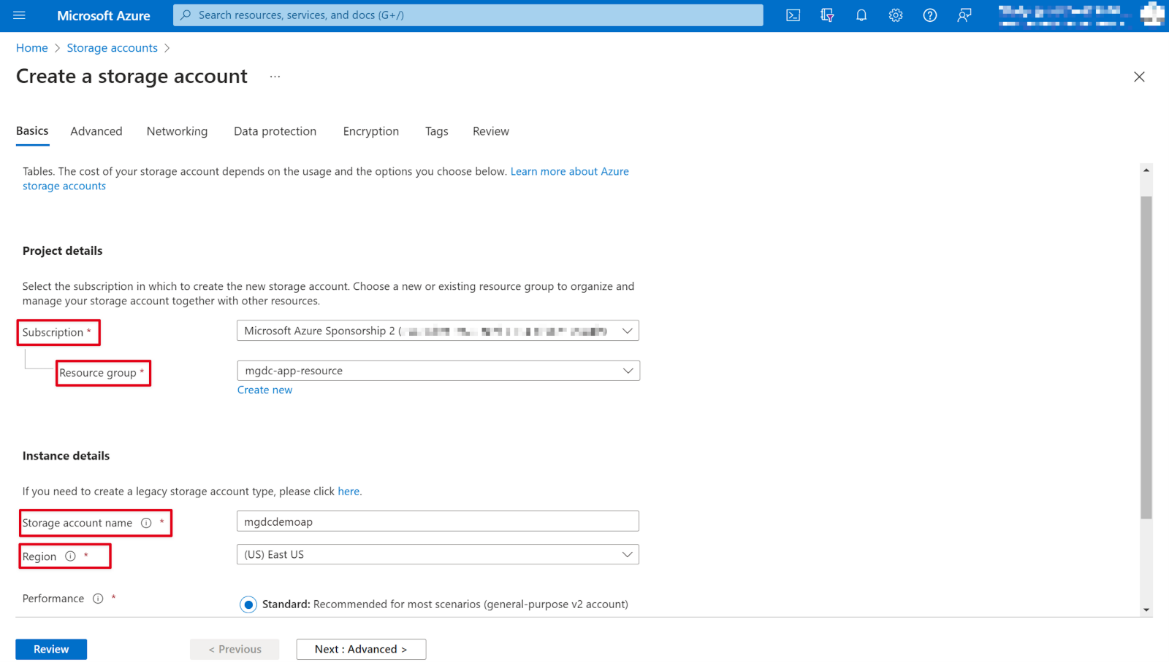
Find the Storage account resource type and use the following values to configure it. For Performance, Redundancy, and the Advanced tab, the values for these fields are an example.
- Subscription: select your Azure subscription
- Resource group: mgdc-app-resource (or select an existing resource group)
- Storage account name: mgdcdemoap (or you can name and select your own storage account)
- Region: pick an Azure region in the same region as your Microsoft 365 region
- Performance: Standard
- Redundancy: Geo-redundant storage
- Advanced tab:
- Access tier: Hot
After configuring the values for the Basics and Advanced tabs, leave the rest of the settings as default.
Note
Ensure that within the Networking tab, the Enable public access from all networks is enabled. You can also select the second option Enable public access from selected virtual networks and IP addresses; however, additional steps outside of this tutorial need to be performed, which are highlighted in the IP addresses section.

Review that the settings match those shown in the previous steps and select Create to finalize.
After the Azure Storage account has been created, grant the Microsoft Entra application previously created the proper access to it.
- Select the Azure Storage account.
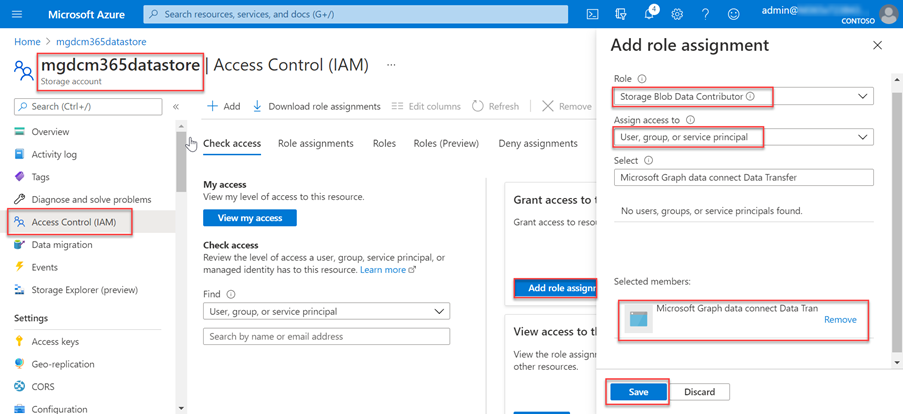
- On the sidebar menu, select Access control (IAM).
- Select the Add button in the Add a role assignment block.
- Grant the Storage Blob Data Contributor role to the application you previously created.
- Select Storage Blob Data Contributor as the Role, and click Next.
- Assign access to User, group or service principal.
- Click + Select members, and in the right pane that displays, search for the application (Microsoft Graph data connect Data Transfer) that you previously created, and click Select.
- Select Review + assign.
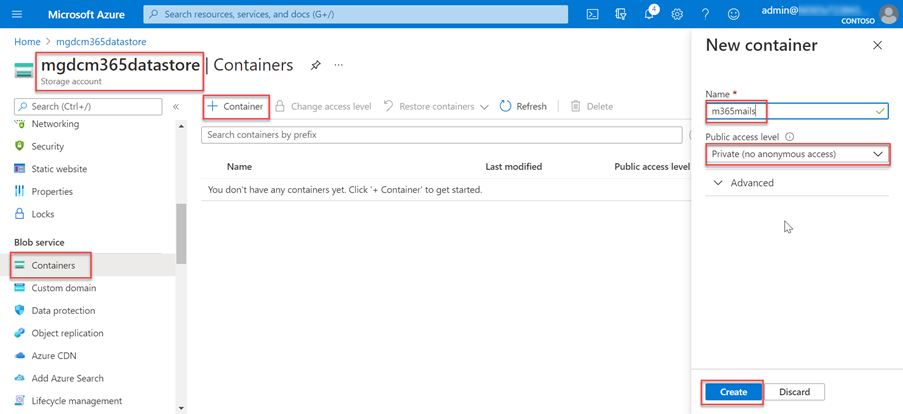
Create a new container in the mgdcdemoap Azure Storage account.
Select the mgdcdemoapp Azure Storage account (or your account name from step 4).
On the sidebar menu, select Containers under the Data storage service section.
Select the +Container button at the top of the page and use the following values and then select Create.
- Name: m365mails
- Public access level: Private (no anonymous access)
Register your Microsoft Entra application with Microsoft Graph Data Connect
As a prerequisite, you should enable Data Connect in your tenant. We recommend that you create a Microsoft Entra application and a storage destination resource; you can also set these up by using the wizard. The app registration process in Data Connect involves using a wizard with three tabs: Registration info, Datasets, and Review + create.
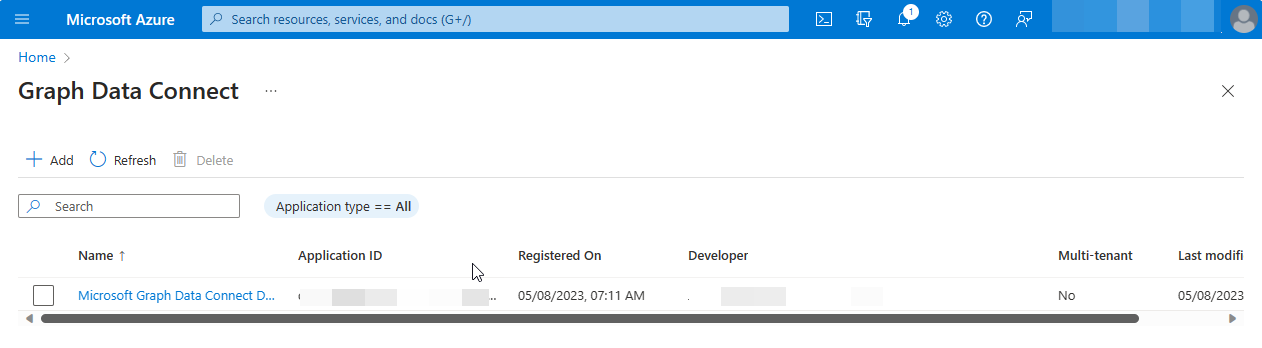
Access Microsoft Graph Data Connect in the Azure portal. You can find it through the search bar in the Azure portal
Choose Add or Add a new application.
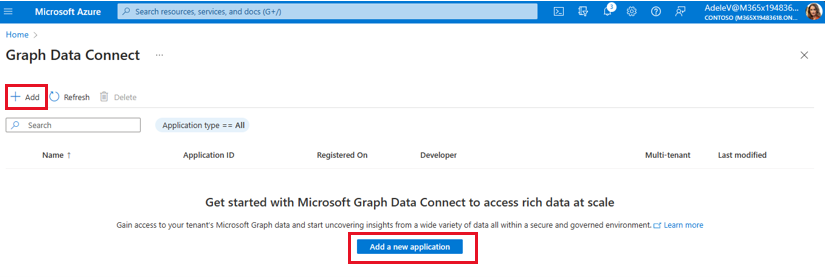
Follow the Add wizard to provide the project details for registration. After you have completed the required fields, choose Next: Datasets >
- Subscription: Select a subscription to filter the next selections:
- Resource Group: Select the resource group you created previously.
- Destination Type: Select Azure storage account.
- Storage Account: Select the storage account you created previously.
- Storage Account Uri: Select the option with .blob.core.windows.net
- Application ID: Select an existing Microsoft Entra tenant or create a new one.
- Description: Type My first app.
- Publish Type: Single-Tenant should be automatically chosen based on your Microsoft Entra app.

- Subscription: Select a subscription to filter the next selections:
Select Next : Datasets >.
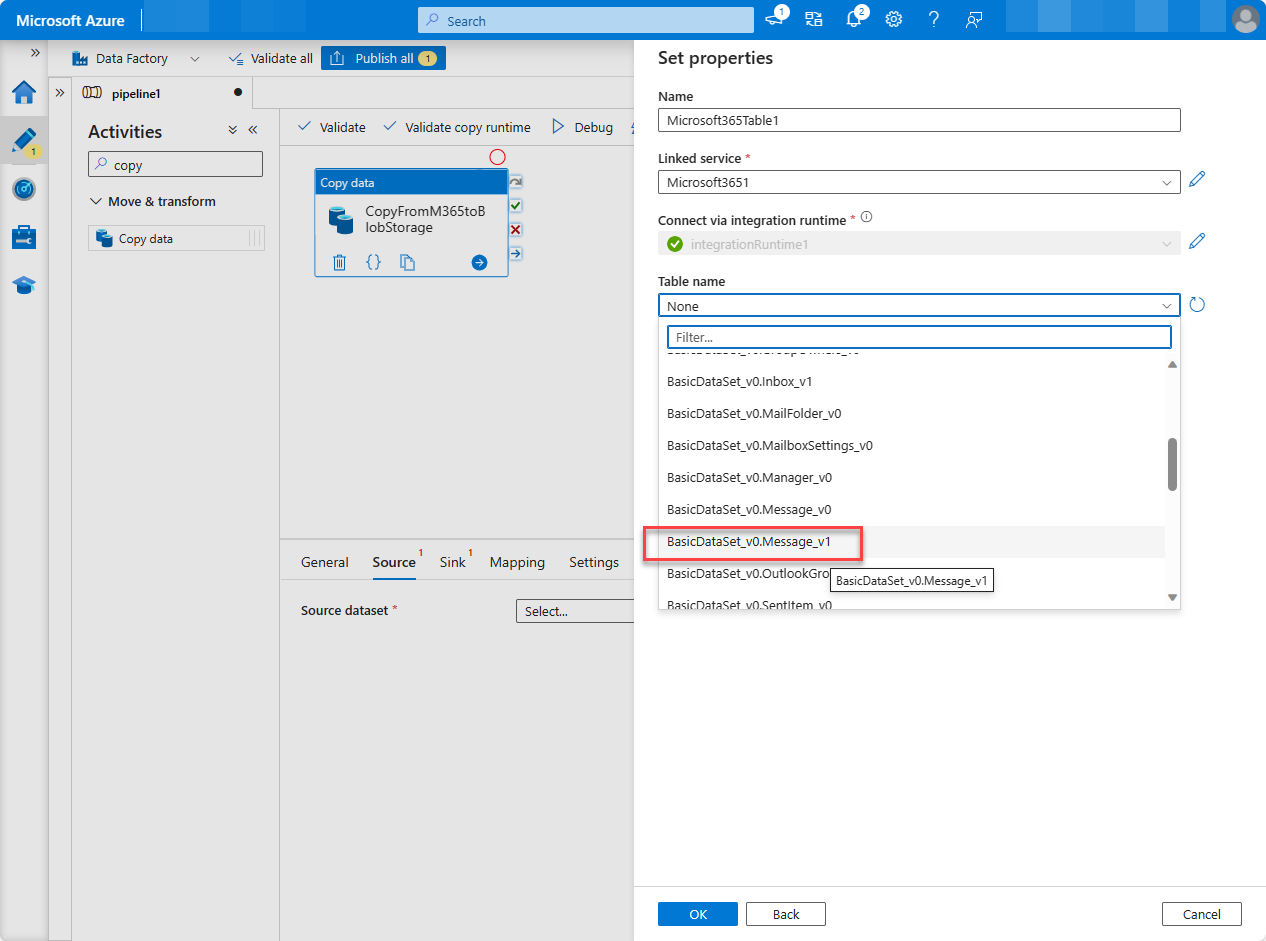
Select
BasicDataSet_v0.Message_v1from the Dataset dropdown, and in the Columns dropdown, chooseAll. In the new row, selectBasicDataSet_v1from the Dataset dropdown, and in the Columns dropdown, chooseAll.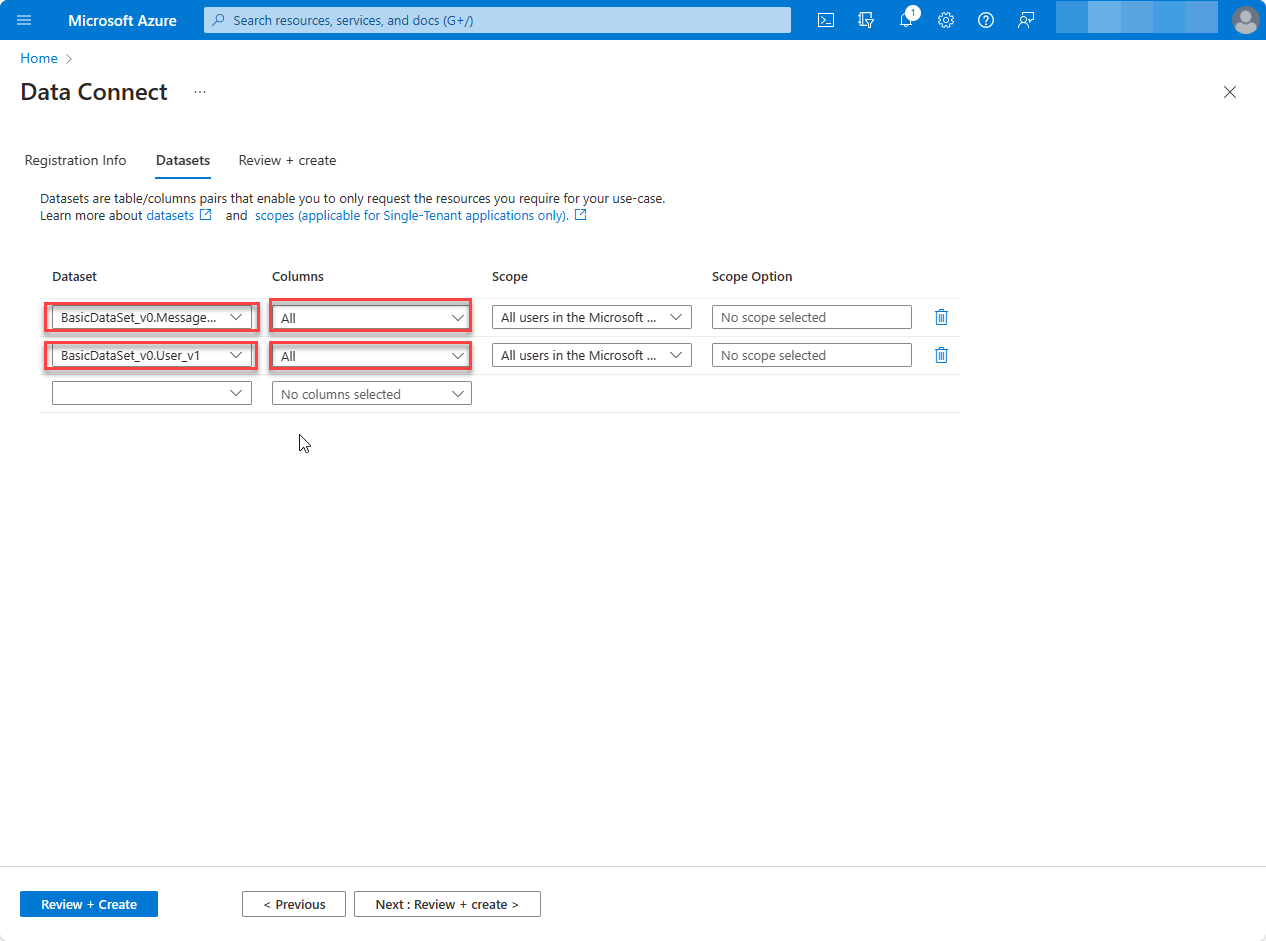
Choose Review + Create, and then Create.
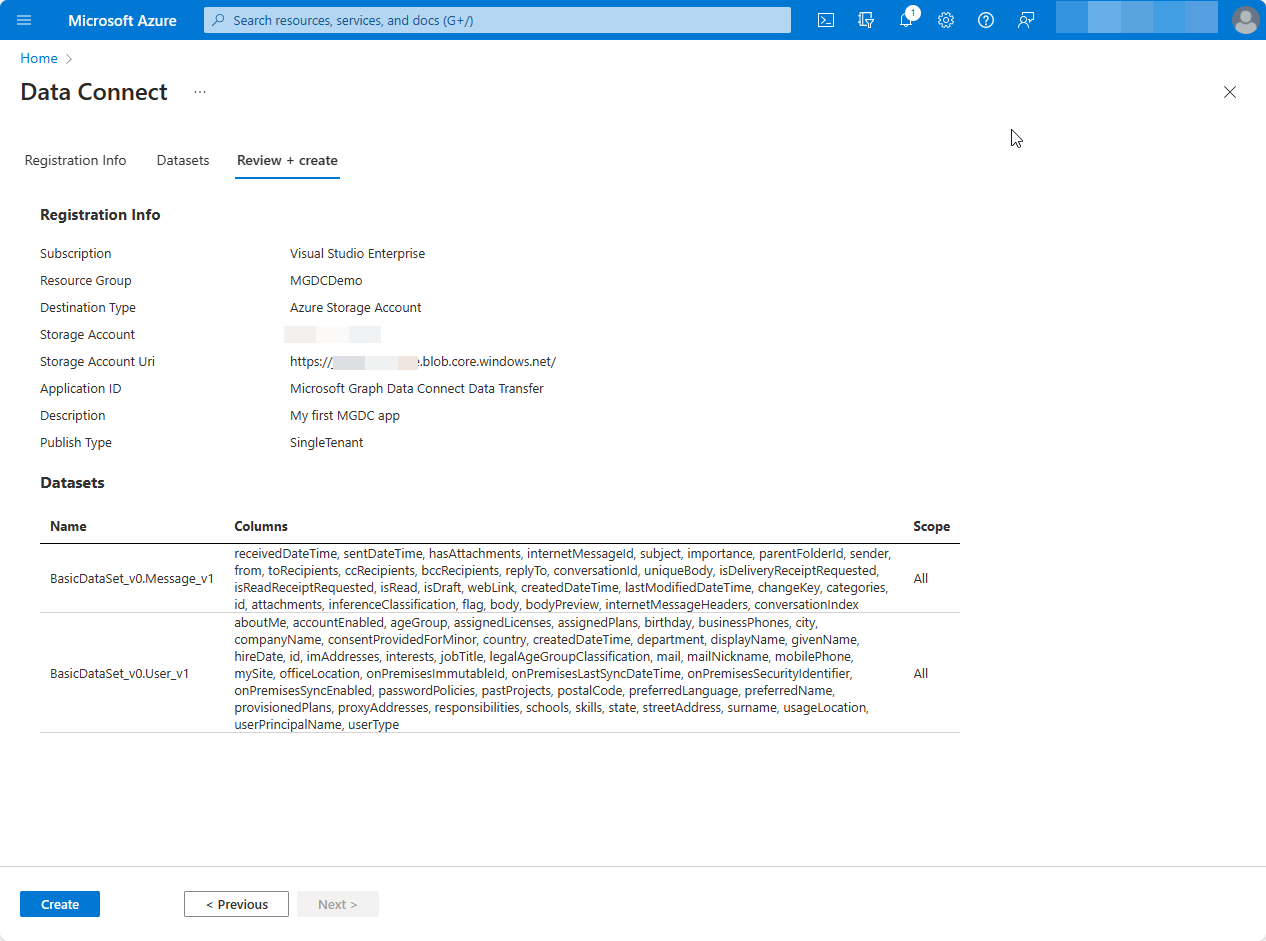
If all required fields are provided, the app registration appears in the landing page.
Approve your application for Microsoft Graph Data Connect
- Open a new browser window in private mode, go to your Microsoft 365 admin center, and sign in with your admin user.
Note
If you are not in your admin account, there will be an error with the approval. You cannot self-approve your apps.
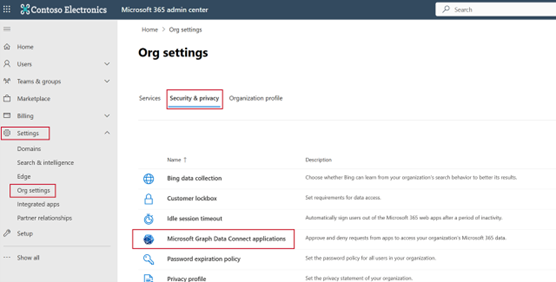
On the left navigation pane, select Settings > Org settings. You might have to choose Show all before you can view Settings.
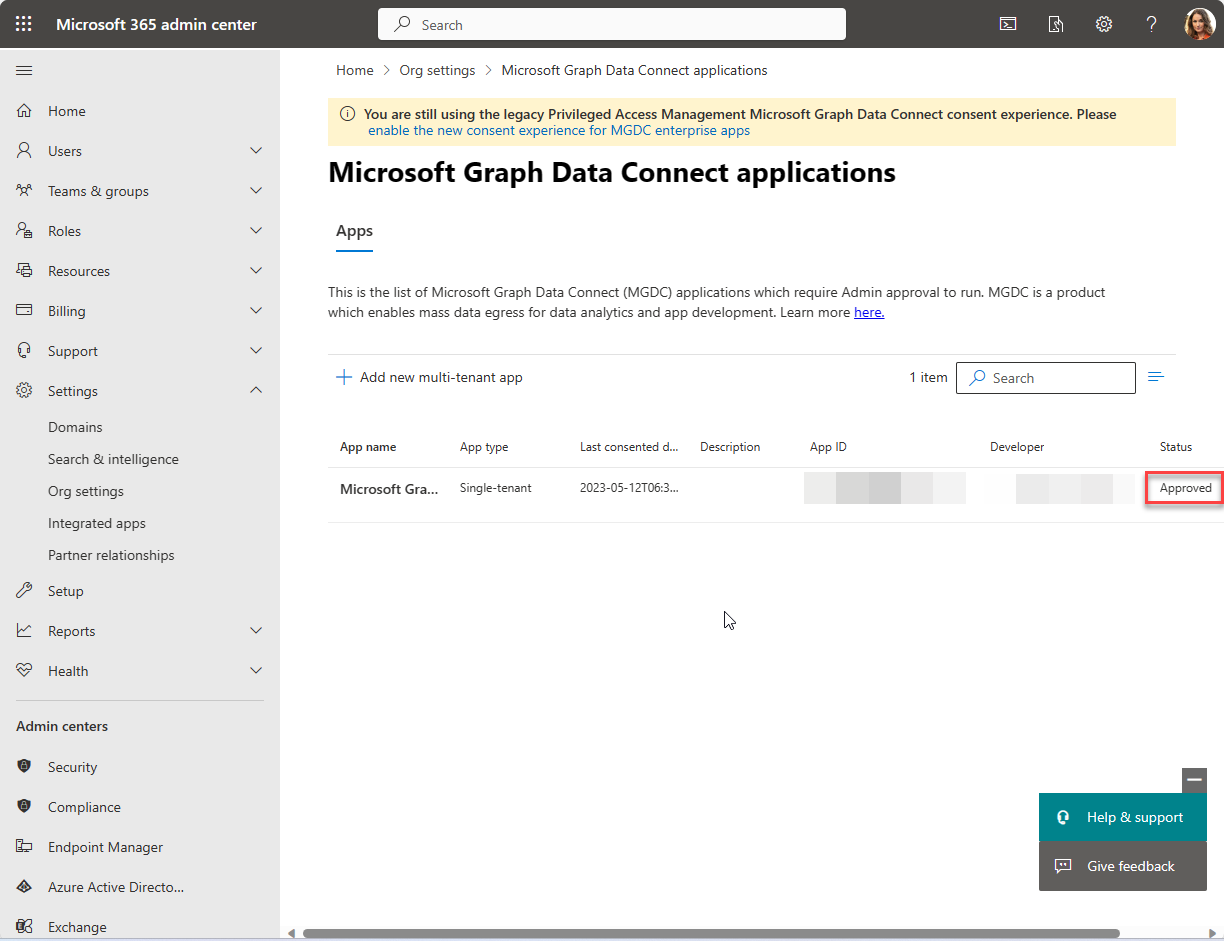
Switch to the Security & privacy tab and select Microsoft Graph Data Connect applications.
In the Microsoft Graph Data Connect applications portal, find the application you registered previously with Data Connect. It should have a Pre-consent status in the application summary table.
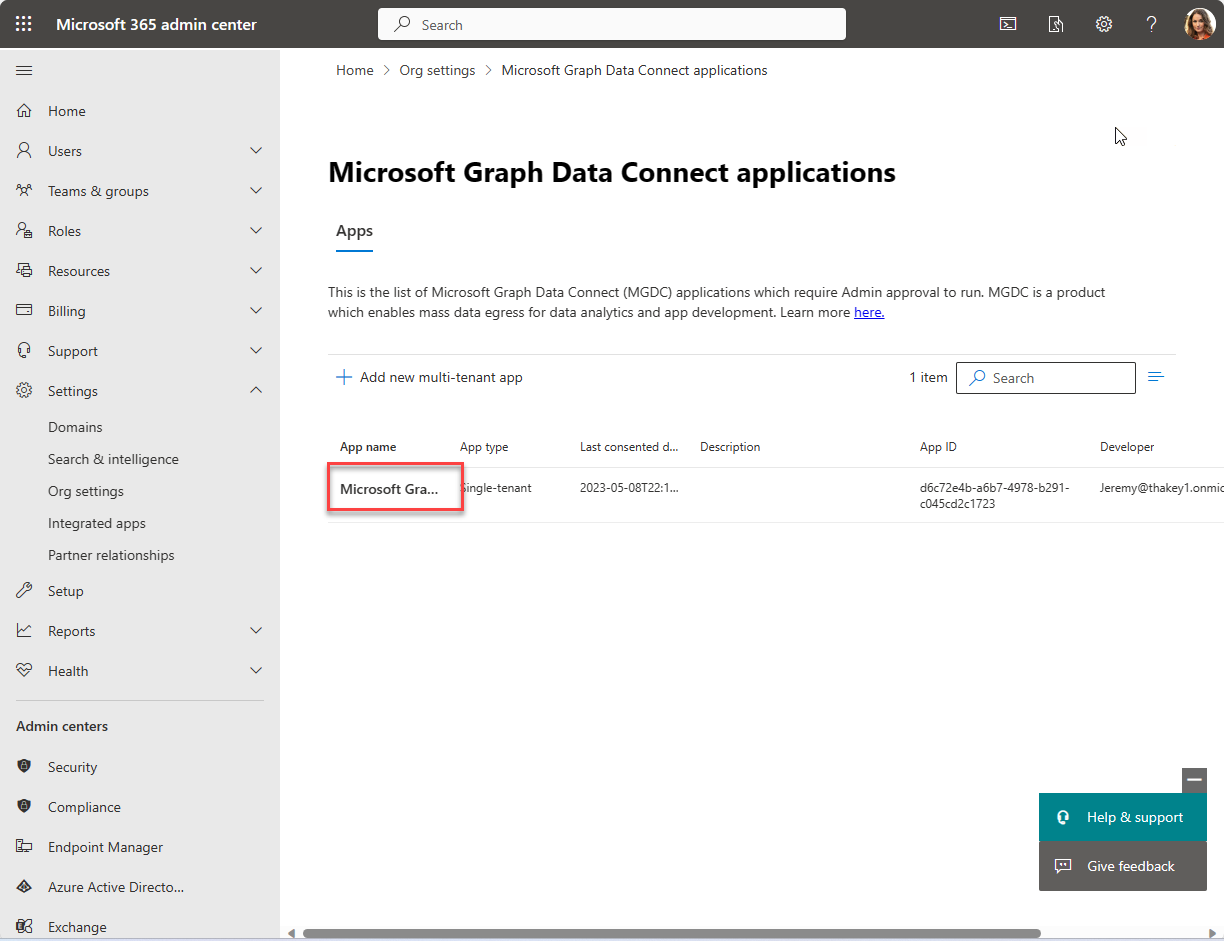
Select your application to open the application details view. Proceed through the wizard by choosing Next twice to review the two datasets.
On the final step, choose Approve to consent to your registered application accessing the specified data.
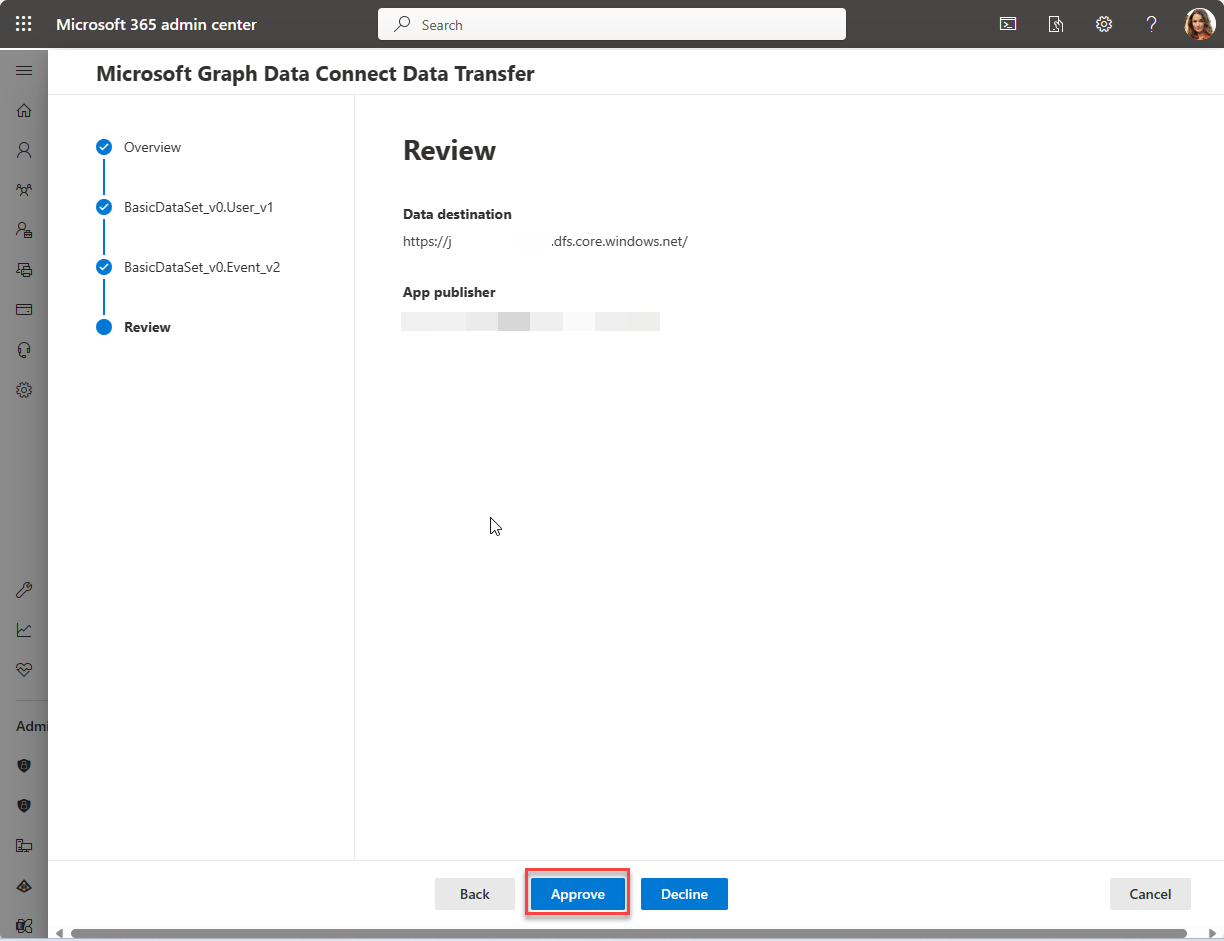
Approve the application summary table reloads with your app listed with the status Approved.
Set up your Azure resource with Azure Synapse or Azure Data Factory
This exercise describes how to set up your Azure resources and connect Microsoft Graph Data Connect (Data Connect) to it. In this step, you can either choose Azure Synapse, Azure Data Factory, or Microsoft Fabric to create a pipeline to extract the data from Microsoft 365 to the Azure Storage account using Data Connect.
Setting up your Azure resources
Open a browser and go to your Azure portal.
Sign in to the portal using an account with an Application Administrator or Application Developer role. Ensure that you're signed-in with your developer account that has privileges to create Azure resources within your subscription.
On the left pane, select Create a resource.
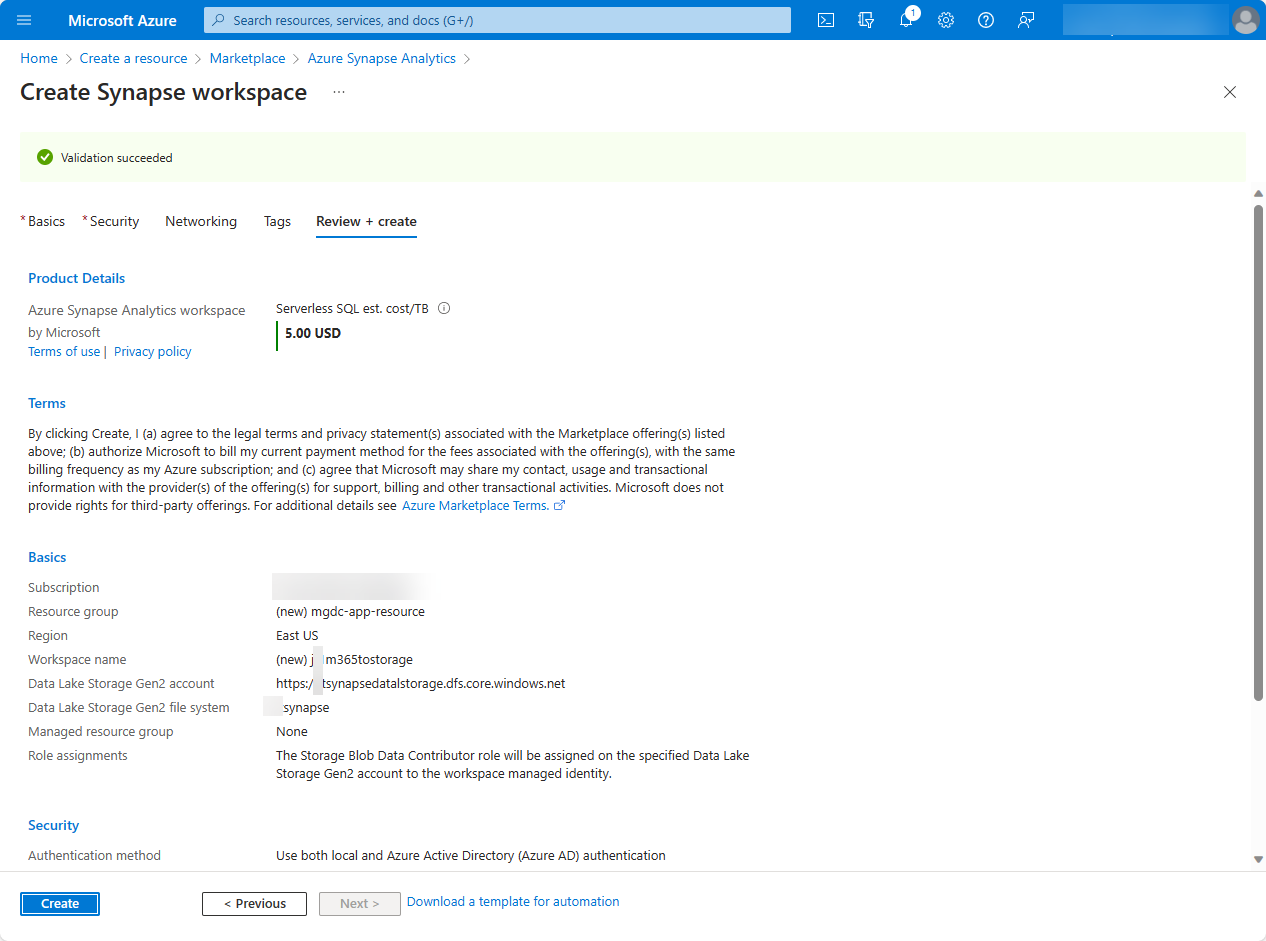
Find the Azure Synapse Analytics resource type, input the following values, and select Create.
Subscription: Select your Azure subscription.
Resource group: Select the resource group you created previously, mgdc-app-resource.
Region: Select an Azure region in the same region as your Microsoft 365 tenant.
Workspace name: m365tostorage
Account name: synapsedatalstorage
File system name: flsynapse

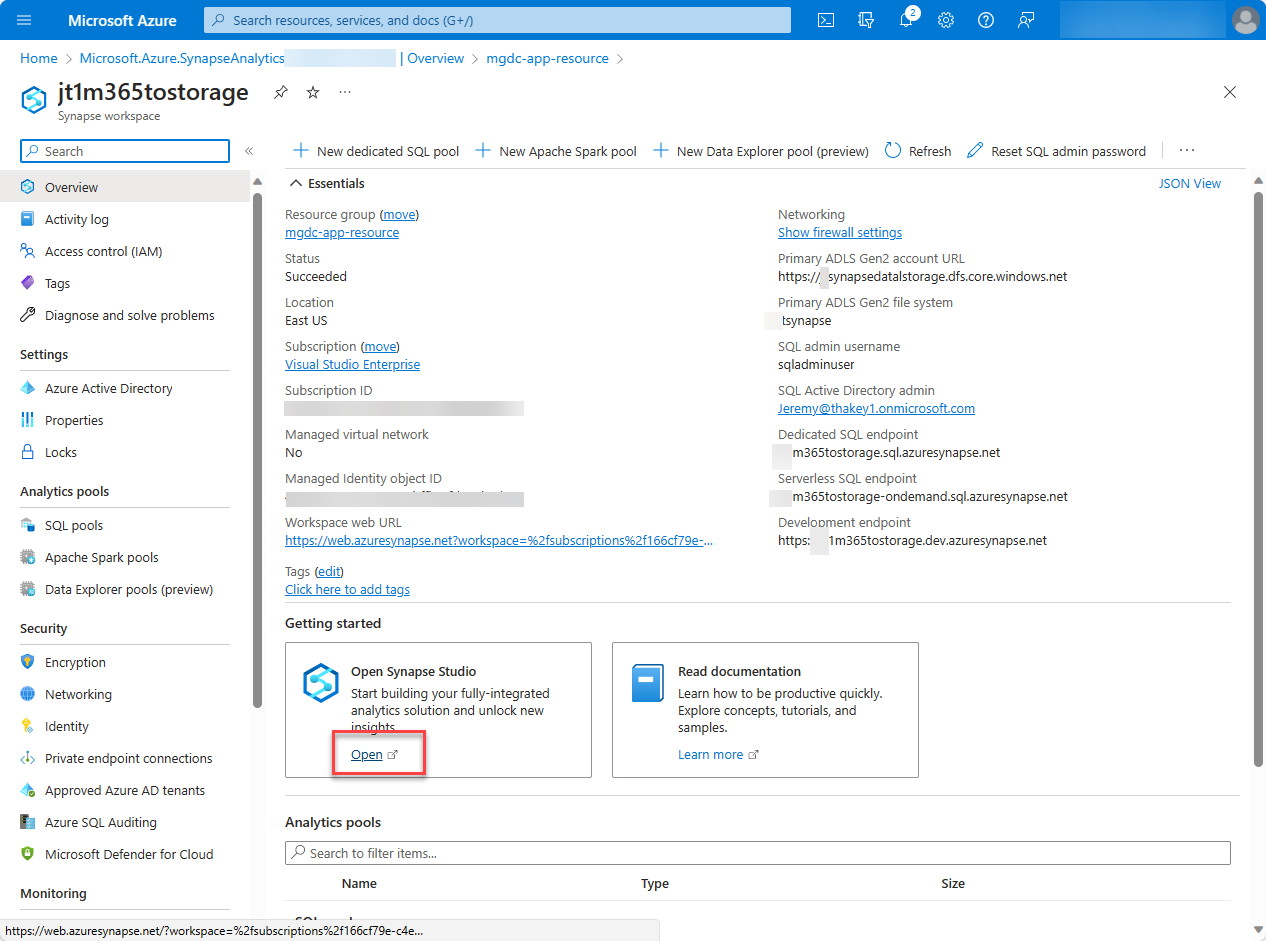
Select Go to resource, open the synapse workspace you've just created (for example, m365tostorage), and then select the Open Synapse Studio tile to launch the Azure Synapse workspace full-screen editor.
By default, Azure Synapse Analytics uses an integration runtime that automatically resolves the region. In this tutorial, we recommend using the default auto-resolve option in the developer tenant.
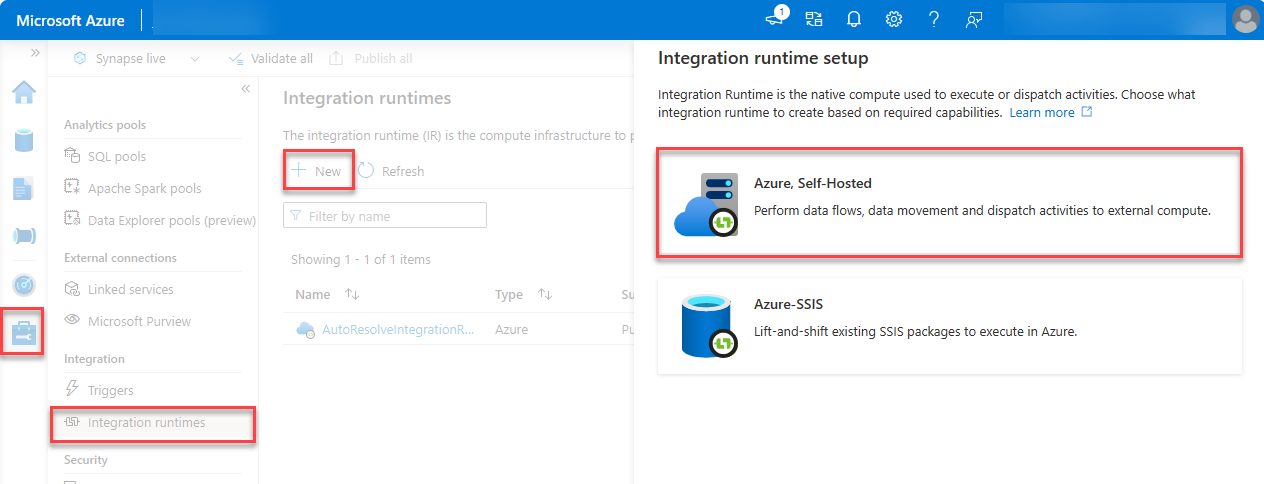
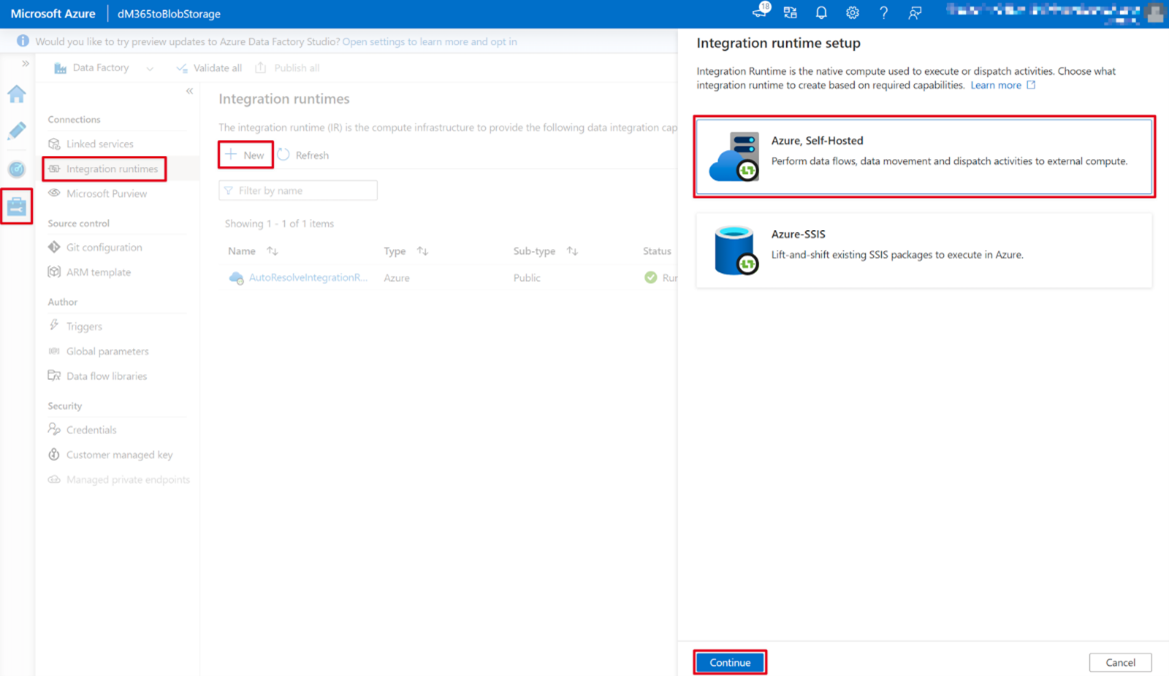
Switch to Manage (toolbox icon) > Integration runtimes > New.
Select Azure, Self-Hosted, and choose Continue.
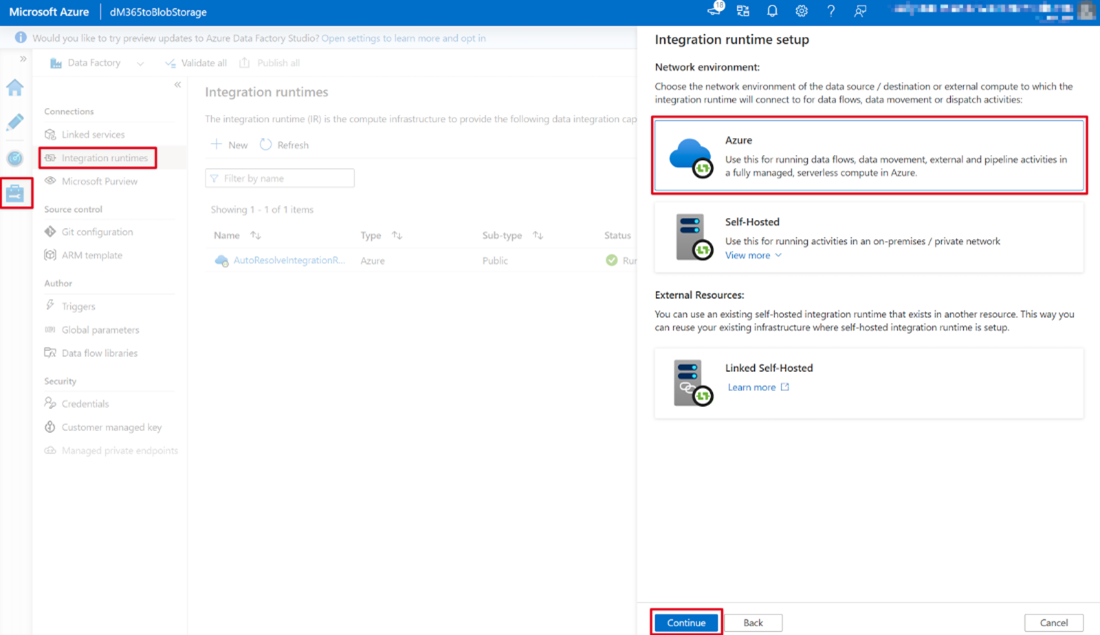
For the network environment, select Azure, and then choose Continue.

Use the following details to complete the form on the final screen and then choose Create.
- Name: Name of your integration runtime.
- Region: Select the region that matches your Microsoft 365 region.
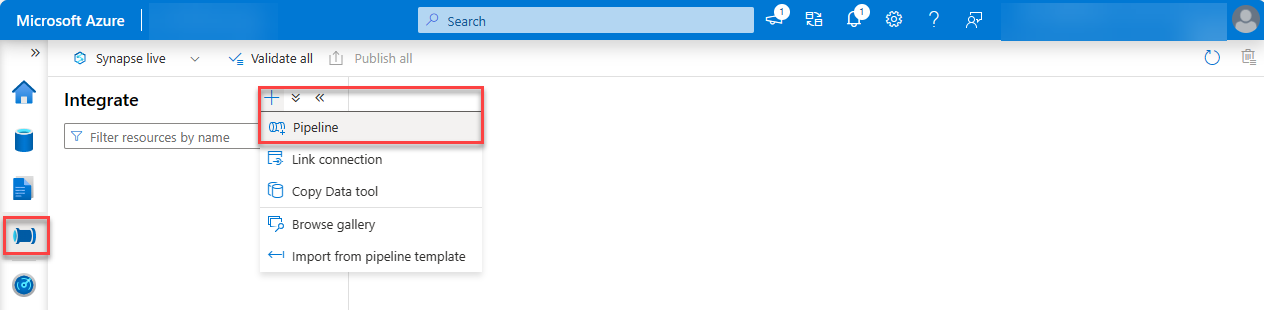
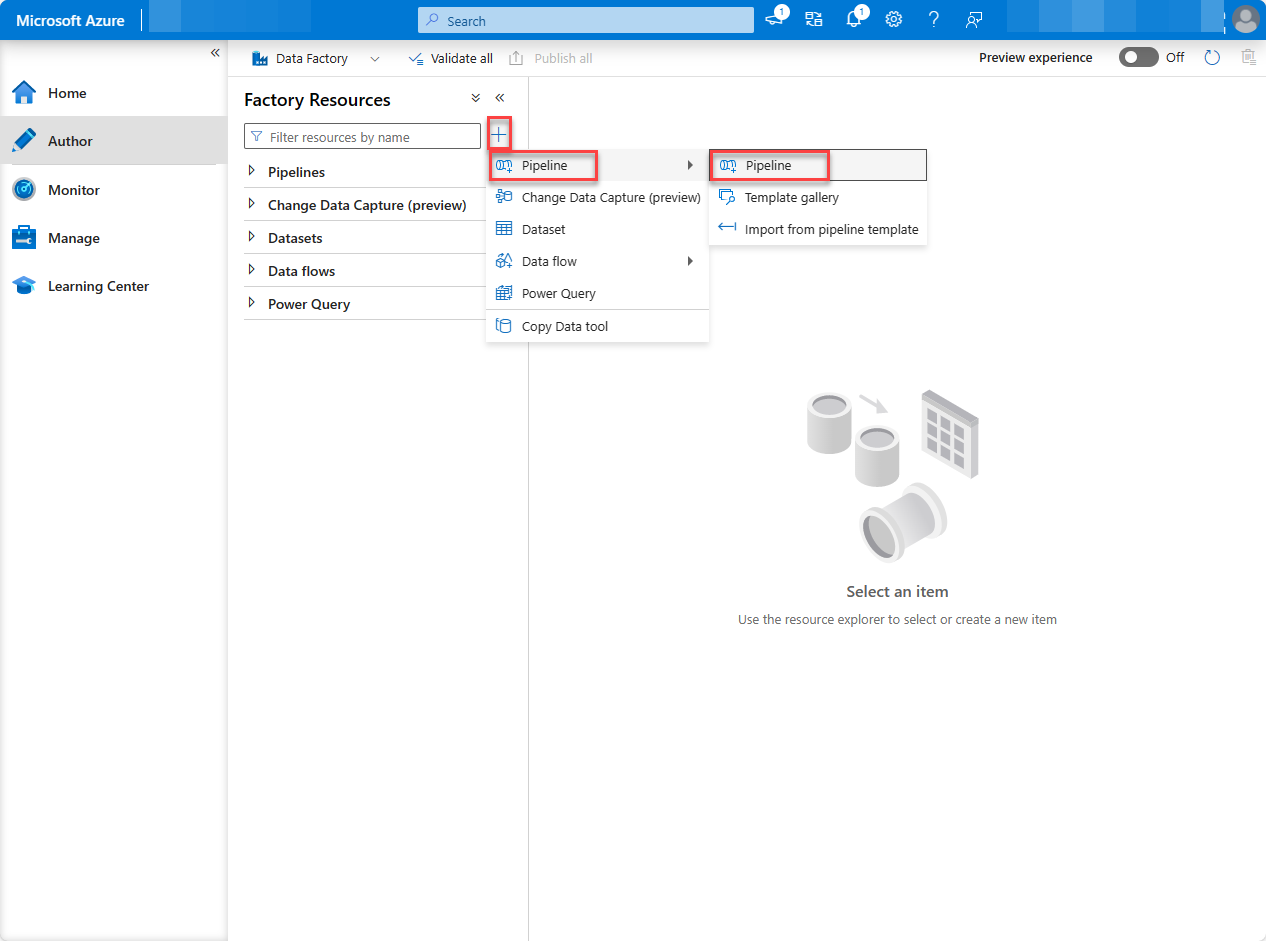
On the left pane, select Integrate (tube icon).
To create a new pipeline, select the Plus icon, and then choose Pipeline.
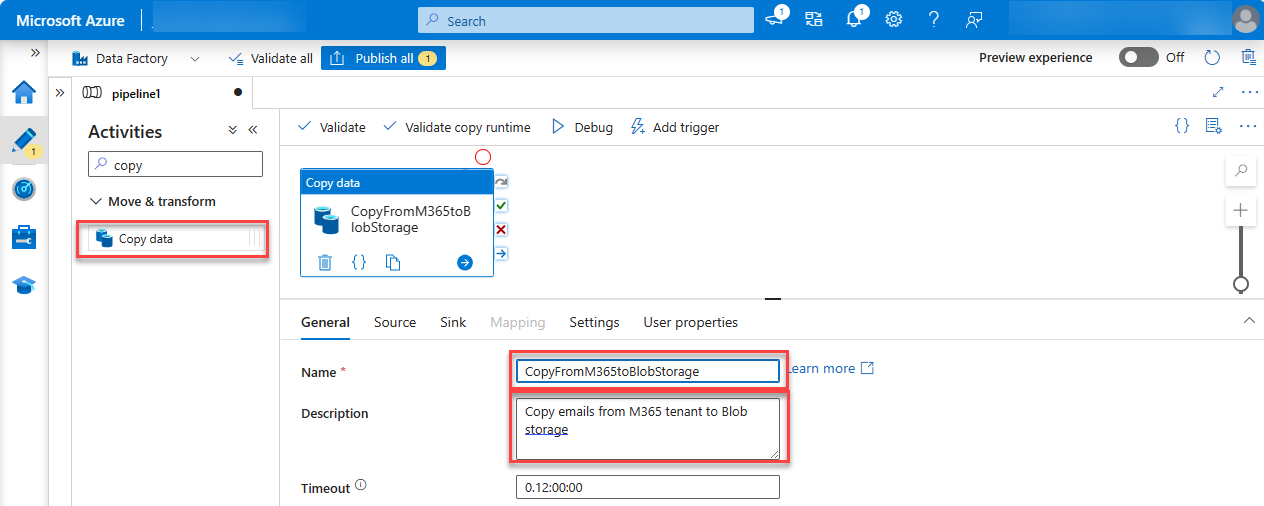
In the search box, enter Copy data and then drag the Copy data activity from the Move & transform section onto the design surface.
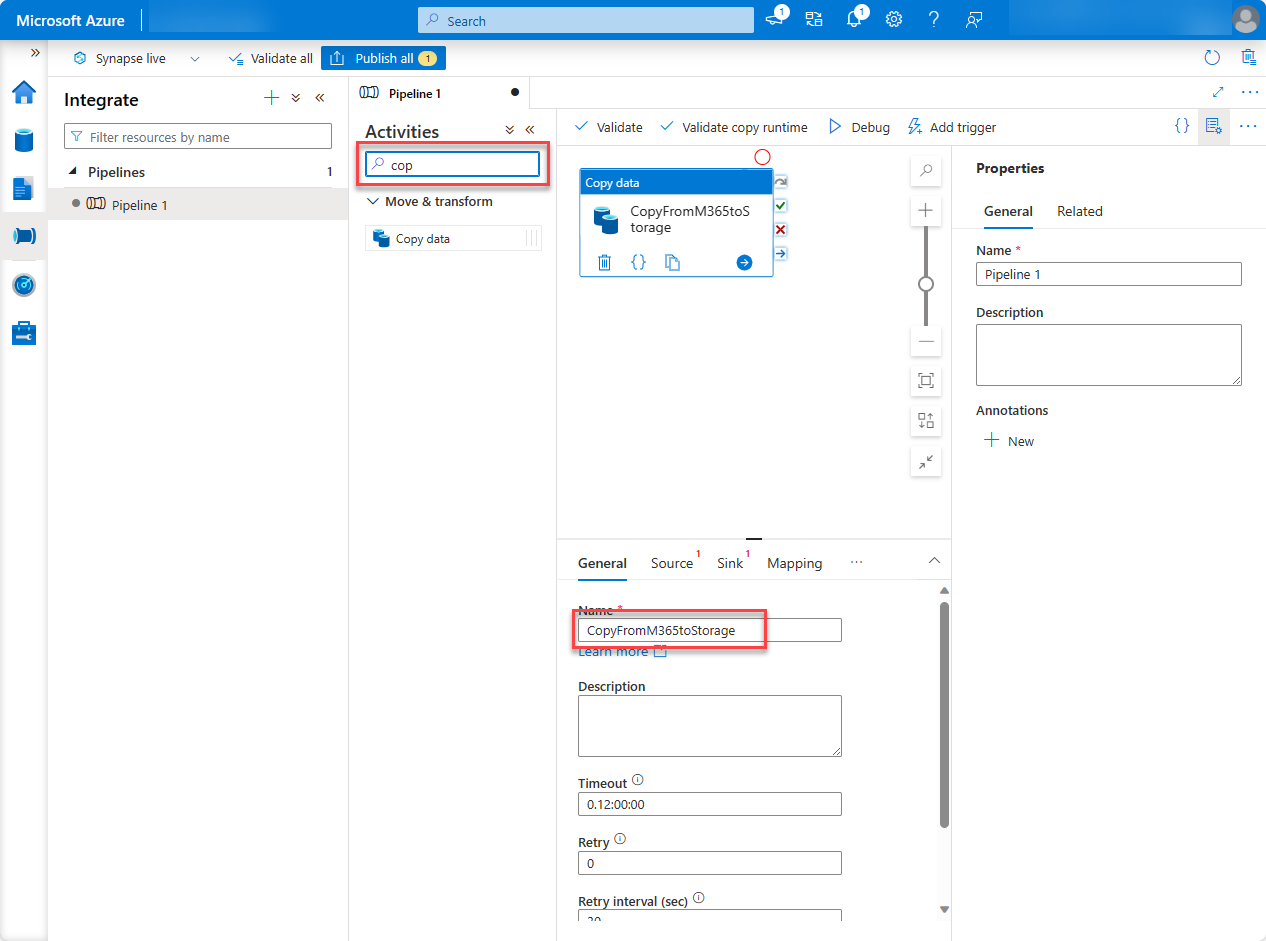
Select the activity in the designer.
Select the General tab and give it a name.
- Name: CopyFromM365toStorage
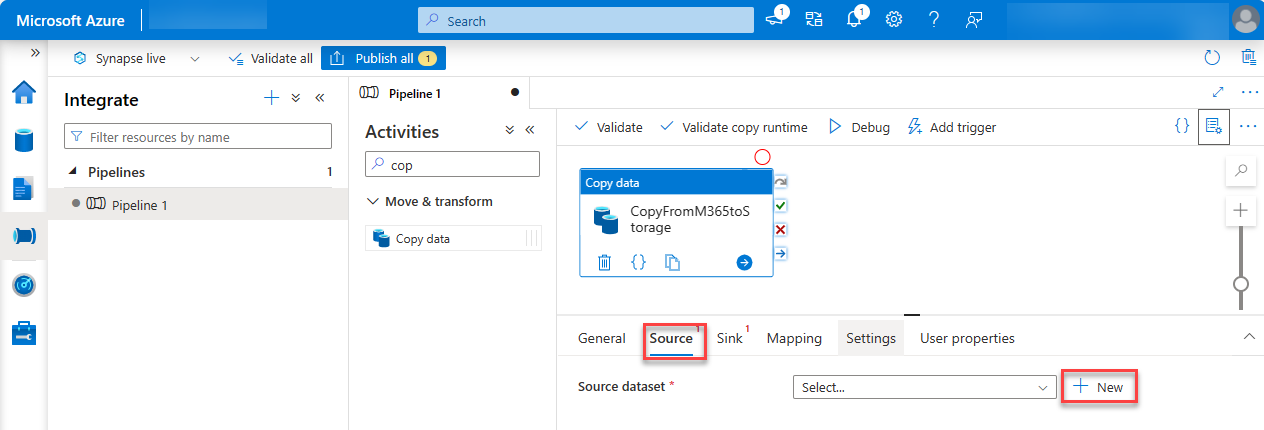
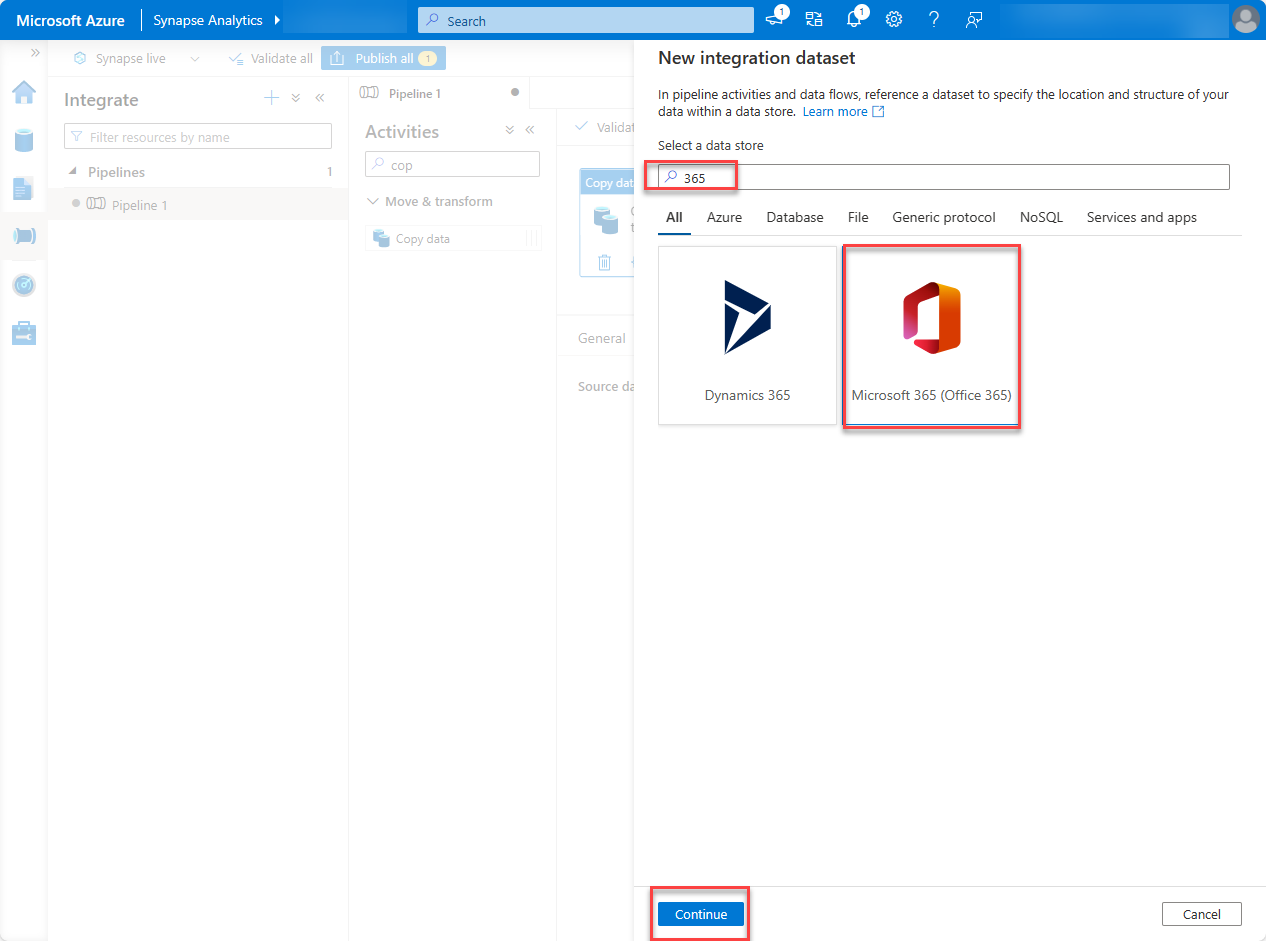
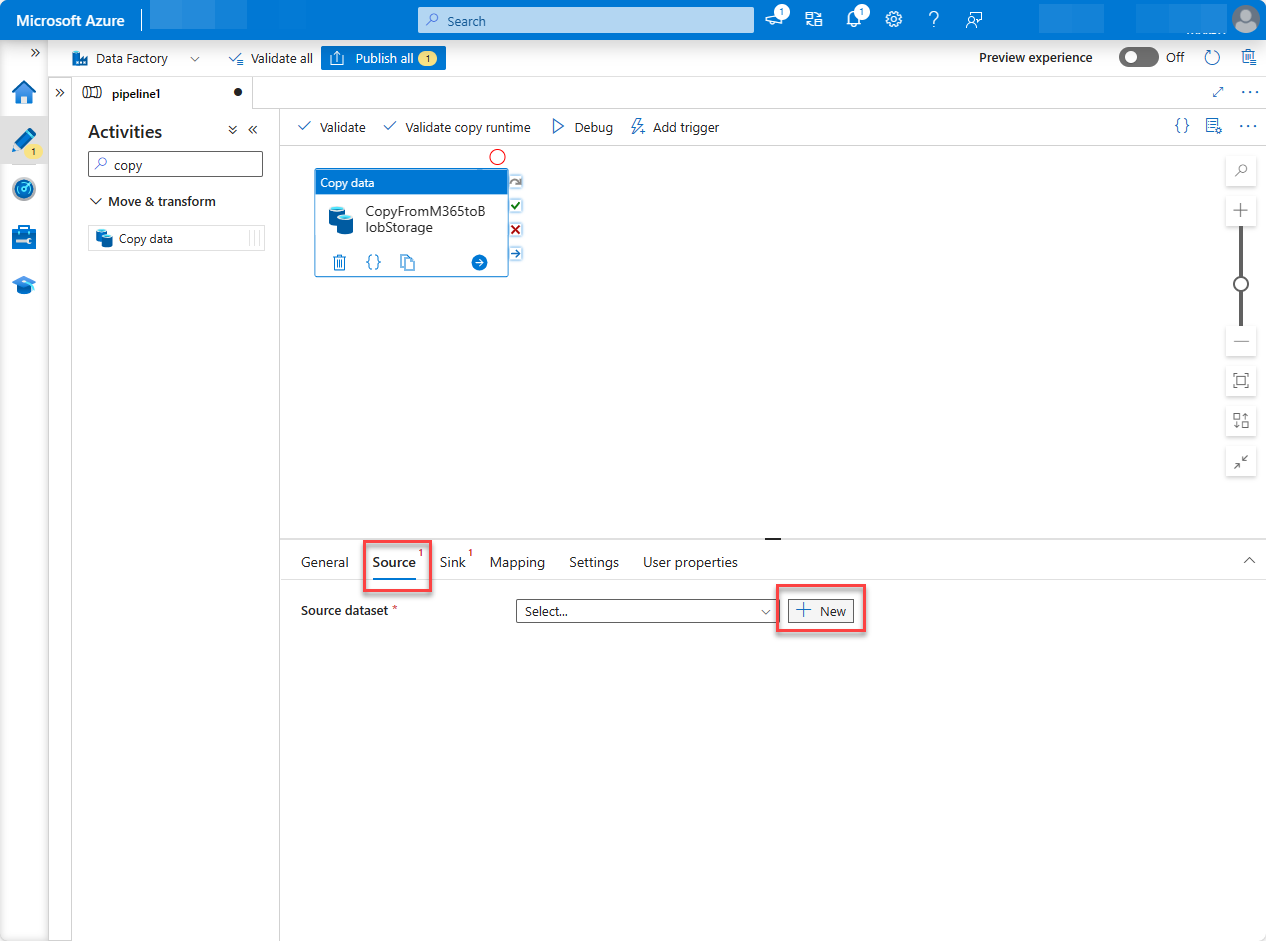
Select the Source tab, and then select New.
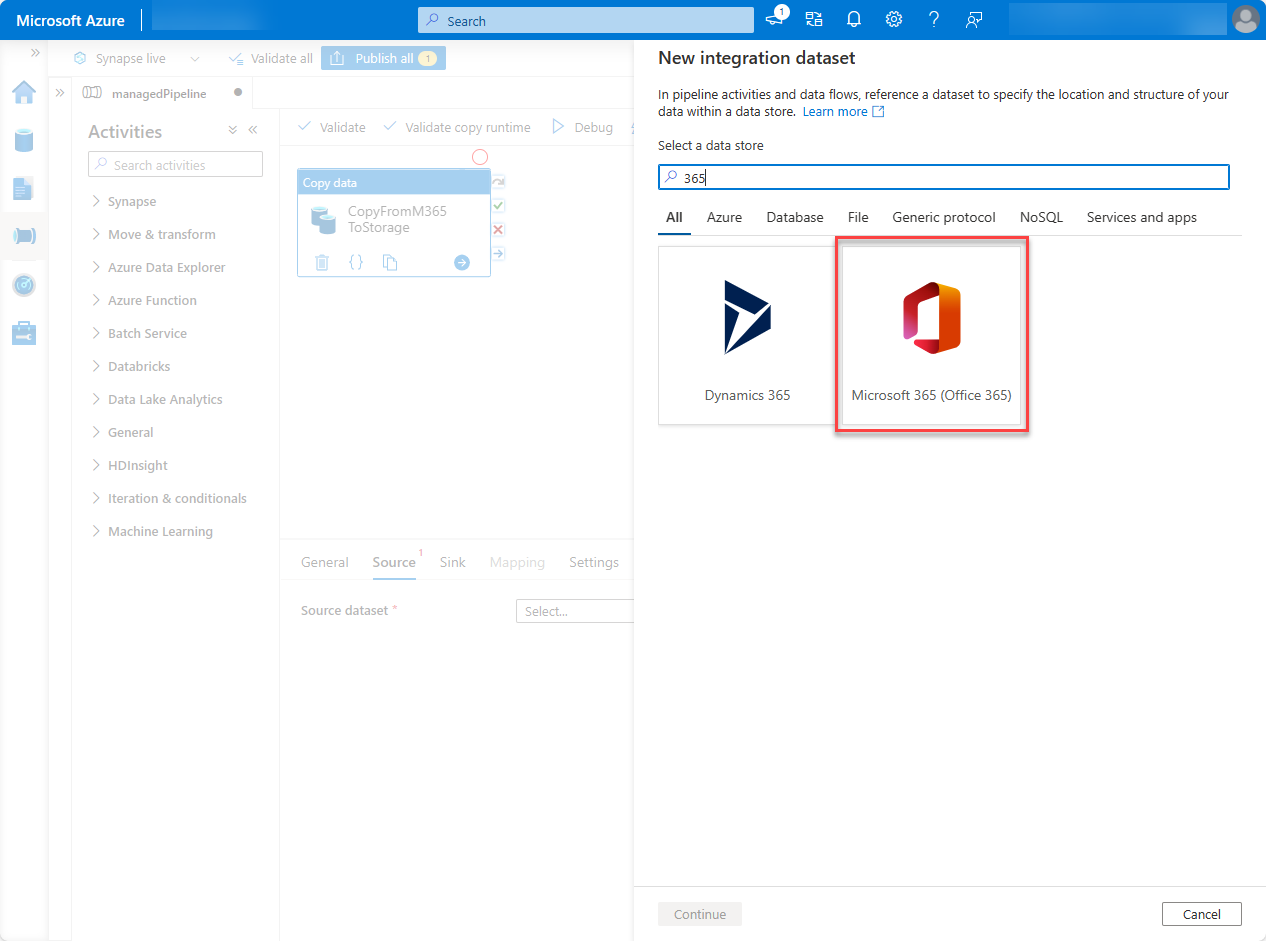
Locate and select the dataset Microsoft 365 (Office 365), and then choose Continue.
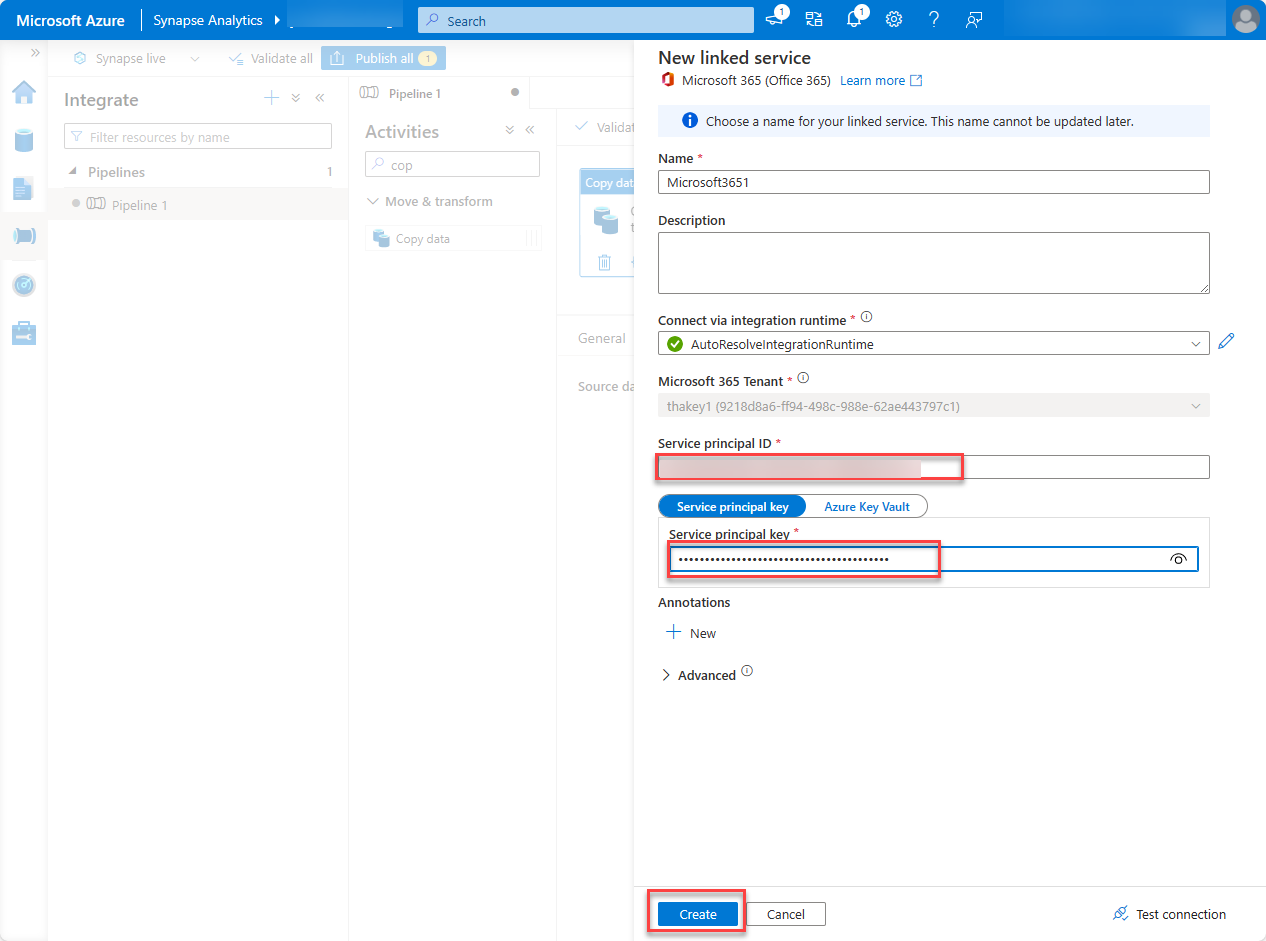
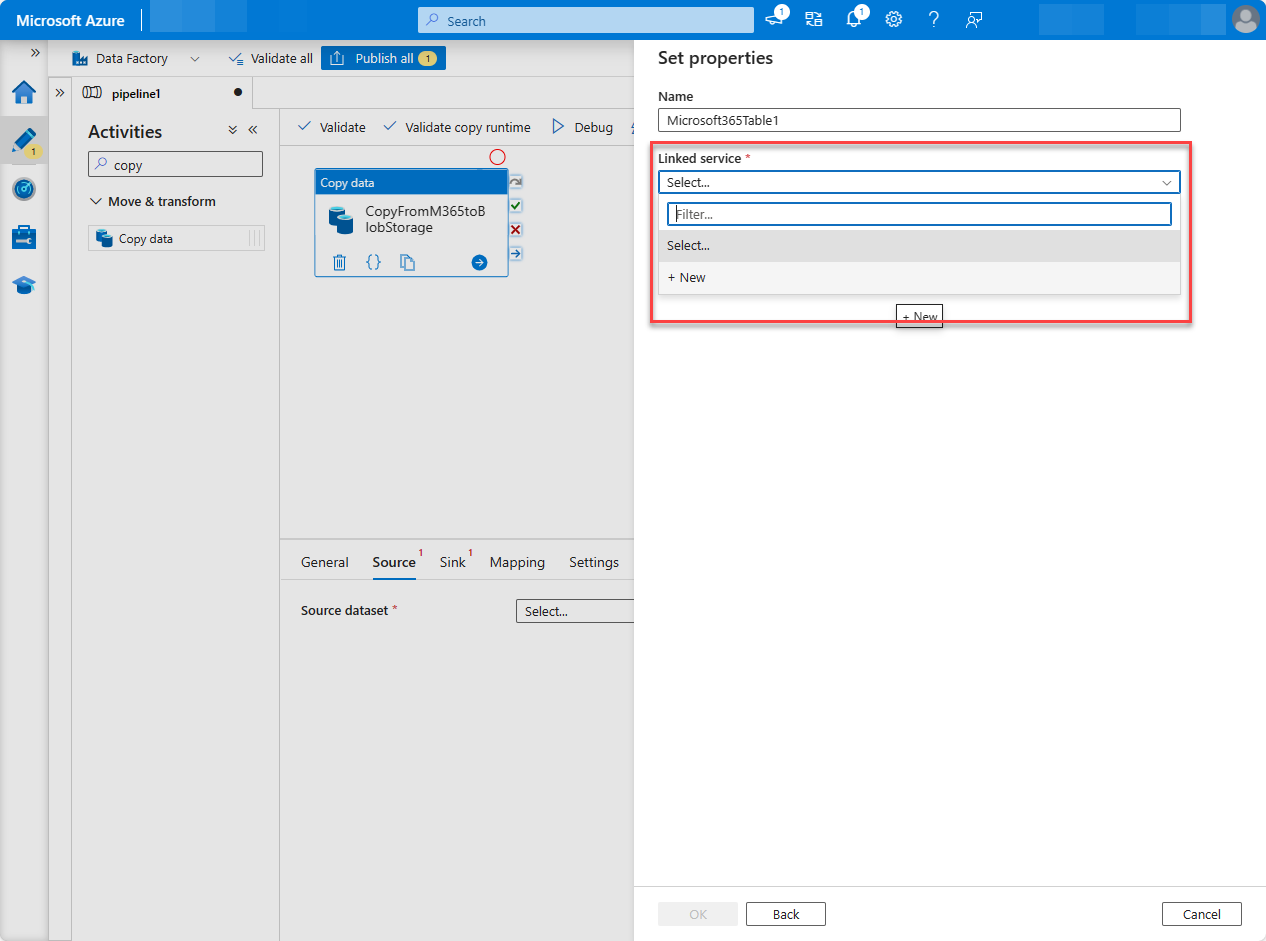
Under Linked service, choose Select, and then choose +New.

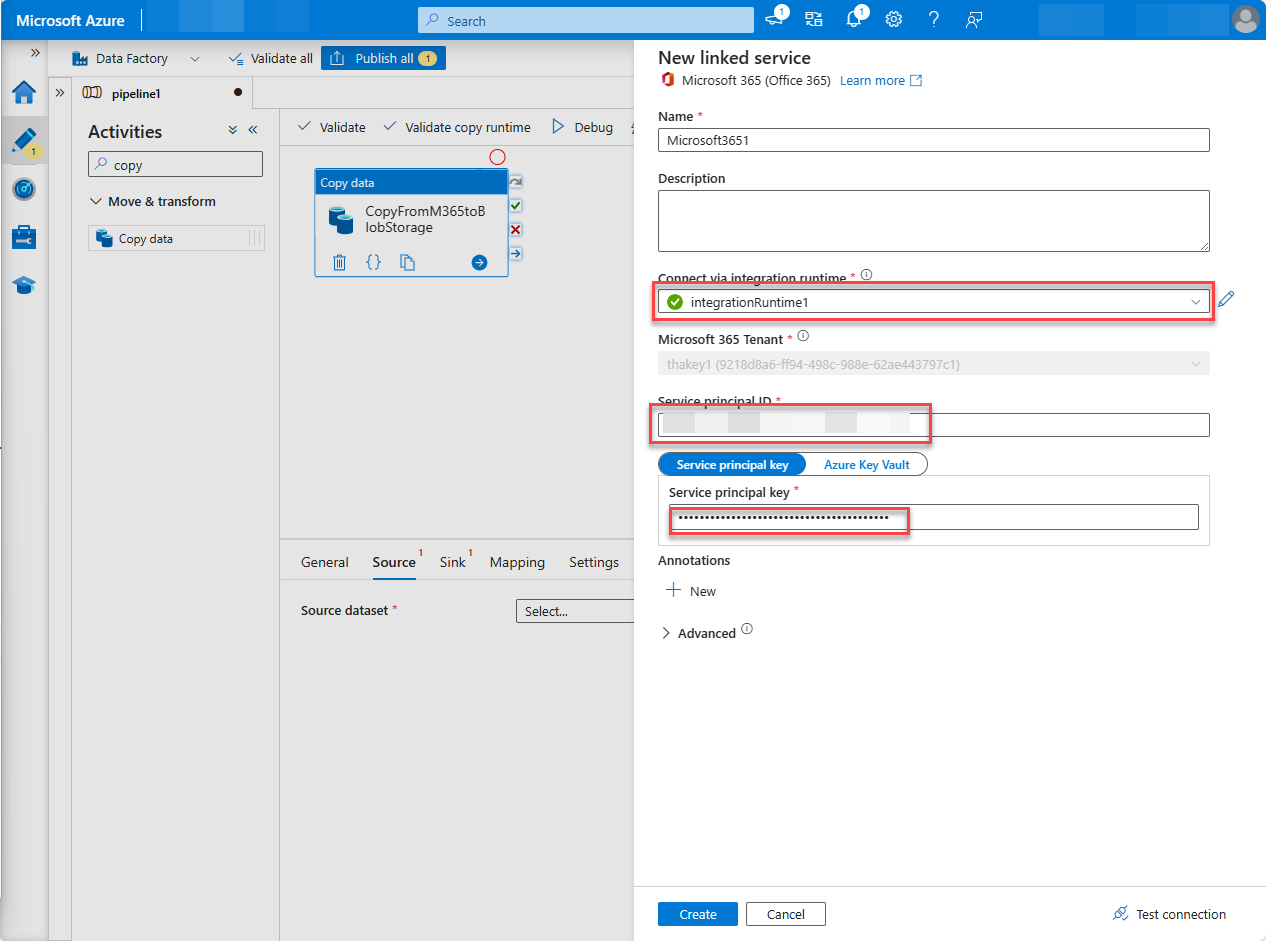
In the dialog box, from the Connect via integration runtime dropdown, select the integration runtime you created, enter the Application ID and client secret value of the Microsoft Entra application in the Service principal ID and Service principal key fields respectively, and choose Create.
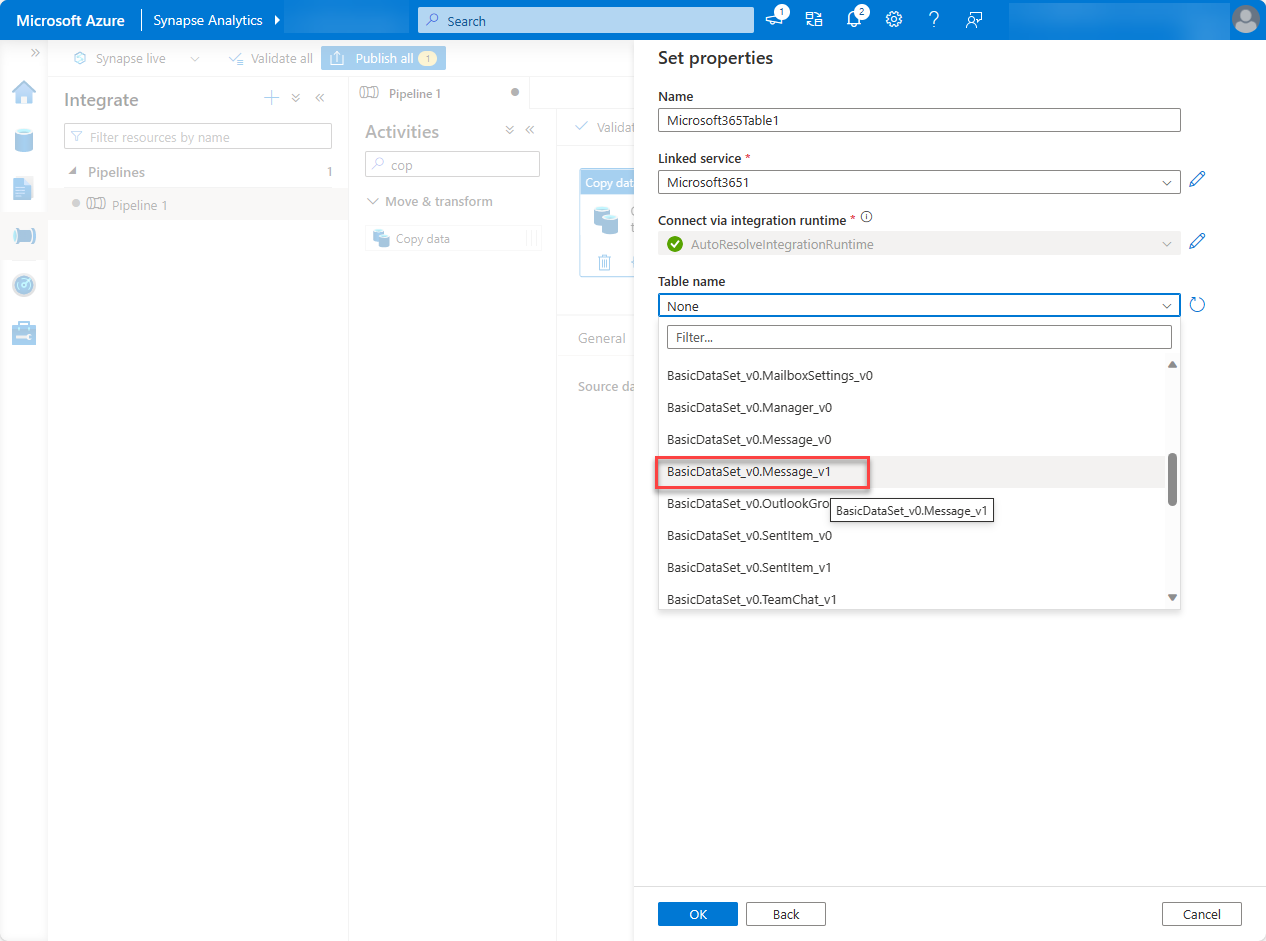
In the Table name field, select BasicDataSet_v0.Message_v1, and then choose OK.
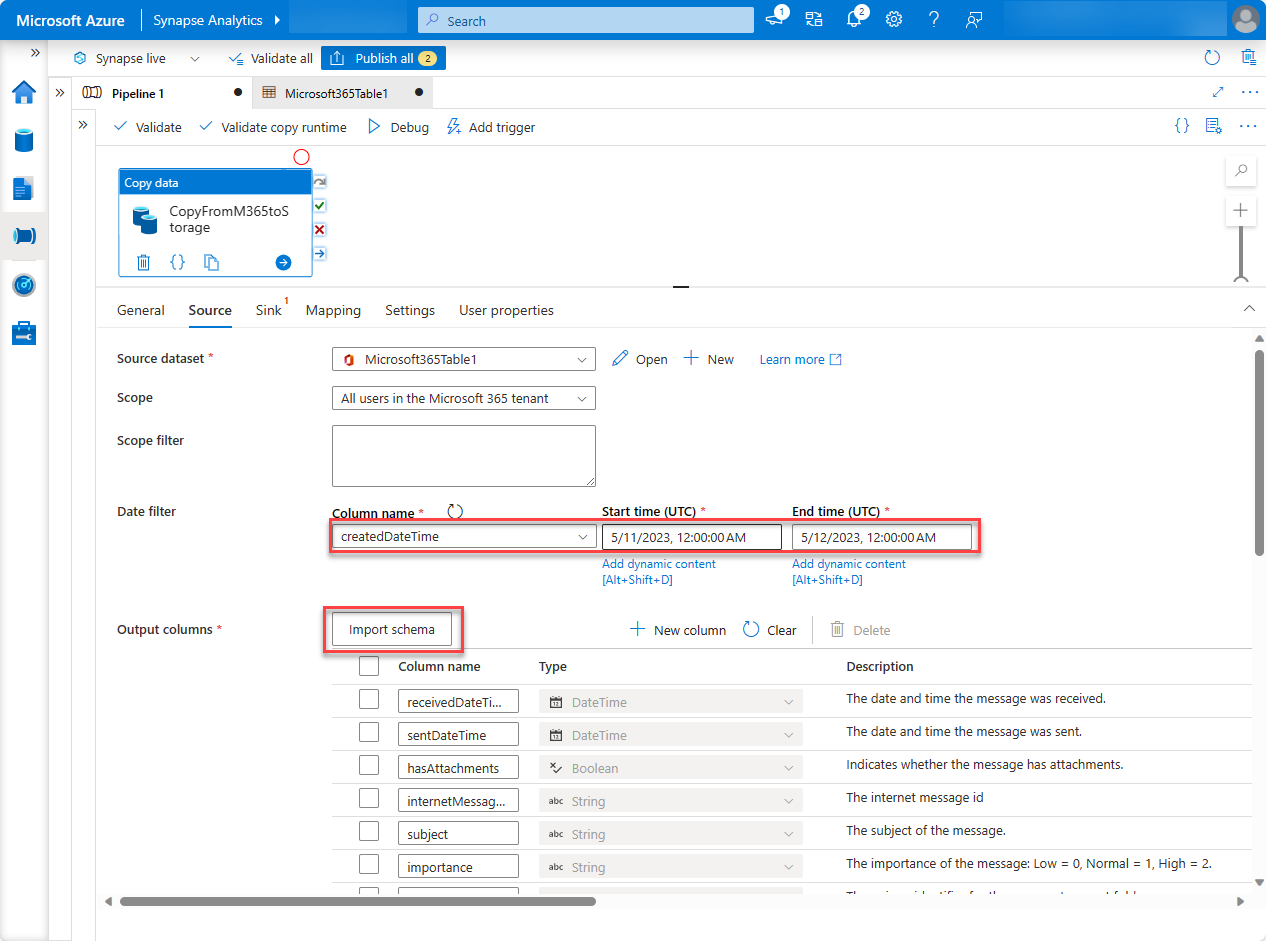
In the Source tab, locate the Date filter section and use the following values to configure it.
Column name: CreatedDateTime
Start time (UTC): Select a date sometime prior to the current date.
End time (UTC): Select the current date.
In the Output columns section, select Import schema.
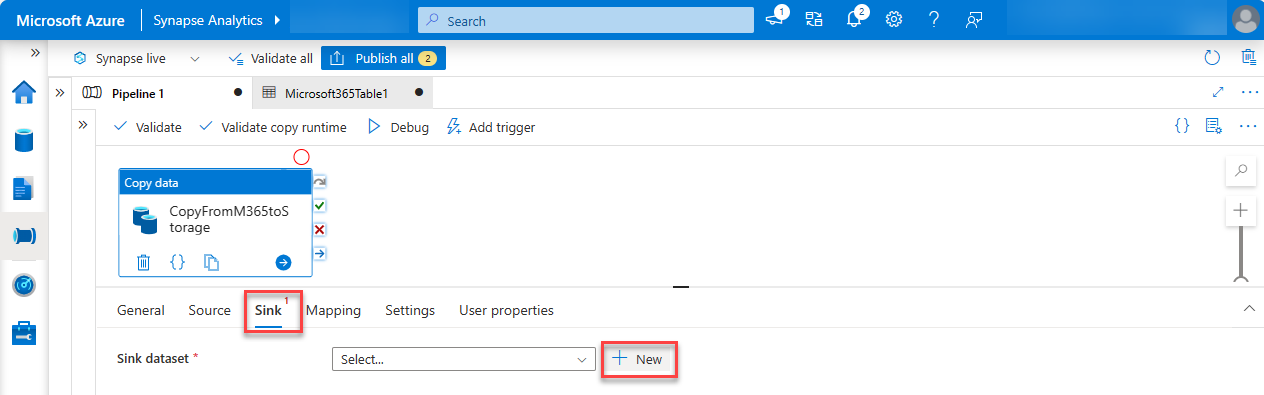
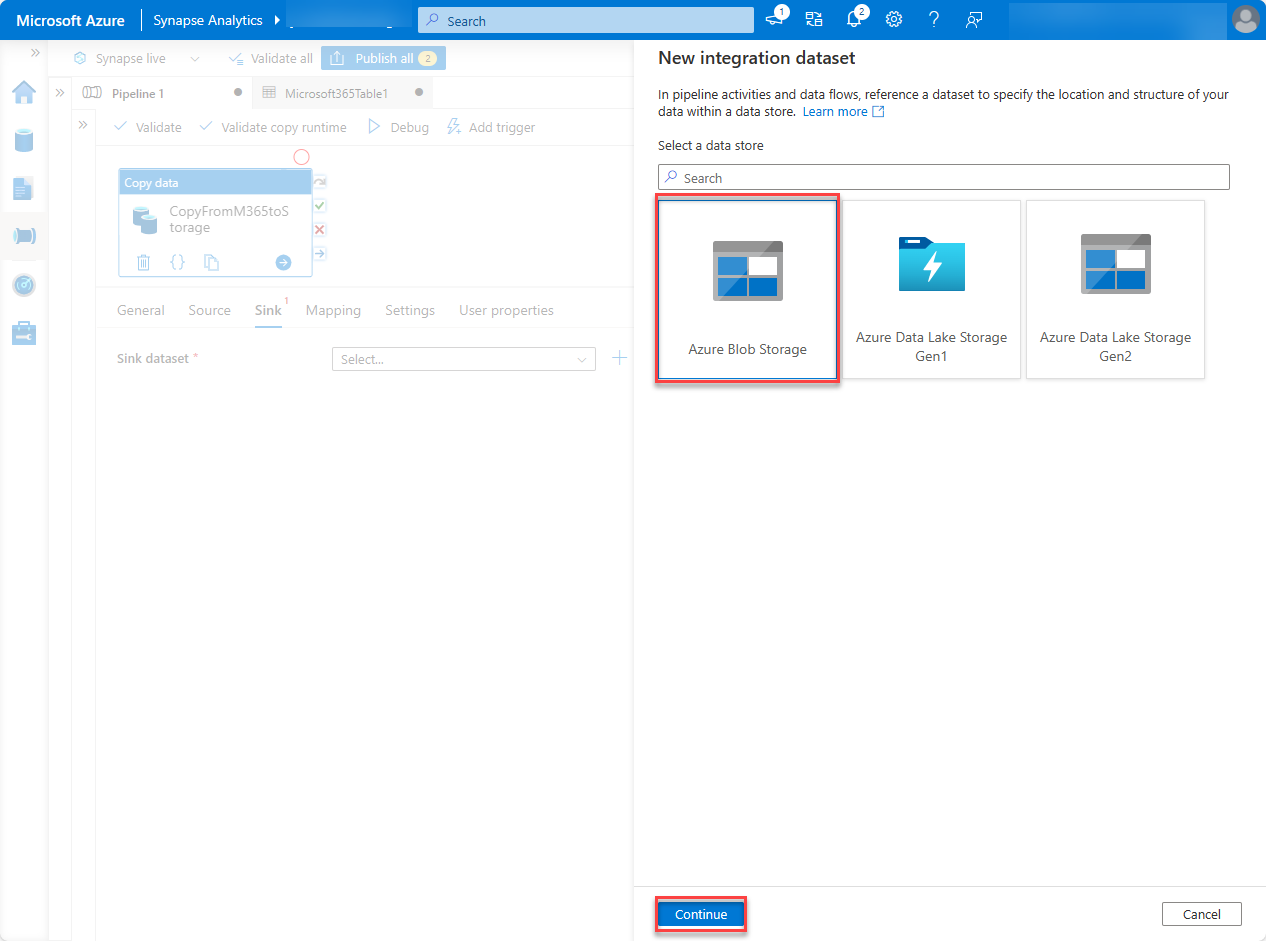
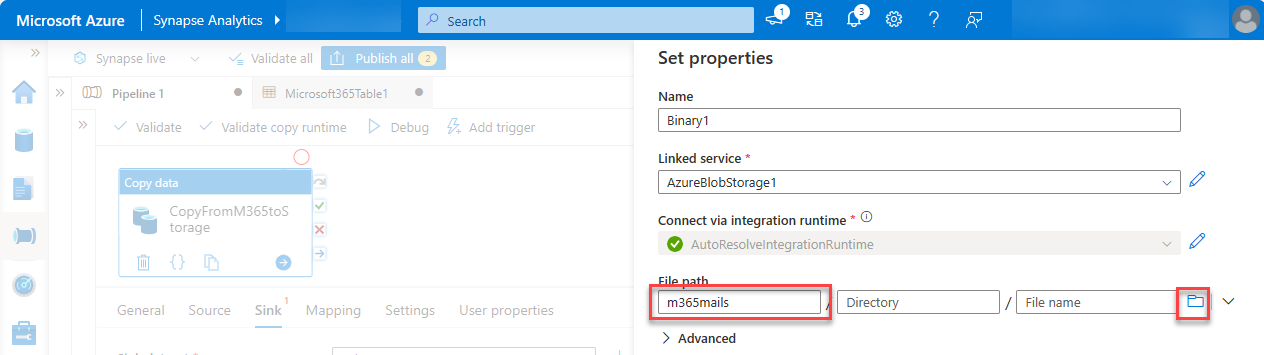
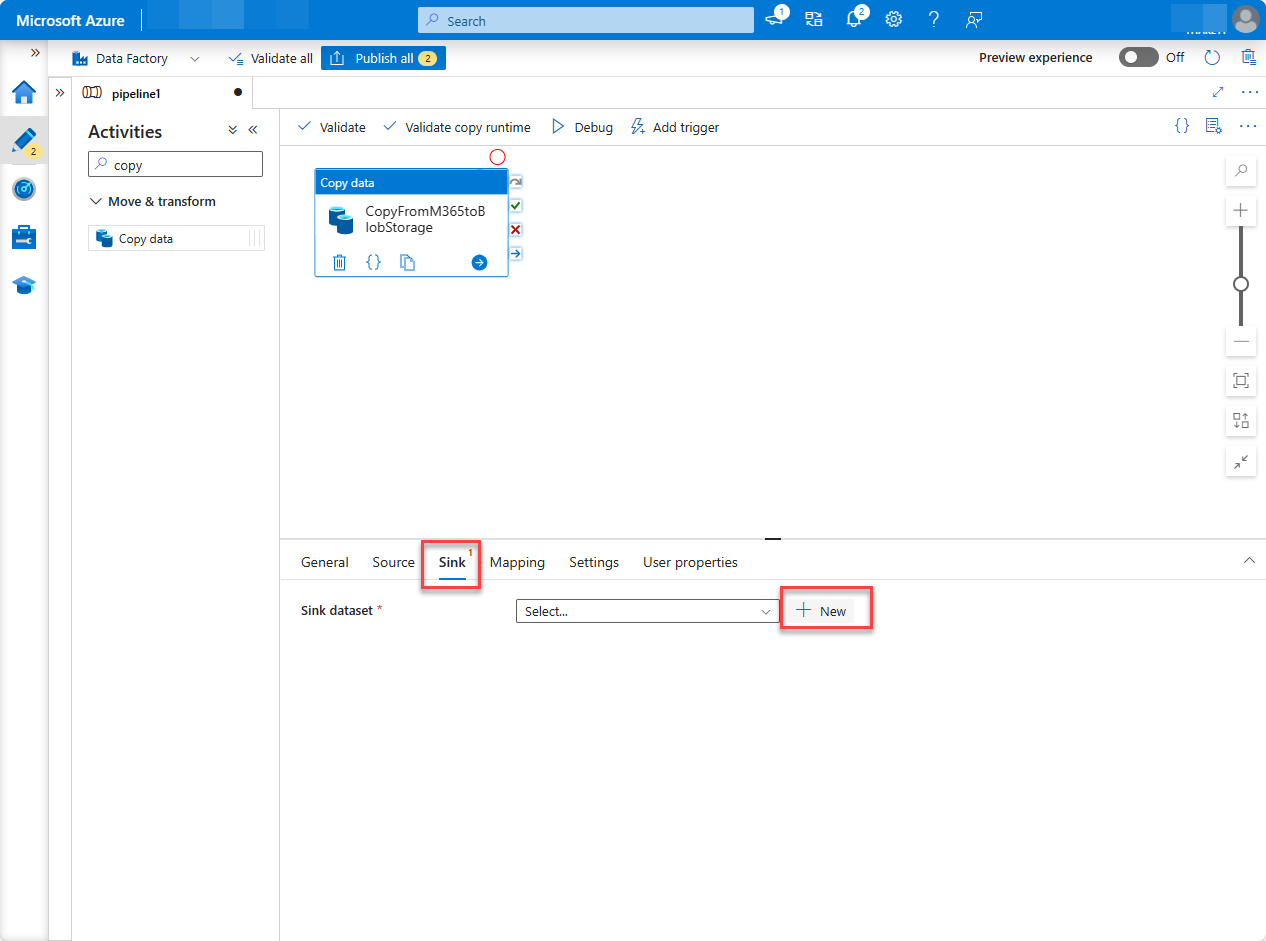
Select the Sink tab. Choose New, select Azure Blob Storage, and then choose Continue.
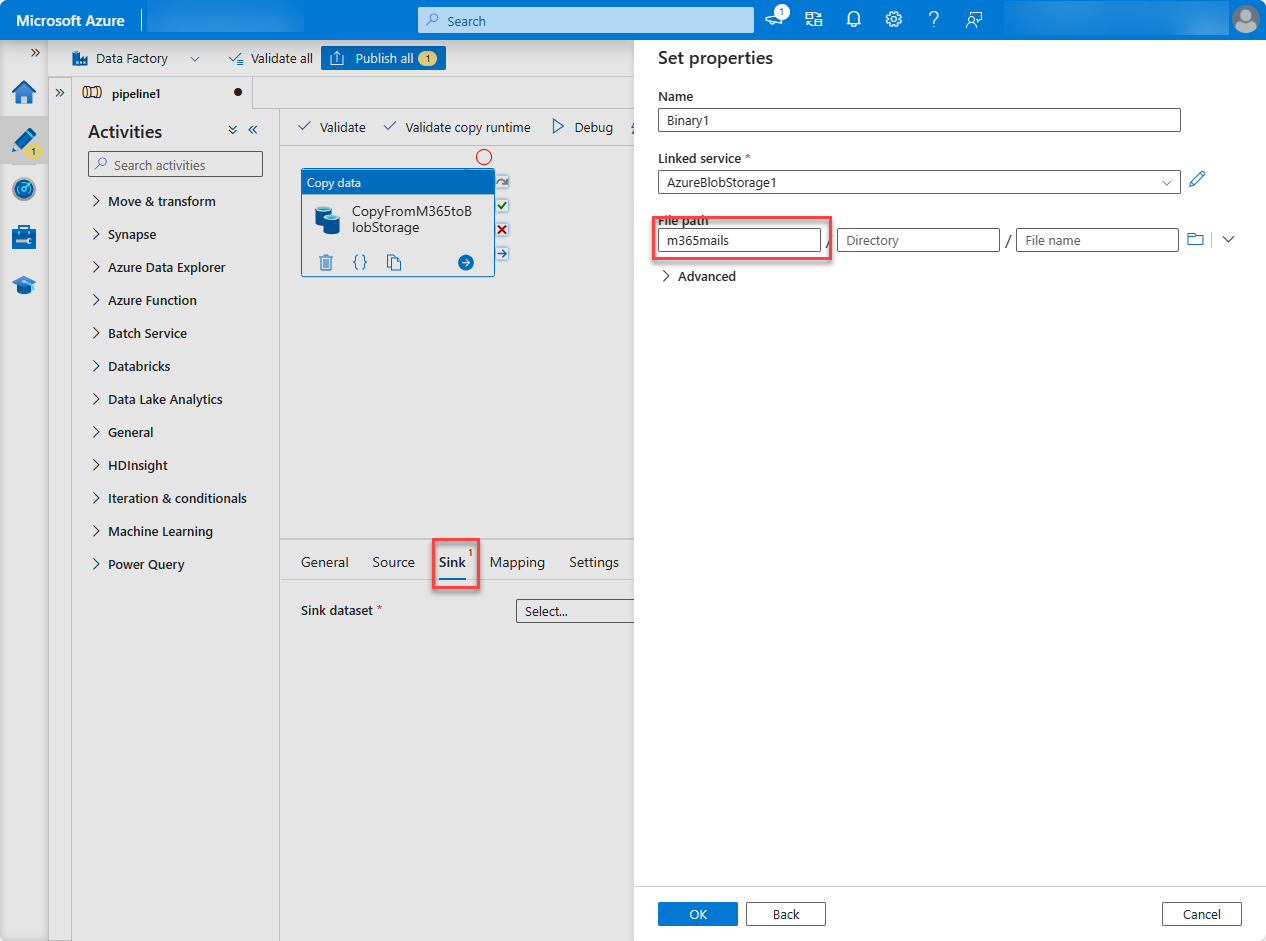
For the format for the data, select Binary, and then choose Continue.
Give the dataset the name M365JsonFile and follow the next steps to create a new linked service if it doesn't exist already.
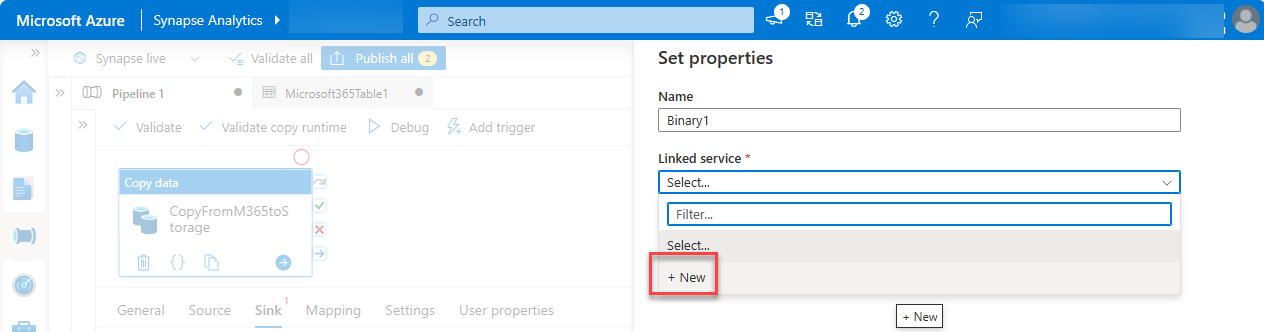
- Under Linked service, choose Select, and then choose +New.
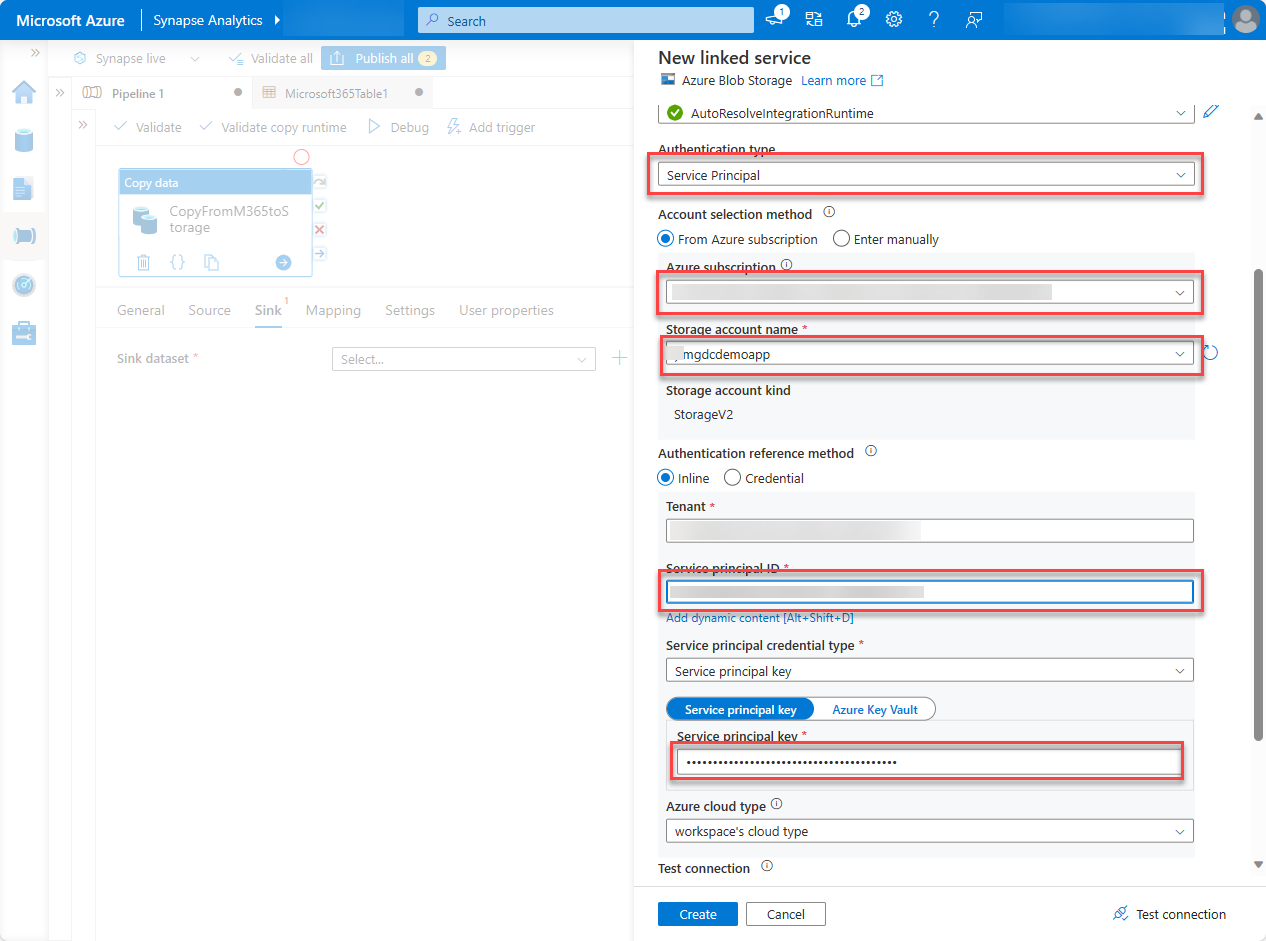
- In the dialog box, set the following values, and then choose Create.
- Authentication type: Service Principal
- Azure subscription: Select all.
- Storage account name: mgdcm365datastore. This is the storage account created earlier in this exercise.
- Service principal ID: Enter the ID of the Microsoft Entra application you created.
- Service principal key: Enter the hashed key of the Microsoft Entra application you created.
Next to the File path field, select Browse.
Select the name of the storage container you created previously, choose OK, and then choose OK again.
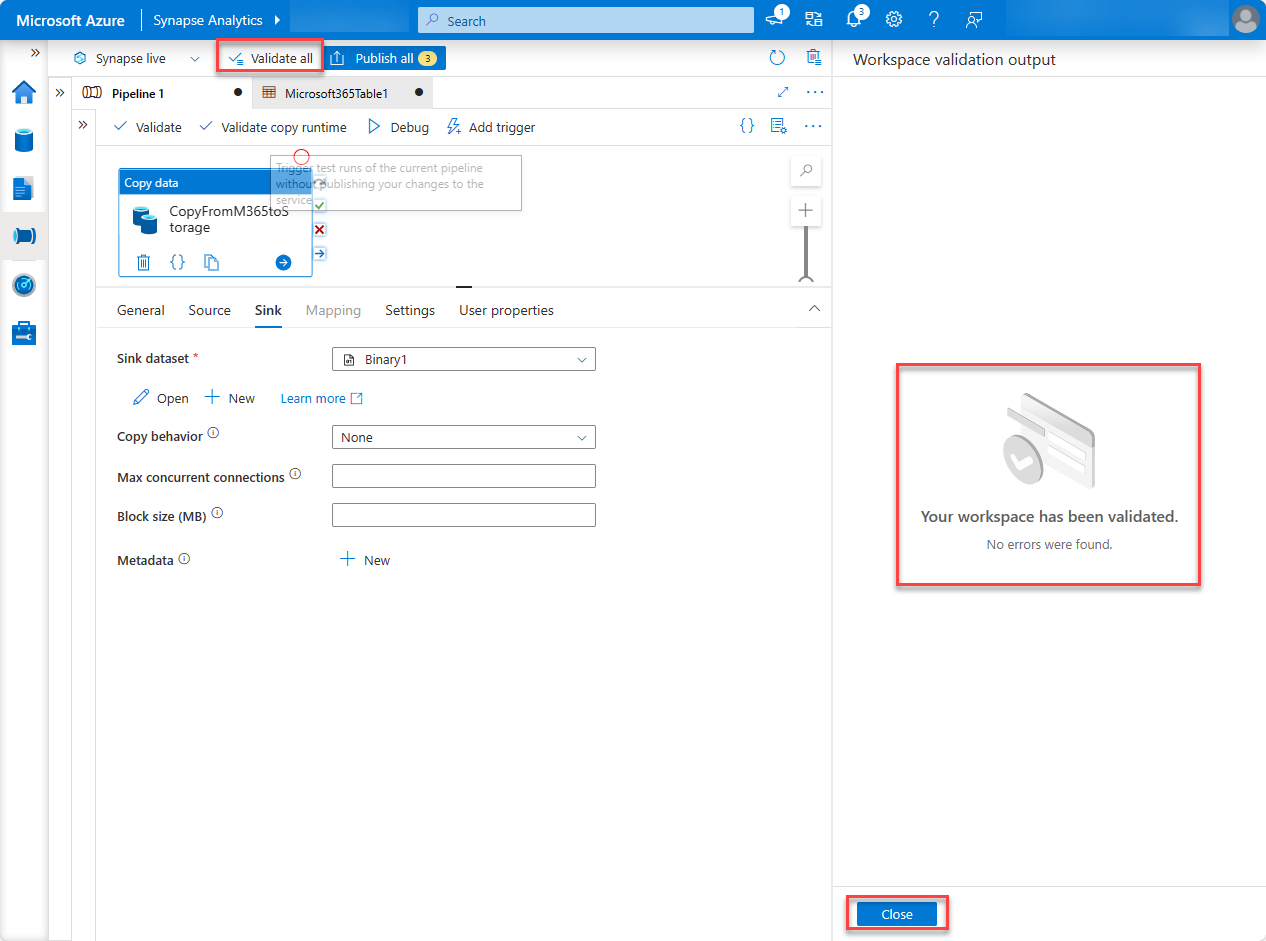
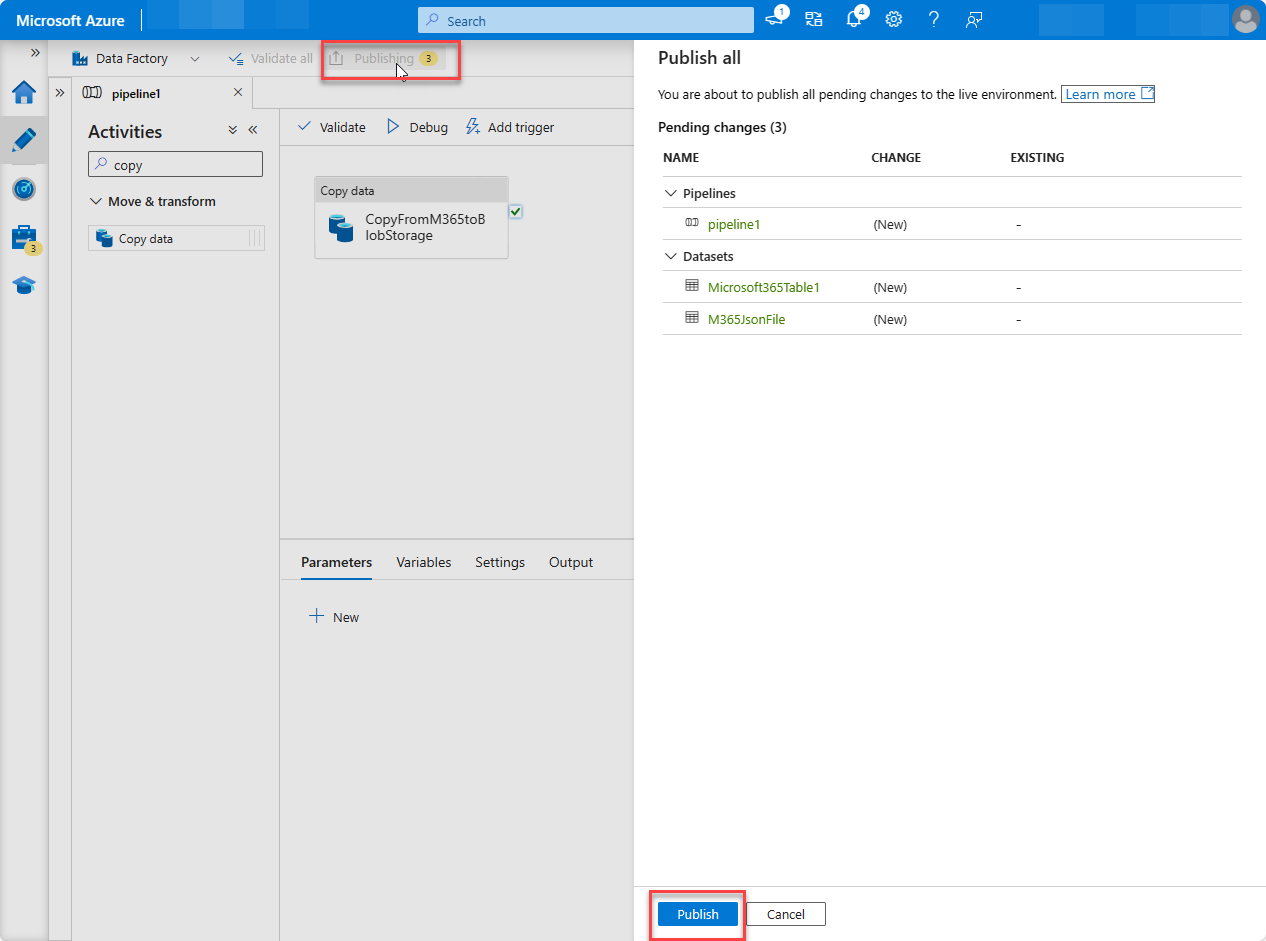
With the pipeline created, at the top of the designer, choose Validate all.
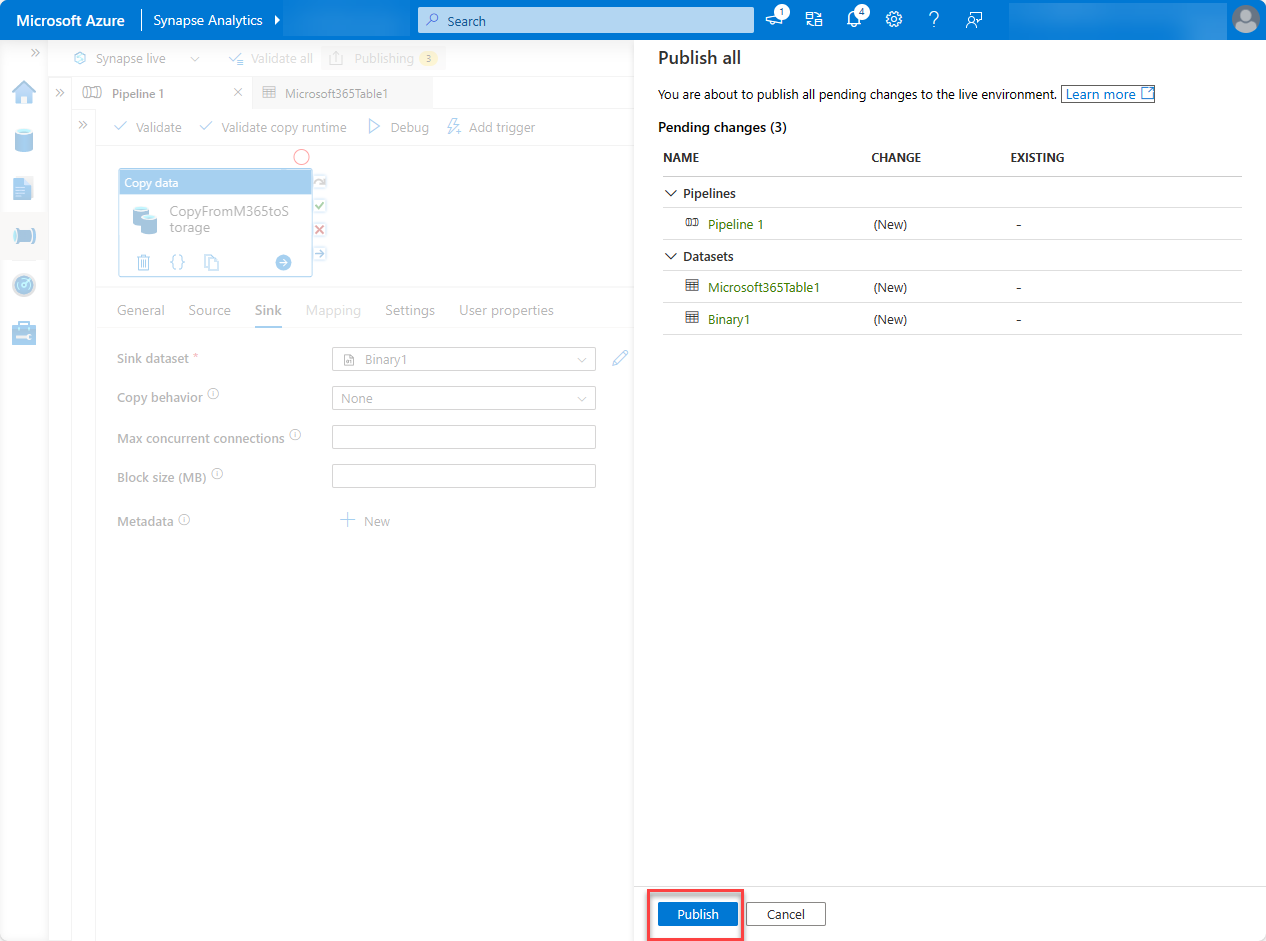
- After validating (and fixing any issues that were found), at the top of the designer, choose Publish all.
Run the Azure Synapse Analytics pipeline
Now that you've created the pipeline, it's time to run it.
Note
It can take several minutes for the consent request to appear, and it's not uncommon for the entire process (start, requesting consent, and after approving the consent completing the pipeline run) to take over 40 minutes.
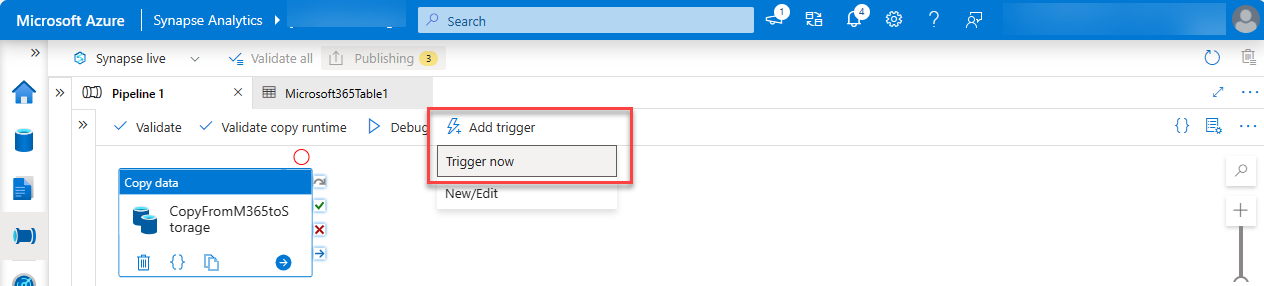
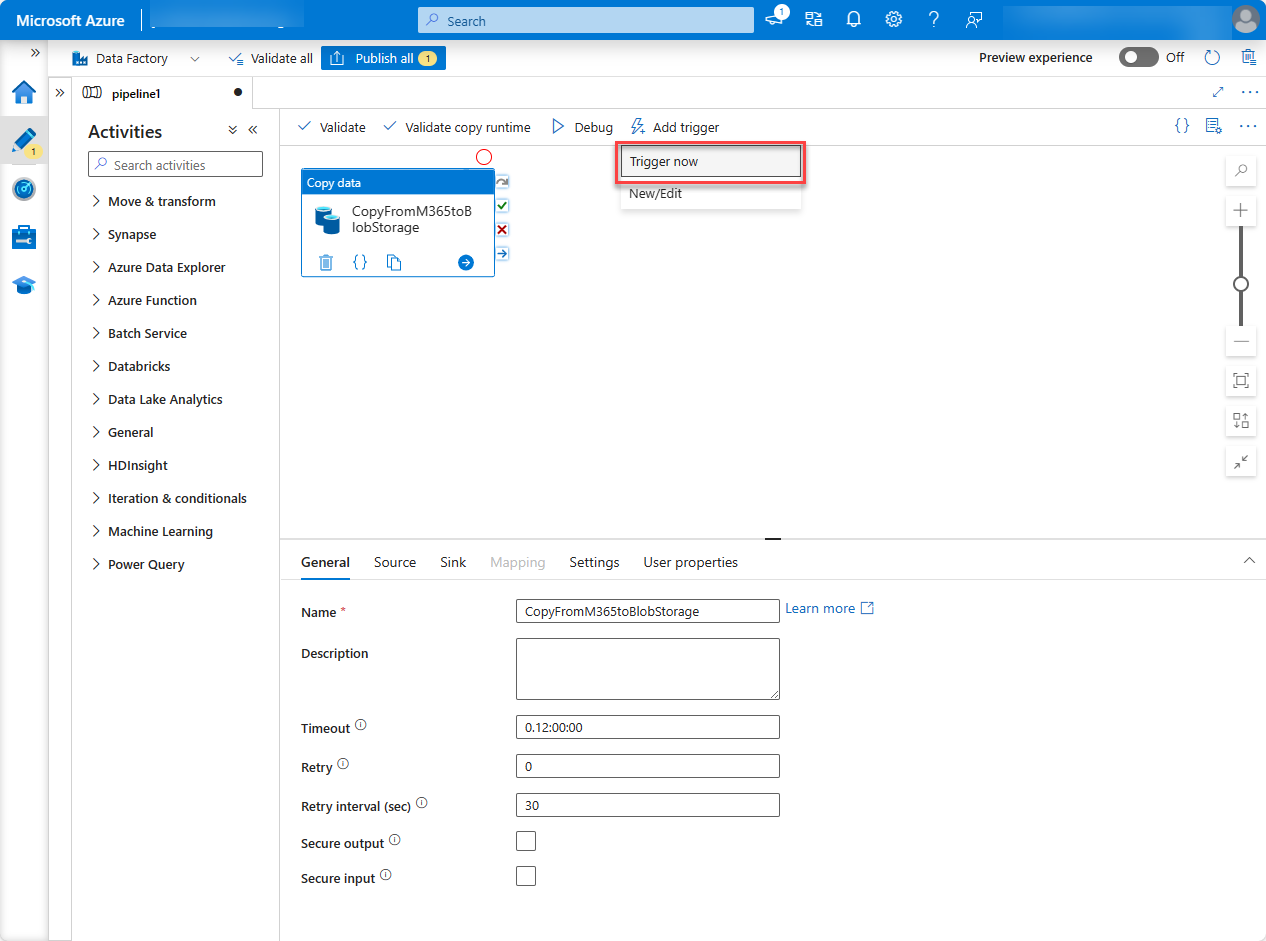
In the Azure Synapse Analytics designer, with the pipeline open, select Add trigger > Trigger Now, and then choose OK.
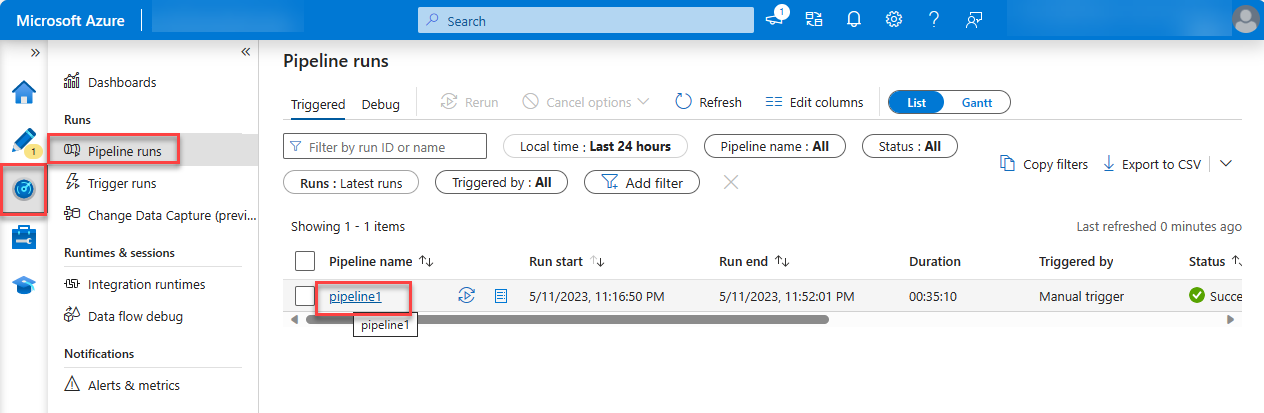
After starting the job, from the sidebar menu, select Monitor to view the current running jobs.
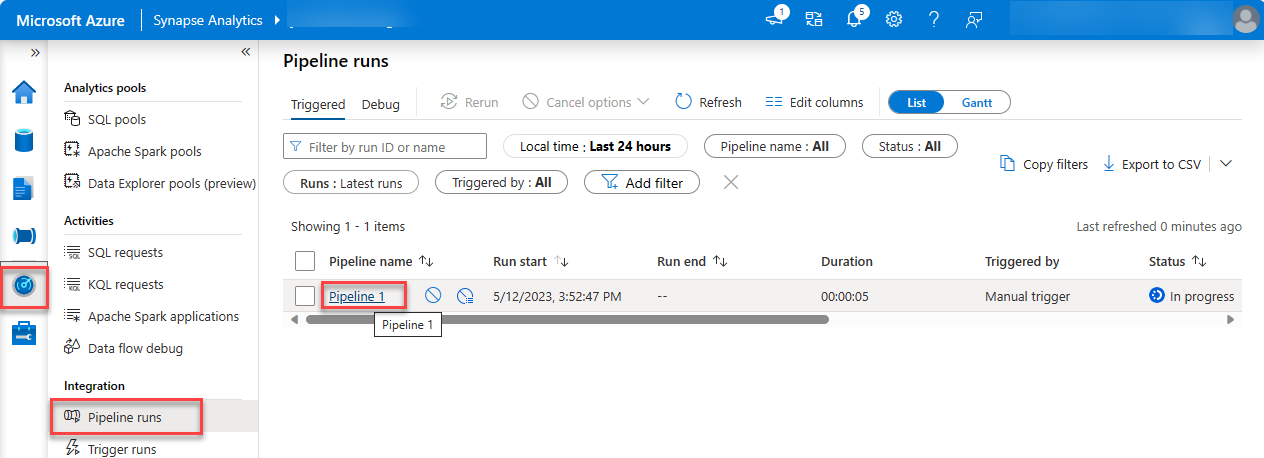
On the left pane, select the Pipeline runs tab. In the Pipeline name column, select the pipeline to view the Activity runs. This pipeline will show as In Progress.
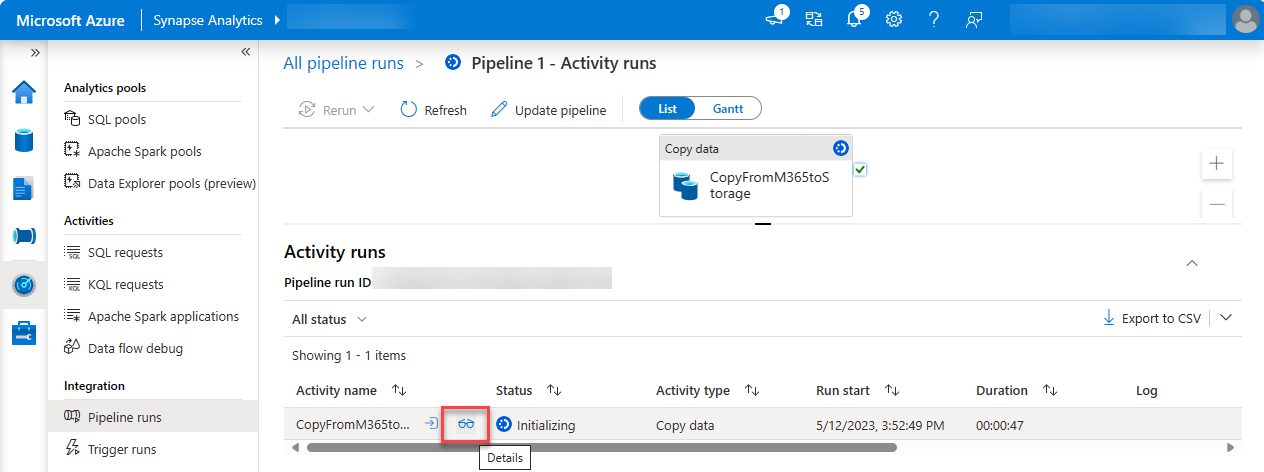
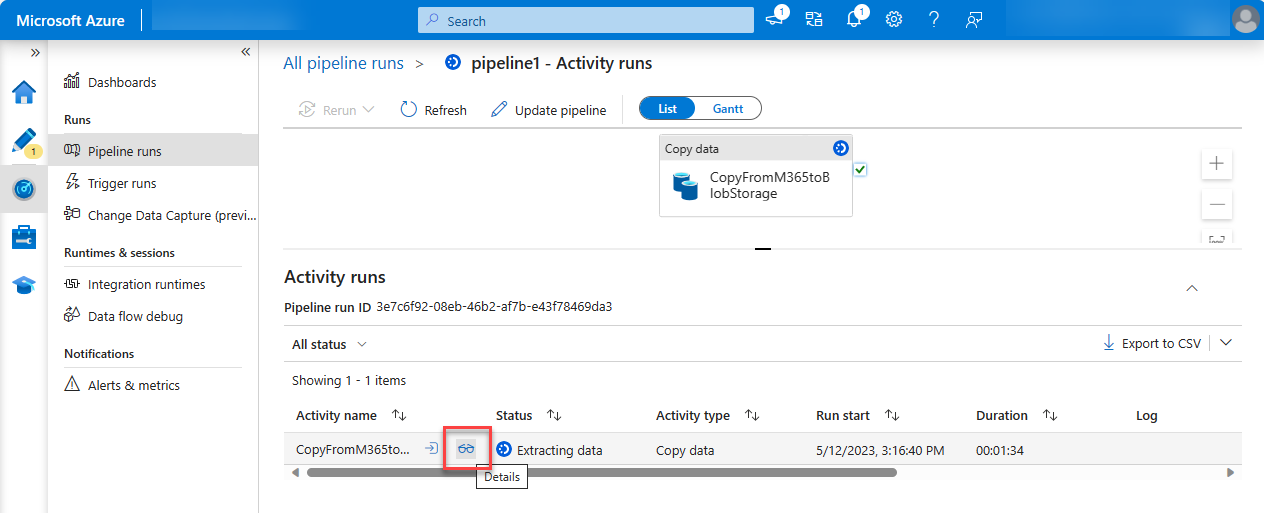
After you're in the Activity runs view, go to the Activity runs section on the bottom side of the page.
Hover over the Activity name and select the goggles option. This will open the Details tab.
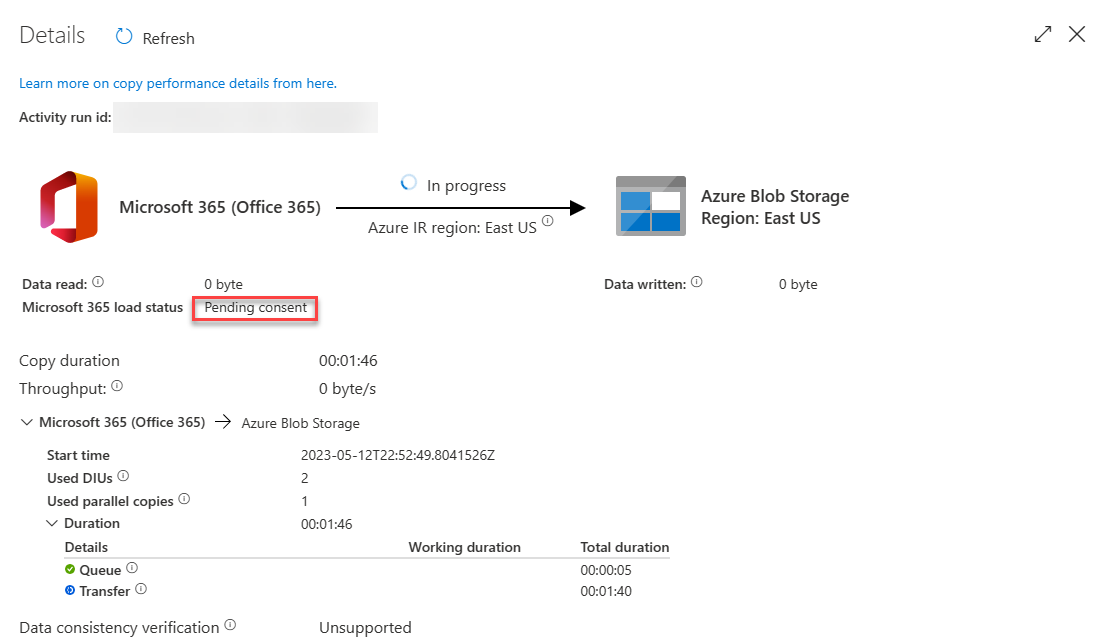
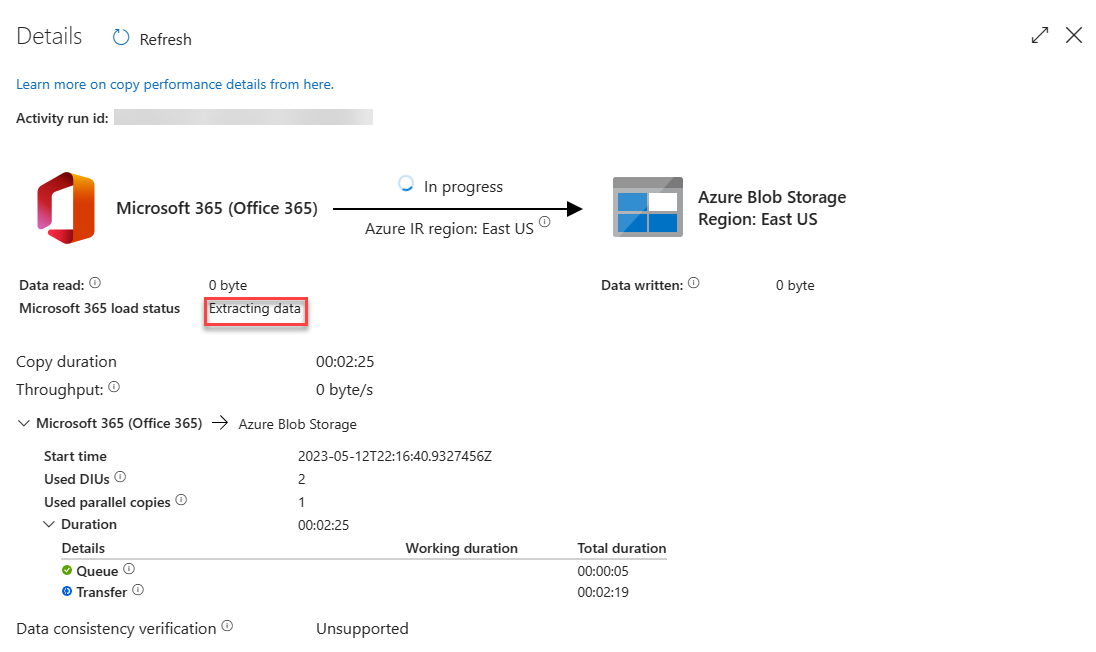
In the Details screen, look for the status of the pipeline activity as highlighted in the following image. The status should progress through Initializing, Consent Pending, Extracting Data, Persisting Data and Succeeded – no further action needed from you for this.
The request is sent to the global admin to be approved. For the context of this tutorial, we recommend opening another tab with your admin privileges enabled so you can approve the pipeline request.

(Optional) Visualize your Microsoft Graph Data Connect data in Microsoft Power BI
This exercise describes how to create a report in Microsoft Power BI to visualize your Microsoft 365 data from Microsoft Graph Data Connect.
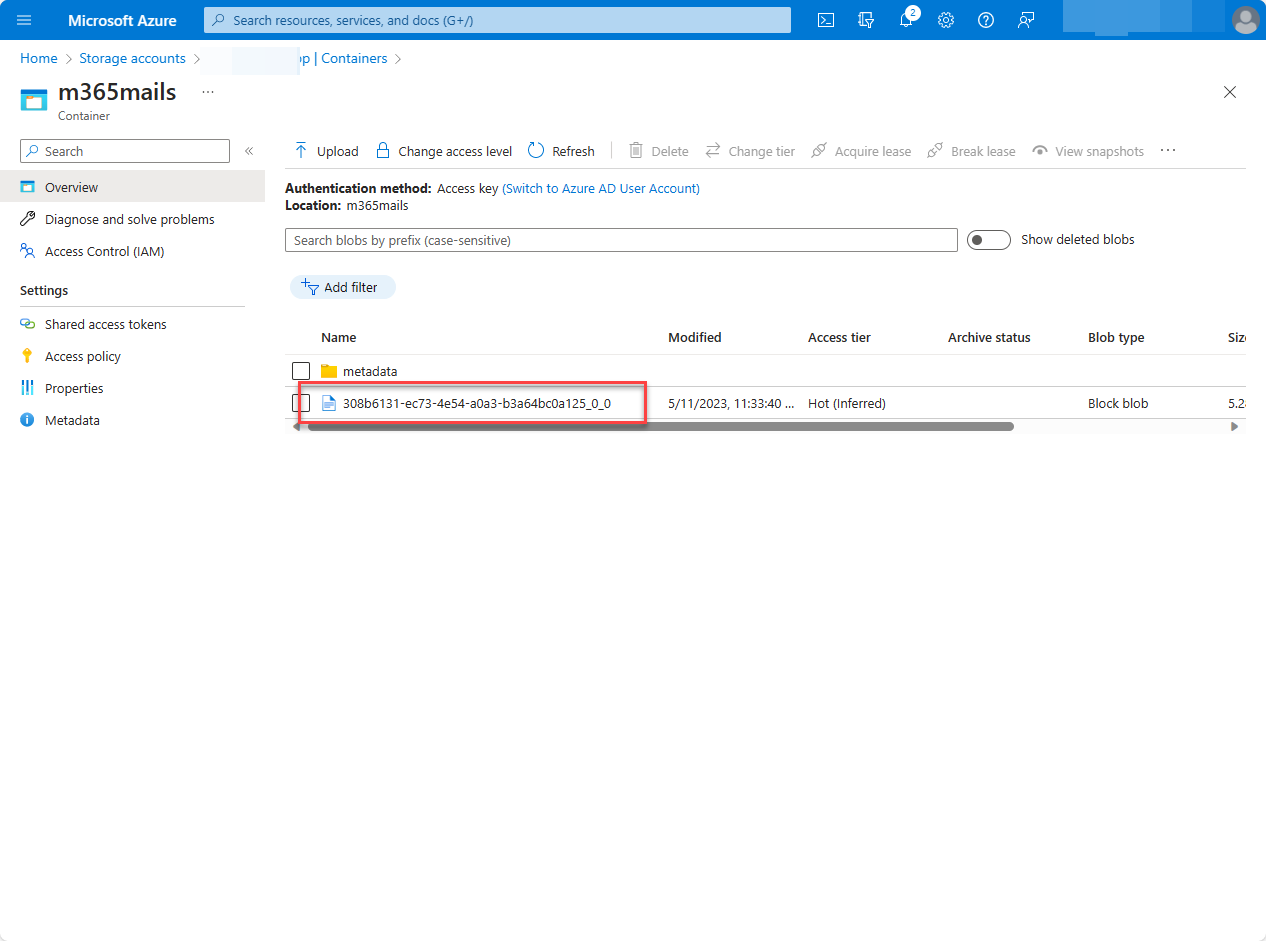
Verify JSON file in Azure Storage
- Open a browser and go to your Azure portal.
- Under Azure Services, choose Storage accounts.
- Select the Azure Storage account you created previously in this tutorial.
- On the left navigation pane, choose Containers.
- Choose the m365mails container that you created previously in this tutorial.
- You should see the file with a GUID name in your container.
Configure Power BI
Open your Power BI desktop application. If you need to download Power BI, go to Download Power BI tools and apps.
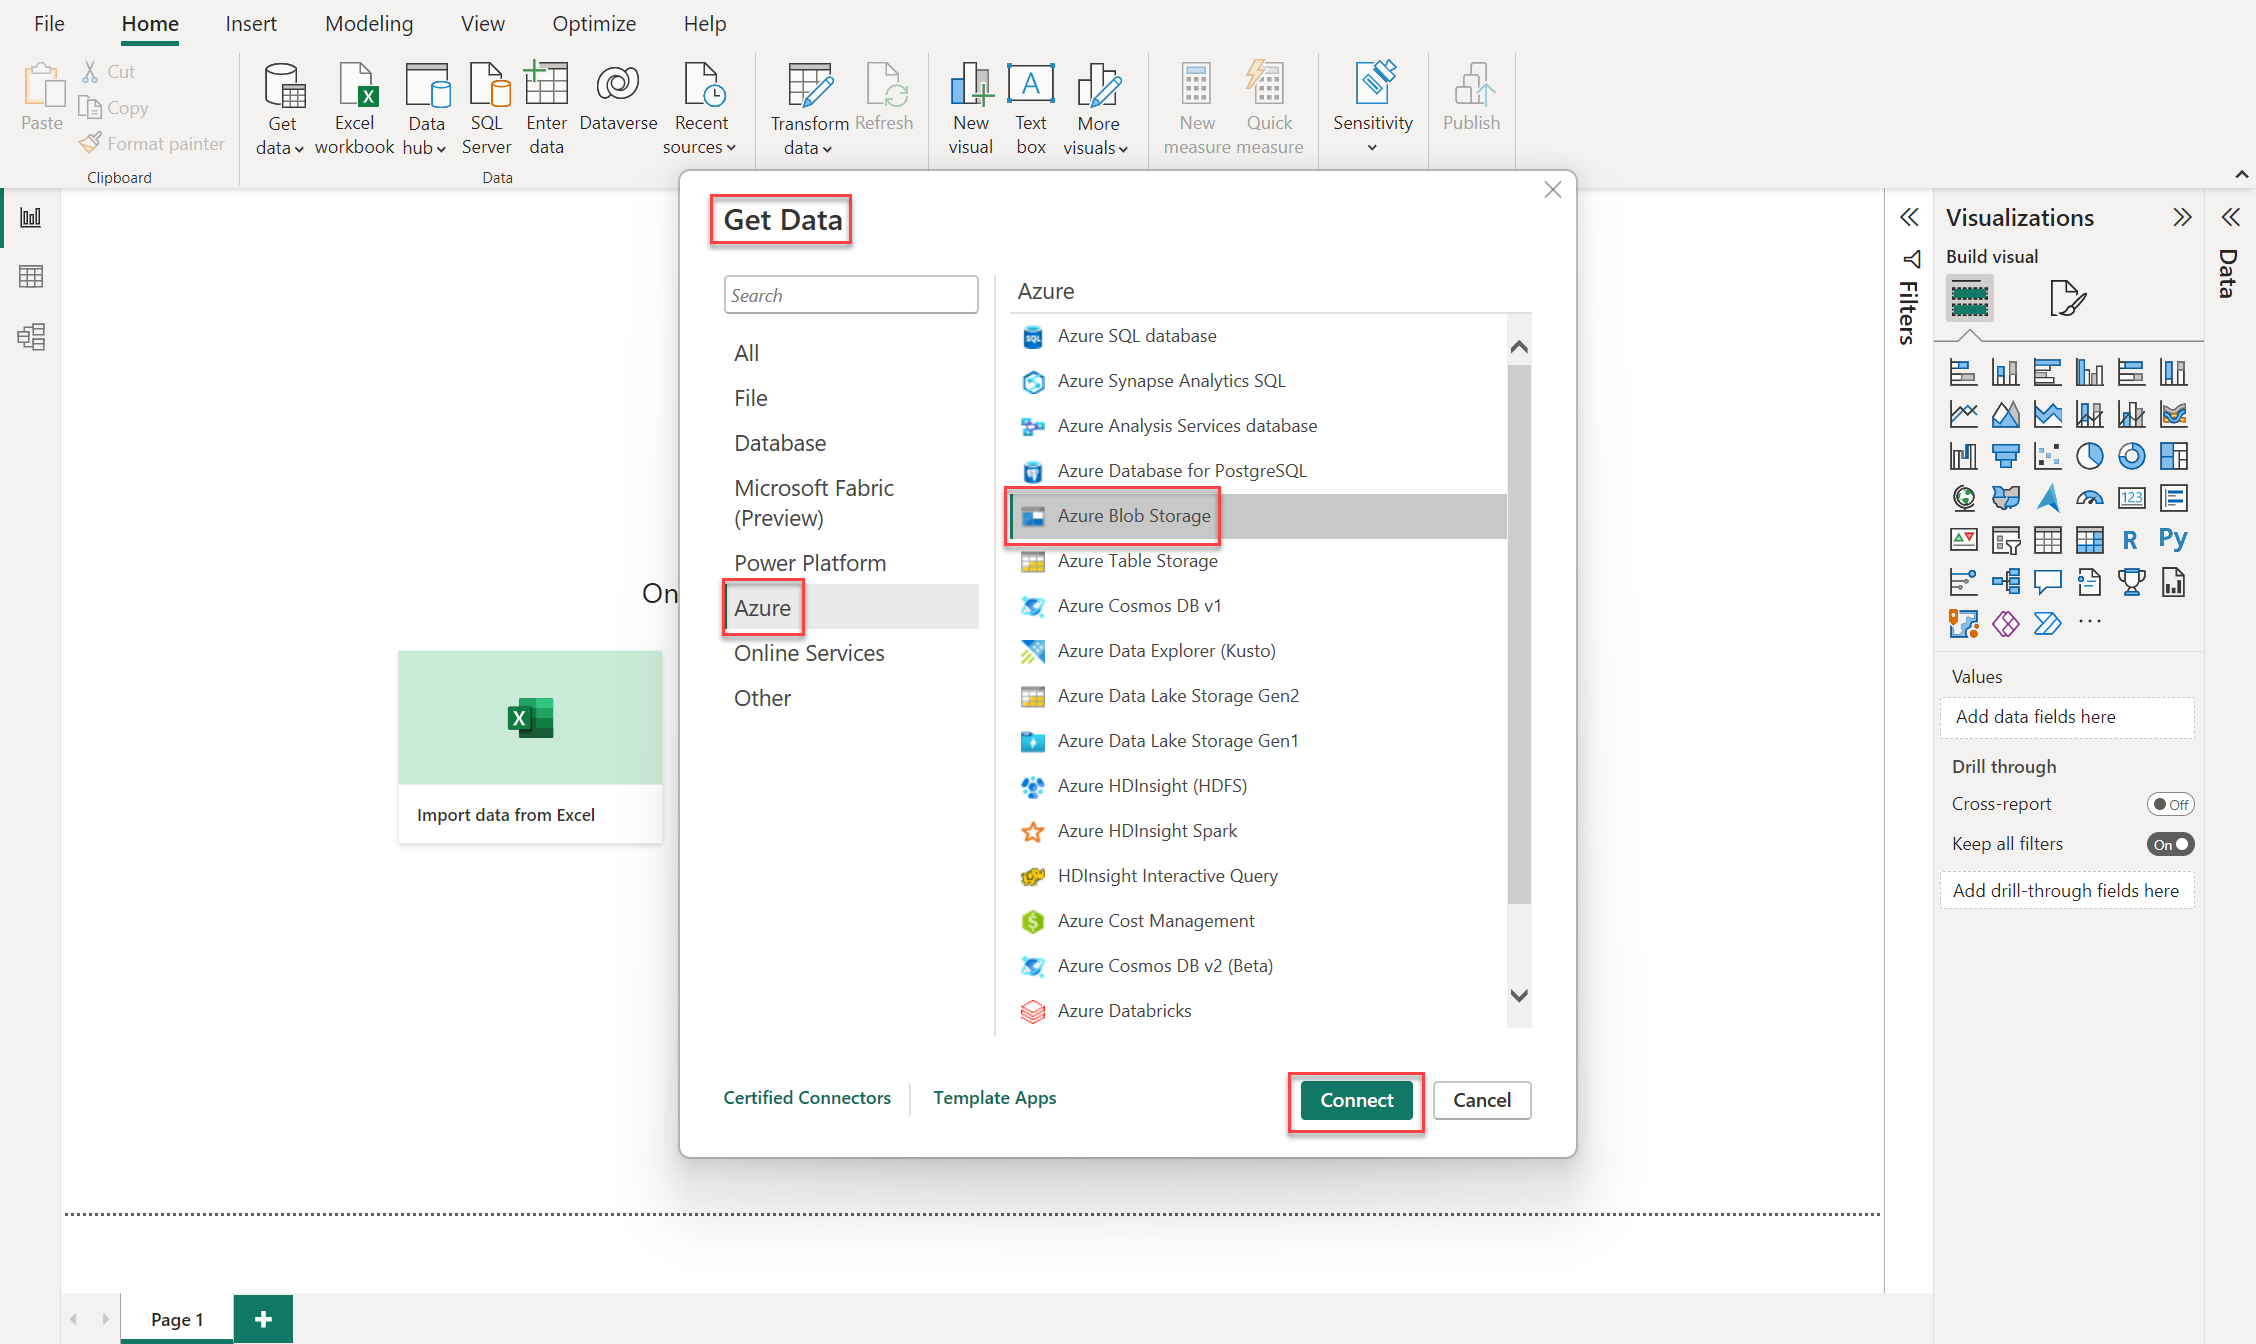
Choose Get Data, select Azure and choose Azure Blob Storage.
Choose Connect to establish the connection between Power BI and your Azure Blob Storage account.
Enter the Azure Storage Account name and container name for the Azure Blob Storage account you want to connect to, and then choose OK.
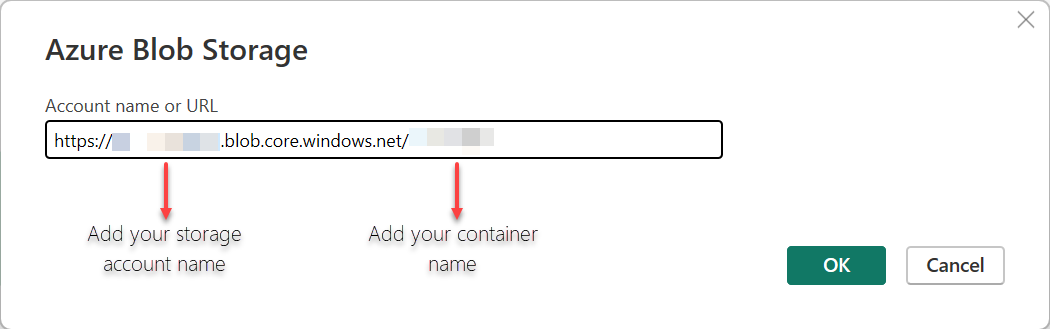
Note
You can find your Azure Storage URL in the Azure Storage Account. Search through your containers, choose the container you want to connect to, go to the Context menu (...), select Container Properties, and copy the URL.
Select Transform Data, and select the first line that says Binary.

To get a list with all the Records, go to the Column1 toggle option, select and hold (or right-click) to select Transform, then choose JSON.
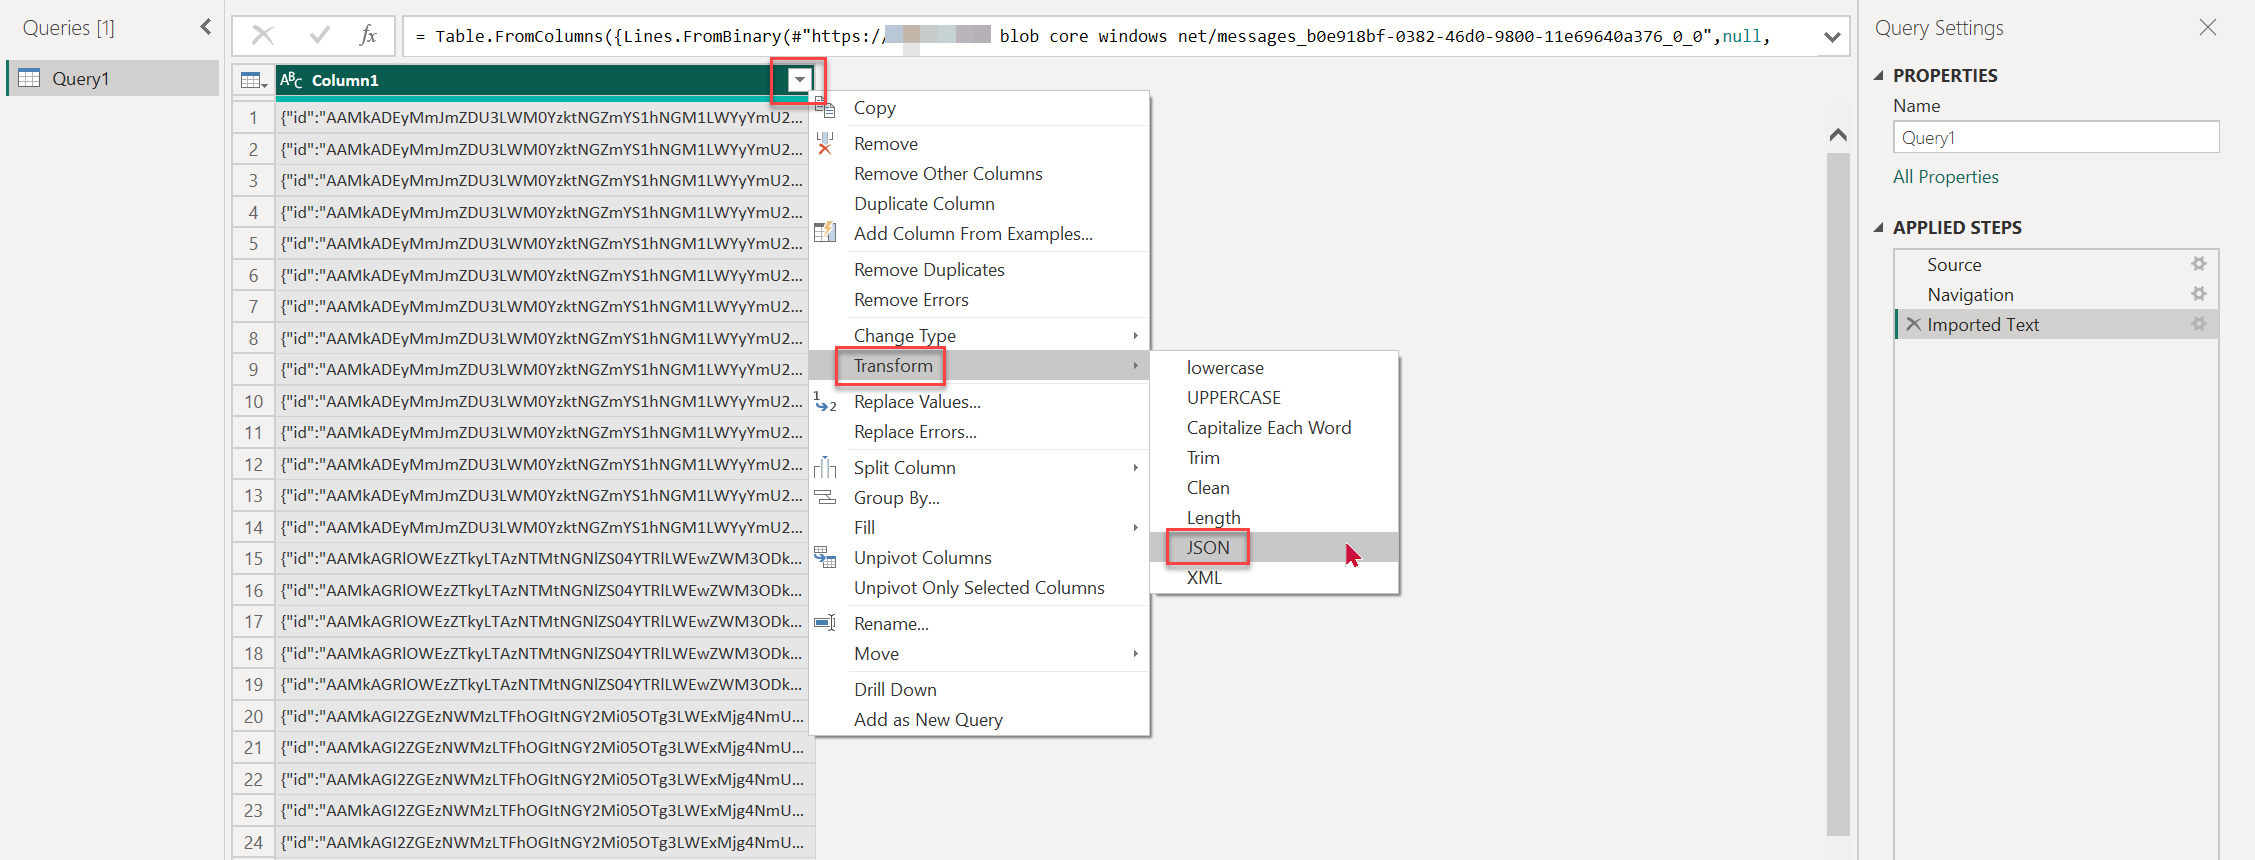
Load all the columns, expand the Records from the Column1 toggle, and then choose OK.
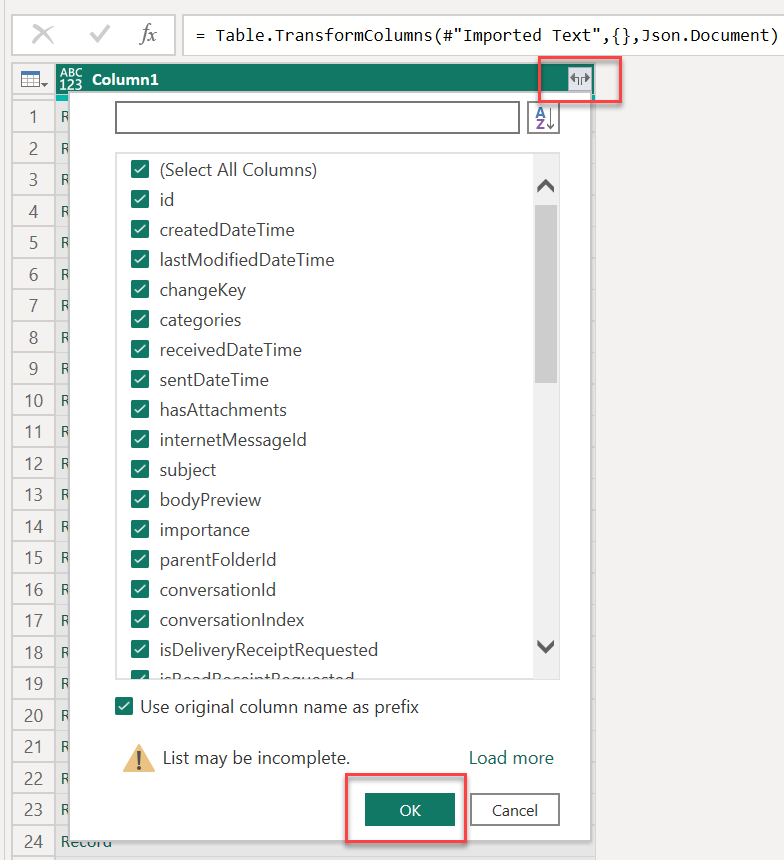
The results are shown as
Column1.property. To expand the columns with nested data, choose the toggle option on each column, and then choose OK.- Choose Close & Apply and wait for your query to load all the columns.
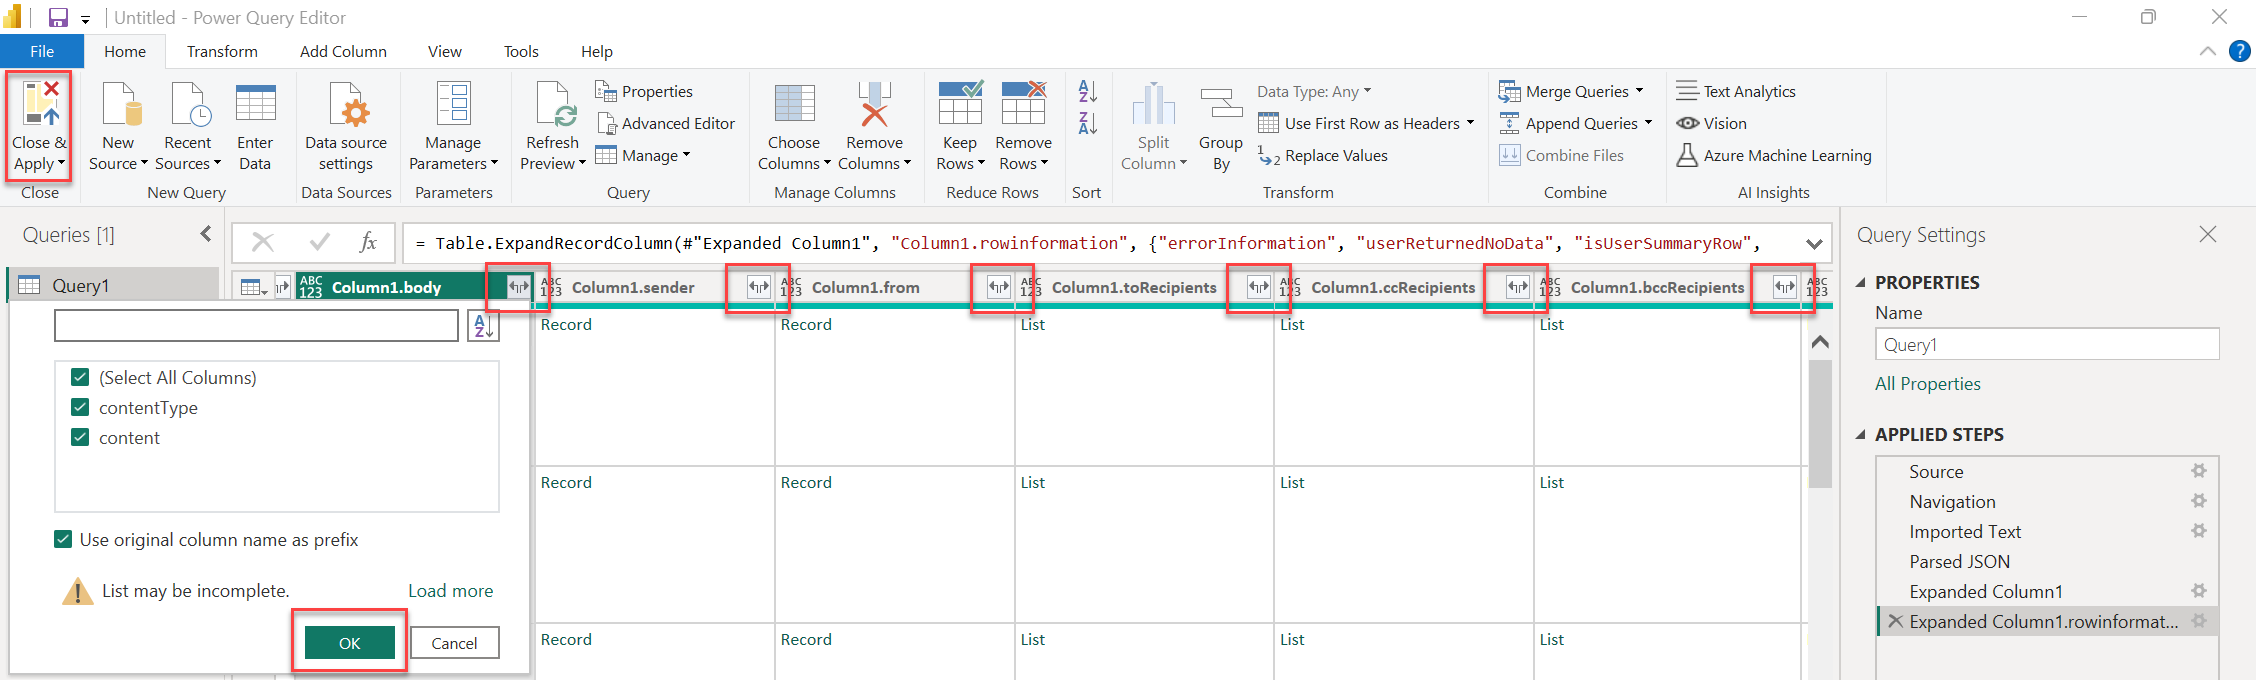
After all the columns load, you can build visuals with your data.
- Under Data, select Query1 to expand the columns and choose the properties you want to visualize.
- Under Visualizations, select the Key Influencers option to visualize the data.
Note
In this example, you can determine whether users read the messages sent by a department in your organization by analyzing every toRecipientName and the isRead property.
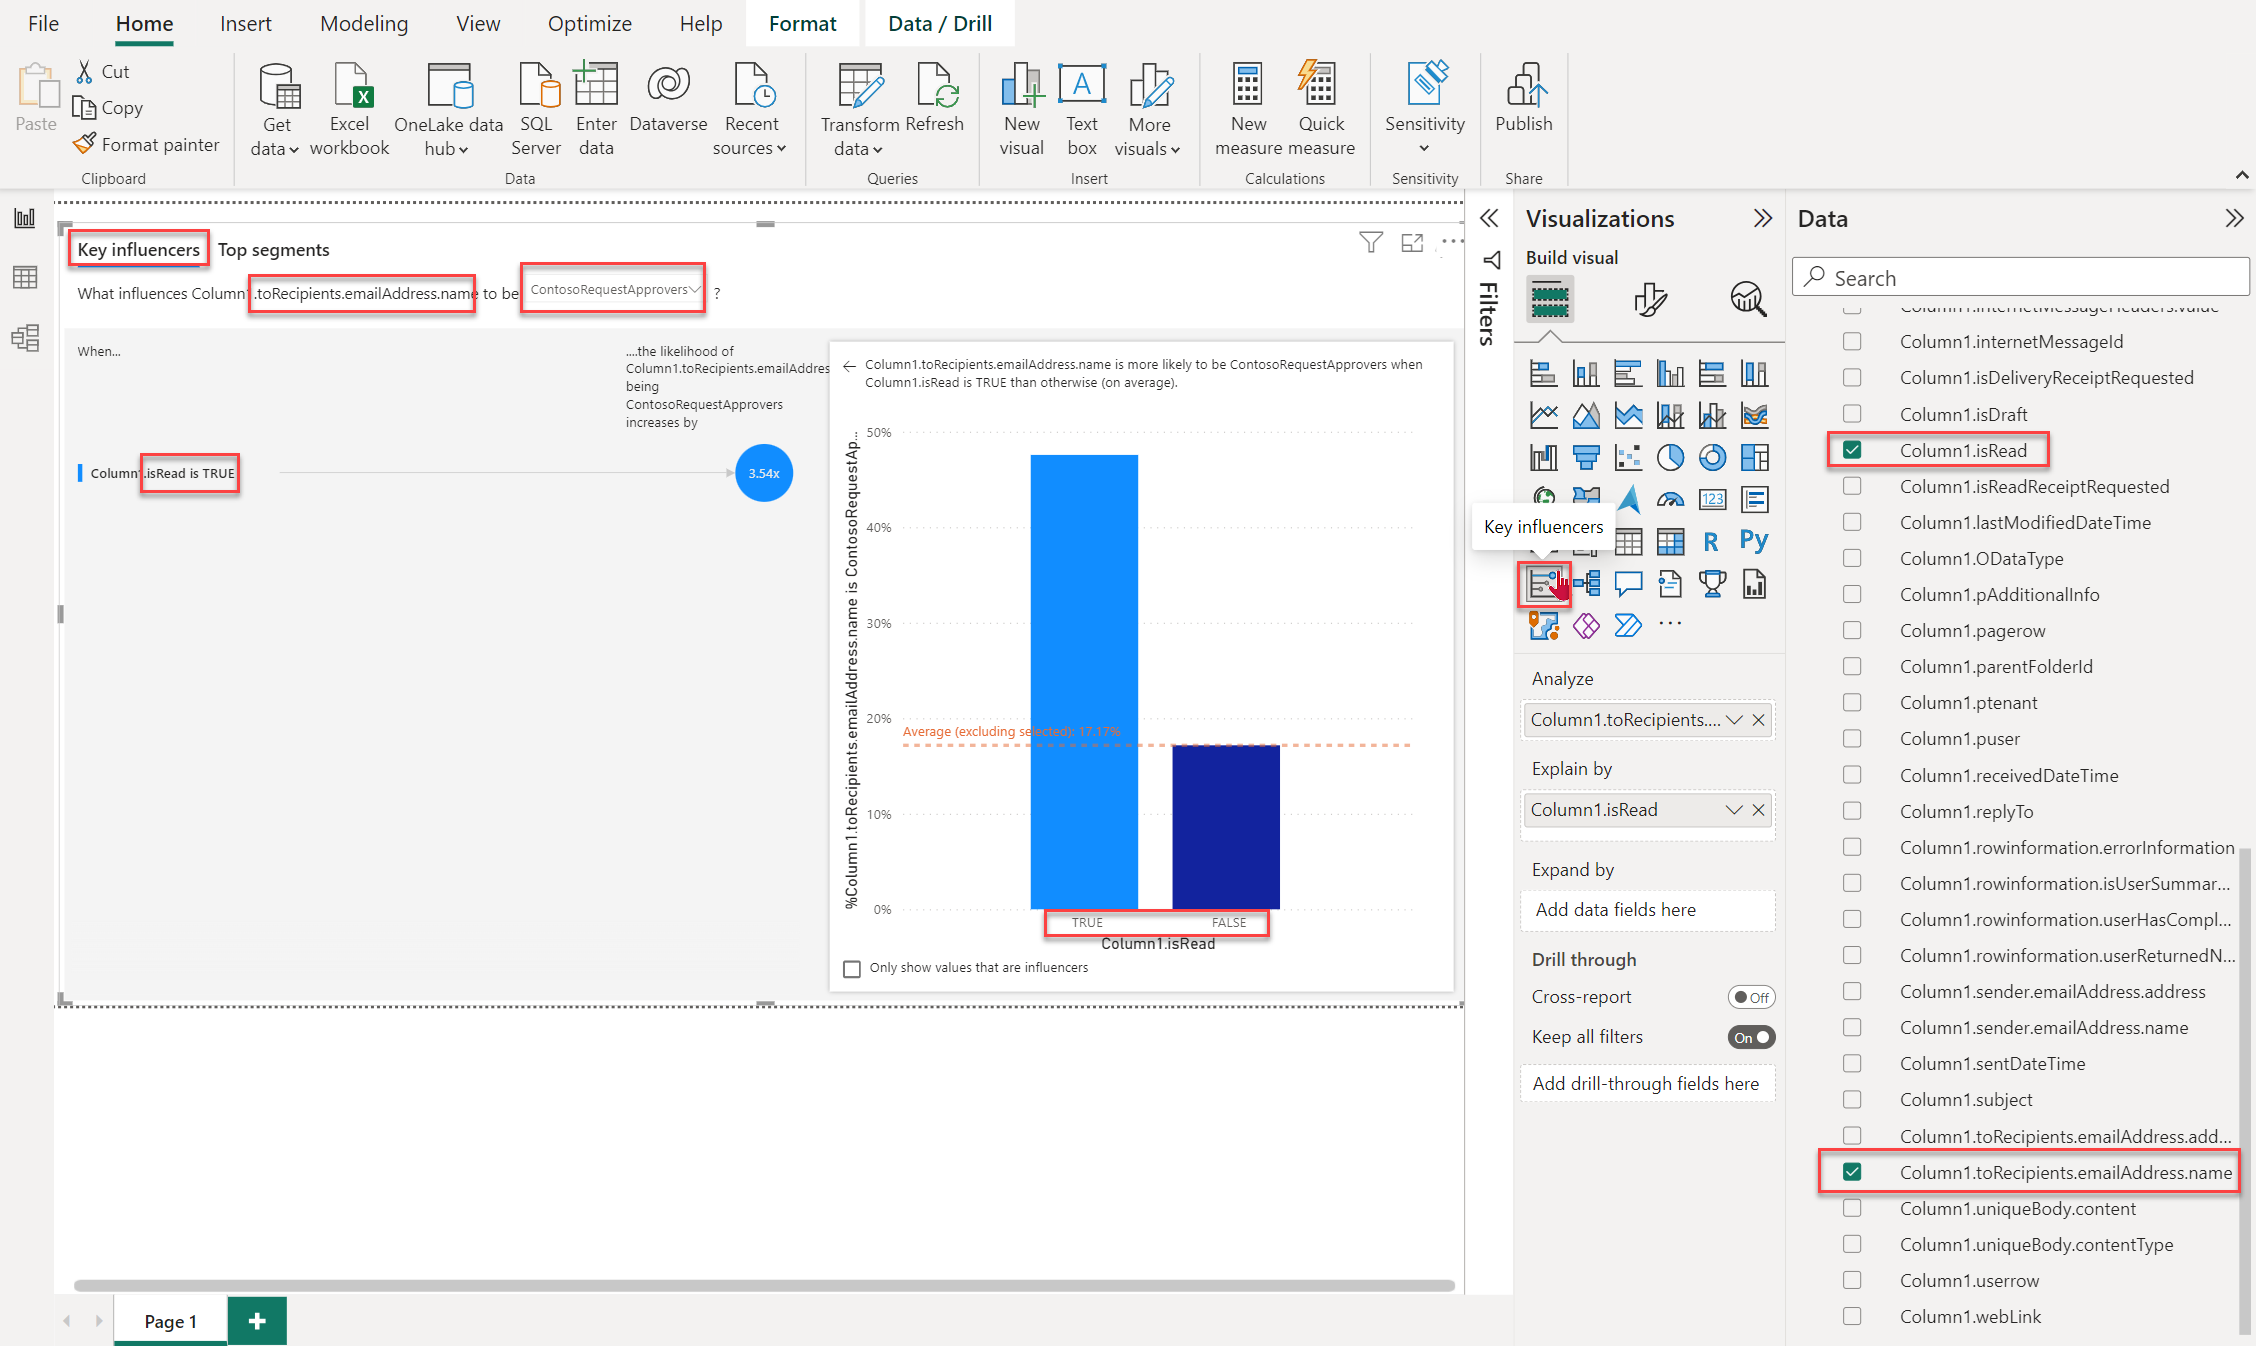
You can now see the JSON data from the Messages_v1 data set from Microsoft Graph Data Connect in a Power BI report.
Note
You can choose the data connectivity mode (DirectQuery or Import) depending on your data size and query requirements. We recommend that you use DirectQuery in this tutorial.
For solution templates that use Microsoft Graph Data Connect built into Power BI, see the Data Connect solutions repo in GitHub.