Dynamics 365 Omnichannel Integration
Dynamics 365 Omnichannel integration allows the patient to interact with Azure AI Health Bot using the Dynamics 365 chat widget to access the medical knowledge and your custom scenarios. It also allows the escalation of a bot conversation to a live agent to continue the interaction. When escalating a conversation, Dynamics passes along the conversation history and the context to the agent.
Configuring Azure AI Health Bot to engage with Omnichannel
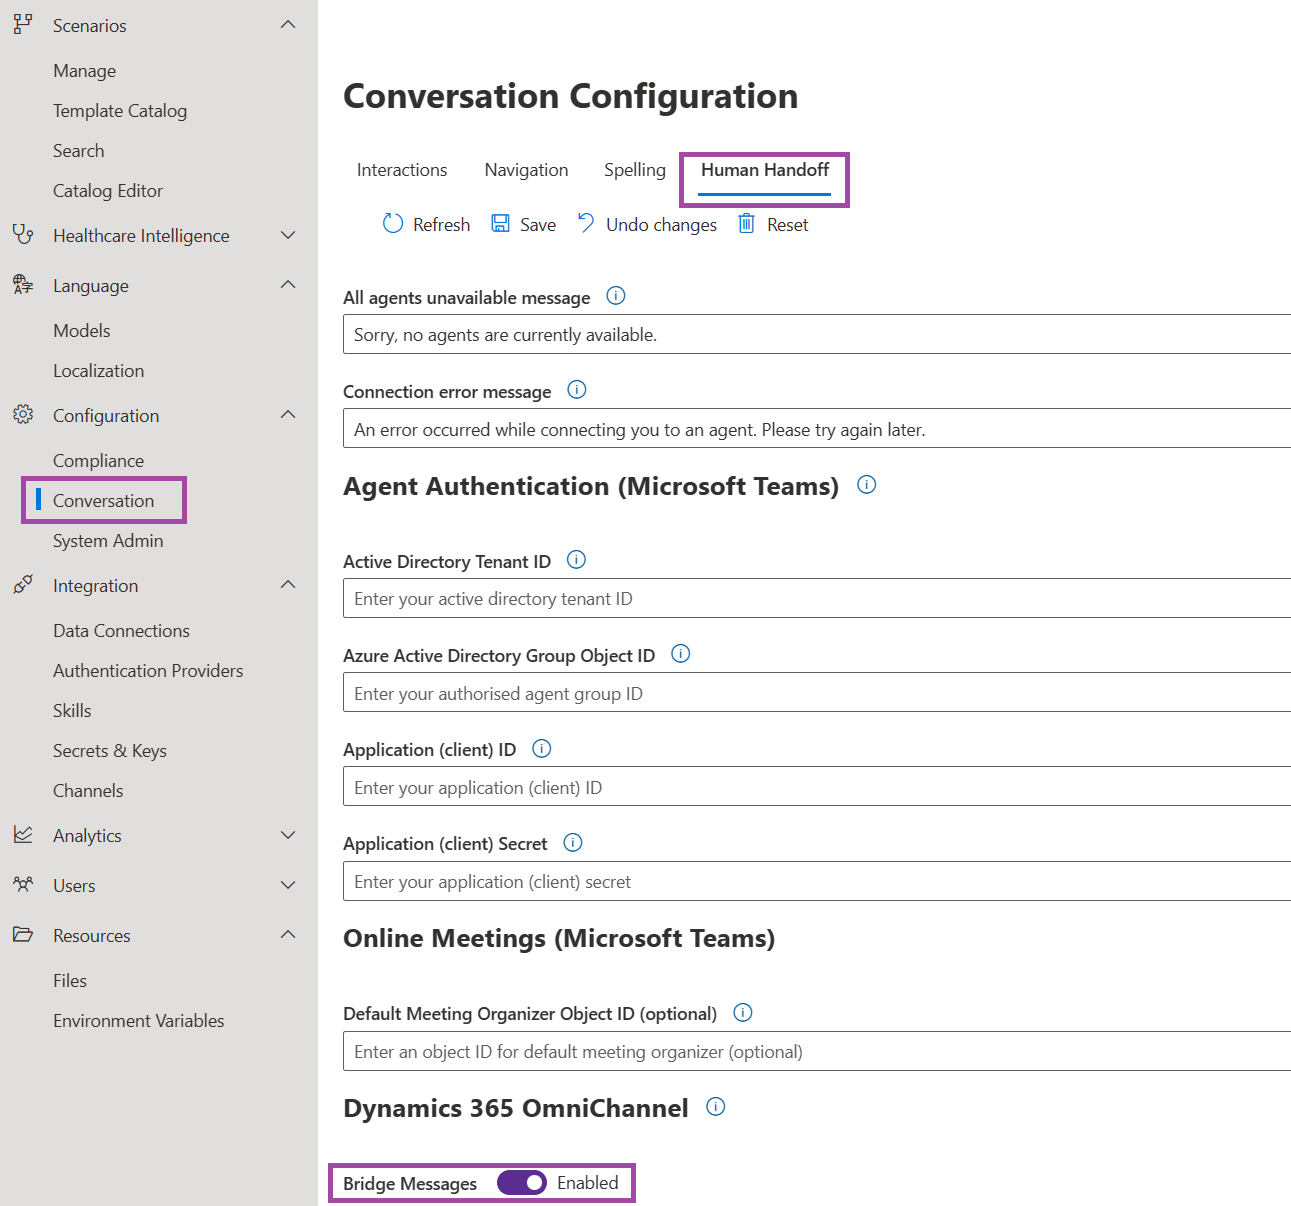
Turn on the Dynamics 365 Omnichannel message bridge by navigating to Configuration > Conversation > Human handoff in your Azure AI Health Bot management portal. Find the Dynamics 365 Omnichannel configuration and enable the message bridge.
Configuring the Dynamics 365 Omnichannel
To integrate a bot with Omnichannel for Customer Service, you must:
Note
Updates to the Omnichannel messaging platform will be rolled out in the beginning of 2022. During this period, users must also configure the Dynamics Omnichannel as described under the channels section. For more information, see here.
Create a Bot User
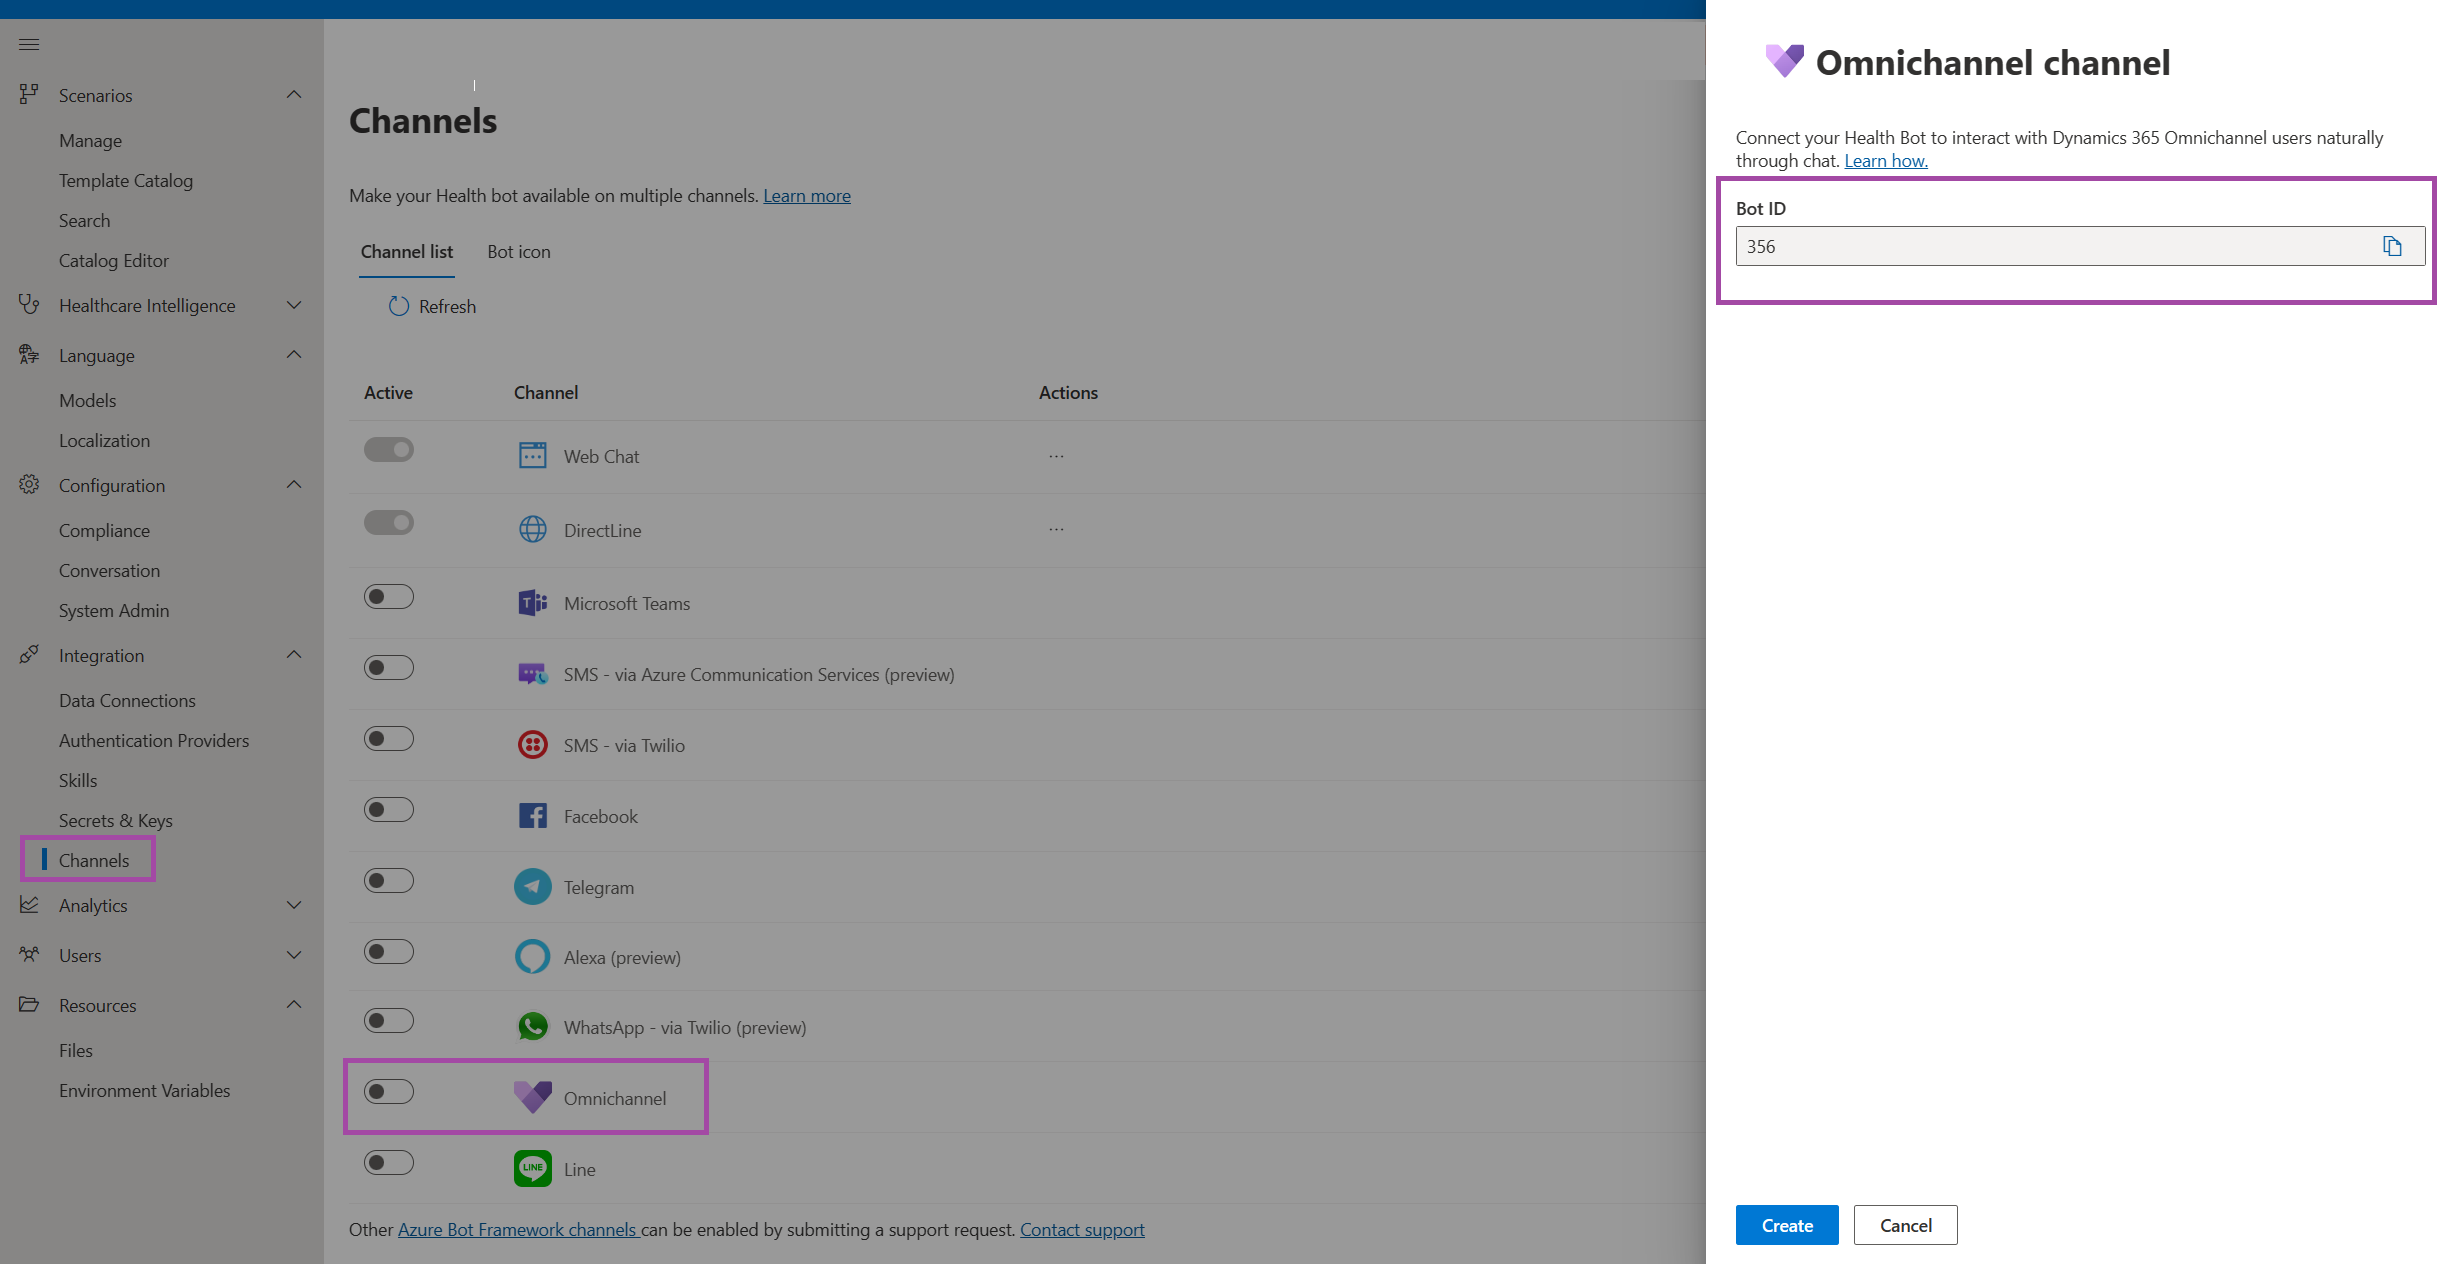
To create a bot user, you'll first need to obtain your Azure AI Health Bot ID. In the Azure AI Health Bot Management portal navigate to Integration >> Channels and enable the "Omnichannel" channel (if not already enabled). Select the "View" option and copy your bot ID to the clipboard.
To create a bot user:
- Navigate to your Dynamics 365 organization and go to Settings > Security > Users.
- In the view drop-down, select Application Users.
- Select New.
- In the Uses drop-down, select Application User.
- On the New User page, enter or select the following information:
- User Name: User name of the bot. It isn't displayed in the chat widget.
- Application ID: An application ID for any valid (nonexpired) application created in Microsoft Entra ID for the same tenant. It isn't used by the bot in Omnichannel for Customer Service.
- Full Name: Name of the bot to be displayed in the chat widget.
- Primary Email: Enter a dummy email address. It isn't used by the bot in Omnichannel for Customer Service.
- User type: Select Bot application user.
- Bot application ID: Bot's ID you copied in the previous step.
For more information on creating an application user, see Create an application user.
- Save the record.
- Select Manage Roles on the command bar.
- In the Manage User Roles window, select Omnichannel agent, and then select OK.
Note
By default, the bot user is assigned the same capacity as other users. You must assign the maximum capacity to the bot user among all users in a queue if you want the bot to handle the customer queries first. The capacity of a bot user isn't reduced when a query is handled by it.
Add a bot user to the queue(s)
Queues distribute the incoming customer queries among bots and agents. You must ensure that the bot user has the highest capacity among all users in the queue. This ensures that the bot user receives the customer query first.
Note
The bot works with the chat widget, work stream, and queues created in Omnichannel for Customer Service.
You can add a bot user to specific queues where you want the bot to handle the customer queries first. Alternatively, you can also create a queue with the bot user only. If you create a queue with the bot user only, ensure that the routing rules are set in a way that customer queries are sent to this queue first. This ensures that the bot acts as a first line of defense for all queries.
An agent can transfer a chat to a bot by adding the bot to a queue, and then transferring the chat to the queue. Note that the chat can't be transferred to the same bot.
Set escalation rules
Escalation rules allow you to create rules for the bot to escalate the queries to the appropriate agent. For escalation rules, you must create a context variable and appropriate routing rules to route the customer queries.
If the bot escalates the customer query, it's routed to the appropriate queue as per the defined routing rule. If the customer query in redirected to the same queue, another agent in the queue picks the conversation as per the capacity. For information on working with queues, see Work with queues in Omnichannel for Customer Service.
Note
If you have only one queue with bot and agents, and you didn't create a routing rule, the customer query is redirected to the same queue in case of escalation and picked up by an agent.
Create a context variable
You must create a context variable for the bot to handle the customer queries appropriately. The context variable is used in routing the incoming customer queries to the appropriate bots and agents. For information on creating context variables, see Understand and create work streams.
Create routing rules
Routing rules route the incoming customer queries to their respective queues. Each routing rule has a condition and a destination queue. If the condition is evaluated as true, the customer query is routed to the destination queue. For bots, the condition is built by using the context variable.
Bots are developed to receive customer queries first, gain information about the query, and then pass the query to a human agent if necessary. To achieve this behavior, you must add a bot user to the queue and configure routing rules in a way that the incoming customer queries are routed to the queue with the bot user.
Be sure to map the routing rules to the correct queues so that the queries are routed appropriately. For information on creating a routing rule, see Create and manage routing rules.
Escalate a conversation to a human agent
In Omnichannel for Customer Service, a bot can escalate the current conversation to a human agent. The routing to the new agent depends on the routing rule that is configured for the work stream. The primary way a bot can dictate how the conversation is routed is by using Omnichannel for Customer Service context variables that are associated with the chat. A bot can send out a list of context variables and the values to which they need to be updated along with the escalation request. Omnichannel for Customer Service updates the context variables to the specified values and then rerun the routing engine. This ensures that an escalated chat is routed to the right queue. Once the agent accepts the request, the chat transcript with the bot is visible on the agent’s conversation widget. The agent can then continue the chat with the customer.
End a conversation
An Omnichannel for Customer Service bot can choose to end the conversation if it determines that the customer’s queries have been answered or if the customer is no longer responding. The bot can do so by sending an EndConversation request to Omnichannel for Customer Service.
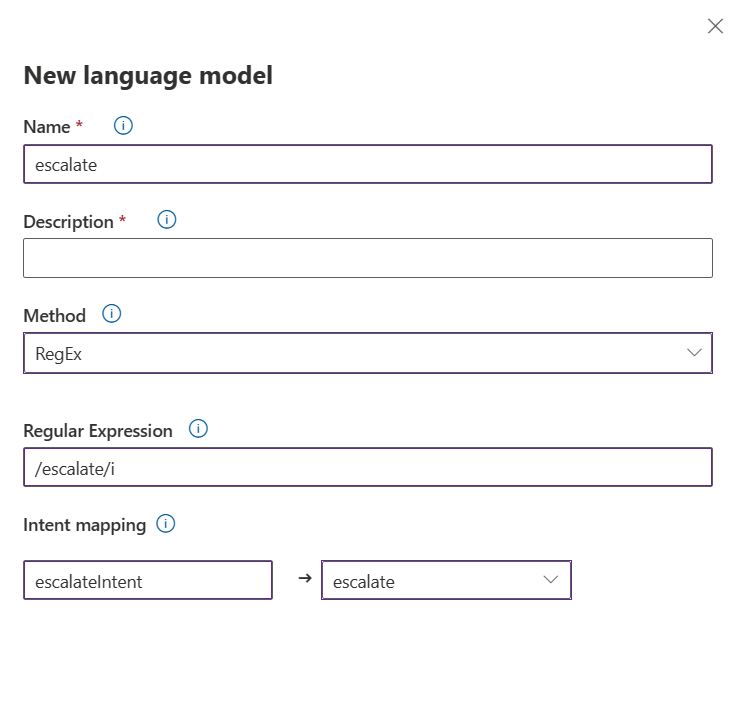
Sample Custom Scenario for escalation
To escalate an Azure AI Health Bot end user to a live agent you need to create an "Escalation Scenario". When the end user utterance triggers the escalation scenario it sends a message to your dynamics instance to escalate the conversation to a different queue.
For example if you want to escalate to a queue with the context variable "BotHandOffTopic" : "Nurse" you can create a scenario like the one below.
- Create a custom scenario with a least one "Action" step that will be used to send an escalation message to Omnichannel.
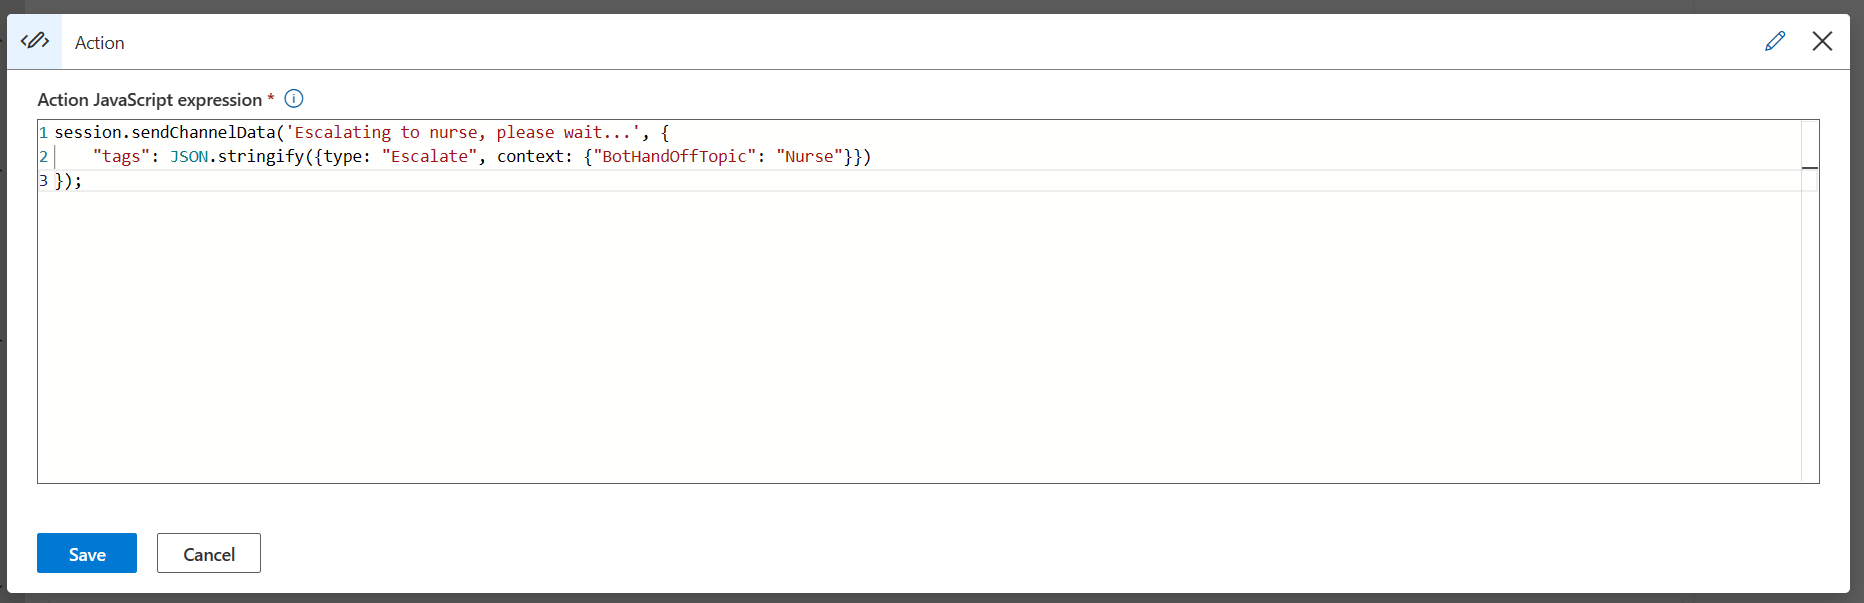
This action code looks like this:
session.sendChannelData('Escalating to nurse, please wait...', {
    "tags": JSON.stringify({type: "Escalate", context: {"BotHandOffTopic": "Nurse"}})
});
- Assign the language model to trigger this scenario