Note
Access to this page requires authorization. You can try signing in or changing directories.
Access to this page requires authorization. You can try changing directories.
Shared Microsoft Entra (formerly Azure Active Directory) accounts on HoloLens are regular Microsoft Entra user accounts that can sign-in to the HoloLens without requiring any credentials. This setup is ideal for scenarios where the following conditions are true:
- Multiple people share the same set of HoloLens devices
- Access to Microsoft Entra resources, such as Dynamics 365 Guides content, is required
- Tracking who has used the device isn't required.
Key benefits of using shared Microsoft Entra accounts
- Simplified deployment. Previously, setting up Microsoft Entra accounts shared between multiple people required setting up each device manually. Shared Microsoft Entra accounts allow you to configure your environment once and automatically deploy to any of your devices as part of Autopilot.
- Great user experience. Users of shared Microsoft Entra accounts do not have to enter any credentials to start using the device. Tap and go!
- Access to Microsoft Entra resources. Users of shared Microsoft Entra accounts get easy access to Microsoft Entra resources so that you can start a Remote Assist call or open a Guide without extra authentication.
Important
Since shared Microsoft Entra accounts can be accessed on the HoloLens device without entering credentials, you should physically secure these HoloLens devices so that only authorized personnel have access. You may also want to lock down these accounts by applying conditional access policies, disabling self-service password reset, and configuring assigned access profiles to the devices where these accounts are used.
Note
Since these are shared accounts, users using these accounts are not shown the typical first sign-in setup screens, including PIN and iris enrollments, biometric data collection notice, and various consent screens. You should ensure that the appropriate defaults are configured for these accounts via policy (see Set up users on HoloLens 2 quickly) and that your users are aware of these defaults.
Known limitations of shared Microsoft Entra accounts
- Shared Microsoft Entra accounts cannot use PIN or iris to sign-in in the current release, even if they've been enrolled.
Conceptual Overview of Shared Microsoft Entra Accounts
This process allows a HoloLens device, to be allocated a user account, and sign into that user account with credentials that are linked to the device, and the device alone. The image describes the process:
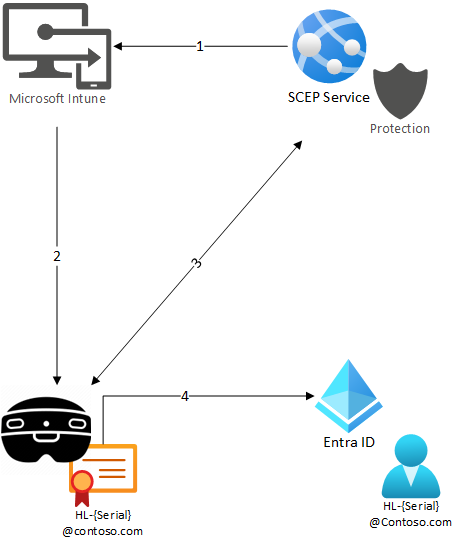
- Intune has a SCEP Configuration profile for the SCEP Service.
- The device joins Intune, and receives the profile information.
- The device contacts the SCEP Service, and recieves a device certificate, with a UPN of
HL-{Serial}@contoso.com. - The device logs into the corrosponding user account in Entra ID, using the certificate as MFA, to provide a seamless sign on experience.
The certificate cannot be removed / exported from the device, and the user account is configured with no other form of MFA avaialable. This configuration ensures that the shared account can only be logged into by the HoloLens device.
Overview of the steps to configure shared Microsoft Entra accounts
Shared Microsoft Entra accounts on HoloLens are implemented as regular Microsoft Entra user accounts that are configured for Microsoft Entra certificate-based authentication (CBA).
At a high level, configuring shared Microsoft Entra accounts includes the following steps:
- (Recommended) Configure your target devices to join Microsoft Entra and enroll into Intune using Autopilot.
- Configure your Microsoft Entra tenant to enable Microsoft Entra CBA for a select group of accounts.
- Configure Microsoft Intune to apply device configurations to a select group of devices that:
- Deploy client certificates used for Microsoft Entra CBA onto the devices via Intune's SCEP certificate profiles.
- Deploy CA certificate so that the devices trust the issuer of the client certificates.
- Deploy shared account configuration instructing the device which certificates are valid for Microsoft Entra CBA.
- Prepares individual devices for shared Microsoft Entra accounts.
Prerequisites
Shared Microsoft Entra account support is available starting in Insider preview for Microsoft HoloLens build 10.0.22621.1217.
In addition to having the required operating system build on your HoloLens, you also need to satisfy the prerequisites for Microsoft Entra CBA (How to configure Microsoft Entra certificate-based authentication).
Finally, you need access to Microsoft Intune in order to deploy device configurations and client certificates. For required infrastructure to deploy client certificates via Intune, see Learn about the types of certificate that are supported by Microsoft Intune. In this example, we use SCEP certificates.
Note
Multiple options are available to deploy SCEP certificates, including Microsoft NDES and PKI. For HoloLens, it can be simpler to use an Azure service to handle certificate enrollment. Multiple options are available within the (Azure Marketplace, which allows the configurations for HoloLens shared Microsft Entra accounts to be isolated from your corporate PKI.
The key requirements for the SCEP service are:
- The service can accept device certificate requests from Microsoft Intune.
- The service can generate certificates with defined EKU's (Client Authentication and Smart Card Logon).
It's highly recommended to configure your devices for Autopilot. Autopilot simplifies the device setup experience for end users.
Configure your Microsoft Entra tenant to enable Microsoft Entra CBA
Your Microsoft Entra tenant must be configured to enable Microsoft Entra CBA for a select group of users.
- Create a Microsoft Entra group that contains the shared Microsoft Entra accounts. As an example, we use the name "SharedAccounts" for this group.
- Create a Microsoft Entra group that contains the shared HoloLens devices. As an example, we use the name "SharedDevices" for this group. This group is assigned device-based Intune configuration profiles later.
- Enable Microsoft Entra certificate-based authentication (CBA) for the SharedAccounts group. For a complete step-by-step guide, refer to How to configure Microsoft Entra certificate-based authentication. The following high-level steps are needed to set this up:
- Add your (Certificate Authority) CA certificate to Microsoft Entra. Microsoft Entra ID allows client certificates issued by this CA to perform CBA.
- Enable CBA for the "SharedAccounts" group.
- Configure CBA such that the certificate issued by your CA uses MFA. This step is to ensure that users can access resources that require MFA without setting up another factor.
- Enable certificate binding via UserPrincipalName.
Intune configuration
Intune must be configured to deploy the certificates necessary for Microsoft Entra CBA. Intune must also deploy a configuration to instruct the devices which certificates are valid for Microsoft Entra CBA.
Client certificate deployment via SCEP
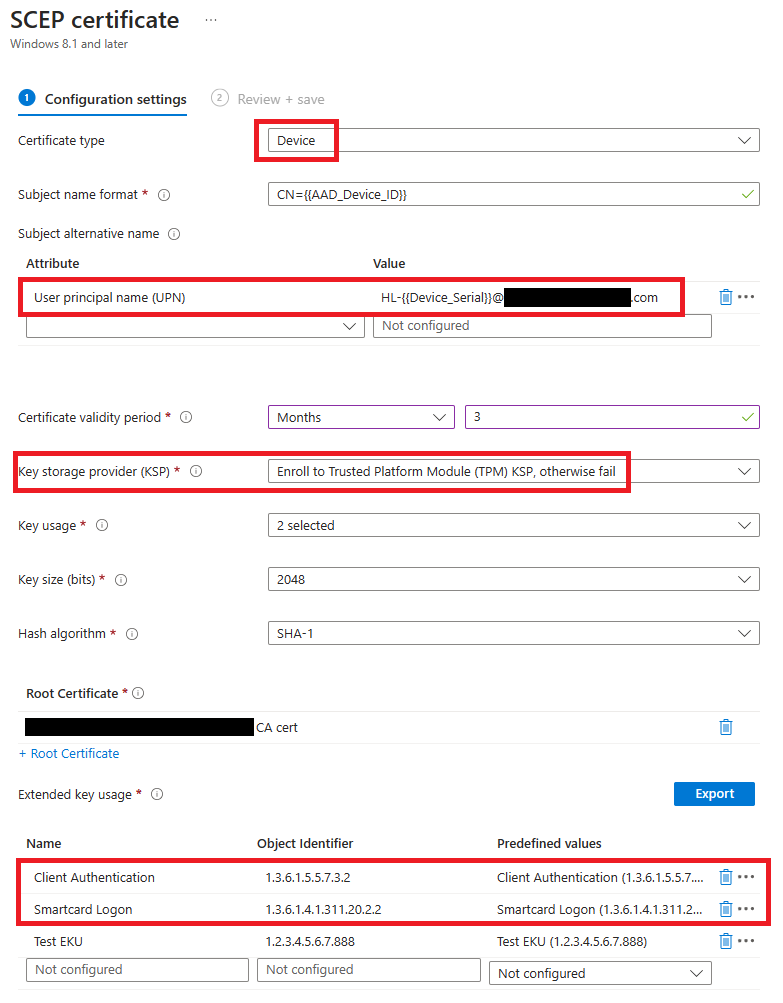
The devices must have the appropriate client certificate to perform Microsoft Entra CBA. Create a SCEP configuration and assign it to "SharedDevices":
Certificate type: Device
Add a User principal name (UPN) Subject alternative name (SAN) where the value is the UPN of the shared account assigned to the device. The UPN must contain the device serial number to associate it with a device. You can use the Intune variable {{Device_Serial}} to refer to the device serial number. For example, enter a value of
HL-{{Device_Serial}}@contoso.comif the shared accounts have a name format ofHL-123456789@contoso.com.Key storage provider (KSP): Select "Require TPM, otherwise fail" to ensure that the certificate can't be exported from the device to be used elsewhere.
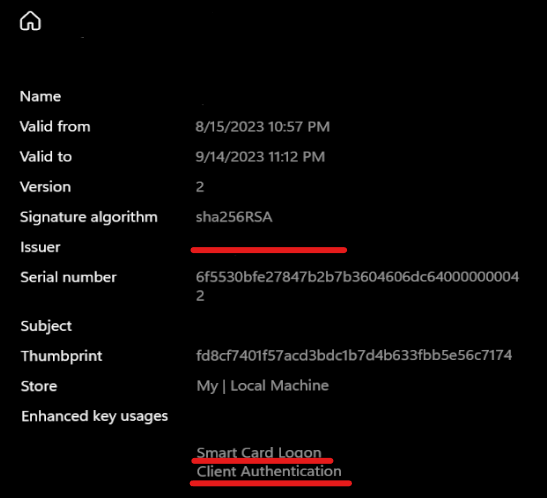
Ensure that the certificate has at least the following Extended key usages (EKUs):
- Smartcard Logon: 1.3.6.1.4.1.311.20.2.2
- Client Authentication: 1.3.6.1.5.5.7.3.2
You may add other EKUs to this list to further restrict the certificates allowed for Microsoft Entra CBA. You need to add these EKUs to the XML for ConfigureSharedAccount policy.
For detailed steps on configuring SCEP in Intune, see Use SCEP certificate profiles with Microsoft Intune.
CA certificate deployment
The devices must also trust the CA who issued its client certificate. Create a trusted certificate configuration and assign it to “SharedDevices” group. This assignment deploys your CA certificate to the devices. See documentation: Create trusted certificate profiles in Microsoft Intune.
ConfigureSharedAccount policy
This policy tells the devices which certificates are valid to be used for Microsoft Entra CBA. Create a custom device configuration policy and assign it to "SharedDevices":
| Policy | Data Type |
|---|---|
| ./Vendor/MSFT/Policy/Config/MixedReality/ConfigureSharedAccount | String or String (XML file) |
Example configuration:
<SharedAccountConfiguration>
    <SharedAccount>
        <!--
          TODO: Replace the example value below with your issuer certificate's thumbprint.
          You may customize the restrictions for which certificates are displayed. See below.
        -->
        <IssuerThumbprint>77de0879f69314d867bd08fcf2e8e6616548b3c8</IssuerThumbprint>
    </SharedAccount>
</SharedAccountConfiguration>
You may customize the restrictions for which certificates are displayed for Microsoft Entra CBA. The above example requires that the issuer’s certificate thumbprint matches the provided value. It’s also possible to apply the restriction based on the issuer’s name, or apply more restrictions based on Extended Key Usages (EKUs) on the certificate. See ConfigureSharedAccount XML Examples for examples on how to configure the XML.
Before saving this device configuration, validate the XML against the schema specified in ConfigureSharedAccount XML Schema to ensure it’s well-formed.
Individual device configuration
For each HoloLens device that you want to configure for shared Microsoft Entra accounts, perform the following steps:
- Create a Microsoft Entra user in the format specified in step 2 of Client certificate deployment via SCEP. For example:
HL-123456789@contoso.com. - Add that user to the "SharedAccounts" group.
- Ensure the device is added to the "SharedDevices" group. You should configure your devices for Autopilot first so they're already present in Microsoft Entra.
See Example device setup script for an example of a PowerShell script that can be used to automate this process.
Testing your configuration
Once you’ve completed the above configuration, you’re ready to try out shared Microsoft Entra accounts on HoloLens!
If your device is configured for Autopilot already, take the device through its normal Autopilot flow. The necessary device configurations are applied during Autopilot. Once the Autopilot flow is completed, you see the following screen:
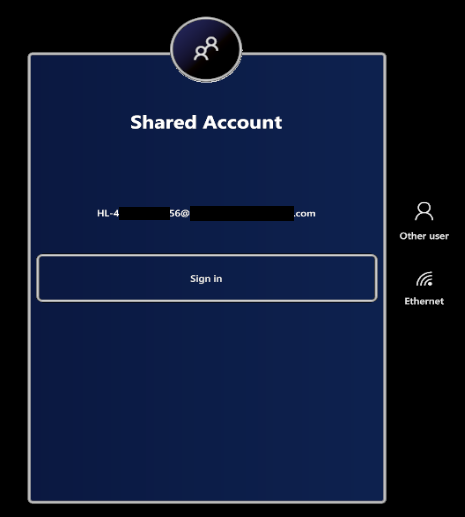
Tap the “Sign in” button to start using the shared Microsoft Entra account.
Troubleshooting
Problem: The shared Microsoft Entra account isn’t showing on the sign-in screen!
Solution: First, check that the device is receiving the correct certificates. Open the certificate manager (Certificate Manager) and make sure that both the client certificate and the CA certificates are successfully deployed to the device.
For the client certificate, ensure that it's installed to the "My" store on "Local Machine."
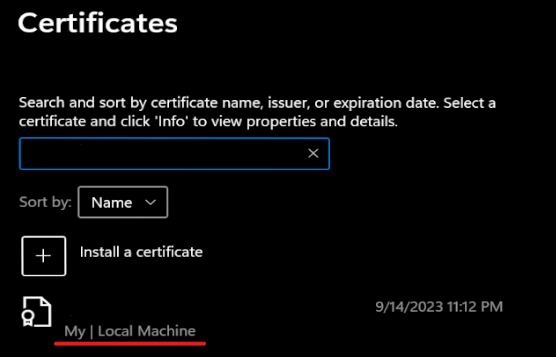
If the certificate isn't present, follow the troubleshooting steps for Intune SCEP profiles.
If the certificate is present, ensure that the certificate is within the validity dates has the expected issuer and EKUs:
Next, ensure that the XML policy value you’ve applied to MixedReality/ConfigureSharedAccount is well-formed. You can use one of the many XML schema (XSD) validators online to check that your XML conforms to the schema described in ConfigureSharedAccount XML Schema.
Problem: The sign in attempt fails!
Solution: Check that you’ve properly configured CBA following the instructions on How to configure Microsoft Entra certificate-based authentication. Also, check out the FAQ on Microsoft Entra certificate-based authentication (CBA) FAQ. Sometimes it may be helpful to try these debug steps on a Windows desktop device first: Windows smart card sign-in using Microsoft Entra certificate-based authentication.
References
ConfigureSharedAccount XML Schema
<xsd:schema xmlns:xsd="http://www.w3.org/2001/XMLSchema">
  <xsd:element name="SharedAccountConfiguration">
    <xsd:complexType mixed="true">
      <xsd:sequence>
        <xsd:element minOccurs="1" maxOccurs="1" name="SharedAccount">
          <xsd:complexType>
            <xsd:sequence>
              <xsd:choice>
                <xsd:element name="IssuerThumbprint">
                  <xsd:simpleType>
                    <xsd:restriction base="xsd:string">
                      <xsd:maxLength value="40" />
                    </xsd:restriction>
                  </xsd:simpleType>
                </xsd:element>
                <xsd:element name="IssuerName">
                  <xsd:simpleType>
                    <xsd:restriction base="xsd:string">
                      <xsd:maxLength value="512" />
                    </xsd:restriction>
                  </xsd:simpleType>
                </xsd:element>
              </xsd:choice>
              <xsd:element minOccurs="0" maxOccurs="1" name="EkuOidRequirements">
                <xsd:complexType>
                  <xsd:sequence>
                    <xsd:element maxOccurs="5" name="Oid">
                      <xsd:simpleType>
                        <xsd:restriction base="xsd:string">
                          <xsd:maxLength value="100" />
                        </xsd:restriction>
                      </xsd:simpleType>
                    </xsd:element>
                  </xsd:sequence>
                </xsd:complexType>
              </xsd:element>
            </xsd:sequence>
          </xsd:complexType>
        </xsd:element>
      </xsd:sequence>
    </xsd:complexType>
  </xsd:element>
</xsd:schema>
ConfigureSharedAccount XML Examples
Require that the issuer certificate has a subject of CN=yourCA, DC=Test:
<SharedAccountConfiguration>
    <SharedAccount>
        <IssuerName>CN=yourCA, DC=Test</IssuerName>
    </SharedAccount>
</SharedAccountConfiguration>
Require that the issuer certificate has a specified thumbprint:
<SharedAccountConfiguration>
    <SharedAccount>
        <IssuerThumbprint>77de0879f69314d867bd08fcf2e8e6616548b3c8</IssuerThumbprint>
    </SharedAccount>
</SharedAccountConfiguration>
Require that the issuer certificate has a specified thumbprint and that the client certificate has EKUs with OIDs 1.2.3.4.5.6 and 1.2.3.4.5.7:
<SharedAccountConfiguration>
    <SharedAccount>
        <IssuerThumbprint>77de0879f69314d867bd08fcf2e8e6616548b3c8</IssuerThumbprint>
        <EkuOidRequirements>
            <Oid>1.2.3.4.5.6</Oid>
            <Oid>1.2.3.4.5.7</Oid>
        </EkuOidRequirements>
    </SharedAccount>
</SharedAccountConfiguration>
EKUs 1.3.6.1.4.1.311.20.2.2 (Smartcard Logon) and 1.3.6.1.5.5.7.3.2 (Client Authentication) are always required regardless of whether they’re in this list.
Example device setup script
Before using this sample device setup script, you should change references from "contoso" to your domain name.
<#
.Synopsis
Configures a device for shared account

.Description
This script configures a device for shared account.

Note that you'll need to have the necessary permissions in your tenant to manage
user and device memberships and query Intune devices.

.Example
.\ConfigureSharedDevice.ps1 400064793157
#>


param (
    [Parameter(Mandatory = $true)]
    [string]
    # Serial number of the device. Typically a 12-digit numeric string.
    $DeviceSerialNumber,
    [string]
    # Group ID of the group that contains the shared accounts such as HL-123456789@contoso.com
    $SharedAccountGroupId,
    [string]
    # Group ID of the group that contains the shared devices
    $SharedDeviceGroupId
)

function Install-Dependencies {
    Write-Host -Foreground Cyan "Installing Dependencies..."

    if (!(Get-InstalledModule Microsoft.Graph -ErrorAction SilentlyContinue)) {
        Write-Host -Foreground Cyan "Installing Microsoft.Graph"
        Install-Module Microsoft.Graph -Scope CurrentUser -Repository 'PSGallery'
    }

    Write-Host -Foreground Cyan "Installing Dependencies... Done"
}

function New-PasswordString {
    $alphabet = 'abcdefghijklmnopqrstuvwxyzABCDEFGHIJKLMNOPQRSTUVWXYZ0123456789!@#$%^&*()_-=+[]{}|;:,.<>/?'
    $length = 40
    $password = ""
    for ($i = 0; $i -lt $length; $i++) {
        $password += $alphabet[(Get-Random -Minimum 0 -Maximum $alphabet.Length)]
    }

    return $password
}

function New-SharedUser {
    param (
        $UserName,
        $DisplayName
    )

    # Does user already exist?
    $searchResult = Get-MgUser -Count 1 -ConsistencyLevel eventual -Search "`"UserPrincipalName:$UserName`""

    if ($searchResult.Count -gt 0) {
        Write-Host -Foreground Cyan "$UserName exists, using existing user."
        return $searchResult
    }

    $mailNickName = $UserName.Split('@')[0];

    Write-Host -Foreground Cyan "Creating $UserName"

    $passwordProfile = @{
        Password = New-PasswordString
    }

    return New-MgUser -AccountEnabled -DisplayName $DisplayName -Country US -UsageLocation US -MailNickname $mailNickName -UserPrincipalName $UserName -PasswordProfile $passwordProfile
}

function New-SharedUserForDevice {
    param (
        $DeviceSerialNumber
    )

    $userName = "HL-$DeviceSerialNumber@contoso.onmicrosoft.com"
    $displayName = "Shared HoloLens"

    return New-SharedUser -UserName $userName -DisplayName $displayName
}

function Add-UserToGroup {
    param (
        $UserId,
        $GroupId
    )

    $groupResult = Get-MgGroup -GroupId $GroupId
    if ($groupResult.Count -eq 0) {
        throw "Failed to find user group"
    }

    Write-Host -Foreground Cyan "Adding user ($UserId) to group"
    New-MgGroupMember -GroupId $GroupId -DirectoryObjectId $UserId
}

function Get-DeviceAADId {
    param (
        $DeviceSerialNumber
    )

    $deviceResult = Get-MgDeviceManagementManagedDevice | Where-Object { $_.SerialNumber -eq $DeviceSerialNumber }

    if ($deviceResult.Count -eq 0) {
        throw "Cannot find device with serial number $DeviceSerialNumber in Intune"
    }

    $result = ($deviceResult | Select-Object -First 1).AzureAdDeviceId

    Write-Host "Found device: $result"

    return $result
}

function Add-DeviceToGroup {
    param (
        $DeviceAADId,
        $GroupId
    )

    $groupResult = Get-MgGroup -GroupId $GroupId
    if ($groupResult.Count -eq 0) {
        throw "Failed to find device group"
    }

    $deviceResult = Get-MgDevice -Count 1 -ConsistencyLevel eventual -Search "`"DeviceId:$DeviceAADId`""
    if ($deviceResult.Count -eq 0) {
        throw "Failed to find device $DeviceAADId"
    }

    Write-Host -Foreground Cyan "Adding device $($deviceResult.Id) to group"

    New-MgGroupMember -GroupId $GroupId -DirectoryObjectId $deviceResult.Id
}

function Register-SharedDevice {
    param (
        $DeviceSerialNumber
    )

    Install-Dependencies

    Connect-MgGraph -Scopes "User.ReadWrite.All", "Group.Read.All", "GroupMember.ReadWrite.All", "DeviceManagementManagedDevices.Read.All", "Device.ReadWrite.All"

    $deviceAADId = Get-DeviceAADId $DeviceSerialNumber
    Add-DeviceToGroup $deviceAADId $SharedDeviceGroupId

    $user = New-SharedUserForDevice $DeviceSerialNumber
    Add-UserToGroup $user.Id $SharedAccountGroupId
}

Register-SharedDevice $DeviceSerialNumber