Create and handle payments of customer invoices for sales orders
A customer invoice for a sales order is a bill that's related to a sale and that an organization gives to a customer. You would create this type of customer invoice based on a sales order, which includes order lines and item numbers. You can specify and post item numbers in the ledger. Subledger journal entries aren't available for a customer invoice for a sales order.
A pro forma invoice is an invoice that you prepare as an estimate of the actual invoice amounts before you post the invoice. You can print a pro forma invoice for a customer invoice for a sales order or for a free text invoice.
Post and print customer invoices that are based on sales orders
You can print customer invoices from sales orders or as a batch. To identify the sales orders that are ready to invoice, you can use the following pages:
- Customer invoicing workspace - Select the Shipped but not invoiced sales orders tile or select the tab of the same name in the filtered list section of the workspace.
- Batch invoicing - In the Accounts receivable module, go to Invoices > Batch invoicing > Invoice.
- Sales order list page - Filter the sales order status to select sales orders with the status of Delivered. You can also select the Shipped but not invoiced sales orders menu item in the Orders section of the Accounts receivable module.
Shipped but not invoiced sales orders
Regardless of where you access the list of shipped but not invoiced sales orders, the process to invoice the orders is the same.
Select one or more orders from the list or open Sales order details for a single order. On the Action Pane, select Invoice > Generate > Invoice.
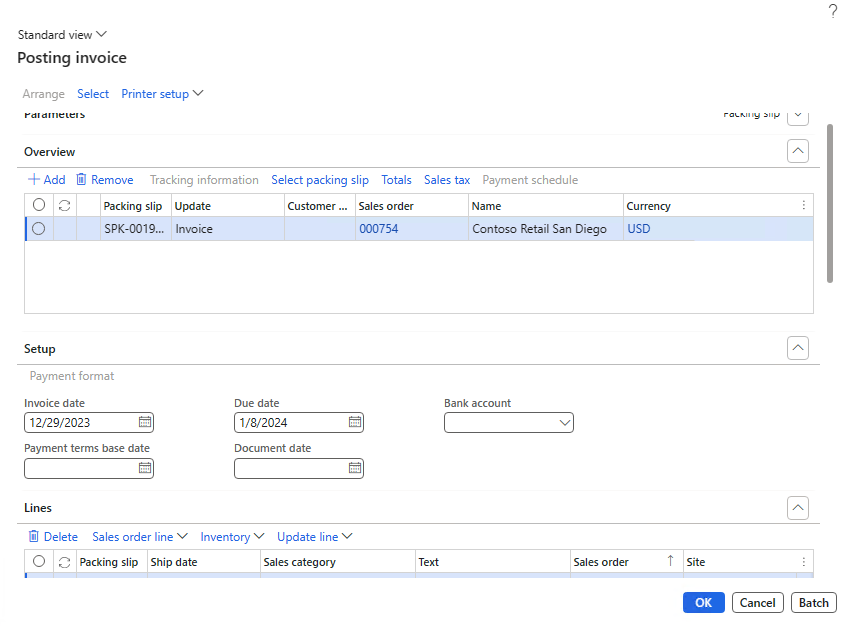
Expand the Parameters tab on Posting invoice to review important settings prior to posting. The parameters are described elsewhere in this unit.
The Posting page contains five extra tabs:
- Overview - Lists the invoices that you select to post. You can select lines and then select the Remove menu item if you decide not to post all listed invoices.
- Setup - The most important field on this tab is the Invoice date. It defaults to today’s date, but you can change it. The Due date is defaulted from the Invoice date based on the payment terms for the sales order.
- Lines - The sales order lines display for the invoice that's currently selected on the Overview tab. You can change the invoice quantity by changing the value in the Update column.
- Line details - Includes more details for the line that's currently selected on the Lines tab. Generally, you don't change this information when you're invoicing.
- Sales orders - Shows the sales order for the currently selected line on the Overview tab.
After you complete the posting information, select OK to immediately post the invoice. Select the Batch button to submit a batch job to post. We recommend that you post by using batch invoicing if you select multiple invoices to post.

Batch invoicing
To select and invoice a batch of sales orders, follow these steps:
- Go to Accounts receivable > Invoices > Batch invoicing > Invoice. The previously described Posting invoice page displays, now with a Select menu item to select the sales orders that you want to invoice.
- Select the Select menu item. The Sales update advanced query opens to specify criteria for order selection.
- Select OK to add orders to the Overview and Sales order tabs of Posting invoice.
- After you add orders, the process is the same as previously described. Make sure that you turn on Late selection on the Posting invoice parameters FastTab if you plan to regularly schedule the batch.

Pro forma invoice
If you want to generate an invoice to observe how it would appear without posting, whether for your own review or for the customer’s review, select the Pro forma menu item from the Generate menu group. This action processes the invoice as if it's to be posted, but it rolls back after producing the document, leaving no subledger or ledger impact.
Post and print customer invoices that are based on packing slips and the date
The customer invoice is based on packing slips and reflects the quantities from them. The financial information for the invoice is based on the information that you enter when posting the invoice.
You can create a customer invoice that's based on the packing slip line items that have been shipped to date, even if all items for a particular sales order haven't been shipped yet. For example, you might use this method if your legal entity issues one invoice, for each customer each month, that covers all deliveries that you ship during that month. Each packing slip represents a partial or complete delivery of the items on the sales order.
When you post the invoice, the system updates the Invoice remainder quantity for each item with the total of the delivered quantities from the selected packing slips. If the Invoice remainder quantity and the Deliver remainder quantity for all items on the sales order are 0 (zero), the system changes the status of the sales order to Invoiced. If the Invoice remainder quantity isn't 0 (zero), the status of the sales order remains unchanged, and you can enter more invoices for it.
As a result, the system updates inventory transactions with the invoice number, and the status in the Line status field on the sales order changes to Invoiced.
You can view the status of the sales orders in the All sales orders list page.
Other settings that change the posting behavior
The following fields change the behavior of the posting process:
Quantity - Select the quantities on which to base the posting of the document. The available options vary, depending on the type of document that you're posting, such as a packing slip or an invoice:
- Deliver now – Select all quantities in the Deliver now field. Use this option to confirm or deliver a partial order.
- Picked – Select all quantities that have been picked.
- All – Select all quantities on the sales order that the current document type hasn't updated.
- Packing slip – Select all quantities that a packing slip has updated.
- Picked quantity and not stocked products – Select all quantities that have been picked and all product quantities that aren't stocked.
Posting - Select this option to journalize the sales order or clear this option to print a pro forma sales order.
Note
If you made an agreement for a payment schedule, the payment schedule doesn't show on the pro forma sales order. Payment schedules only show on actual sales orders.
Late selection - Select this option to apply the selected query later. You would use this option for batch jobs. The system runs the query when it runs the batch job.
Reduce quantity - Select this option to automatically reduce the delivered quantity when the document is posted so that the delivered quantity equals the available inventory.
Print - Select when to print documents:
- Current – Print documents after each invoice is updated.
- After – Print documents after all invoices are updated.
Note
The Print field is available only if you select the Print invoice, Print confirmation, Print picking list, or Print packing slip options. For example, on the Form sorting page, you set up the system to sort the information by invoice account. Then, you can select After to print the documents in a batch that's sorted by invoice account. Otherwise, the system prints documents before processing is complete and doesn't sort the documents in the order that's specified on the Form sorting page.
Print invoice - Select this option to print the invoice. If this option is turned off, you can post an invoice without printing it.
Send email - Select this option to send the invoice for a sales order to the customer as an email attachment after you post the invoice. The system sends attachments as PDF and XML files. This option is available only if you select the Enable CFD (electronic invoices) option on the Electronic invoice parameters page.
Note
(MEX) This control is available only to legal entities whose primary address is in Mexico.
Use print management destination - Select this option to use the print settings that are specified for the transaction, document, or module on the Print management setup page.
Check credit limit - Select the information to analyze when performing a credit limit check.
- None – No requirement for the credit limit check.
- Balance – The system checks the credit limit against the customer balance.
- Balance + packing slip or product receipt – The system checks the credit limit against the customer balance and deliveries.
- Balance+All – The system checks the credit limit against the customer balance, deliveries, and open orders.
Credit correction - Select this option to display the credit note as a debit in the voucher transactions.
Credit remaining quantity - If you're posting a credit note, select this option to keep the remaining quantity on order. If this option is cleared, the remaining quantity is set to 0 (zero).
Summary update for - Select how to summarize multiple sales orders.
- None – Don't summarize sales orders. For example, you need to create a separate invoice for each sales order.
- Invoice account – This option consolidates and summarizes the selected orders by the invoice account number, and you can set up the selected orders on the Summary update parameters page.
- Order – With this option, you can summarize orders into one order and invoice by sales order number. The system summarizes the orders based on the criteria that you set up on the Summary update parameters page. If you select this option, you need to select a value in the Sales order field.
- Automatic summary – Automatic summary invoicing consolidates and summarizes the daily invoice postings into a single summary invoice, reducing the number of received invoices each month. If summary updates are specified on the Summary update page, you need to summarize all selected orders based on the criteria that are set up on the Summary update parameters page. If summary updates haven't been specified, the system posts the order separately.
- Packing slip – Summarize a selected range of orders into one invoice for each packing slip. This option is available only if you select Packing slip in the Quantity field.
Consolidate sales orders or packing slips for posting
Use the consolidate sales orders or packing slips for posting process when one or more sales orders are ready to be invoiced and you want to consolidate them into a single invoice.
You can select multiple invoices on the Sales order list page and then use Generate invoices to consolidate them. On the Posting invoice page, you can change the Summary order setting to summarize by order number (where multiple packing slips exist for a single sales order) or by invoice account (where multiple sales orders exist for a single invoice account). Use the Arrange button to consolidate sales orders into single invoices based on the Summary order settings.
Create a sales order credit note
You can't directly change a posted invoice. You need to create a credit note to adjust or cancel the amount that the customer owes. The credit note adds lines to the sales order with negative quantities. After the lines are on the order, the system invoices the sales order and the new lines produce a credit note document.
The credit note starts from the sales order header or sales order line; menu items are in each location.
- If you start from the header, select Sell > Credit note > Credit note on the Action Pane.
- To start from the line, select Sales order line on the Action Pane above the Sales order lines grid. Then, select New > Credit note.
The Create credit note page displays regardless of whether you start the process at the header or line. Usually, you would add the credit lines to the sales order that they apply to. You can also create a sales order that only contains the credit lines.
Expand the Parameters tab to specify the following elements:
- Reason code - Select from a list of predefined reasons indicating why you're providing the credit to the customer.
- Reason comment - Enter a description that further describes why you're providing the credit.
- Quantity factor - You can multiply the quantity on each line by a number. It defaults to 1 and is usually left at 1.
- Invert sign - Yes indicates that the system should invert (make negative) the sign for the new lines that you add to the sales order.
- Copy charges - Yes indicates that the system adds charges at the header and line level to the new lines that you add to the sales order. This setting fully backs out the original amount of the line.
- Recalculate price - Prices might have changed since the original order. If this toggle is set to Yes, the system uses active trade agreements and current pricing versus the original price on the line.
- Copy precisely - The system copies ledger accounts, sales tax, and other information from the original sales order lines to the new negative lines when this option is set to Yes.
- Delete order lines - Yes indicates that the system should delete the original order lines that are copied. This option makes reading the sales order and understanding its history difficult, and it impacts reports that rely on sales order line data.
- Copy order header - A single order header is selected; the system copies information from this header to all lines that you add to the credit note, regardless of the original order that the lines are copied from. This option is useful when you create a sales order document for the credit note rather than adding lines to the existing sales order.

To correct a sales order invoice that has incorrect prices, you first need to create a credit note with Invert sign set to Yes and Recalculate price set to No. Next, repeat the same process with Invert sign set to No and Recalculate price set to Yes. Post an invoice after the first credit note and then again after the second. The second invoice only displays the lines with the correct prices.
The Create credit note page has four extra FastTabs:
- Invoices - Select one or more invoices that you want to credit.
- Lines - The lines for the selected invoice display. Select only the lines that you want to invoice. You can select lines from multiple invoices by selecting multiple invoices on the Invoices tab.
- Project invoices - Sales orders that are linked to projects are listed on the Headers grid of the Project invoices tab, not on the Invoices tab. The Lines grid lists the lines for the selected Header grids.
- Selected lines or header to be copied - This FastTab displays a list of your selections that show the quantity and items to be copied. This list is non-editable. To change this list, change the selections in the other tabs.
Select OK to add the lines to the sales order or Cancel to not create the credit note. After you add the lines to the order, you can delete them if something is wrong with them. You can add negative lines manually to the sales order to create a credit note. The credit note menu items simplify the process.

The customer credit isn't available until you generate an invoice for the new credit lines on the sales order. After you generate the invoice, you can settle the credit note manually, or the system settles it automatically depending on the Automatic settlement setting in the Accounts receivable parameters.
References to original invoices in credit notes
For some countries and regions, it's a legal requirement to print the original invoice references on credit notes. The Credit invoicing layout for sales and project invoice reports feature is optional, and you can turn on this feature in the Feature management workspace.
Invoice crediting is no longer controlled by country context when this feature is available, meaning that you can use invoice crediting across all legal entities. It's applicable to the following documents:
- Free text credit note
- Customer credit note
- Project credit note
Make sure that you set up print management with the printable formats for each document.
To control the invoice reference on related credit notes, follow these steps:
- Go to Accounts receivable > Setup > Accounts receivable parameters.
- On the Updates tab, on the Invoice FastTab, set the Apply the credit invoicing layout into sales and project invoice reports option to Yes.
For more information, see References to original invoices in credit notes.
Payment proposal
When customers make payments, you need to create and post them in a payment journal. The reason is because you need to record the payments to the customer's accounts and ensure that you can reconcile the accounts receivable information with general ledger information. Use a payment proposal as an effective way to select the payment records and create the payment journal.
The payment proposal completes the following actions:
- Search for payment lines that are due or have a maximum date for receiving a cash discount.
- Check open and approved customer transactions.
The search only includes transactions with a due date or a cash discount date. After the system generates payment lines, you can edit them in the payment journal.
Enter customer payments page
An alternative to manually creating payment journal lines is using the Enter customer payments page. Use this page to enter, settle, and save customer payments.
You can select Transactions based on the following fields:
- Customer account information
- Customer invoice information, including:
- Open invoice
- Credit note
- Collection letter
Additionally, you can view customer transaction records across multiple companies and define other aspects of the payment line, such as Method of payment, Offset account type, and so on.
If the amount in the Amount field of the Enter customer payment page doesn't equal the total of the marked transactions, then the page displays a warning that the payment isn't fully settled. Adjust the marked transactions or amount accordingly. If you transfer payment to the journal without adjustment, normal overpayment or underpayment posting rules apply.
To clear transactions that are selected for payment in the Enter customer payments page, select the Clear button.
Free text invoices
The following videos demonstrate how to create, invoice, and receive a payment by using a free text invoice:
Summarize transactions
To summarize transactions in the bank subledger, see Summarize vendor and customer payments in bank transactions.