Create and process sales orders
A sales order is a key document in Supply Chain Management as it represents a sale of a product to a customer. A sales order consists of a customer who is being sold a product. Included on a sales order are any charges, things such as freight or installation charges. Then, we have delivery options, we can arrange for delivery to be at different times and different locations, based on the customer’s wishes.

Sales order process
There are several steps as part of the sales order process that can be performed. The general business process for sales orders in Supply Chain Management is as follows:
- A sales order is created
- Lines are added to the sales order
- Sales order confirmation
- Picking list is created
- Picking list is registered
- Packing slip is created
- Items are shipped to the customer
- Invoice is created
- Payment is received from the customer
Sales orders can be created and managed in the following modules:
- Sales and marketing
- Accounts receivable
- Retail
- Revenue recognition
You can create a new sales order by navigating to Accounts receivable > Sales orders > All sales orders then select New in the Action Pane. Additionally, you can also create sales orders by confirming a sales quotation in the Sales and marketing module. When the sales quotation is confirmed, a sales order is automatically created.
Watch this video to see how you can convert a sales quotation to a sales order in Supply Chain Management
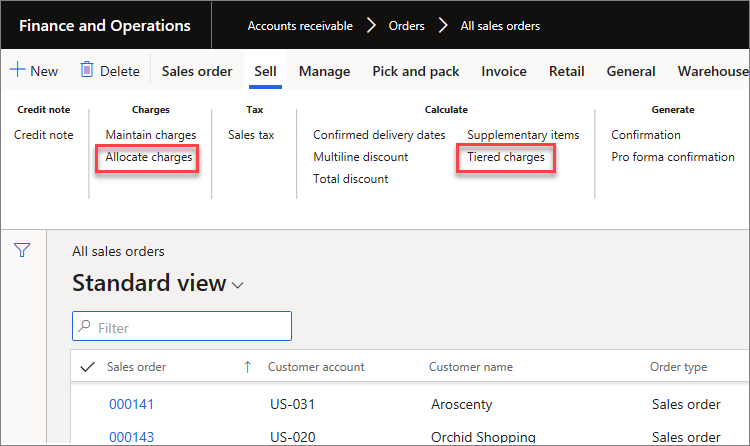
Charge allocation
Charges are costs and fees that you can add to the cost of items and purchases according to the setup. The following are examples of charges:
- Freight
- Transport
- Postage
Automatic setup of charges
Automatic charges, which are referred to as auto charges, are applied automatically when you create a sales order. You can define auto charges for a specific customer or item, or for groups of customers or all items. This charge is set up in the Accounts receivable, Accounts payable, or Procurement and sourcing modules under Setup > Charges > Auto charges.
In the Level field, select the level to which to apply the auto charge from the following values:
- Header, which applies charges to the order header.
- Line, which applies charges to the order lines.
Select an account in the Account code dropdown to be Table to assign charges to a specific customer, Group to assign charges to a miscellaneous Charges group, or All which assigns charges to all customers.
In the Customer relation dropdown, select a specific customer if you selected Table, or select a customer charges group if you selected Group.
In the Item code dropdown, select an item code. You can select an item code only when you define auto charges at the lines level. If you select Table, the system assigns charges to a specific item. Choose Group to assign charges to an item charges group, or select All to assign charges to all items. In the Item relation dropdown, select a specific item if you selected Table, or select an item charges group if you selected Group.
In the Mode of delivery code dropdown, select mode of delivery code. If you select Table, the system assigns charges to a mode of delivery. Choose Group to assign charges to mode of delivery group, or select All to assign charges to all modes of delivery
In the Mode of delivery relation dropdown, select a specific mode of delivery if you selected Table, or select mode of delivery charges group if you selected Group.
Expand the Lines fast tab.
In the Currency field, select the currency to use to calculate the charge.
Select the Charge code from the dropdown. Before you plan to add automatic charges when you create a sales order, you must set up charges codes first. These codes are used to define the type of charge and how the charge is going to be debited or credited.
Choose the Category of the charge, either fixed amount, percent, etc.
Fixed - The charge is entered as a fixed amount on the line. Fixed charges can be used on charges in the order header and on the order lines.
Pcs. - The charge is based on the unit. These charges can be used only on order lines.
Percent - The charge is entered as a percentage on the line. Percentage charges can be used on charges in the order header and on the order lines.
Intercompany percent - The charge is entered as a percentage on the line for intercompany orders. Intercompany percentage charges can be used only on order lines.
External - The charge is calculated by a third-party service that is associated with one or more shipping carriers.
Enter the Charge value as it pertains to the Category of the charge.
In the Charges currency code field, specify a currency for the charge to use a different currency than is specified in the Currency field. This is possible if the Debit or Credit type is either Ledger account or Item for the selected charges code.
Specify a starting amount to apply the auto charge to in the From amount field. In the To amount field, specify the ending amount to apply the auto charge to. Amount in this context refers to the order total. This is optional and header level only.
Select the Sales tax group (optional).
By selecting the Keep check box, you can keep the charges transaction after invoicing.
Select Site and Warehouse from the dropdowns for charges to be applied to (optional).
When the automatic charges are set up, and lines have been added to a new Sales order, select Tiered charges on the Purchase Action Pane.
Select Allocate charges to apply the charges as expected.