Set up warehouse management
When a company is in the process of implementing warehouse management, basic setup must be completed to make sure that the system works for the company's business needs.
Storage dimension groups
Storage dimension groups are an inventory dimension that is used to determine inventory storage information for your items, and how you store or retrieve your inventoried items. You can set up multiple storage dimension groups to fit the needs of your business. For example, you may have some products that are stored by site and warehouse, and you may have other items that are stored by site, warehouse, and location.
Storage dimension groups can be configured in Product information management > setup > Dimension and variant groups, the Use warehouse management process option indicates that the warehouse management functionality is used for all products that are assigned to this storage dimension.

The Inventory status option is used to divide inventory into categories, such as Available or Not available. It also can block certain activities in case certain items aren't available in inventory.
For example, if you want to prevent a worker from picking the items for any orders, use the inventory blocking feature, which prevents the use of items that aren't available.
The License plate inventory dimension can be used to track inventory that is grouped together in a warehouse, such as the pallet, bin, cart, or individual item.
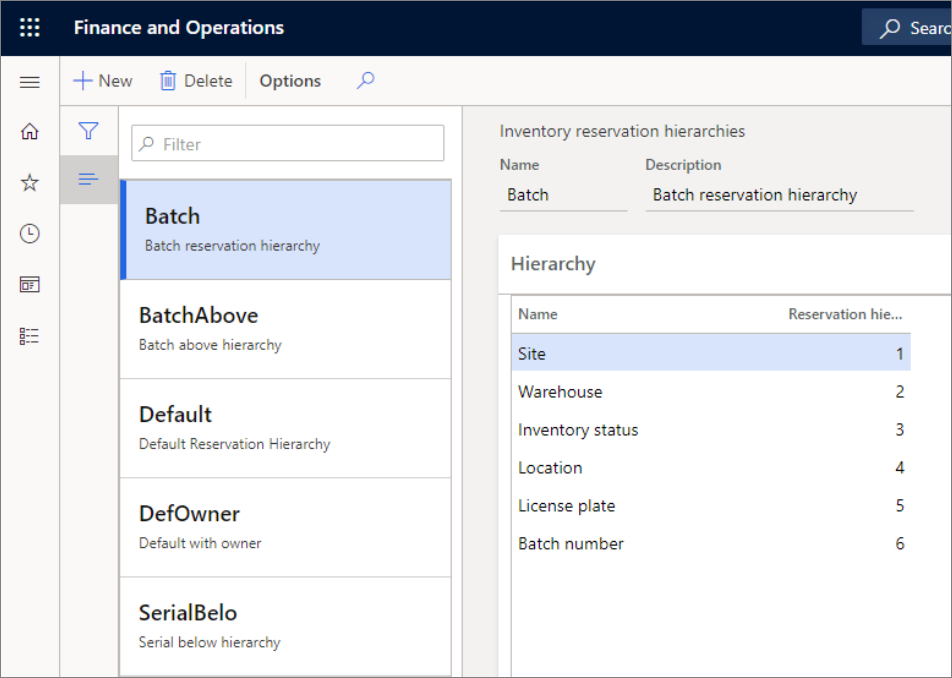
If you want to use the warehouse management processes and apply a reservation hierarchy, you must set up at least one storage dimension group with at least one storage dimension.
Tracking dimension groups
Tracking dimension groups are used in Supply Chain Management to enable you to keep track of your items in your facilities. For example, you can track your items by serial numbers, batch numbers, or ownership.
- Serial numbers can be used if you have items that are unique, or you would like to track your items on a single-item basis. Batch numbers can be used for groups of items.
- Batch numbering is also beneficial for tracking issues with production or shipping.
- Ownership can be used if you're storing items that are owned by a third party and not your organization.
In warehouse management, tracking dimensions are optional for Reservation hierarchies, found in Warehouse management > Setup > inventory. Tracking dimensions are typically used as batch control or to serialize inventory. When you select to enable a serial number dimension, you have an option to define when the serial number is captured in the warehouse management process.
Override the default reservation principle for materials in production
When you create a new production order or batch order, you're asked to choose the reservation principle that applies to the order and all of its BOM lines or formula lines. Any or all of the BOM or formula lines can override the reservation principle established for the relevant item model group and use the reservation principle specified for that item model group instead.
By default, you can define a default reservation principle for each item model group. Production bill of materials (BOM) or batch order formulas often require different reservation principles. Select which default reservation principle is used for an order, and what reservation principle is used instead (manual, estimation, scheduling, release, or start).

For example, if you have raw materials or ingredients that require picking, any BOMs or formula lines developed for those goods must include a physical reservation, because physical reservation is required for the generation of warehouse work. If you want the reservation to automatically happen, you typically choose one of the reservation principles: estimates, scheduling, release, or start. If you have materials or ingredients that don't require pick labor because they're taken directly from a location, you'll probably choose the manual reservation concept, which doesn't make any physical reservations or generate any pick work.
For more information, see Override the default reservation principle for materials in production
Unit sequence groups
A unit sequence group must be assigned to any item that has a storage dimension group that uses warehouse management.
The unit sequence group defines the sequence of units that can be used in warehouse operations. The sequence determines the order of units in which warehouse work is generated, and it is applied when work is created for quantities on a purchase order line or transfer order line. The unit sequence group should include units of measure that range from the smallest to the largest unit and can be used for the product in warehouse operations.
The important features of the Unit sequence groups page are:
- Each unit of measure can be selected if you allow that unit to be used in cycle counts.
- You can select a unit of measure as the default unit of purchase orders, production, or material consumption.
- You can specify a default container type for the unit.
If you want to receive an item larger than a pallet size and have it grouped, select The License plate grouping field. If this option isn't selected, every single item above the pallet unit would be assigned its own license plate.
Inventory statuses
The inventory status dimension can be used to divide items into categories, such as Available and Blocking. You can create an unlimited number of statuses. Additionally, you can set the default for the inventory status to apply for all items, for items in one warehouse, or to one customer or vendor.
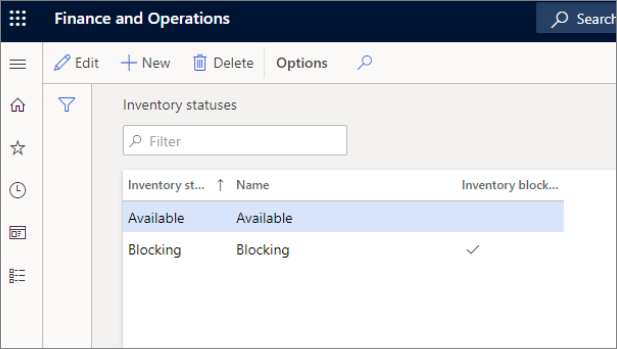
After you set up an inventory status, you can set the default inventory status for a site, item, and warehouse. You can change the default status on a mobile device or on the purchase order, sales order, or transfer order line.
Set up product filter codes
You can set up product filters and filter codes to categorize inventory items in a warehouse. You can also use filters to specify which customers can order a particular item and which items can be purchased from a particular vendor.
Additionally, you can set up and use product filters to automatically organize inventory items in a warehouse and combine filtered items into filter groups. Filters can be used to put items into categories for handling, purchasing, and selling processes. You might want to group items together or separate them from each other when the way that they are handled is based on weight or handling restrictions. You can also specify which customers or vendors an item can be purchased from or sold to.
There are some steps that need to be taken before you start setting up your product filters. The following table shows the prerequisites that must be in place before you start.
| Prerequisite | Instructions |
|---|---|
| Before you start to set up products on the Released product details page, you must turn on warehouse processing for the product's storage dimension group. | Go to Product information management > Setup > Dimension and variant groups > Storage dimension groups, and select or create a storage dimension group where the Use warehouse management processes option is set to Yes. |
| If you use customer filters or vendor filters, you must enable their use in Warehouse management parameters. | Go to Warehouse management > Setup > Warehouse management parameters. On the Product filters tab, set the Enable customer filters and Enable vendor filters option to Yes. |
Set up product filters
Product filters provide up to 10 Filter title characteristics, which are enumeration values. These enumeration values are available for selection when you create a product filter. The enumeration values Code 1 through Code 10 are system-defined and represent a specific characteristic or attribute of an item. For example, Code 1 might represent items that have a hazardous material classification. Code 2 might represent items that only vendors can purchase. Product filters then define the specific Filter code value that is associated with a Filter title value.
Use the following steps to select and enter values for Filter title and Filter code:
Go to Warehouse management > Setup > Product filters > Product filters.
On the Action Pane, select New to add a product filter to the grid.
In the Filter title field, select a value.
In the Filter code field, enter a value.
In the Description field, enter a name for the code. For example, Code 2 might represent vendors. You can then create a product filter for a specific vendor or group of vendors.
Set up product filter groups
You can use filter groups to group filter codes. This capability is helpful when a group is used in a query in for a location directive, and you want to search for the group instead of a series of codes. Each filter group is associated with an item group.
To set up filter groups, follow these steps:
Go to Warehouse management > Setup > Product filters > Product filter groups.
On the Action Pane, select New.
In the Group 1 and Group 2 fields, enter the names that are used to categorize items.
On the Details FastTab, select New to add a line.
In the Start date/time and End date/time fields, enter start and end dates for the filter group.
In the Item group field, select the item group that the product filter should apply to.
In the Code 1 through Code 10 fields, select the filter codes to include in the group, as required.
Item groups
Items groups are also used to group items together that all share a similar posting profile. This way, you don’t have to set up a posting profile for every item you have in the application. The information within the item group is used for several transactions in the system. For example, when a transaction occurs, the item group assigned to the items within the transaction are used to determine which ledger accounts the transaction is posted to.
In the item groups, you might need to set up the use of filters. Filters, which are used to further describe an item, can also be used to limit items for vendors and customers and can be made a required setup for a product.
Filters allow users to categorize items, limit customers to items, and then limit vendors to items. For example, you should use the filters if there's a requirement to only sell items that have that specific filter.
Four filter codes are available in Supply Chain Management. Make sure you predefine the values for each filter code and consider renaming the filter codes from the generic labels of code one, code two, and code three to match your business use of the filter code.

Filters are turned on and off on the Item groups page.
The Use filter code option indicates that you're using the filter code for the item and that you'll manually set that filter code on the Released product page. You can also set up filter groups, which automatically default to filter codes based upon the item group selection when you create a new product.
By setting up filter codes on an item group, you can make the codes that are required for products that are attached to that item group.
To set up filter codes on item groups, follow these steps:
Go to Inventory management > Setup > Inventory > Item groups.
On the Action Pane, select New to create an item group.
In the Item group field, enter a name.
In the Name field, enter a description.
On the Warehouse FastTab, in the Filter required section, select the check boxes for the filter codes that must be specified for products that are associated with the item group.
To update a released product, open its Released product details page, and then, on the Action Pane, select Edit. The filters that are associated with codes then become available on the Warehouse FastTab.
In the Item group filter section, select the check boxes for the filters that must match for the filter group to be the default filter group for an item.
For example, if the Use filter code 1 and Use filter code 2 check boxes are selected, both filter code 1 and filter code 2 of the item must match the setup of the filter group for the item group before the filter group can be selected. When you create a new item, the selected filter group is the default filter group in the Group 1 and Group 2 fields on the Warehouse FastTab of the Released product details page.
After you create the filter codes, you can then configure items to be generally available, which overrides any customer or vendor-specific filter codes, or you can add the filters to your customers and vendors.
Dock management profiles
The dock management profile helps you control inventory items for multiple orders, shipments, loads, or waves at the docks when inbound items are received or outbound items are loaded. The location profiles also specify whether a warehouse location is license plate controlled, can be cycle counted, and whether it allows for mixing of inventory batches.
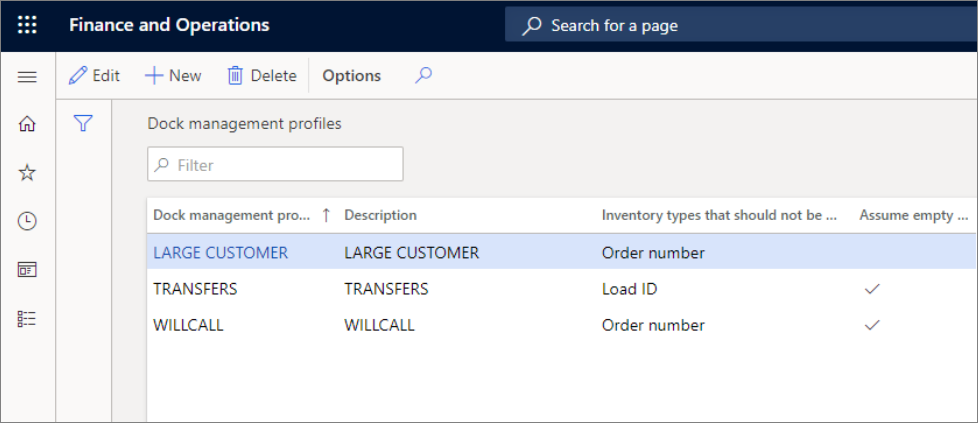
You can set up a dock management profile and assign it to a location profile to manage the mixing of inventory in specific warehouse locations.
For example, when you stage product into a staging location, perhaps you only want one order to be staged in each staging lane, or to segregate items by shipment ID, load ID, order number, wave ID, and work order type.