Exercise - Analyze the content of a tweet
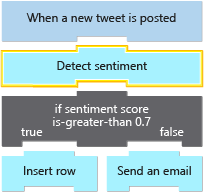
In this exercise, we're going to continue work on our social media monitoring app. We'll analyze whether the tweets about our product are positive or negative. We'll use the Sentiment action, which provides a numeric score that represents the tweet's sentiment. The following diagram shows a conceptual view of the workflow and highlights the part that we'll work on.
Get key and endpoint for Azure AI services
The Azure AI Language API provides natural language processing for text and includes capabilities such as sentiment analysis, key phrase extraction, language detection, and entity linking. We'll use this API for sentiment analysis and run a script to programmatically complete the following tasks:
Set up an Azure AI services account.
Register the Text Analytics service.
Return an account key and an endpoint URL for the Azure AI services. For this exercise, we need these values to make calls and get back sentiment scores.
In the Azure portal, open a Cloud Shell session by selecting the Cloud Shell icon along the top of the screen. You can also open a Cloud Shell window at https://shell.azure.com.
In the Cloud Shell window, run the following
curlcommand to copy the setup-textanalytics.sh script from GitHub:curl https://raw.githubusercontent.com/MicrosoftDocs/mslearn-route-and-process-data-logic-apps/master/setup-textanalytics.sh > setup-textanalytics.shRun the following command to execute the script. This command will take a couple of minutes.
bash setup-textanalytics.shWait for the script to complete. When it finishes, Cloud Shell displays values for the following properties.
Cognitive Services account key
Cognitive Services account endpoint
Save the values that appear in Cloud Shell somewhere safe. We need them in this exercise when we update our app in the Azure portal.
Add the Sentiment action
Now, we'll add the Sentiment action to our workflow using the Azure portal.
In the Azure portal, return to the workflow designer. On the logic app resource menu, under Development Tools, select Logic app designer.
Under the X trigger, select New step.
In the Choose an operation search box, enter Cognitive Services.
Select the Azure Cognitive Services for Language connector.
In the Actions section, select Sentiment.
The connection profile box appears so that you can provide information for your connection to your Azure AI services account.
Provide the following connection information:
Property Required Value Description Connection name Yes CognitiveServicesConnection The name to provide your connection Authentication Type Yes Api Key The authentication to use for access to your Azure AI services account Account Key Yes <your-previously-saved-API-key> The key to use for accessing your Azure AI services account Site URL No <your-saved-endpoint-address> The URL address for your Azure AI services account endpoint When you're done, select Create.
The Sentiment action and properties now appear.
Set up the Sentiment action
Next, we'll set up the Sentiment action's properties to pass in the tweet text from the X trigger.
In the Sentiment action, select the documents-id field. Provide a unique ID to assign your document.
Next, select the documents-text field.
The dynamic content list appears for you to select outputs from the preceding trigger or any actions.
From the dynamic content list, under When a new tweet is posted, select Tweet text.
Substitution: If you're using the RSS trigger named When a feed item is published, select FeedSummary.
Save your workflow.
This step pushes your changes to your deployed logic app. Tweets containing your product name will be processed by Azure AI services and will be given a numeric score. Recall that a score close to 1 is positive sentiment, while a score near 0 is negative.
Review the results
In this section, you'll learn how to monitor your logic app workflow's execution, and view the data flowing through each step. This capability is useful to know about because you can confirm whether your app is working correctly.
On the logic app resource menu, select Overview.
On the Overview pane toolbar, select Refresh every minute until the Runs history section shows at least one completed run.
Note
Each item in the Runs history list represents a separate tweet that contained the search text that you provided to your trigger.
After at least one completed run appears, select the run.
A page named Logic app run opens to show the status for each step in the workflow and the time taken to run each step. From this view, you can also review the data that flowed through each step.
To view the action's inputs and outputs, select the Sentiment action.
The action shape expands to show the INPUTS and OUTPUTS sections.
In the OUTPUTS section, find the tweet text and the score, which is assigned by the Azure AI services engine.