Note
Access to this page requires authorization. You can try signing in or changing directories.
Access to this page requires authorization. You can try changing directories.
After the device group is created, a Windows Autopilot deployment profile can be applied to each device in the group. Deployment profiles determine the deployment mode, and customize the out-of-box experience (OOBE) for end users.
Windows Autopilot profiles can be created via:
For Intune managed devices, pre-provisioning, self-deploying, and co-management profiles can only be created and assigned in Intune.
Create a Windows Autopilot deployment profile
Windows Autopilot deployment profiles are used to configure the Windows Autopilot devices. Up to 350 profiles can be created per tenant.
Sign in to the Microsoft Intune admin center.
In the Home screen, select Devices in the left hand pane.
In the Devices | Overview screen, under By platform, select Windows.
In the Windows | Windows devices screen, under Device onboarding, select Enrollment.
In the Windows | Windows enrollment screen, under Windows Autopilot, select Deployment Profiles
In the Windows Autopilot deployment profiles screen, select the Create Profile drop down menu and then select either Windows PC or HoloLens. This article explains how to set up Windows Autopilot for a Windows PC. For more information about Windows Autopilot and HoloLens, see Windows Autopilot for HoloLens 2.
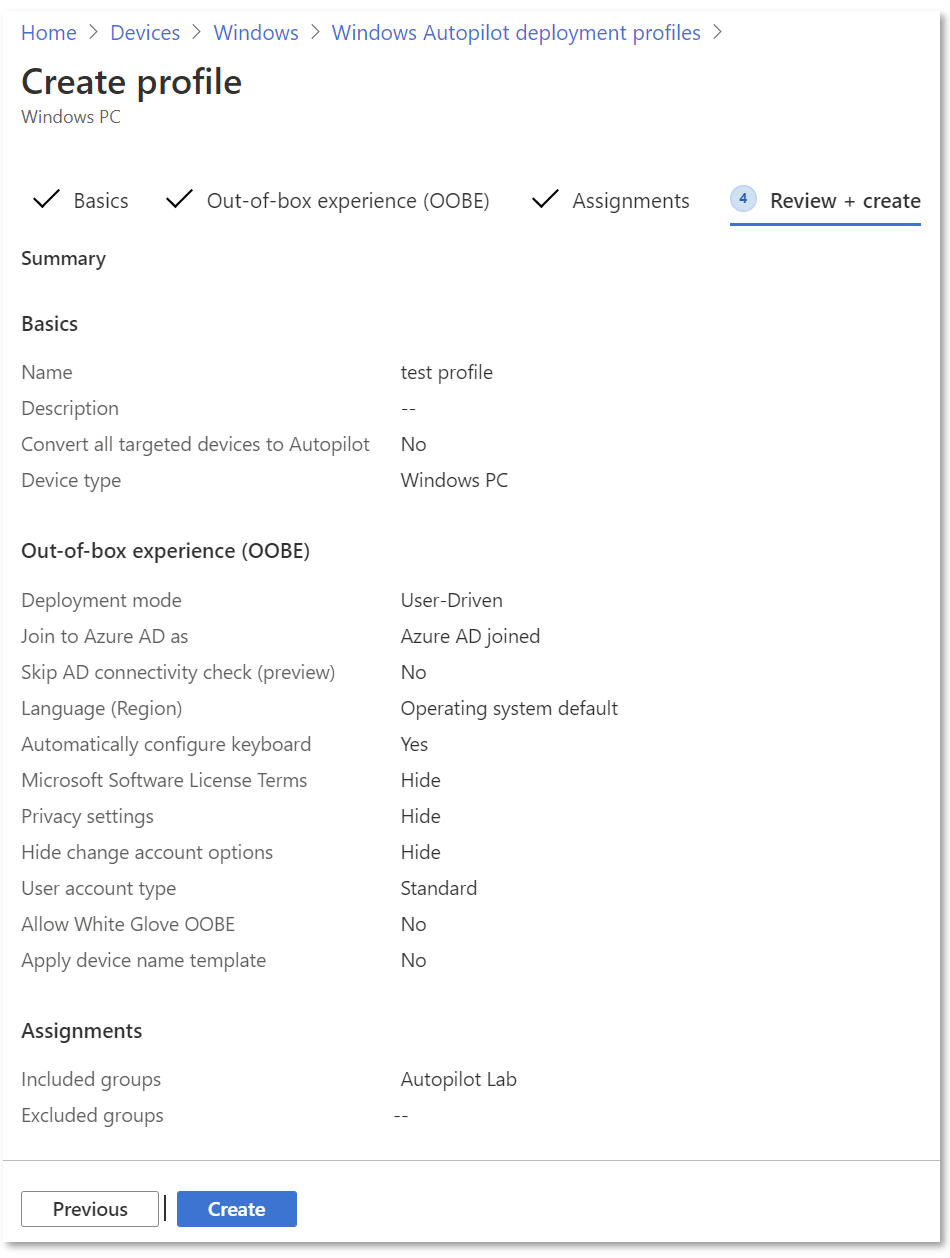
In the Create profile screen, on the Basics page, enter a Name and optional Description.
If all devices in the assigned groups should automatically register to Windows Autopilot, set Convert all targeted devices to Autopilot to Yes. All corporate owned, non-Windows Autopilot devices in assigned groups register with the Windows Autopilot deployment service. Personally owned devices aren't registered to Windows Autopilot. Allow 48 hours for the registration to be processed. When the device is unenrolled and reset, Windows Autopilot enrolls it again. After a device is registered in this way, disabling this setting or removing the profile assignment won't remove the device from the Windows Autopilot deployment service. The device must instead be removed directly.
Note
Using the setting Convert all targeted devices to Autopilot doesn't automatically convert existing Microsoft Entra hybrid device in the assigned groups into a Microsoft Entra device. The setting only registers the devices in the assigned groups for the Windows Autopilot service.
Select Next.
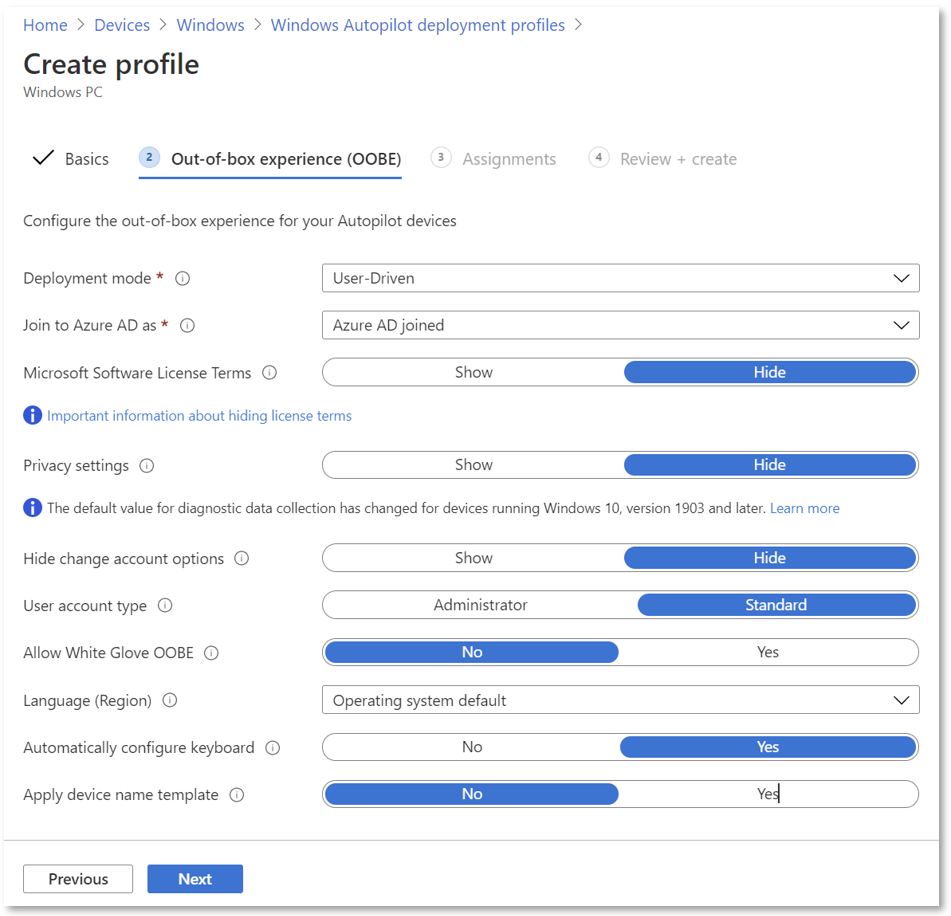
On the Out-of-box experience (OOBE) page, for Deployment mode, select one of these two options:
User-driven: Devices with this profile are associated with the user enrolling the device. User credentials are required to enroll the device.
Self-deploying: Devices with this profile aren't associated with the user enrolling the device. User credentials aren't required to enroll the device. When a device has no user associated with it, user-based compliance policies don't apply to it. When self-deploying mode is used, only compliance policies targeting the device are applied.
Note
Options that are dimmed or shaded in the selected deployment mode aren't currently supported.
In the Join to Microsoft Entra ID as box, select Microsoft Entra joined.
Configure the following options:
Microsoft Software License Terms: Select whether or not to show the EULA to users.
Privacy settings: Select whether or not to show privacy settings to users.
Important
The default value for the Diagnostic Data setting is set to Full during the out-of-box experience. For more information, see Windows Diagnostics Data.
Warning
When hiding Privacy settings, location services are disabled by default. When privacy settings are hidden and location services are needed, use appropriate policies configured in Intune or other MDM solution to enable location services.
Hide change account options: Select Hide to prevent change account options from displaying on the company sign-in and domain error pages. This option requires company branding to be configured in Microsoft Entra ID.
User account type: Select the user's account type (Administrator or Standard user). We allow the user joining the device to be a local Administrator by adding them to the local Admin group. We don't enable the user as the default administrator on the device.
Allow pre-provisioned deployment (Requirements): Select Yes to allow pre-provisioning support.
Note
When setting Allow pre-provisioned deployment to No, it's still possible to press the Windows key five times during OOBE to invoke pre-provisioning and progress down that path. However, Intune enforces this setting and a pre-provisioning failure with error code 0x80180005 occurs.
Language (Region): Select the language to use for the device. This option is available in all Deployment modes.
Automatically configure keyboard: If a Language (Region) is selected, select Yes to skip the keyboard selection page. This option is available in all Deployment modes.
Note
Language and keyboard settings requires ethernet connectivity. Wi-fi connectivity isn't supported because of the requirement to select a language, locale, and keyboard to make that Wi-fi connection.
Apply device name template (requires Microsoft Entra join type): Select Yes to create a template to use when naming a device during enrollment. Names must be 15 characters or less, and can have letters, numbers, and hyphens. Names can't be all numbers. Use the %SERIAL% macro to add a hardware-specific serial number. Or, use the %RAND:x% macro to add a random string of numbers, where x equals the number of digits to add. Only a prefix can be provided for hybrid devices in a domain join profile.
Select Next.
On the Assignments page, select Selected groups for Assign to.

Select Select groups to include, and select the groups to include in this profile.
To exclude any groups, select Select groups to exclude, and select the groups to exclude.
Note
When the assignment All Devices is used, exclusions aren't supported. Attempting to exclude groups while targeting to all devices might cause assignment problems and might require uploading device hashes again.
Select Next.
On the Review + Create page, select Create to create the profile.
Assignment of Windows Autopilot deployment profiles to devices
Intune periodically checks for new devices in the assigned groups, and then begin the process of assigning deployment profiles to those devices. Due to several different factors involved in the process of Windows Autopilot profile assignment, an estimated time for the assignment can vary from scenario to scenario. These factors can include Microsoft Entra ID groups, membership rules, hash of a device, Intune and Windows Autopilot service, and internet connection. The assignment time varies depending on all the factors and variables involved in a specific scenario.
Before deploying a device, ensure that a Windows Autopilot deployment profile is assigned to the device. To ensure the process is complete:
Sign in to the Microsoft Intune admin center.
In the Home screen, select Devices in the left hand pane.
In the Devices | Overview screen, under By platform, select Windows.
In the Windows | Windows devices screen, under Device onboarding, select Enrollment.
In the Windows | Windows enrollment screen, under Windows Autopilot, select Devices.
In the Windows Autopilot devices screen, monitor the Profile Status column for a device that just had a deployment profile assigned to it. The profile status changes from Unassigned to Assigning and finally to Assigned.
Once the device is showing Assigned, open the properties of the device by selecting it.
In the device properties pane that opens, ensure that Date assigned is populated. If Date assigned isn't yet populated, wait until it populates before deploying the device.
Edit a Windows Autopilot deployment profile
After the Windows Autopilot deployment profile is created, certain parts of the deployment profile can be edited.
Sign in to the Microsoft Intune admin center.
In the Home screen, select Devices in the left hand pane.
In the Devices | Overview screen, under By platform, select Windows.
In the Windows | Windows devices screen, under Device onboarding, select Enrollment.
In the Windows | Windows enrollment screen, under Windows Autopilot, select Deployment profiles.
Select the profile to edit.
Select Properties to change the name or description of the deployment profile. Select Save after making changes.
Select Settings to make changes to the OOBE settings. Select Save after making changes.
Note
Changes to the profile are applied to devices assigned to that profile. However, the updated profile won't be applied to a device that is already enrolled in Intune until after the device is reset and enrolled again.
If a device is registered in Windows Autopilot and a profile isn't assigned, it receives the default Windows Autopilot profile. If a device shouldn't go through Windows Autopilot, the Windows Autopilot registration must be removed.
Windows Autopilot profile priority
If a group is assigned to multiple Windows Autopilot profiles, the device would receive the oldest created profile to resolve the conflict. If no other profile is applicable to the device and there's a default profile (any Windows Autopilot profile assigned to all devices), then the default profile is applied. If a device is assigned to a security group that isn't assigned to Windows Autopilot profile, then it would receive the default profile targeted to all devices. To see when a Windows Autopilot profile is created:
Sign in to the Microsoft Intune admin center.
In the Home screen, select Devices in the left hand pane.
In the Devices | Overview screen, under By platform, select Windows.
In the Windows | Windows devices screen, under Device onboarding, select Enrollment.
In the Windows | Windows enrollment screen, under Windows Autopilot, select Deployment Profiles.
In the Windows Autopilot deployment profiles screen, under Name, select the Windows Autopilot profile name where the create date needs to be viewed.
When the Windows Autopilot deployment profile screen opens, the date the Windows Autopilot deployment profile was created is displayed under Essentials and next to Created.
Windows Autopilot deployments report
Details on each device deployed through Windows Autopilot can be seen through a report. To see the report, go to the Microsoft Intune admin center, select Devices > Monitor > Windows Autopilot deployment status. The data is available for 30 days after deployment.
This report is in preview. Only new Intune enrollment events trigger device deployment records. Deployments that don't trigger a new Intune enrollment don't appear in this report. This case includes any kind of reset that maintains enrollment and the user portion of Windows Autopilot pre-provisioning.
Windows Autopilot profile tutorials
The following articles are tutorials on configuring and assigning a Windows Autopilot deployment profile for each of the Windows Autopilot scenarios via Intune:
- User-driven Microsoft Entra join: Create and assign user-driven Microsoft Entra join Windows Autopilot profile.
- User-driven Microsoft Entra hybrid join: Create and assign user-driven Microsoft Entra hybrid join Windows Autopilot profile.
- Pre-provision Microsoft join: Create and assign a pre-provisioned Microsoft Entra join Windows Autopilot profile.
- Pre-provision Microsoft Entra hybrid join: Create and assign a pre-provisioned Microsoft Entra hybrid join Windows Autopilot profile.
- Self-deploying mode: Create and assign self-deploying Windows Autopilot profile.