Features in Configuration Manager technical preview version 1906
Applies to: Configuration Manager (technical preview branch)
This article introduces the features that are available in the technical preview for Configuration Manager, version 1906. Install this version to update and add new features to your technical preview site.
Review the technical preview article before installing this update. That article familiarizes you with the general requirements and limitations for using a technical preview, how to update between versions, and how to provide feedback.
The following sections describe the new features to try out in this version:
Improvements to maintenance tasks
Site server maintenance tasks can now be viewed and edited from their own tab on the details view of a site server. The new Maintenance Tasks tab gives you information such as:
- If the task is enabled
- The task schedule
- Last start time
- Last completion time
- If the task completed successfully
Try it out!
Try to complete the tasks. Then send Feedback with your thoughts on the feature.
Edit a site maintenance task
- In the Administration node, expand Site Configuration, then click on Sites.
- Select a site from your list, then click on the Maintenance Tasks tab in the detail panel.
- Right-click one of the maintenance tasks and select one of the following options:
- Enable - Turn on the task.
- Disable - Turn off the task.
- Edit - Edit the task schedule or its properties.
Configuration Manager update database upgrade monitoring
When applying a Configuration Manager update, you can now see the state of the Upgrade ConfigMgr database task in the installation status window.
If the database upgrade is blocked, then you're given the warning In progress, needs attention.
- The cmupdate.log logs the program name and sessionid from SQL Server that is blocking the database upgrade.
When the database upgrade is no longer blocked, the status is reset to In progress or Complete.
- When the database upgrade is blocked, a check is done every 5 minutes to see if it's still blocked.
Multiple pilot groups for co-management workloads
You can now configure different pilot collections for each of the co-management workloads. Being able to use different pilot collections allows you to take a more granular approach when shifting workloads. This co-management change was made based on your product feedback.
In the Enablement tab, you can now specify an Intune Auto Enrollment collection.
- The Intune Auto Enrollment collection should contain all of the clients you want to onboard into co-management. It's essentially a superset of all the other staging collections.
The Workloads tab hasn't changed and you can still choose which workloads to transition.
In the Staging tab, instead of using one pilot collection for all workloads, you can now choose an individual collection for each workload.
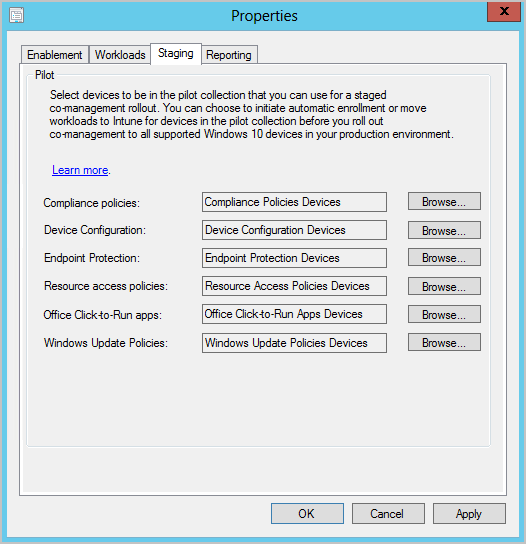
These options are also available when you first enable co-management.
Redesigned notification logic for newly available software
The New Software is Available notification will only show once for a user for a given application and revision. The user will no longer see the notification each time they log on. They'll only see another notification for an application if it has changed.
RBAC on Folders
Based on your feedback, you can now set security scopes on folders. If you have access to an object in the folder but don't have access to the folder, you'll be unable to see the object. Similarly, if you have access to a folder but not an object within it, you won't see that object.
Try it out!
Try to complete the tasks. Then send Feedback with your thoughts on the feature.
- In the Configuration Manager console, right-click on a folder. For example, right-click a folder under the Task Sequences node.
- Select Folder then Set Security Scopes.
- Choose the security scopes you want to apply then click OK.
If you're already in the folder, you can also click on Set Security Scopes in the ribbon.
Microsoft Entra user group discovery
You can now discover user groups and members of those groups from Microsoft Entra ID. Users found in Microsoft Entra groups that haven't been previously discovered will be added as user resources in Configuration Manager. A user group resource record is created when the group is a security group.
Prerequisites
- Cloud Management Azure service
- Permission to read and search Microsoft Entra groups
Limitations
Delta discovery for Microsoft Entra user group discovery is currently disabled.
Try it out!
Try to complete the tasks. Then send Feedback with your thoughts on the feature.
- Go to the Administration workspace, expand Cloud Services, then click on the Azure Services node.
- Select one of your Azure services, then click Properties in the ribbon.
- In the Discovery tab, check the box for Enable Microsoft Entra group Discovery, then click Settings.
- Click Add under the Discovery Scopes tab.
- You can modify the Polling Schedule in the other tab.
- Select one or more user groups. You can Search by name and choose if you want to see Security groups only.
- You'll be prompted to sign in to Azure when you click Search the first time.
- Click OK when you're finished selecting groups.
- Once discovery finishes running, browse your Microsoft Entra user groups in the Users node.
When you onboard the cloud management service, you're given the option to configure Microsoft Entra user group discovery.
Remote control anywhere using Cloud Management Gateway
Important
This feature was removed in Configuration Manager technical preview branch version 2112. For more information, see A new remote assistance tool.
An admin or helpdesk operator can now connect to a client via remote control over the Internet via cloud management gateway.
Prerequisites
- Remote control user requirements:
- The Microsoft Entra user needs to be discovered by Configuration Manager.
- The user needs to be a permitted viewer for remote control under the Remote Tools page in the Client Settings.
- Remote control client requirements:
- Remote control needs to be enabled under the Remote Tools page in the Client Settings.
- The client needs to be upgraded to the latest version.
- The client needs to be online from the Cloud Management Gateway
Known issues
For internet clients communicating with Cloud Management Gateway using Microsoft Entra authentication, remote control may not work as expected.
Try it out!
Try to complete the tasks. Then send Feedback with your thoughts on the feature.
Connect to a client from the console
- Choose a client that is communicating via CMG using a client PKI certificate. Make sure the client is online from the admin console.
- Launch the remote control viewer from the console by right-clicking on a client, selecting Start, then Remote Control.
Use the standalone remote control viewer
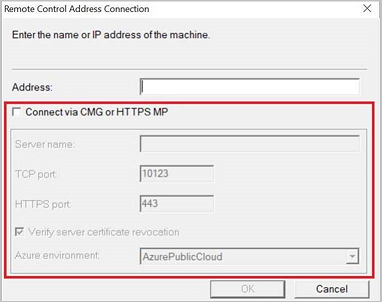
Launch the standalone remote control viewer from
adminconsole\bin\i386\CmRcViewer.exe. The folder and file are located where the admin console is installed.From the File menu, click on Connect to open the connection dialog.
Fill in the following options:
- Address: The target address of the client. To connect using CMG, you must use the FQDN. You can't use the hostname or IP address.
- For the Try it out! scenario, choose a client that is communicating via CMG using a client PKI certificate. Make sure the client is online from the admin console.
- Connect via CMG or HTTPs MP: This option allows for fallback from a TCP direct connection to use the CMG service.
- Server name: The CMG service name to which the current user and target client can connect.
- TCP port: If needed, change the default port from 10123.
- HTTPS port: If needed, change the default port from 443.
- Verify server certificate revocation: If the CRL DP location isn't accessible for the current user, disable this option for testing purposes.
- Azure environment: This option will prompt for sign in with your Microsoft Entra credentials. Then, select the Azure environment for that user.
- Address: The target address of the client. To connect using CMG, you must use the FQDN. You can't use the hostname or IP address.
Click OK to connect. Remote control will attempt a direct connection first, then fallback to CMG for connection.
Improvements to Community Hub
Aside from the existing support for scripts and reports, the Community Hub now supports the following objects:
- PowerShell Scripts
- Reports
- Task sequences
- Applications
- Configuration items
The hub allows sharing these objects, but doesn't share any package source content associated with the objects. For example, boot images, OS upgrade packages, or driver packages referenced by a task sequence aren't shared.
The hub currently doesn't support object dependencies. For example, if you share app A that is dependent upon app B, it only shares app A with the community. Similarly, if a task sequence includes the Install Application step, the referenced apps aren't shared.
Passwords or other secrets are removed from a task sequence before sharing.
Updating Hub objects
The hub now manages updates to shared objects. There are two use cases for this scenario:
You've downloaded an object from the hub. When you visit its entry in the Community Hub, the hub detects that you have an older version of the object. You can update it in your site with the latest version from the hub
You created an object in your site, and share it in the hub. You then revise it in your site. When you revisit My Hub, because the version changed, you can update the object in the hub.
Only the original contributor to the object uploaded to the hub can make changes and update their own item.
Note
The following prerequisites for Community Hub were recently updated in the 1904 Technical Preview documentation:
- To download reports, you'll need Full Administrator rights in Configuration Manager.
- To download reports, you need to turn on the option Use Configuration Manager-generated certificates for HTTP site systems at the site you're importing into. For more information, see enhanced HTTP. This prerequisite is also needed in 1906 Technical Preview for updating hub objects.
Known issues
When clicking on a report folder, the console may crash. To work around this issue, select the Reports node above the report folders, then filter or sort for the report.
For more information on Community Hub, including setup prerequisites and necessary permissions, see Community hub and GitHub.
Add joins, additional operators, and aggregators in CMPivot
Based on your feedback for CMPivot, you now have additional arithmetic operators, aggregators, and the ability to add query joins such as using Registry and File together. The following items have been added:
Table operators
| Table operators | Description |
|---|---|
| join | Merge the rows of two tables to form a new table by matching row for the same device |
| render | Renders results as graphical output |
The render operator already exists in CMPivot. Support for multiple series and the with statement were added. For more information, see the examples section and Kusto's join operator article.
Limitations for joins
- The join column is always implicitly done on the Device field.
- You can use a maximum of 5 joins per query.
- You can use a maximum of 64 combined columns.
Scalar operators
| Operator | Description | Example |
|---|---|---|
| + | Add | 2 + 1, now() + 1d |
| - | Subtract | 2 - 1, now() - 1d |
| * | Multiply | 2 * 2 |
| / | Divide | 2 / 1 |
| % | Modulo | 2 % 1 |
Aggregation functions
| Function | Description |
|---|---|
| percentile() | Returns an estimate for the specified nearest-rank percentile of the population defined by Expr |
| sumif() | Returns a sum of Expr for which Predicate evaluates to true |
Scalar functions
| Function | Description |
|---|---|
| case() | Evaluates a list of predicates and returns the first result expression whose predicate is satisfied |
| iff() | Evaluates the first argument and returns the value of either the second or third arguments depending on whether the predicate evaluated to true (second) or false (third) |
| indexof() | Function reports the zero-based index of the first occurrence of a specified string within input string |
| strcat() | Concatenates between 1 and 64 arguments |
| strlen() | Returns the length, in characters, of the input string |
| substring() | Extracts a substring from a source string starting from some index to the end of the string |
| tostring() | Converts input to a string operation |
Examples
Show device, manufacturer, model, and OSVersion:
ComputerSystem
| project Device, Manufacturer, Model
| join (OperatingSystem | project Device, OSVersion=Caption)
Show graph of boot times for a device:
SystemBootData
| where Device == 'MyDevice'
| project SystemStartTime, BootDuration, OSStart=EventLogStart, GPDuration, UpdateDuration
| order by SystemStartTime desc
| render barchart with (kind=stacked, title='Boot times for MyDevice', ytitle='Time (ms)')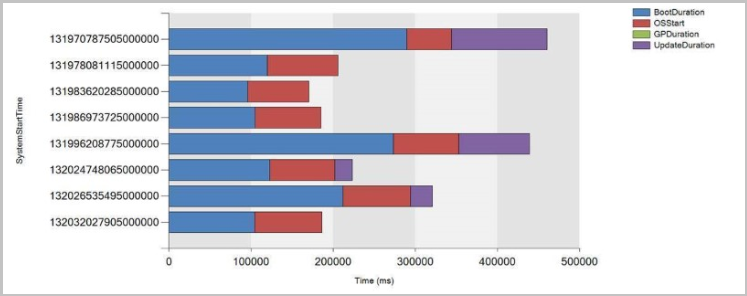
Improvements to CMPivot
To enable more people, such as security admins, to use CMPivot, we've expanded the ability for CMPivot to be run outside the console. We've also expanded the Security Admin role's default permissions. These changes give you the benefits of real-time queries across the organization.
Connect to CMPivot Standalone without using the command line.
- When you run CMPivot standalone, you'll be given a site connection prompt.
- You'll find the CMPivot app in the following path:
<site install path>\tools\CMPivot\CMPivot.exe. You can run it from that path, or copy the entire CMPivot folder to another location.
Added CMPivot permissions to the Security Administrator role
The following permissions have been added to Configuration Manager's built-in Security Administrator role:
- Read on SMS Script
- Run CMPivot on Collection
- Read on Inventory Report
Improvements to Configuration Manager console
You can now enable some nodes of the Configuration Manager console to use the administration service. This change allows the console to communicate with the SMS Provider over HTTPS instead of via WMI.
In this version, it only affects the following nodes under the Security node in the Administration workspace:
- Administrative Users
- Security Roles
- Security Scopes
- Console Connections
Prerequisite
Enable the administration service. For more information, see Administration service.
Try it out!
Try to complete the tasks. Then send Feedback with your thoughts on the feature.
In the Configuration Manager console, go to the Administration workspace, expand Site Configuration, and select the Sites node. In the ribbon, select Hierarchy Settings.
On the General page, select the option to Enable the Configuration Manager console to use the administration service.
Support for Windows Virtual Desktop
Windows Virtual Desktop is a preview feature of Microsoft Azure and Microsoft 365. You can now use Configuration Manager technical preview to manage these virtual devices running Windows in Azure.
Similar to a terminal server, these virtual devices allow multiple concurrent active user sessions. To help with client performance, Configuration Manager now disables user policies on any device that allows these multiple user sessions. Even if you enable user policies, the client disables them by default on these devices, which include Windows Virtual Desktop and terminal servers.
The client only disables user policy when it detects this type of device during a new installation. For an existing client of this type that you update to this version, the previous behavior persists. On an existing device, it configures the user policy setting even if it detects that the device allows multiple user sessions.
If you require user policy in this scenario, and accept any potential performance impact, use the Configuration Manager SDK with the SMS_PolicyAgentConfig server WMI class. Set the new PolicyEnableUserPolicyOnTS property to true.
More frequent countdown notifications for restarts
The following improvements have been made for computer restart notifications:
- In Client Settings on the Computer Restart page, you can now Specify the snooze duration for computer restart countdown notifications (hours).
- The default value is 4 hours.
- Your snooze duration value should be less than the temporary notification value minus the value for the notification the user can't dismiss.
- The maximum value for Display a temporary notification to the user that indicates the interval before the user is logged off or the computer restarts (minutes) increased from 1440 minutes (24 hours) to 20160 minutes (two weeks).
- The user won't see a progress bar in the restart notification until the pending restart is less than 24 hours away.
Co-management auto-enrollment using device token
A new co-managed device now automatically enrolls to the Microsoft Intune service based on its Microsoft Entra device token. It doesn't need to wait for a user to sign in to the device for auto-enrollment to start. This change helps to reduce the number of devices with the enrollment status Pending user sign in.
To support this behavior, clients need to be running Windows 10 version 1803 or later.
If the device token fails, it falls back to previous behavior with the user token. Look in the ComanagementHandler.log for the following entry:
Enrolling device with RegisterDeviceWithManagementUsingAADDeviceCredentials
Additional options for third-party update catalogs
You now have additional configuration options for how third-party update catalogs are synchronized into Configuration Manager.
Important
These options are only available for v3 third-party update catalogs, which support categories for updates. These options are disabled for catalogs that aren't published in the new v3 format.
Prerequisites
New subscription to a third-party catalog
In the Configuration Manager console, go to the Software Library workspace. Expand Software Updates and select the Third-Party Software Update Catalogs node.
Select the catalog to subscribe and click Subscribe to Catalog in the ribbon.
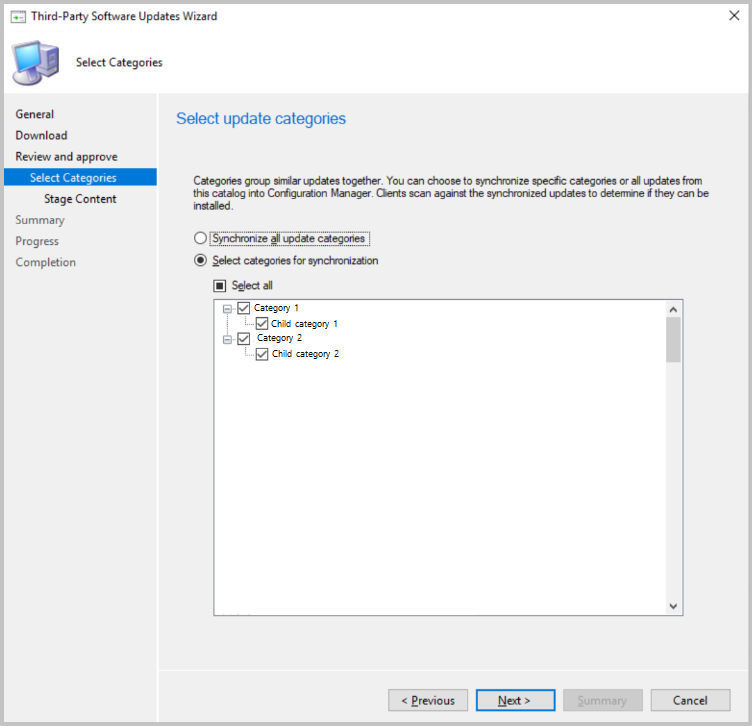
Choose your options on the Select Categories page:
Synchronize all update categories (default)
- Synchronizes all updates in the third-party update catalog into Configuration Manager.
Select categories for synchronization
- Choose which categories and child categories to synchronize into Configuration Manager.
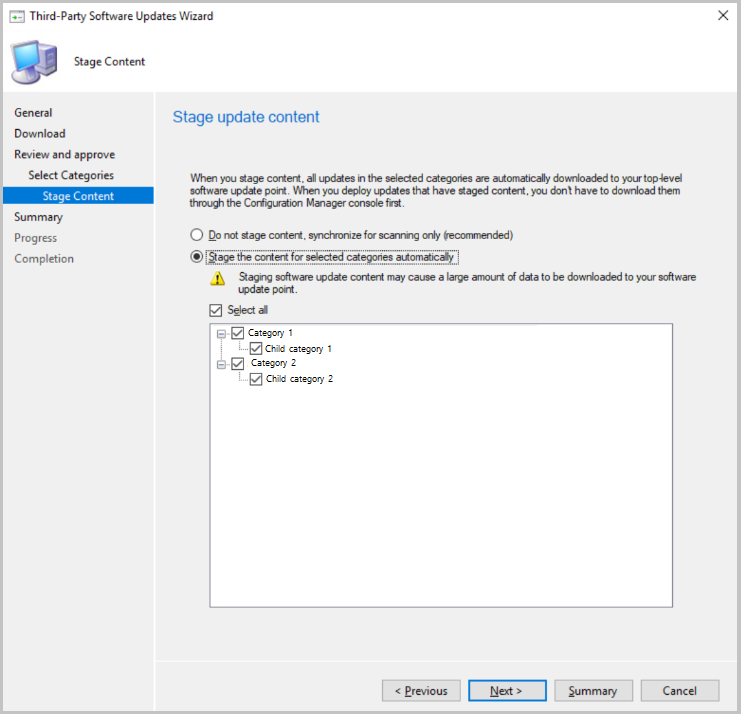
Choose if you want to Stage update content for the catalog. When you stage the content, all updates in the selected categories are automatically downloaded to your top-level software update point meaning you don't need to ensure they're already downloaded before deploying. You should only automatically stage content for updates you are likely to deploy them to avoid excessive bandwidth and storage requirements.
Do not stage content, synchronize for scanning only (recommended)
- Don't download any content for updates in the third-party catalog
Stage the content for selected categories automatically
- Choose the update categories that will automatically download content.
- The content for updates in selected categories will be downloaded to the top-level software update point's WSUS content directory.
Edit an existing subscription
- In the Configuration Manager console, go to the Software Library workspace. Expand Software Updates and select the Third-Party Software Update Catalogs node.
- Right-click on the catalog and select Properties.
- Choose your options on the Select Categories tab.
- Synchronize all update categories (default)
- Synchronizes all updates in the third-party update catalog into Configuration Manager.
- Select categories for synchronization
- Choose which categories and child categories to synchronize into Configuration Manager.
- Synchronize all update categories (default)
- Choose your options for the Stage update content tab.
- Do not stage content, synchronize for scanning only (recommended)
- Don't download any content for updates in the third-party catalog
- Stage the content for selected categories automatically
- Choose the update categories that will automatically download content.
- The content for updates in selected categories will be downloaded to the top-level software update point's WSUS content directory.
- Do not stage content, synchronize for scanning only (recommended)
Known issues
Saving setting for v3 catalogs with large numbers of categories may take longer than expected. We're working on improving this issue.
Clear app content from client cache during task sequence
In the Install Application task sequence step, you can now delete the app content from the client cache after the step runs. This behavior is beneficial on devices with small hard drives or when installing lots of large apps in succession.
Prerequisite
Update the target client to the latest version to support this new feature.
Try it out!
Try to complete the tasks. Then send Feedback with your thoughts on the feature.
Edit an existing task sequence or create a new custom task sequence.
Add and configure the Install Application step.
On the step, enable the option to Clear application content from cache after installing.
Deploy the task sequence to the target client.
New Windows 10, version 1903 and later product category
Windows 10, version 1903 and later was added to Microsoft Update as its own product rather than being part of the Windows 10 product like earlier versions. This change caused you to do a number of manual steps to ensure that your clients see these updates. We've helped reduce the number of manual steps you have to take for the new product.
When you update to 1906 technical preview and have the Windows 10 product selected for synchronization, the following actions occur automatically:
- The Windows 10, version 1903 and later product is added for synchronization.
- Automatic Deployment Rules containing the Windows 10 product will be updated to include Windows 10, version 1903 and later.
- Servicing plans are updated to include the Windows 10, version 1903 and later product.
Management insights rule for NTLM fallback
Management insights includes a new rule that detects if you enabled the less secure NTLM authentication fallback method for the site: NTLM fallback is enabled.
When using the client push method of installing the Configuration Manager client, the site can require Kerberos mutual authentication. This enhancement helps to secure the communication between the server and the client. For more information, see How to install clients with client push.
Filter applications deployed to devices
Based on your feedback, user categories for device-targeted application deployments now show as filters in Software Center.
Try it out!
Try to complete the tasks. Then send Feedback with your thoughts on the feature.
Specify a user category for an application on the Software Center page of its properties. For more information, see Manually specify application information.
Deploy the application to a machine as available.
Then open the app in Software Center and look at the available filters. For more information, see Applications in Software Center.
Known issue
If you rename an existing user category, it doesn't update on the client.
After adding a category to multiple apps, if you rename the category for one app, the renamed category only applies to that app. This change doesn't apply to other apps that reference the category. In Software Center, the renamed category shows as a new filter. The old category also shows as a filter.
To work around this issue, after you rename the category, deselect it on the app. Apply the changes, and then reselect the renamed category. This action revises the app, which applies the change.
Improvements to OS deployment
This version includes the following improvements to OS deployment:
Based on your feedback, it's now easier to edit variables when you run a task sequence. After you select a task sequence in the Task Sequence Wizard window, the page to edit task sequence variables includes an Edit button. You can use accessible keyboard shortcuts to edit the variables. This change helps in cases where a mouse isn't available.
Based on your feedback, the task sequence sets a new read-only variable _SMSTSLastContentDownloadLocation. This variable contains the last location where the task sequence downloaded or attempted to download content. Inspect this variable instead of parsing the client logs.
This release further iterates on the improvement to the Disable BitLocker step from technical preview version 1905. It resolves the known issue with the client-side functionality, and adds a new variable, OSDBitLockerRebootCountOverride. Set this value from 0 to 15, and it overrides the count set by the step or the OSDBitlockerRebootCount variable. While the other methods only accept values 1 to 15, if you set this variable to 0, BitLocker remains disabled indefinitely. This new variable is useful when the task sequence sets one value, but you want to set a separate value on a per-device or per-collection basis.
Direct link to custom tabs in Software Center
You can now provide users with a direct link to a custom tab in Software Center.
Use the following URL format to open Software Center to a particular tab:
softwarecenter:page=CustomTab1
The string CustomTab1 is the first custom tab in order.
For example, type this URL in the Windows Run window.
You can also use this syntax to open default tabs in Software Center:
| Command line | Tab |
|---|---|
AvailableSoftware |
Applications |
Updates |
Updates |
OSD |
Operating Systems |
InstallationStatus |
Installation status |
Compliance |
Device compliance |
Options |
Options |
Next steps
For more information about installing or updating the technical preview branch, see Technical preview.
For more information about the different branches of Configuration Manager, see Which branch of Configuration Manager should I use?